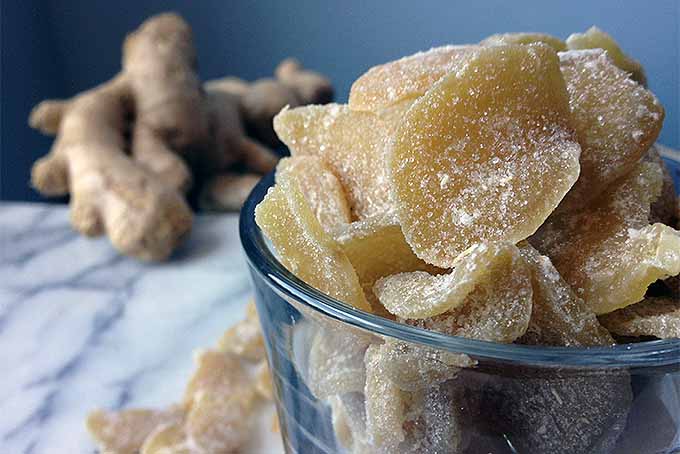
A beautiful blend of sweet and spicy (as well as chewy and crunchy), these small ginger confectionaries are bursting with big flavor!

This rhizome is a stimulating ingredient with a variety of uses: both in the home kitchen as a delicious garnish or snack, and even in the herbal medicine cabinet as a natural tummy-tamer.
While it’s no multivitamin gummy, it has its own style of beneficial goodness. Ginger is a superfood that can soothe the simptoms of a variety of nausea-related illnesses, including morning sickness.
With this recipe, you can enjoy this sweet concoction as a natural remedy when those symptoms occur – or otherwise just for pure enjoyment!
Make It Yourself!
You can easily make these candies in your home kitchen, with just two ingredients.
This recipe is unlike many of the packaged candied ginger products that you’ll find. With no additives, preservatives, or food dyes, it’s a homemade creation that’s all about pure, gingery goodness!
Keep in mind: without any of those additives, our homemade version will like be darker than the store-bought versions of these treats that you may be used to.
Another consequence of eliminating additives and preservatives like sulfur dioxide is that your gingery goodies will have a shorter shelf life.
While many store-bought kinds can last for a few months, these candies will remain fresh for about two weeks.
Using oxygen absorbers and vacuum sealed bags can help to increase shelf life as well, when you’re making large batches.
But don’t worry – the sweet and spicy flavor that you love is the same. So give it a try!
The Recipe

- 1 1/2 lbs fresh ginger
- 3 1/4 cups granulated Sugar divided
- Peel the skin off the ginger and discard. Using a mandoline or very sharp knife, carefully slice into 1/8-inch to 1/4-inch thick pieces. You will need a total of 1 pound. If you have any left over, store for later use.
- Place all of the pieces in a large saucepan and add enough water to fully cover them. Simmer uncovered over medium-high heat for 30 minutes. Drain, reserving 3/4 cup of the water. Place drained ginger in a separate bowl.
- Place 1 pound of granulated sugar in the empty saucepan. Add the reserved 3/4 cup ginger-water and stir together. Bring to a low boil and completely dissolve the sugar. Add the slices of ginger. Continue to boil gently, stirring occasionally, until the pieces are translucent and the syrup has thickened slightly, about 15-20 minutes.
- Immediately remove the pan from the heat and drain, using a colander over a big bowl to collect the syrup. Set up a wire cooling rack over a baking sheet. Using two forks, separate the individual pieces and place in a single layer on the cooling rack, with space in between the pieces so they do not touch. Allow to cool completely, about 30 minutes to one hour.
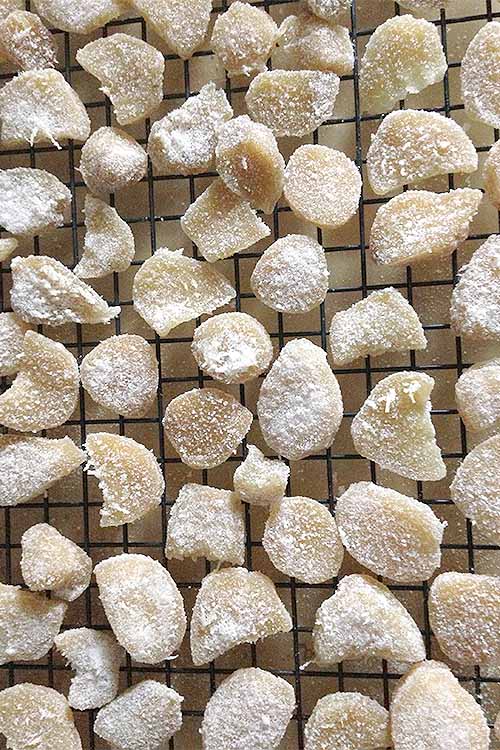
- Place the remaining cup of sugar in a large, clean bowl. Toss the cooled pieces in the sugar a handful at a time to coat in a thin layer.
- Place back on the wire cooling rack in a single layer with space in between, and let sit for at least 3 hours or overnight until completely dry. Store in an airtight container at room temperature, in a dry place and away from direct sunlight. Your candy will keep for about two weeks.
Cooking by the Numbers…
Step 1 – Prep the Ginger
For a yield of 1 pound of peeled and sliced ginger, you will need about half a pound more of fresh, unprocessed ginger than what the recipe demands.
Take into consideration the waste involved: peeled skin, end pieces, and small knobs will take away from the total weight.
All of these things need to be discarded, while the remaining quantity will give you the appropriate yield of usable product.
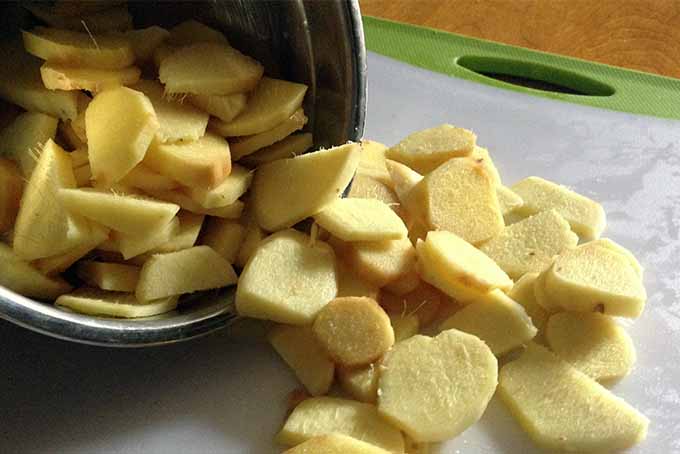
The ideal thickness for your slices is between 1/8 and 1/4 inches. You may use a knife or a mandoline to get a more precise cut.
In order to maintain a chewy texture to balance that crunchy sugar exterior, avoid cutting them too thin – or else the slices will lose moisture as they cook and dry.
Step 2 – Soften
Slowly simmering the ginger slices in hot water before introducing the sugar syrup helps to break down and soften the fibrous cell walls.
This promotes a better infusion of the sugar syrup into each piece and will yield a softer, more enjoyable texture.
Place in a large pot and fill with cold to room temperature water. The gradual increase in heat as you cook them yields a better final texture, rather than initially shocking them with high heat.
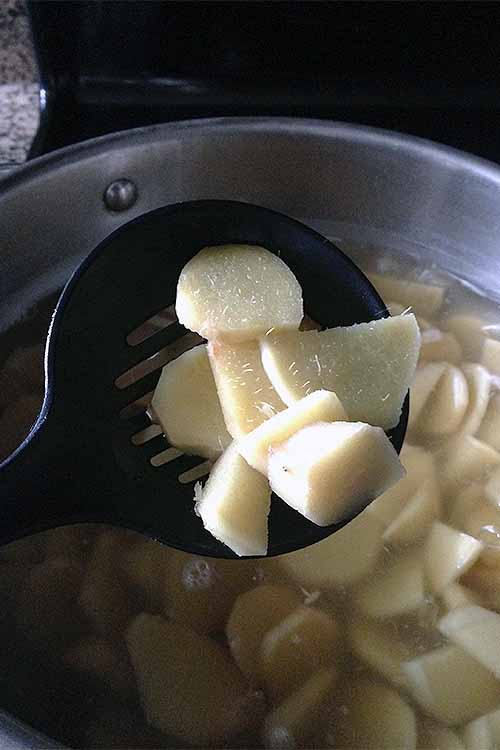
As you simmer them, be sure to keep all of the pieces fully covered to promote even cooking. You may need to add another cup or so of water to the pot if too much evaporates.
Step 3 – Cook in Sugar Syrup
Now that they are prepped and softened, you can make the sugar syrup in the same pot by mixing together sugar and some of your reserved ginger water.
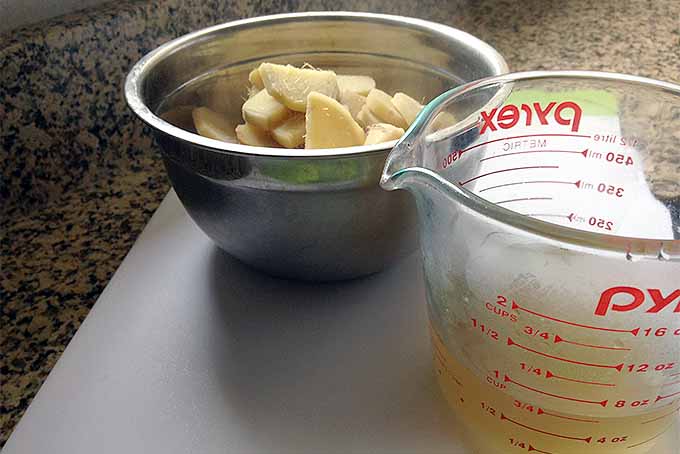
Using the water from the softening step augments the final flavor, yielding an even more intense, gingery kick!
The syrup is highly concentrated in order to promote crystallization. Because of this significant quantity of sugar, make sure to dissolve all of it in the water. And keep the heat at medium-low, to prevent it from crystallizing too quickly or burning.
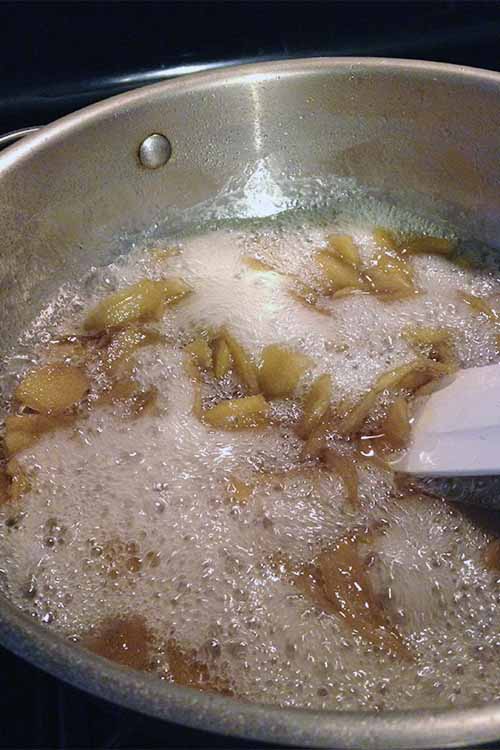
Once the sugar is completely dissolved and the syrup begins to boil, you can add the ginger slices. Don’t forget to stir occasionally! This helps to continually and evenly coat and cook them.
Use a heatproof spoon or spatula for this process.
Step 4 – Remove and Cool
In about 15 minutes, check to see if they are ready to remove from the syrup.
There are two visual signs that will help you to determine this: the syrup will be thickened slightly, and the ginger will be translucent. Cook them for a few more minutes if you need to.
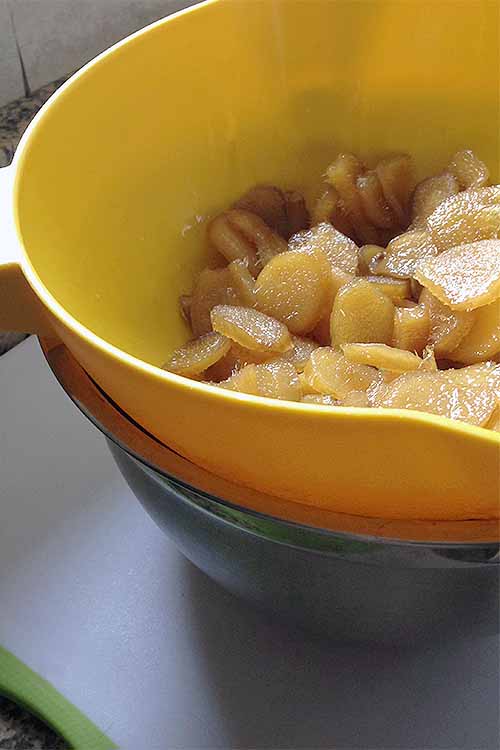
As soon as they are ready, immediately remove the pan from the heat and drain, using a colander over a big bowl to collect the syrup.
Be sure to use a heatproof colander and bowl when straining, as you are dealing with very hot ingredients!
You can now set the pieces to cool on a wire cooling rack over a baking sheet. I advise using two forks during this process instead of your bare hands, as the pieces are very hot and sticky at this point.

Do your best to keep the pieces separate from one another on the cooling rack – they will stick together as they cool.
As an added bonus, you can actually reserve the syrup for other uses. It will be infused with some subtle, gingery spiciness.
Use a spoonful in your next cup of tea, a cocktail or mocktail, or even to flavor a papaya smoothie!
To prevent recrystallization, mix an additional 1/2 cup of water into the syrup and store in an airtight container in the refrigerator for up to 2 weeks.
Step 5 – Coat with Sugar
After 30 minutes of cooling, test one piece to see if it’s ready. You want it to still be sticky enough that the sugar coats it properly, but not warm enough that the sugar melts away.
Toss it in some sugar, and allow it to rest for 10 minutes. If nothing has dissolved, you’re cleared to continue coating the other pieces.

You can definitely toss a handful at the same time without any issues. Just be sure to place the pieces back on the rack to continue cooling and drying separately, so they don’t stick.
Step 6 – Dry and Store
Once all of the pieces are coated in sugar, place back on the cooling rack in a single layer. They will need at least 3 hours to cool and dry completely (though I couldn’t resist snacking on a few during the long wait!)
Store in an airtight container at room temperature, away from heat and direct sunlight. They will keep for about two weeks.
Serve as You Wish!
Enjoy a few pieces on their own as a delicious, tummy-taming snack or a quick, fiery pick-me-up.
Or, serve as a bold garnish for some of your favorite desserts, like this lemon bundt cake. The next time you are ready to eat a bowl of silky semifreddo, or serve a slice of scrumptious pie, top it off with a handful of freshly made candied slices to wake up the flavor!
If you simply have a sweet tooth for candy however, make sure to check out our caramel candy recipe, our sugared flowers tutorial, homemade mochi, and even 23 of our holiday-inspired favorites.
Last but not least, candied ginger is often a favorite addition to batter for gingerbread baked goodies.
Be inspired to go homemade with this DIY recipe, and consider gifting this candy as a holiday present.
And be sure to tell us what you think in the comments below!
Don’t forget to Pin It!
The staff at Foodal are not medical professionals and this article should not be construed as medical advice. Foodal and Ask the Experts, LLC assumes no liability for the use or misuse of the material presented above. Always consult with a medical professional before changing your diet or using supplements or manufactured or natural medications.
Photos by Nikki Cervone, © Ask the Experts, LLC. ALL RIGHTS RESERVED. See our TOS for more details.
About Nikki Cervone
Nikki Cervone is an ACS Certified Cheese Professional and cheesemonger living in Pittsburgh. Nikki holds an AAS in baking/pastry from Westmoreland County Community College, a BA in Communications from Duquesne University, and an MLA in Gastronomy from Boston University. When she's not nibbling on her favorite cheeses or testing a batch of cupcakes, Nikki enjoys a healthy dose of yoga, wine, hiking, singing in the shower, and chocolate. Lots of chocolate.

Wow, this is very cool. I never really thought about making stuff like this on my own. It’s the perfect time of year to do it, that’s for sure. The tea idea sounds especially handy. My mother will love this.
In fact, I can think of several people who would be interested in this recipe. I’ll be sure to share it with them, so they can make their own.
I have some ginger growing in a polystyrene box in the carpark. It has slowed down a bit over winter, but still I harvested a good knob already this June ! Would like to try this recipe as my uncle used to grow it commercially.
I am amazed at how easy these are to make! When I was young and had frequent nausea attacks, I would eat a piece or two of crystallized ginger and it would help immensely. When I was pregnant and had morning sickness, I always made sure I had some with me, and it was really the only thing that helped. These are pretty expensive in the stores, so making it at home is a great way to save money. I like the idea of saving the syrup, too. That would be a great addition to a cup of tea or to a dessert. Thank you for posting this!
Well I have always used ginger as a way to sooth and ease my stomach, so this seems like it would really be more of a preventative thing, ad I have to say that I like it. I love using ginger in sweets, but am getting a little tired of just having the cookies, so this will be nice.
Try cooking with it! Great sautéed with butter and Brussel sprouts! Yum!!!
Definitely going to try this. Never would have come up with pairing ginger and Brussels sprouts but love both. I’m making the candied ginger now with monkfruit zero calorie sugar. So far tastes amazing.
I never knew how crystallised ginger was made until now 🙂 And now I am tempted to make some although I don’t usually like it as much as I like fresh ginger in food. And using the left over syrup sounds like a REALLY good idea 🙂
I never actually ginger at all before I was pregnant and discovered it was good for settling my tummy. Since then I do enjoy the freshness it gives food and smoothies.
Can I substitute Coconut Sugar instead?
Just made some. It’s great! A little time consuming but worth it and it will be quicker next time, now that I’ve gotten some experience. Thanks for the great instructions.
Glad you enjoyed the recipe, Susan! Yes, it definitely gets easier and quicker the more you make this recipe – and who wouldn’t want a continual supply of these homemade gingery goodies?!
Just tried it never thought it would have been so easy. Thank you very much.
They are so delicious.
Right?! Super easy, with just two ingredients! Enjoy the gingery feast!
One of my all time, very favorite, occasional treats is dark chocolate covered crystallized ginger! Occasional because they’re expensive and the store I buy them from is a distance from me. Finding this recipe was definitely meant to be! Kismet! Fate! My destiny! And completely random. Thanks for sharing it! Can’t wait to try them.
I have a jar of candied ginger in my fridge. Still good well after a year.
This sounds great, I need to eat more ginger for all my stomach problems, but, I have one question, is there a recipe for a smaller batch?
This recipe should still work if you want to divide it in half, but be sure to use a smaller pot and maintain temperature carefully, to avoid burning the smaller quantity of sugar syrup.
Bought a bag of crystallized ginger yesterday and it was good. Just made a batch using your recipe and these tasted better. A lot better, and so easy, and the syrup too. Good on pancakes!
This was much easier than I ever thought it would be. I loved the fact of making my own instead of the store bought. Thanking you so much for sharing this recipe.
Can I use 1/2 sugar and the other 1/2 sweetener of some kind. Would like to use less sugar due to limitations I need to keep.
Made it using home grown ginger absoulety perfect, made it without a hassle, just put it into my dehydrator for three hours after and turned out superb. Delicious for a snack or add small pieces to some apple turnovers i made . Family can’t get enough. A big thank to you for sharing this recipe .
Wow, home-grown ginger?!? What an amazing addition to a home garden! So happy you AND the family like the recipe!
Hi! Can’t wait to try this recipe!
Can I use regular sugar instead of the granulated?
What type of sugar would you like to use? I think you’ll find “regular” white sugar is also known as granulated, or caster sugar in some places. Enjoy the recipe!
Made this candied ginger tonight! I used monkfruit sugar as a diabetic/keto sugar replacement. It worked perfectly and the ginger candy is delicious. I used the leftover syrup and simmered some pecans in it for about 20 minutes. They came out like pralines. Oh so good! Thank you for the recipe.
I see this makes 4 servings… but how much is one serving? I am trying to see if I need to double this for gifts. Thank you!
I feel I must say. It says will keep for 2 weeks. I’m sitting here with my last piece and they barely lasted 24 hrs ????????
Can these be frozen?
Yes, you can freeze candied ginger for up to 1 year.