So you want to make your own beer. How hard could it be, right? Really, it’s not that hard, and I’ll have a nice home brewing guide for you soon that outlines every aspect of the process.

Before you get all fired up about it, though, let me be the voice of reason and point out that you’re going to have to spend a pretty nice chunk of change before you can even make your first batch.
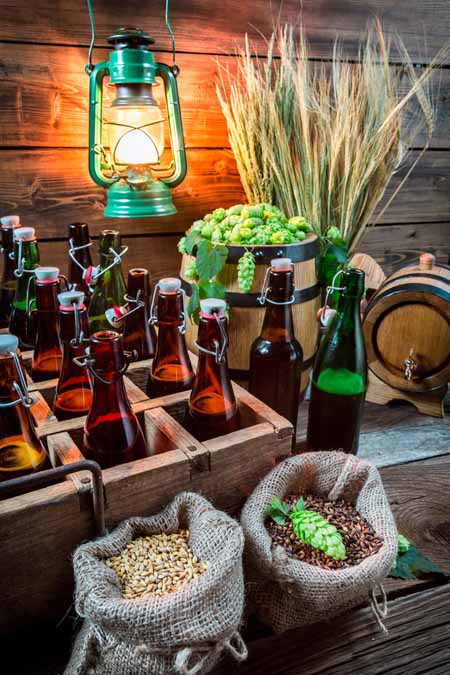
While the actual process of brewing is simple, it is pretty time consuming, and when you first get started, there is quite the long list of equipment and ingredients that first need to be bought.
Not all of these are cheap, either, but after your initial investment, the home brewing process is actually much more affordable than buying beer at the store. Let’s take a look at what all you’ll need to get ready to brew.
Sanitizer
Every single article or guide that I have read is sure to emphasize this one key point: sanitize like a maniac. Every item that will have even the slightest contact with your beer at any phase of the brewing process needs to be as clean as you can get it.
Foodal recommends One Step Sanitizer (8 oz.) by Strange Brew
You can, of course, use a mixture of bleach and hot water to soak everything, and then rinse everything thoroughly. This can add additional time to the process that you don’t necessarily have to spend.
Many sanitizers do not require rinsing and most are on the inexpensive side, costing less than $5 on average and up to $15 for a large container. One package or bottle will last you through many brewing sessions, so they are a fantastic deal. I would definitely make the small investment in a good no-rinse sanitizer if I was planning to brew on a regular basis.
Brew Kettles
I suppose that you could use any old stock pot for making your wort, but I wouldn’t recommend it. First, when you’re boiling your wort (pronounced wert- see my guide to beer for more on that), you will need plenty of extra room to avoid overflowing the pot.
Foodal recommends the Concord Stainless 15-Gallon Brew Kettle Stockpot, available on Amazon.
Most home beer recipes make five gallons, so you need at least an 8 gallon pot to have enough additional space during the boiling process. This is not your average-size stock pot.
Additionally, brew kettles are made specifically for making beer (obviously), which means that they have nice heavy bottoms for even heat distribution.
The Brewsie 10-Gallon Stainless Steel Brew Kettle Set features a built-in thermometer
You can also get them with built-in temperature gauges to easily keep an eye on that, which is really important for the step that follows the boil – adding the yeast. If you add it when the wort is too hot, it kills the yeast, and dead yeast = no beer.
You can even get a kettle with a built-in spigot, which will come in super handy. These two features cost more, but even a basic kettle will be a bit pricey, with the price climbing upwards for the extra features and larger sizes.
Fermentation Vessel
Known in the beer-making world as a carboy, a fermentation vessel is simply the place where the wort and yeast are combined and allowed to sit for several days to turn into beer.
Whatever you use for this fermentation process needs to be 100% airtight so that not even one airborne microbe can get in to alter the taste of the batch.
Foodal recommends the Kegco 6 Gallon Glass Carboy
Keep in mind also that you will need at least two containers for this part of the process, because you will siphon the beer out of the first fermentation vessel into a second one after a few days (more on that part of the process in my next article).
A plastic carboy will run you around $30, which isn’t too bad, and these won’t be nearly as heavy to try to move when they are full of liquid as a thick glass fermenter (also referred to as a fermentor).
On the other hand, a good glass carboy will last forever, with proper care and handling, and they start around the same price point.
You can get away with buying a simple food-grade plastic bucket for under $20, but I haven’t seen one that has a gasket on the lid to make for a truly air-tight seal, whereas all the better carboys and other actual fermenters will have a gasket.
Air Locks
During the fermentation process, as the yeast eats up the sugar in the wort, there are two byproducts- alcohol and carbon dioxide. As the CO2 builds up inside the fermentation vessel, you’re going to need a way to release that gas without letting outside air into the container to possibly contaminate your brew.
Foodal recommends these: 3 Piece Plastic Airlock (Sold in sets of 3)
This is where an air lock comes into play. These fit securely into the top or, in some cases, onto the lower side of any vessel made specifically for brewing.
The air lock allows all the built-up gas to escape, which will hopefully prevent any explosions from happening. Yes, you read that correctly- explosions.
Don’t forget bungs: these pre-drilled Medium Universal Carboy Bungs are sized for the carboy listed above
Whenever you have any situation where pressure is building within an enclosed area, explosions can occur, and the fermentation period is no exception. Not using an air lock pretty much guarantees you’ll end up with beer pouring out of a broken carboy, and with them only costing a couple of bucks, there’s no reason not to buy one.
Long-Handled Spoon
Remember, you’re going to be dealing with at least an 8-gallon brew kettle, so we’re talking about a really long handle on this spoon, an item you’re not likely to have on hand.
Foodal recommends Brewcraft’s 24″ Stainless Steel Spoon
You’ll use the spoon for stirring during the boiling process, and you will need to be able to reach all the way to the bottom of the pot. You can also lay the spoon horizontally across the top of the kettle, which will help prevent the wort from boiling over.
I recommend going with the stainless steel option on this for durability, which only costs a few dollars.
Hydrometer
Before I go into what a hydrometer does and why you need one, we need to talk about gravity. No, I’m not talking about the kind of gravity that keeps your feet on the earth.
I’m talking about specific gravity, which, according to Wikipedia, is “the ratio of the density of a substance to the density (mass of the same unit volume) of a reference substance,” with the substance being your fermenting beer and the reference substance being water.
Specific gravity in beer is important because it’s how you can determine the percentage of alcohol in the final product. When you first start the process, the density of the liquid will be higher, closer to that of plain water.
Foodal recommends The Brew Supply Triple-Scale Alcohol Hydrometer and Cylinder Combo Kit, available via Amazon
As the yeast in the fermentation vessel consumes the sugar in the malt and converts the liquid into alcohol, the specific gravity inside the container will drop, because alcohol is considerably denser than water. Once the gravity stops dropping, you know that the yeast has finished its work.
A hydrometer is a device that measures the specific gravity of your brew, so it’s useful for determining the aforementioned readings. Also, by taking the measurement of the final gravity inside the container and subtracting it from the original gravity of the brew, you can determine the percentage of alcohol your product contains.
A hydrometer looks like an oversized, old fashioned, mercury thermometer, and costs around the same amount, so it’s not an expensive tool to buy and is pretty useful to have around. You just don’t want be measuring non-stop during fermentation since you’d be letting air into the container.
You can simply measure before putting on the lid or stopper and then again when you siphon the beer out for the secondary fermentation that I mentioned before. We recommend this one.
Siphons
As I said, at some point you will need to siphon out the liquid from one fermentation vessel to another. In the same place where you attach the air lock to the container, you will need to attach a siphon.
Now, once the yeast has done its job, all the dead yeast will settle on the bottom of the container, along with the used up malt and hops. You need to remove the liquid from the container while at the same time getting as little of those bits and pieces as possible.
Regular 5/16″ Auto Siphon With 8 Feet of Tubing available on Amazon
You could always just pick up the ridiculously heavy carboy or bucket and slowly and carefully pour the beer from one container to the other, but you will end up with more of that sediment in the second container, which will result in a hazy final product. You don’t want that. Instead, make sure to purchase a siphon.
Alternatively, you can even buy a ported fermenter that has a valve on the side to transfer the liquid, no siphons required.
Bottles, Etc.
Once you finish the brewing and fermenting, you will of course need to bottle up your brew. Invest in a good set of glass bottles that you can use time and time again. Go with brown glass since they will block out the most UV light, which can cause spoilage.
500 ml (16 oz) Amber Flip-Cap Bottles 12 pack
To make things easy on yourself, I would also say to buy the bottles with the attached swing caps. Expect an investment of around $2.50 per bottle.
The kicker is that you will probably need about 4 packs to bottle all of the beer from a standard recipe, which is for 5 gallons.
If you want to save some money here, you can always opt for capping the bottles yourself. You will spend about half the amount on the bottles themselves going that route.
Red Baron Bottle Capper available from Amazon
You will spend another couple of bucks on a pack of bottle caps and a little more for a bottle capper. This will ultimately result in some savings. And considering the amount of money you will have invested already, this seems like a pretty good idea!
Ingredient Starter Kits
Assuming you fall in love with the whole home brewing process, at some point you will probably want to buy your own malt and hops to really customize it to your taste. To begin with, though, it will be so much easier for you to buy a recipe kit.
True Brew Pale Ale Home Brew Beer Ingredient Kit
There are tons of websites including Amazon that offer these if you don’t have a home brewer’s store in your neck of the woods. Just decide what kind of beer you want to make (ale or lager) and the style that you prefer, and you’ll be able to find a kit for that.
This really simplifies the brewing process, which is awesome when you’re a beginner. And they’re affordable, too.
Ready to Make Some Beer?
I bet you would have never thought that it can take so much stuff to actually make a few bottles of beer, not to mention an initial investment of at least $300.
Now that you know, though, it’s easy to set about buying what you need. Stay tuned for my follow-up article where you’ll get a step-by-step guide to the actual beer-making process.
About Ashley Martell
Ashley has enjoyed creative writing since she was six years old, when she wrote her first short story. She majored in English literature at the University of Montevallo. After years of professional work, she is now a stay-at-home mom of three, who uses her craft to write about her life and adventures in and out of the kitchen.

There are places were you can pay to go to try this out with a teacher before you invest a lot of money into setup.
I home brewed in the 90’s, Ashley right on the mark it’s time consuming. That being said it is fun and it does end up getting you cheaper beer if you do it a few times to recoup cost of equipment. I stopped making beverages it at home because I ran out of time, and I don’t drink as much as I used to or have friends over as often.
These instructions are very detailed and correct, as well there are just so many more gadgets out then when I was doing it! Everything has also come down in price since then, well except hops! Hops are twice as much now as in the 90’s.
For a bonus, brew your own then make homemade beer bread with it!
Wow, I did NOT know there were so many ingredients and materials needed into making your own home brew! I live in an area where it’s very common for individuals do make homemade beer or kombucha (which isn’t the same thing as your frothy ale, but still), so I always thought it was an easy thing to do…apparently not!
Would any of these materials be used in making hard cider? My husband and I drink “adult apple juice” more than grain based beverages, and we’d be more than interested in learning how to make our own!
I’m surprised at how many parts go into making your own brew. Though for people that love to experiment, making it themselves will be a great idea. Doing it yourself will help you realize just what it takes to make the beverages you like.I think adding different types of spices could make your drink more interesting. Is the brewing process described here the same for other drinks like wine?
Brewing beer at home does indeed require a substantial initial outlay so it makes sense to check the classifieds for second-hand equipment. You’re going to be sterilizing it regardless of where it comes from so it’s definitely worth considering.
I’ve never thought about making beer at my house since it seems kind of complicated, but from what I’ve read it isn’t that hard. Thank you for the really detailed guide, it’s really helpful.Home brewed definitely has a different taste than the one we purchase from the stores, and that’s a good thing.
I would love to brew my own beer, and I just might give it a shot sometime soon. I’m a big fan of such libations, although I’m not one of those people that tastes nuanced flavors. I taste alcohol and sometimes a hint of oak or whatever wood it’s stored in. Stronger flavors like chocolate or citrus are easy enough to taste. Still, if you handed me a bottle and told me to describe everything about the liquid within, I’d be wrong nine times out of 10.
This process is interesting. I had a friend years ago that made her own beer. Using some kind of a machine. I like these green bottles. I never tried homemade myself. It has got to taste really good.
I’m actually going to do this in a couple of months, I’ve read tons of articles and pages on this subject and I can say your’s very detailed and good but we don’t need all that fancy equipment, I think a simple pressure cooker that is found in every house and plastic container is just fine.
and one more important thing: Polishing and activated carbon filter, this is a key element in making a high quality spirit or beer.
Excellent detail while keeping it simple! You really broke down the pieces and explained why they were needed instead of just saying “buy all this stuff ’cause I know what I’m talking about”.
My brother is huge into brewing his own, and I must say you are spot on with the prices! When he went into detail about the labor and initial investment, I couldn’t bring myself to spend that much on trying something new. He loves having his own beverages to share with family and friends, and he’s now getting into the part where you buy the individual ingredients to create a truly unique beer. He is very proud of his labor of love.
This is so awesome! I think that it is a great thing to be able to create your own beer. I recently came across some similar information when I was researching how to make your own rootbeer. Then, I discovered this whole culture of beer making in general. This is a good list to get started from I already have a brew set. Now I am looking for some great recipes to get started.
I have tried home brew before, and it’s not the same as you would by from the store. Different people make different kinds of beer some very strong others very weak. I suppose it is a craft that people take pride in mastering and being able to sample, and share their own style of beer.
I do not trust in beers made at home whether it is me who has made it or a friend. First, these types of beer are easily contaminated. I would have second thoughts when it is my own making but i would totally not taste a beer made at home by someone else. This is because i do not trust whatever the person has put in the drink. It does not hurt for one to go for the ones sold in bars, they are much safer.