Searing is something that probably does not get enough attention, considering how radically the process can change the flavor of the meat that you are eating.
Searing is a rather simple step in cooking that really only adds just a few minutes on to your meal preparation, and can change your meals from “okay” to “Oh, Wow!” by using nothing more than the flavors that are already present in the meat.
It’s simply about unlocking the trapped flavor molecules, and unleashing them onto your taste buds.
Although your grandmother might have told you that searing the meat would “seal in” the juices, this is not actually the case.
While Grandma was right about the fact that the meat tasted better when prepared this way, she was just a little confused as to the science of why.
What is truly happening during browning is that you are taking a piece of meat that is average tasting, and placing it under the right conditions for it to create a myriad of flavor combinations.
The browning of meat prior to braising or boiling may take a bit more time, but there is no question that a proper browning will help to turn a humdrum meal into an exquisite one.
Once you have learned the basics of searing, it’s a technique that you will never forget. There are a few things you will need to know, which can help you better understand the science behind what you are doing.
Although this may seem a bit on the boring side, you’ll be thankful for it later. Plus, perhaps you can impress your friends with your knowledge of meat and what’s going on during the cooking process?
Okay, maybe not…
But they will be impressed with the delicious food that you cook for them!
The Science Behind Searing – The Maillard Reaction
The Maillard reaction is a chemical reaction between amino acids and reducing sugars that gives flavor, aroma, and pigment to foods—particularly meats—that are browned over high heat. This reaction was named after the French chemist who originally described the phenomenon in 1912.
Each type of food that is seared will have its own distinct set of flavors that are compounded during the process of the Maillard reaction.
This browning process in meat is the same chemical change which causes the crust of bread to brown when it reaches certain temperatures, as well as the effect of browning toast.
This is a chemical reaction that occurs when the amino acids in the gluten strands start to change, break down, and combine with oxygen.
The browning in meat is a breakdown in the amino acids found in muscle protein, which causes a chemical reaction that adds to the flavors and aromas being released into the air, and the food. Hundreds or even thousands of new flavor compounds are formed through this process.
The time that it takes for the Maillard reaction to happen is controlled by the speed of the increased temperature, as well as the dryness of the food being cooked.
This means that meats that are in water or juice will not experience the Maillard reaction, and will not brown or sear until the water has completely evaporated.
This is why browning meat before finishing in a slow cooker (such as a roast) or Dutch oven is necessary prior to cooking in juice, broth or water.
A similar process occurs within carbohydrate-based foods, known as caramelization. It involves the breakdown of carbohydrates into more simple sugars, and eventually (if burned) into free carbon.
The Maillard reaction in steaks and other proteins may appear to be similar to caramelization but it is a different and distinct process. However, these two reactions are often both found together in various foods. The main difference is that the Maillard reaction involves amino acids, whereas the chemical change taking place in caramelization involves sugars instead.
Dry Meat and High Heat for Searing
When searing meat, it is important to bring the temperature of the dry meat high enough to bring out the flavors and brown color, without overcooking the inside of the meat.
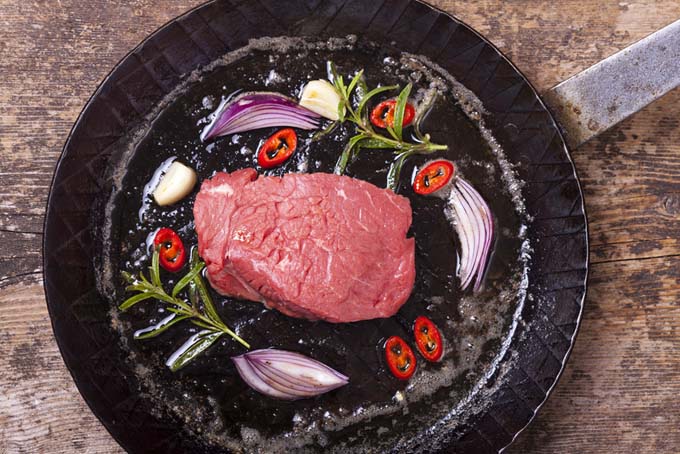
One help with this is to make sure that the meat’s surface is as dry as possible prior to placing it in the pan, to allow the heat to properly affect the meat.
If there is water present when attempting to brown meat, steam will be created, and browning will not occur. Preventing this can be accomplished simply by patting the steak or other meat with a paper towel prior to searing it.
You’ll want to make sure that you do not raise the temperature too high. Any temperature above 355°F brings on the chemical reaction that we know as burning. And no one wants that.
Even if the idea of slightly charred meat is appealing for the look, too much charring can bring out bitter flavors, and may even be responsible for the release of carcinogens.
That being said, the surface temperature of the pan or grill is different than the surface temperature of the object being seared. You’ll generally want an initial 400-450°F cooking surface (about the smoke point of most cooking oils) to reach the best range for the better flavor molecules to be formed via the Maillard reaction, and for some of the sugars in the meat to begin to caramelize.
TIP
If you sprinkle a little baking soda on each side of the meat, it’ll act as a catalyst and speed the browning process along. This is particularly helpful if you’re looking to make a nice crunchy “crust” on the outside while leaving the inside rare.
Obtaining the Perfect Seared Meat In 6 Easy Steps
- Place your chosen skillet on the stovetop and turn the heat on high.
- While waiting for the skillet to heat, begin patting your meat surfaces with a paper towel to remove as much moisture as possible.
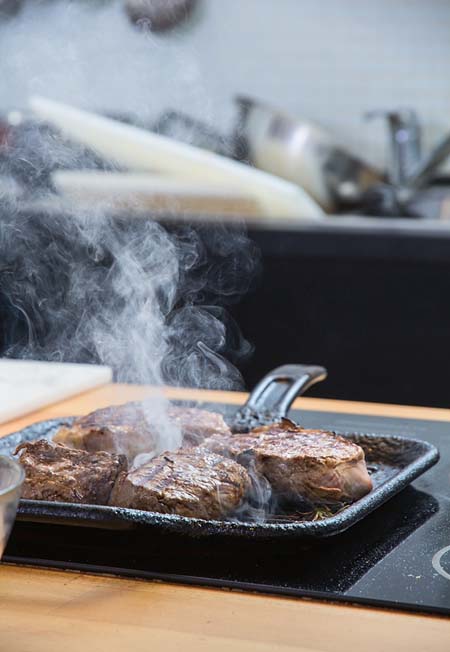
- When the pan is heated to the point where it is just barely beginning to show signs of smoke, add just enough oil (vegetable oil is preferred, as it has a higher limit before it begins to smoke) to cover the surface of the skillet. Remember, you aren’t deep frying. The oil simply allows the meat to have even contact with the pan surface.
- Place the meat on the frying pan with space between the pieces. It is best if the meat is not in contact with the sides of the pan.
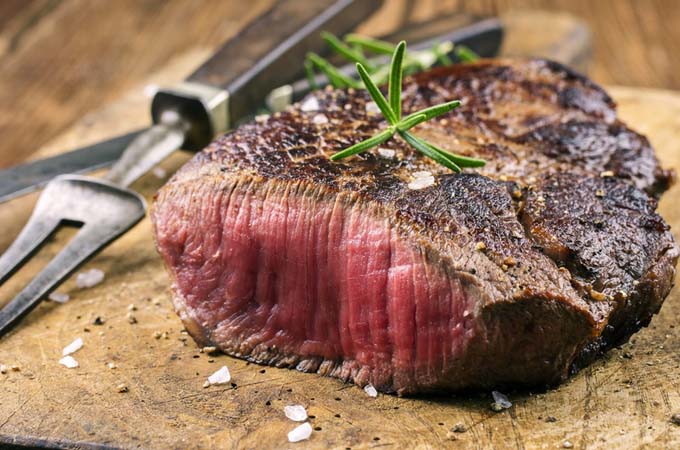
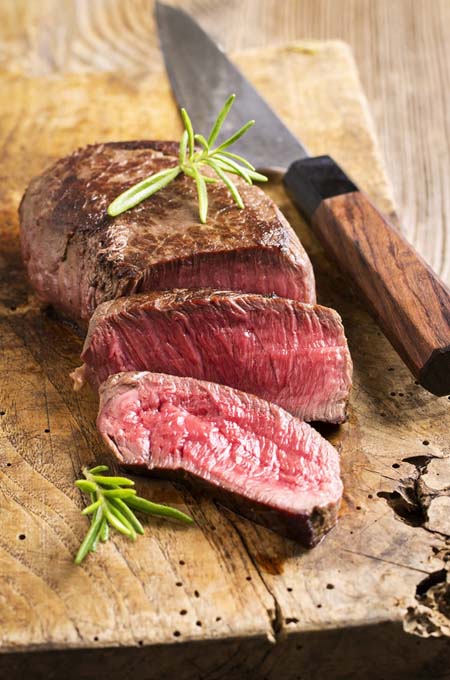
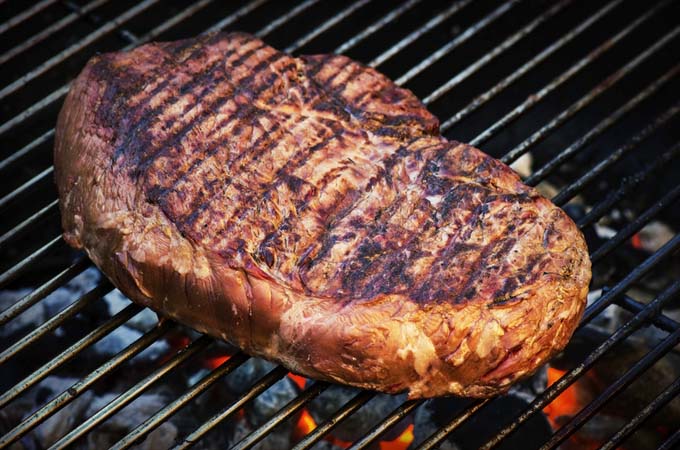
- Watch, but don’t touch! The meat needs to be left alone in order to get through the entire searing process. If you poke at it or try to flip it, you’ll interrupt the flow. The meat is expected to stick to the pan and then release, when the process is finished and it’s ready to be turned. It should be dark brown—but not black.
- Remove the seared meat from the pan and continue how ever you have planned for the rest of the cooking process. Don’t forget to deglaze your pan for a lovely sauce (unless you’re using seasoned cast iron)!
TIP
Rather than using salt to add sodium to your steak, consider sprinkling some loose powdered beef bouillon on top. One of the main ingredients in bouillon is monosodium glutamate (MSG).
Before you panic and shout something to the extent of “MSG! THAT’S BAD! Foodal! I can’t believe you are recommending adding MSG,” consider this:
MSG is a naturally occurring substance that forms as red meat ages, and it adds flavor.

All beef is aged, and the better (read: high priced) steakhouses age their meat until it is just at the point prior to rotting. Besides letting a natural amount of MSG develop, this aging process further breaks down ligaments and connective tissue, so the steak is more tender and flavorful.
You can partially recreate this process and taste at home with loose bouillon powder.
Besides the added MSG, the boullion powder will add a little more “beefy” flavor. But more importantly, it will help to soak up any remaining moisture, which ensures that you will get a nice finishing crust on that thick-cut T-bone or rib-eye.
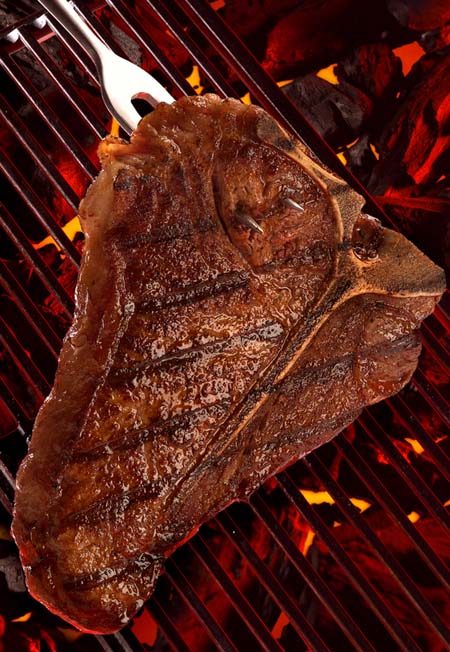
Gas or Charcoal Grill for Searing
One other option for enhancing flavors of the meat, instead of using cookware, is to perform the process over open flames on your own personal gas or charcoal grill. Some gas grill companies brag that they can get up to 700°F for just this purpose, but this goes above and beyond the capacity that just about anyone actually needs.
However, many high end, newer gas grills do offer a sear burner on the side, which provides a perfect option for grill usage. If you have one of these, definitely take advantage of it.
If you don’t have a special burner just for this purpose on your gas grill, try lowering the grate so that you can get your steak as close to the flames as possible.
This way you should be able to heat up to about 500°F, which is more than sufficient for a good sear.
For a charcoal grill, it is best to build the fire up high and use bricks on the bottom to provide support. Coals need to be evenly spaced and at least two layers deep in order to get the best results, or you can use some advanced tricks such as setting up various heat zones for your coals.
On the other hand, some people just prefer to stick to pan searing, and then use the grill for step two of the cooking process.
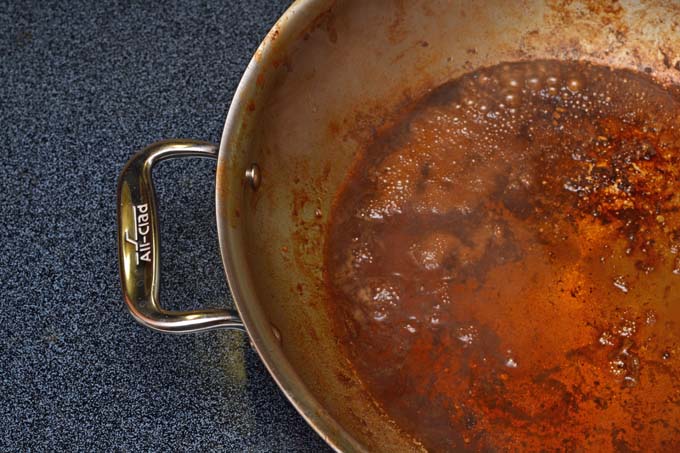
Deglazing
After experiencing the beauty of seared meat, you will also likely find yourself wanting to use those pan drippings and tasty little morsels left from the meat to create something extremely yummy.
Plus, you’ll need to clean your pan somehow, right? So why not deglaze? Some simple deglazing liquids include water (not as effective), sherry or cooking wine, various vinegars, soy sauce, beef consommé or bouillon, and other alcoholic beverages – basically anything that is acidic or that acts as a natural solvent.
Deglazing is actually a fancy word for something your grandmother has probably been doing for years: making gravy by pouring water into the roasting pan, or sautéing onions and then adding broth to make soup.
Really, what you are doing is using the stupendous flavors that are stuck on the bottom of the pan (the sticky coating and bits are called fond) in order to create either a delicious starter to the meal, or an incredible sauce.
The process of deglazing is fairly simple, but there are a few things you’ll want to remember:
- Avoid any burnt pieces or they will have a tendency to make your dish taste charred instead of seared.
- Pour the bulk of the fat (oil) from the pan so that it doesn’t burn while you deglaze.
- Adding cold water (or broth or wine) to the very hot pan will make it boil quickly.
- If using alcohol, remove the pan from the heat before adding it, to avoid starting a fire!
- Scrape the fond from the pan to make sure you get the most flavorful pieces that might stick to the bottom otherwise.
- Add flour or corn starch (combined with cold water first, to make a slurry) if you prefer a gravy-like sauce, but be sure to stir thoroughly and constantly to avoid lumps.
- Deglazing pulls all of those crumbles and pieces from the bottom of the pan so that you can use them for flavor—and it makes it so much easier to clean the pan afterwards.
- Get creative with your deglazing by using various liquids to see which pulls out the flavors you prefer.
The entire process of searing meat is a fairly quick and easy way to take your meat from gray and bland to browned and fabulous!
It is also a skill that you can develop on your own, to satisfy your own preferences as well of those for whom you are cooking.
Do some experimenting with beef and pork, make roasts or steaks (try some non-traditional steak cuts for a bit of adventure) or chops, and try broiling, slow cooking or grilling. After all, although there is a great deal of science involved in cooking, there is also a whole lot of art.
We recommend starting with our easy recipe for honey mustard pork chops to work on getting a perfect sear in a pan.
So step up the flavor of your meals, and enjoy!
About Julie Workman
As a freelance writer for over 15 years, Julie Workman has been published in various magazines, books, and online media. She holds a college degree in Home Economics which she uses every day in overseeing her household and making her home a happy place for her family.

Great post Julie! As a steak enthusiast, I am a firm follower of medium-rare cult. However, I always find it difficult to adjust the temperature and rawness of the steak. Thus, I usually eat steak when I am dining out and it costs a fortune. I see that it is really important to have high quality pans or skillets in order to cook steak properly. May be me and hubby will go some pan hunting this weekend. I am tempted 🙂
I love my steak! and I find the best way to do it is either on a grill like a barbeque or a grill pan with a little butter, a lot of coarse salt and yes rare for me!
You can do it in a pan with lots of butter and garlic, salt and a little basting to give it a nice taste but to cook it rare, keeps the juices in.
I never knew the process of searing was so scientific! Like Granny, I just thought searing sealed in all the meat juices. I also like to degalze the pan after cooking, not only does it help to clean the pan, there is so much flavor left over at the end of cooking and it seems a shame to let it go to waste!
This is a step I’ve often skipped for the sake of not having to wash another pan heh. Having read your scientific explanation regarding what searing does, I will definitely spend the extra time and effort on this step.
The comparison of different pans was also very useful. Thanks for the great writeup 🙂
Awesome post! So much good info in here, I’ve been using the wrong pans all along, no wonder my steaks didn’t look as good. With these tips I’ll definetly get a better sear, actually dinner is in an hour, so I’m going to go try now! Thank you!
Thanks for this info. I have no problem searing on the grill but have always had a problem with pan searing anything, I often have one of two issues, either it gets too wet and doesn’t sear (I suppose I haven’t dried it enough), or it doesn’t release easily from the pan. Perhaps I do not use enough fat. Searing is something I have found to be quite difficult, especially since I don’t often cook meat this way indoors, so I also have little practice. Thanks for these tips, I’ll be excited to try searing again now having this information!
Ellie,
You just need a little bit of oil. Make sure the pan and oil is hot – hot as you can get it on most normal residential stoves. Drop in the meat and let it do its thing. Don’t flip it back and forth. When I you think it’s ready it should release easily enough. Of course it’ll leave some fond but that it were the goodness lies if you deglaze.
I finally understand deglazing now! Thanks Julie, I also liked the information on the cookware. That is really something to know about the Teflon. I absolutely appreciate those points in your tips, that will keep us safe.
Believe it or not, I am a vegan! Still, I always love to learn different cooking methods. The fact that searing activates the gluten, also has an effect on some vegan dishes, such as sietan. Your thorough explanation has allowed me to understand the process, and be able to adapt it. Flavor is king!
What an interesting post! I’ve always been very interested in the chemistry behind cooking, so all this information about the Maillard Reaction is a cool new way of looking at preparing meals.
I’m also enthusiastic about the return of cast-iron. There’s nothing that can really beat a good cast iron pan or a solid aluminum baking sheet, even if non-stick materials have been stealing all of the spotlight recently.
Great advice overall — I was always so disappointed when I cooked steak and somehow the texture many times felt more “boiled” than seared! I will be careful to pat the meat dry from now on. Though I have to say, the searing pans with texture always worked great for me (grilling lines not even being the reason!) because it felt like any juice from the meat would just dissipate a bit down.
Also good advice on not touching the meat. My boyfriend is used to put a lot of oil and shake around to make sure nothing sticks to the pan (to be fair, the material of the pans make for extra sticking, urgh). I’ll be sure to let it rest in place through the process instead of scraping from now on!
Cryonelle, it sounds like you boyfriend was trying to sauté rather than brown. Useful for lightly frying vegetables in a minimal amount of oil. Sautéing involves much lower heat.
Very comprehensive article. Since I switched from Teflon to cast iron for steak it has been very good. It is key to get the pan really hot, and then just monitor the temperature as the meat cooks depending on the thickness of the cut. I would usually start off high then flip and go medium and finish off a little on high.
Searing meat was one of the first things my mom taught me when I started cooking. It’s is one of the most important techniques in the kitchen in my opinion. The flavor difference between a piece of meat the was properly browned and one that wasn’t is astounding, and the difference of flavor of a dish cooked in the slow cooker with seared meat is indescribable. I’ve actually had people say things like “I’ve never had something out of the crock pot taste so good.” My first question to them is “Do you brown the meat before you put it in?” The answer is usually no.
Searing isn’t just for large piece of meat either, especially if you are cooking in a crock pot. I brown any meat I add to the crock pot; stew meat, sausage, etc. I’m kind of glad that I didn’t read this article before I started searing and deglazing though. I didn’t know that deglazing in a cast iron pan could remove the seasoning. I have been doing it from the beginning (20 some years) and I’ve never had that problem thank goodness! I don’t ever use anything acidic or anything with alcohol though. Usually just stocks.
Thinker,
Deglazing with a very light acidic solution (which is what stock is) won’t do too much harm in a very well seasoned and often used cast iron skillet (kind of like soap – a dab or two every once in a while is ok). When you fry, you add some seasoning and when you use stock or tomato sauce you remove a little. It may not maintain that pristine shiny black surface but it’s still be (mostly) nonstick and immune from day to day rust (as long as it’s not submerged for long periods).
What an amazing amount of information in this article! I’m a firm fan of cast iron cookware, and stainless steel plays a huge part in my kitchen too. I believe that having the right tools (as well as the right knowledge of course) will give you the best possible results.
For years I struggled to sear my steaks correctly – and one of the reasons I was not getting it right was because I didn’t pat the meat dry before putting it on the pan. With what I’ve already learned, and what you’ve stated here, I’m keen to cook a couple of steaks over the weekend!
Great article. I use my cast iron frying pan for nearly all my cooking, especially meat and even ground beef. Searing ground beef gives it extra flavour for things like hamburger helper and ortega taco dinners.
I’ll have to remember to tell my husband about the baking soda. Great tip thanks for sharing we grill steaks about once a week. My husband is big on having a nice juicy steak on friday. He loves to grill, and is very good at it.
What a great article. I’ve been experimenting with the joys of searing, and it is a wonderful way to make delicious dinners from so-so cuts of meat. I recently tried it with a “poor man’s ribeye” or chuck eye tender steak, and it was a melt in your mouth success. The meat was tender, juicy, and so tasty that my husband, who generally only likes steak on the grill, was sufficiently impressed.
I seared the meat in my cast iron skillet, which I was then able to pop right into the preheated oven. Before, I would try to sear the meat and then transfer to broiling pan, but this method worked much better.
Interesting tip concerning the baking soda. I’m wondering if I should flavour the baking soda before applying it though? It seems like a strange approach. I guess I’m equating it to coating things in flour for some reason.
Yum, steak! My cousin was the grill master of the house and he always knew how to get the perfect sear; I have tried to follow what he has done but I still cannot do what he does!
Who knew there’s so much chemistry behind a nice steak sear; kinda makes you wonder who was the first one to break down all those chemistry and chemical reactions, doesn’t it?
Thanks for sharing, I can’t wait for the next time I purchase a steak!!
I absolutely love this post! As a science person I love the explanation of caramelization and the Maillard Reaction. I never thought to dry off the surface of the meat before searing it. I’ll definitely be doing that from now on. I wonder if this is the same case for ground beef patties for burgers?
I also love the explanation on deglazing. I have never attempted a deglazing and now will definitely try it with some different liquids to make a great sauce instead of just buying one from a bottle!
Now that summer is here I’ll definitely attempt a sear on the charcoal grill as well.
Thank you for the post. The pictures in this post make my mouth water! It looks so good though, I’m putting it on the list of things to try out when I get the chance. Too bad I’m mostly working on a vegetarian diet!
I should stop reading meat-related articles. My mouth is watering too much. These techniques will come in handy when I’m preparing for my next steak night or BBQ, thanks for sharing!
Searing meat provides an excellent visual, as well as providing a savory and tasty meal! Taking that extra step to put a proper “crust” on protein and really give love to your food actually makes the dish taste magical. All it takes is a little love and time to turn any normal meal into an amazing experience.
This is the first time that I read anything that explained the science behind the process so well. Dispelling myths about why searing works the way it does is good too. People used to claim that it sealed in juices which I always thought was a silly explanation.
It’s funny I’ve heard this term but I didn’t really know what it meant. It is kind of how I would pan fry something anyway. I just don’t think I would use a vegetable oil. I get the smoke part. I don’t do high temperatures really with things like meat.
I’ve been trying different oils I think sunflower is a high heat oil.
People always invite me to barbecues because of how well I’m able to develop a good crusty finish but I never really understood the science behind it. Pretty comprehensive article, it gave me a good perspective on to why we are doing some specific things.
I mostly cook pork.
Thank you, thank you , thank you! As a student who’s just left home, I’ve been trying to find out how my mom managed to make food that was actually edible. Meat of any kind is my favourite, and so it’s great that someone has a good explanation of what to do, and explains why. Too often it’s just what you need to do and I’m left wondering what on earth baking powder has to do with making a good steak!
Wow! This was packed full of great information. I’ve never had any success will cooking meats over the stove. I especially look forward to applying what I’ve learned about searing when cooking my next steak. The only way that some meats tastes good to me are when they are grilled. Living in an area where the winters are longer than summer can be challenging when ti comes to grilling. And MSG? I hear what you are saying, but that still scares me. I’ve been trying for so long now to protect my family from MSG, pesticides, chemicals, hormones, etc. in foods, so the thought of actually adding MSG to my meat is troublesome. However, the information about the process is incredible. I’ll think on that! Thanks!
I’ve been cooking quite a bit of steak in cast irons for the past few years. The article I read at the FoodLab taught a pretty good method that involved using oil first, and then butter with a ton of glazing and steak flipping.
I really love the idea of using bullion to enhance the flavor. I usually salt my steaks overnight and wrap them in paper towel to draw out the water.
Great article about searing though. Cooking techniques are fun to learn, and usually my favorite articles to read.
Wow this was for informative! I’ve noticed that the best tasting steaks I’ve ever had are seared and now I know the secret! I’m going to try this tomorrow and see how it goes! Also I loved how you put the science explanation in as well (I’m a bit of a science geek) this was delightful to read!
These are wonderful tips. I never knew about using baking soda on meats. I usually use it for baking my cookies! Deglazing sounds like a good idea to get the most of your meat, especially of it is an expensive cut. Since I also happen to wash dishes, maybe this will help in cleaning off the hard crusty bits of food?
After reading this article I’ve learned why my meat never looks and tastes the way I want. First of all, I had no idea the meat had to be as dry as possible. I always took it directly from the marinade and threw it on the pan. Of course it always resulted in disaster. The question would be what to do about the marinade, should I skip it or just let the meat dry before cooking it or what?
This article was incredibly helpful! My success has been hit and miss with searing, so I’m excited to try some of these tips! I used to fret as soon as the meat started sticking, but I’ll have to try leaving it alone to see if it releases as the searing completes. I was also not patting the meat dry, so I’ll definitely be doing that from now on and plan to try the baking soda trick as well! We recently started using cast iron, so I appreciate the note on deglazing too. I didn’t know why you said not to so I researched it – I didn’t know that you have to be careful with acids in cast iron!
I recently decided to try this method for roast. I seared a rump roast on all sides and then cooked it slowly for a bit. It was so delicious. It tasted more like medium rare steak than roast, and it certainly went over well for Sunday dinner. I actually can’t wait to make another one.
It also works well for pork chops and other cuts of meat. I’m enjoying learning how to better prepare a variety of meats. I always thought I was a reasonably good cook, but this site has made me better.
Truly loved this article. Great tips. I’ve tried searing many times, but have always been unsuccessful. As a steak lover I have always wanted to be able to make great steaks at home, without having to go to a restaurant. With your tips, I’m sure I’ll make the perfect steak. I’m giving it a try this week, and I will let you all know how it goes. Wish me luck!!
Hi Julie, I was going through recipes that I’ve found in the site and have tried at home, and ran into this one. I actually noticed that I have already tried several of your recipes without even knowing. Now that I know, I’m a loyal fan. I found this recipe at the beginning of the month of October, but it wasn’t until 2 weeks ago that I gave your searing techniques a try. The tips worked wonders, and I was glad to learn of the science behind the searing. My steaks came out delicious, tender, and moist in the inside. Thank you much.
I’ve always had a problem browning meat in non-stick pans. Thanks for providing such in-depth instructions. I think I’ve been afraid to heat the pan to a high temp before adding the meat, and I end up with meat just sweating in the pan and turning an unappealing grayish color. Clearly I have a lot to learn, and this blog is the place to find great information across the board. Thanks!
Loved the article and learned a lot. I normally marinate my steaks so i drop the steaks on the BBQ still wet. If I pat them dry, will this still accomplish the searing process? I will have to learn more about deglazing. I am looking forward to trying this at home. Thanks again.
I never really knew the “science” behind all of this, but I learned a lot from reading this piece. I keep coming back to it again and again. It’s so helpful, and I’ve had a lot of success following these tips. I’ve now tried this process with thick pork chops and small steaks as well. It’s perfect for just about any cut. Nice, brown edges, nice tender, juicy, center… my skillets have been getting used much more often, my husband is enjoying the benefits of my “practice.”