
It’s always a great joy to put out your fine silverware – to polish elegant cutlery, and neatly arrange crystal glasses for a beautiful dinner table.
Are there any other details that could be important?
Let’s face it – first impressions do count if you want to throw a fancy dinner. A beautifully folded napkin atop every plate is the icing on that cake, and is sure to strike the eyes of your guests in combination with your other arrangement flourishes!

While not all kinds of occasions require such a fine accoutrements, folded napkin decorations are nevertheless a wonderful and classic way to combine beauty, simplicity, and usefulness to add an extra special touch to the table.
History
In the past, the use of napkins – even beautifully arranged ones – looked a bit different than it commonly does today.
In fact, the proper tool to wipe your hands and mouth clean at meals before the dawn of the age of the napkin had been the tablecloth itself. You can only imagine how this must have looked at a fancy banquet!
However, new fashionable appearances at the beginning of the 17th century made it necessary to reconsider this habit. Luxurious dresses and costumes with lacy or ruffled neck braces became popular, and people just didn’t want their special clothes to become dirty.
This was around the time when the napkin was invented – a piece of cloth that had the exclusive purpose of keeping you clean during eating!
For this, strict instructions and traditions around this eating tool were developed further during the 18th century. When a napkin, plate, knife, spoon, and fork couldn’t be found on the table, this was considered a total violation of decency (1).
While today many of us we use paper napkins for most occasions, the tradition of using a nicely arranged piece of cloth at the table has become increasingly rare. Sadly, cheaper paper counterparts have replaced it at most dinner tables, relegating careful folding to the status of a lost art.
My aim with this article is to revive this technique, and get everyone to start folding again!
This guide will provide you with an overview of materials, tips, and accessories. Last but not least, you will learn excellent techniques for arranging your cloth serviettes with many different examples.
If you think that your handcrafted DIY chops are not at their best, our step-by-step instructions for some of the most popular and prettiest techniques will change that – eventually helping you to become a master of this long-lost art!
What kind should you choose?
Complicated, extravagant variations and techniques can’t be achieved with every type of napkin, mind you.
Paper versions, for example, are of course less suitable for this. They are too thin, too light, and too small to hold the shape you desire.
That’s why fabric napkins are simply the best choice for the purpose of folding. While they are available in lots of different materials, some do work better than others.
So what should you consider when looking for a new set?
Size
The size should at least come to 20 x 20 inches. The larger they are, the easier it will be to create complicated shapes (though some of the easier techniques will work with smaller varieties, too).
Material
The most popular and suitable materials are cotton, linen, damask, or a blend of these ideal fabrics. Most high-quality napkins should also be washable at high temperatures, in order to remove stains completely.
Keep in mind that paper varieties are not all bad – for simpler occasions they suit a variety of occasions, seasons, and menus, since they are available in countless designs and colors – plus, they’re disposable, an appreciated bonus for picnics, barbecues, and large less-formal gatherings.
Finishing
The prices of cloth pieces can vary quite a bit. This not only depends on material, but also on the quality of finishing.
What is finishing when it comes to napkins?
It’s important to address the following questions:
- How are the seams processed?
- Are they handcrafted or do they include elaborate embroidery?
- Are they of a single hue, or multicolored?
Sometimes, a chosen cloth variety might be a bit too much of a good thing – making them straight-up unpractical. Stain removal is a pain if your selection is intricately decorated, and napkins that fray easily won’t stand the test of time after a few washings.
For summer parties, casual birthdays, or barbecue feasts – particularly when more than eight guests are expected – I think paper versions are the more suitable way to go. They can be disposed of, easily replaced, or even used to soak up dropped drinks and spills without worrying about staining.
Accessories: Put a ring on it
Instead of folding cloth napkins, another equally beautiful choice is to use napkin rings.
A great advantage here: you don’t need to spend lots of time folding, since you can quickly make a beautiful arrangement without it.
With some of these rings on hand, it’s easy to set up a wonderful table decoration, whether you’re using cloth or paper.
Plus, many different styles are available, allowing you to find the right look and type for your personal taste, to suit any occasion.
Yet, there is another way to create wonderful and eye-catching accessories: just make them yourself!
Some great ideas for lovely homemade napkin rings are:
- Using long-stemmed herbs, like chives or parsley, as a ring to wrap around the cloth
- In the same vein, using vines like ivy or nasturtium – or long grasses or reeds
- Ribbons, decorative tapes, or threads; especially those comprised of special materials (like silk, linen, felt, etc.) or with stripes, dots, or other patterns
- Sweets like candy canes, licorice, or fruit gum strings used as rings
3 Useful Tips Before You Start
1. Start with the easier techniques.
Start with the simplest forms, and work your way up to more complicated shapes.
It’s always nice to have easy success in the beginning. Easy wins will encourage you to keep practicing!
2. Take your time.
Don’t start your very first attempt 20 minutes before your guests arrive to your important dinner!
Practice makes perfect, so take a bit of time in the beginning – and be patient. You’ll get it down eventually!
3. Press after each fold.
After every step, press the napkin tightly to maintain the creases you make. Or – if you have the time or want to be very accurate – iron after every step to strengthen creases you’ve created.
Though this is not mandatory to do this for all of the techniques described below, it does make a nice crisp line that will hold its shape, at least until your guests arrive and have a chance to admire your handiwork.
Starching your napkins before working also works wonders towards holding the shape you desire.
6 Awesome Techniques
Below you will find six great ideas to impress your guests.
The suggestions are organized by difficulty level, starting with quick and easy shapes and then moving into the more complex.
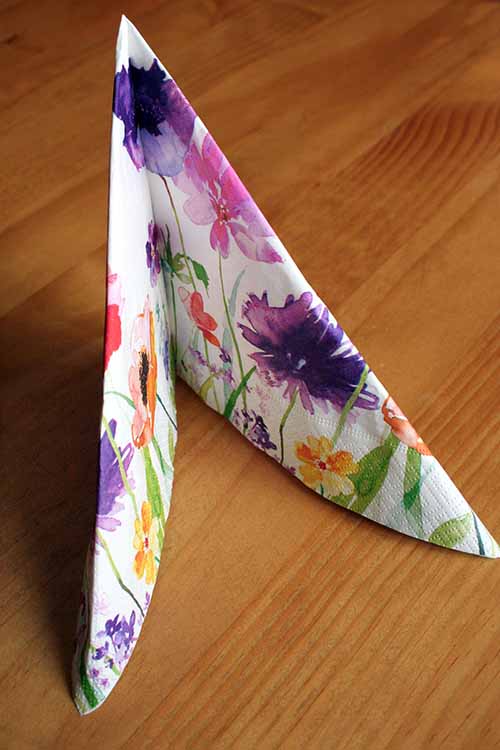
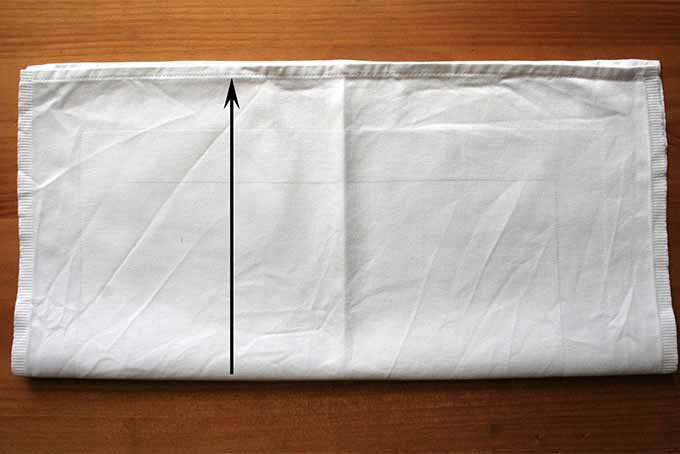
1. The Sail
This is probably the easiest variety that you can start with. It is prepared in the blink of an eye, and I can guarantee you that it’ll work – even with smaller cloths or paper versions!
1. Spread the napkin out fully.
2. Fold the lower half upwards.
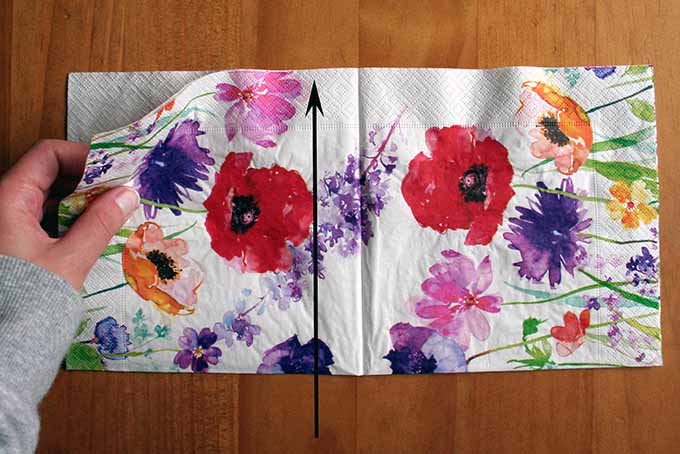
3. Bend the two outer low edges to the upper center diagonally.

4. Press together and arrange with the tip on top.
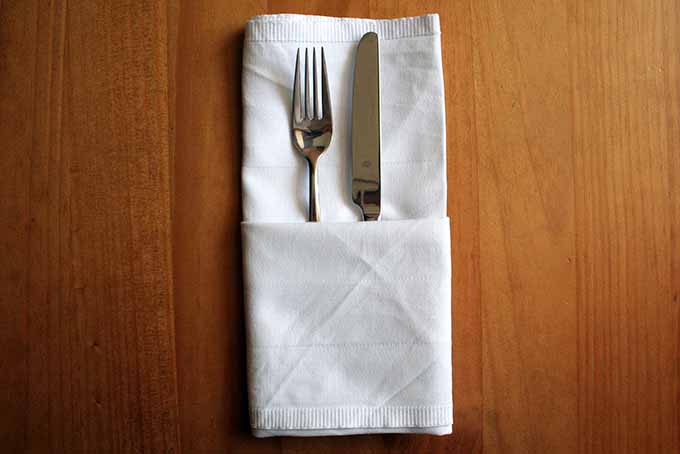
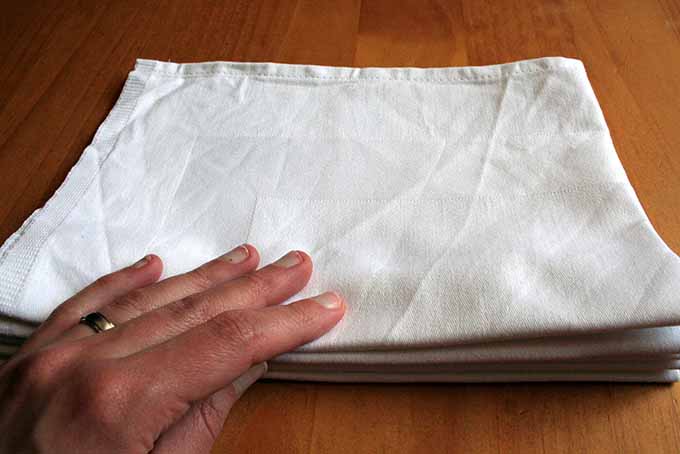
2. The Cutlery Pouch
This design is casual, yet elegant. It’s a fancy way to arrange cutlery in your table setting, and looks great with patterned or decorated napkins in particular.
Plus, it’s an easy one to prepare for a large number of guests.
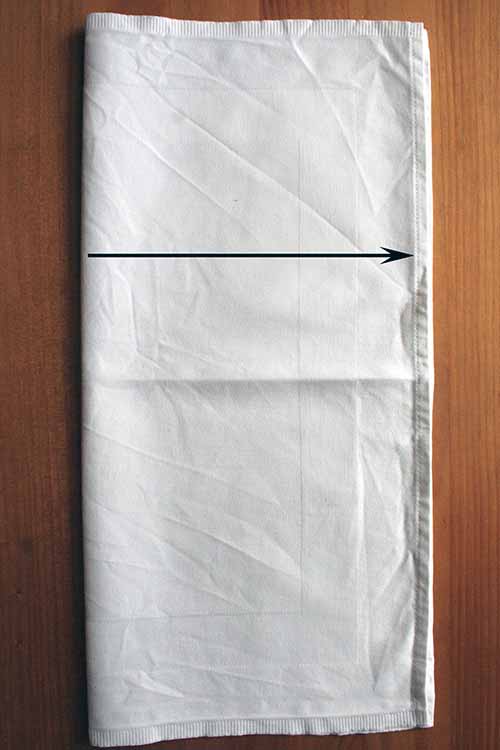
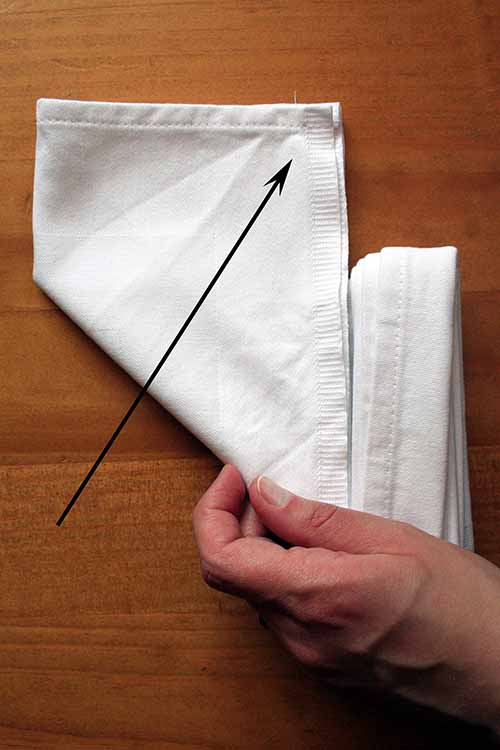
1. Spread the napkin out flat on your work surface.
2. Fold in half, and then fold the top layer back to be even with the right edge.
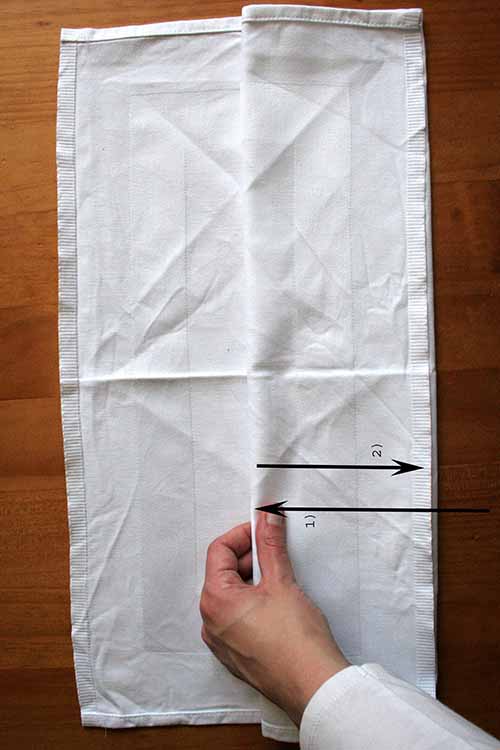
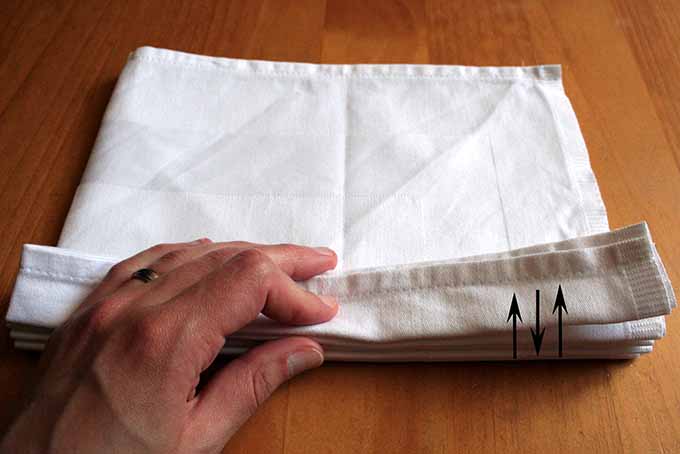
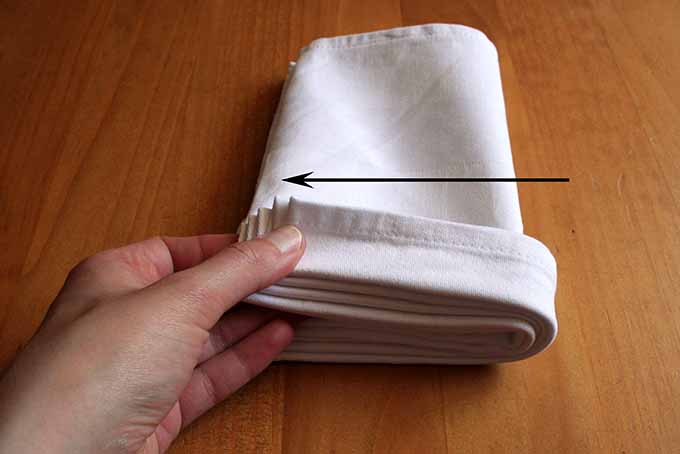
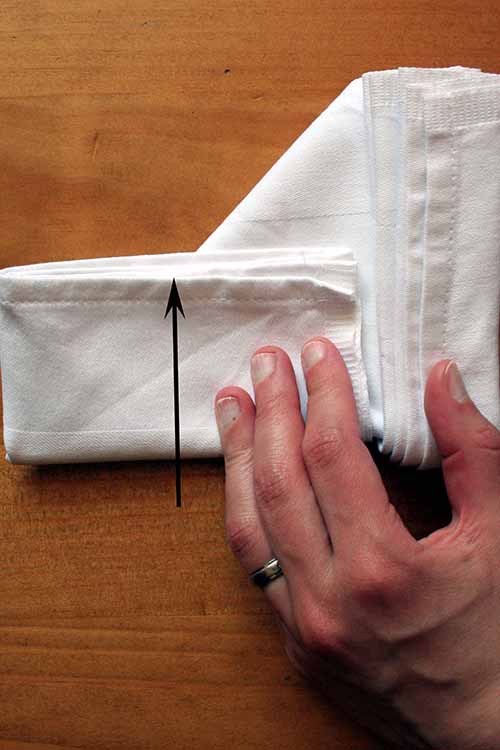
3. Carefully flip over, then fold approximately one third towards the top and crease firmly.
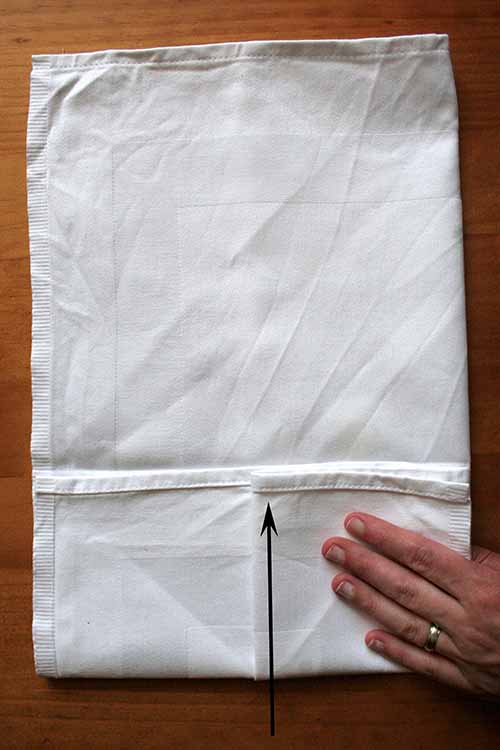
4. Repeat the previous fold two times, until the cloth is used up. Put cutlery (or sprigs of herbs, a single flower, or other decorative items) into the resulting pocket.
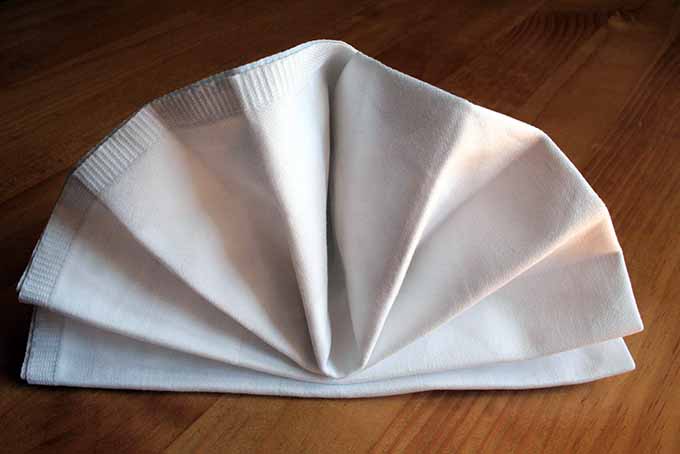
3. The Fan
A beautiful wavy form, this one provides a lively and light touch to the table.

The fan also functions wonderfully when working with particularly vibrant colors. If you want it to keep its shape for a couple of hours, it’s best to iron the creases after each step.
1. Spread out your napkin, into its full rectangular or square shape.
2. Fold in half, with the crease at the left.
3. Start folding from the bottom up, creating according folds until you reach about two-third of the way up the cloth.
4. Carefully flip the napkin over, with the accordion fold at the bottom.
5. Fold the right half to the left edge, and crease.
6. Take the top left corner and fold down and to the right, overlapping just above the accordion fold.
7. Carefully flip over, and bend the overhanging portion created in the last step to the center, forming a small rectangle.
8. Press all of the creases together tightly or iron, and arrange your fan with the rectangular portion at the back.
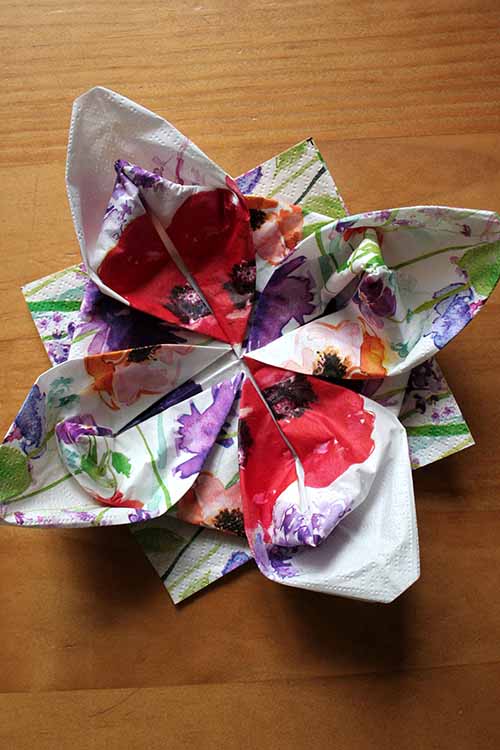
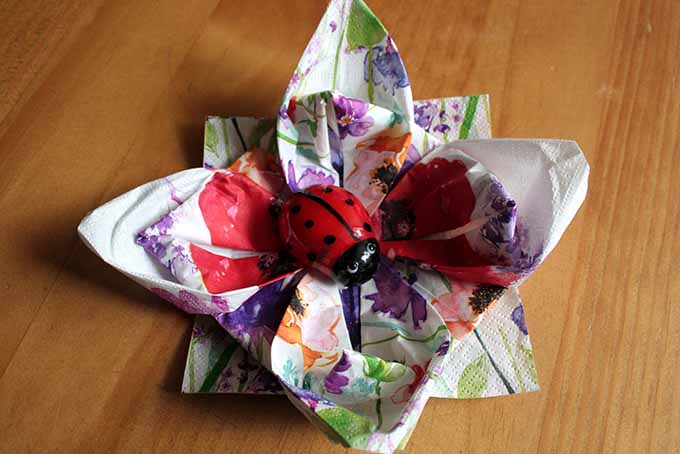
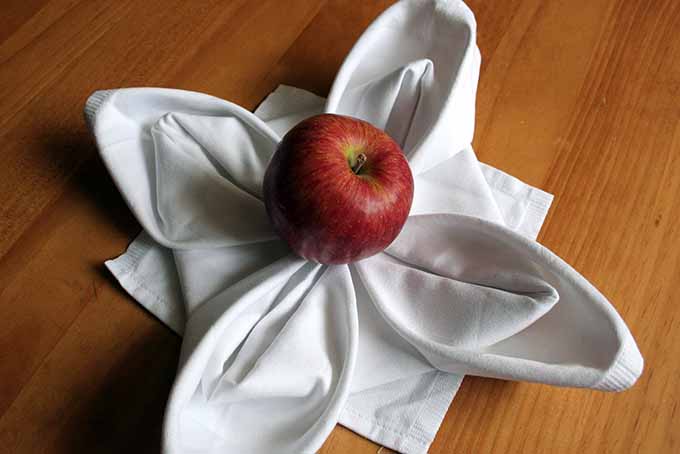
4. The Lotus Flower or Water Lily
With its very special design, this extraordinary shape is a real eye-catcher – and it’s bound to impress.
When you’ve had some practice, this technique will also work with paper varieties.
Bonus tip: use colorful napkins here, and put a small goodie inside that fits the theme of the dinner for a creative touch.
Once you’ve mastered one of these, making the others will go a lot more quickly!
1. Spread the napkin out on your work surface.
2. Fold all corners into the center, forming a diamond.
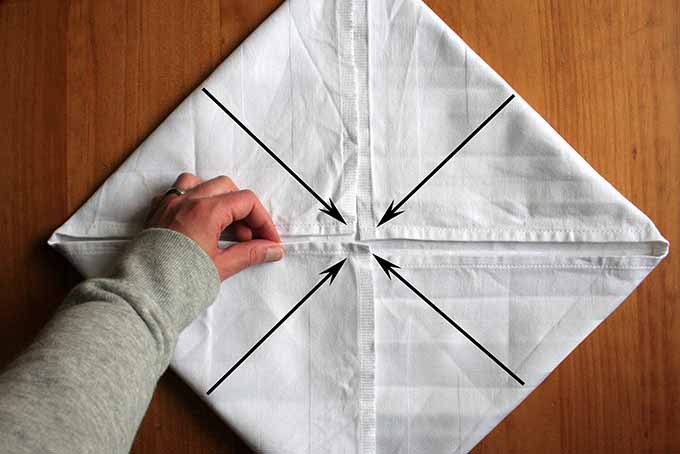
3. Repeat the step once more with all four corners, forming a square.
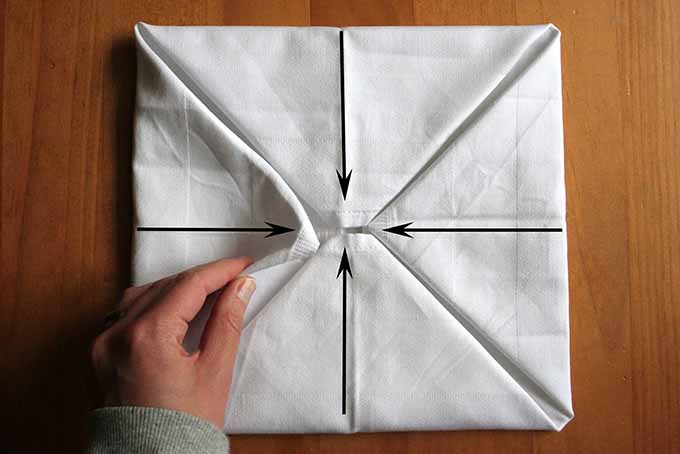
4. Flip over carefully and repeat once more to form a diamond. Press or iron the creases.
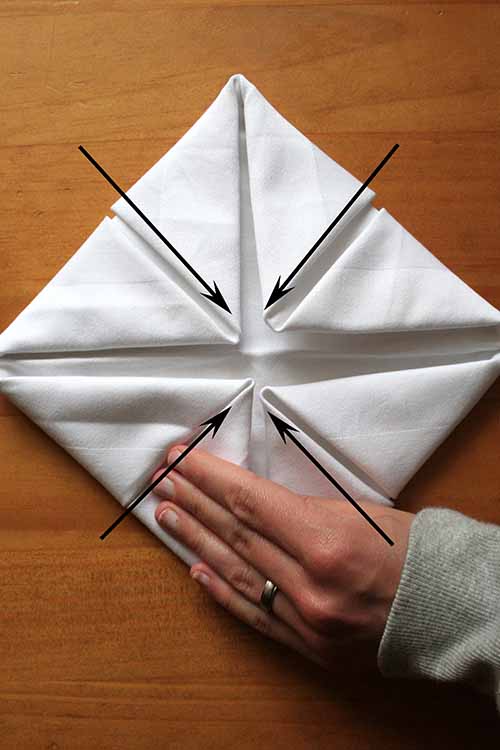
5. Gently pull out the edges underneath to form the flower’s petals.
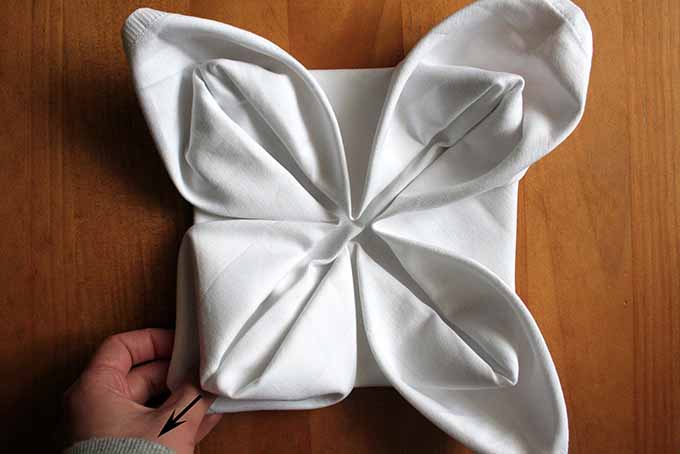
6. Pull out the edges of the four straight sides at the top, bottom, left, and right to form a diamond.
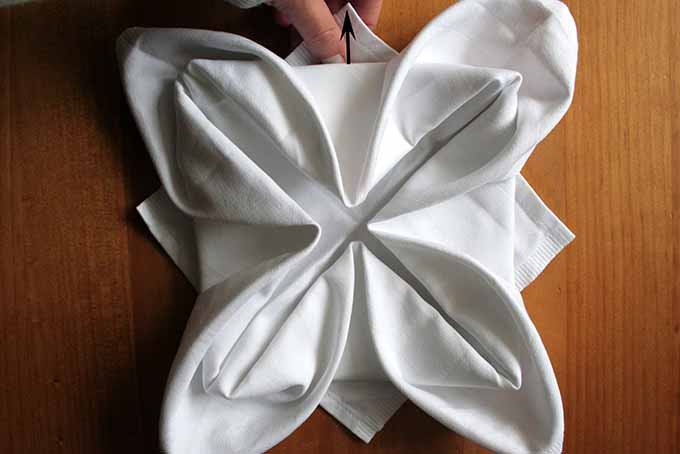
7. Arrange on the table, with some decoration or a small treat in the middle, if you like.
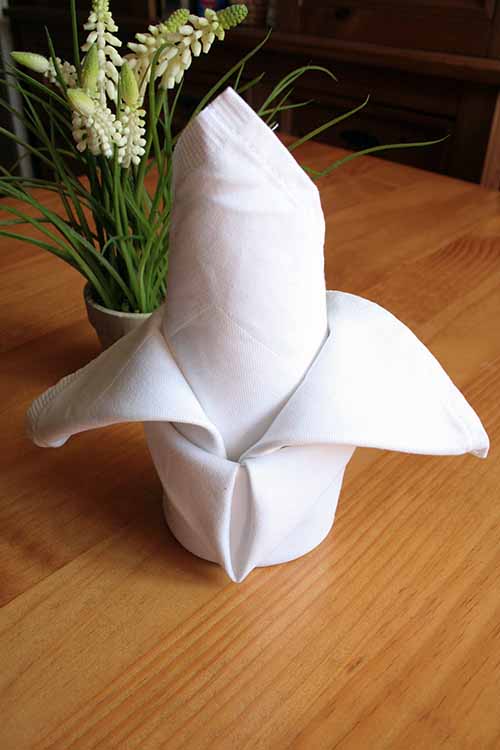
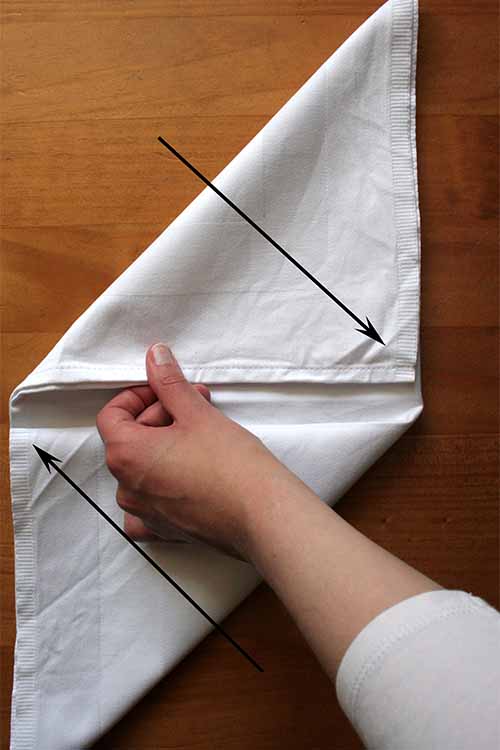
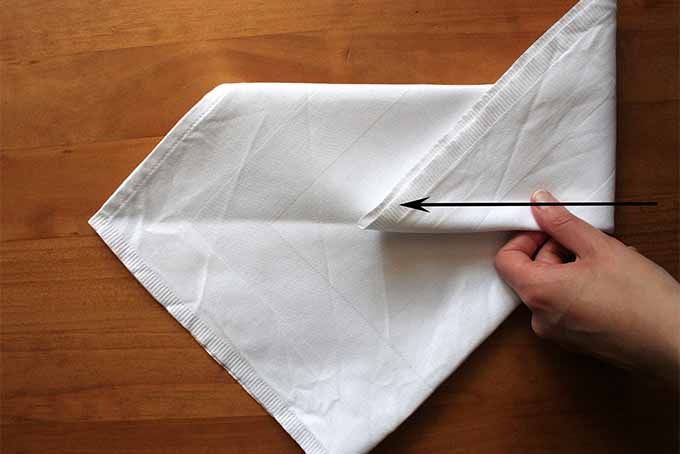
5. The French Lily
This lily pattern looks incredibly elegant on the table!
Although it is one of the most difficult techniques, you should be able to put together a wonderful shape with your first try, with practice only making it better and better.
Make sure the cloth keeps its form by ironing, or pressing it together firmly after every step.
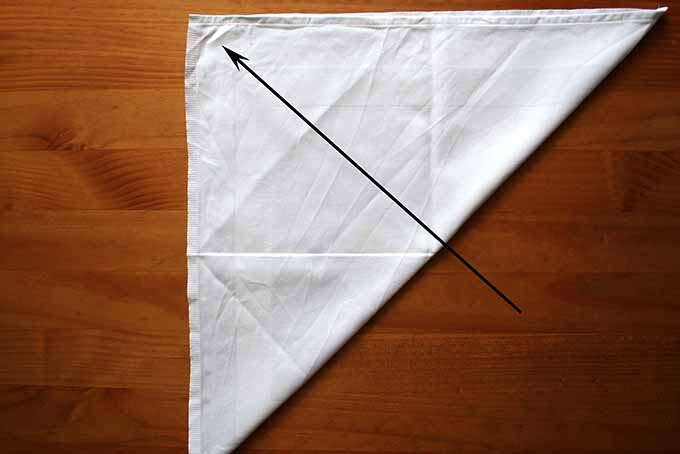
1. Spread napkin out in front of you on the tabletop.
2. Fold the lower right edge to the top left so a triangle is formed.
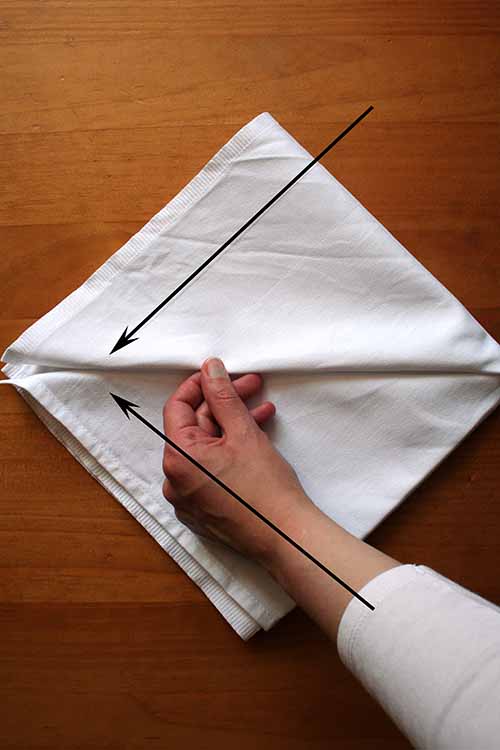
3. Place in front of you with the long side at the bottom. Fold the two lower edges in to the center diagonally.
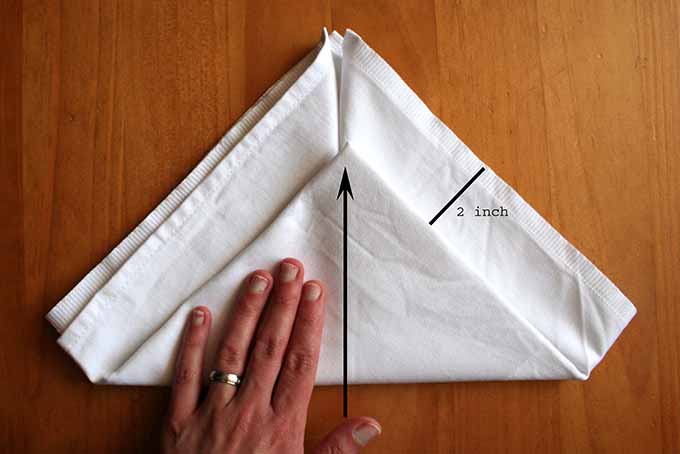
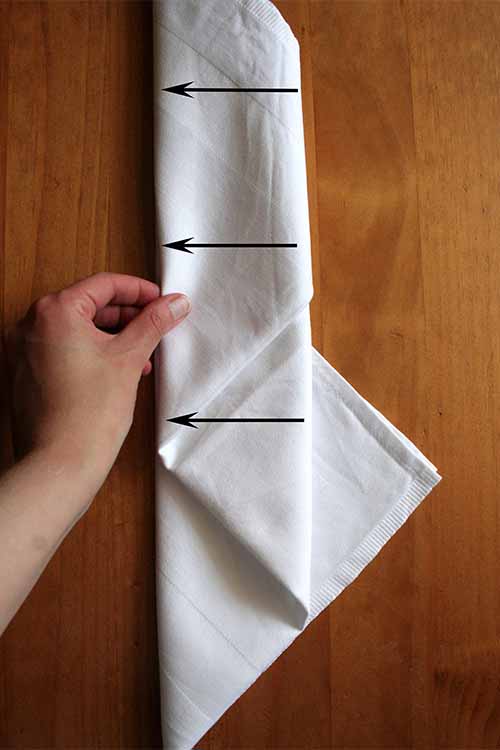
4. Bend the lower part upwards, so that an edge of about 2 inches is still visible.
5. Bend the top of the smaller triangle so the peak is even with the bottom edge and crease.
6. Carefully flip over, then bend the left and right sides into the center, and slip them into each other so they interlock.

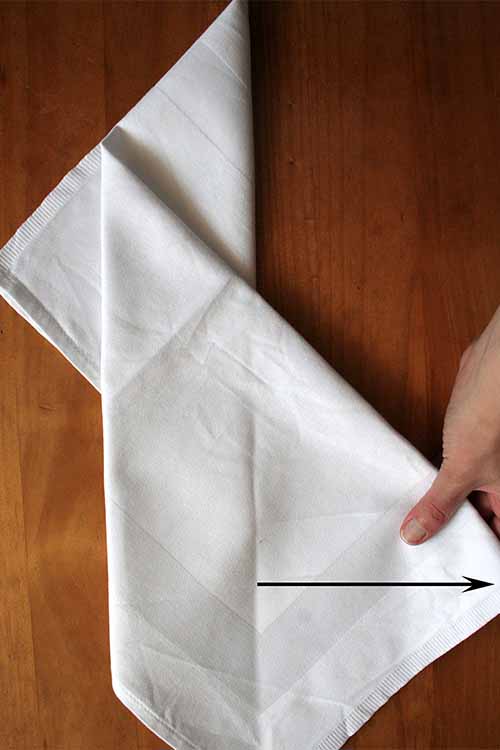
7. Stand up the arrangement, and bend the two outer layers to the sides and down.
8. Arrange on the table.
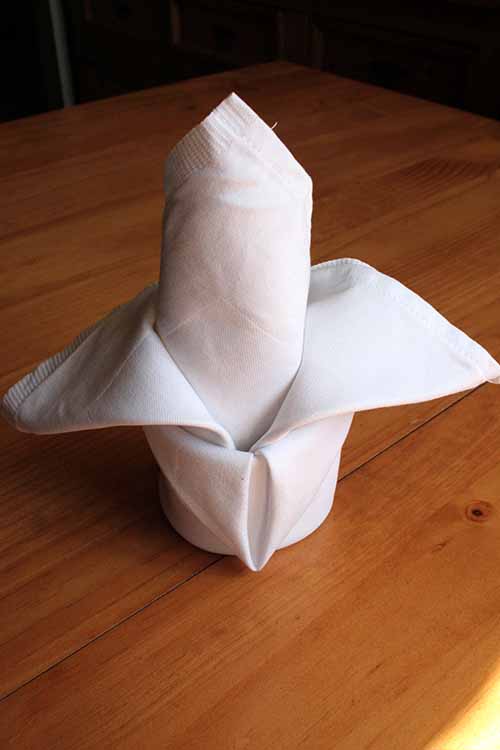
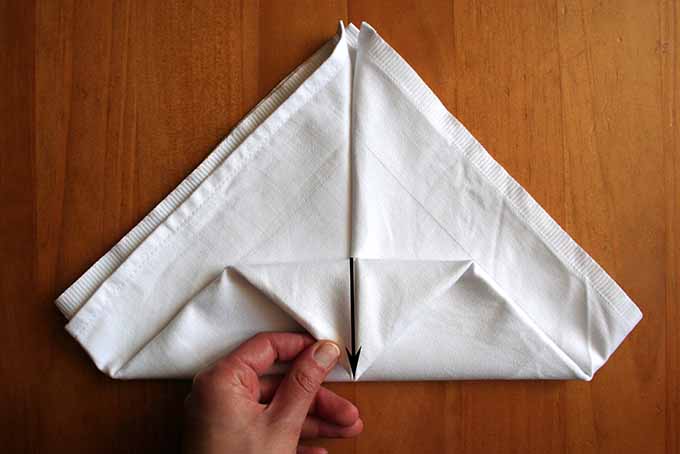
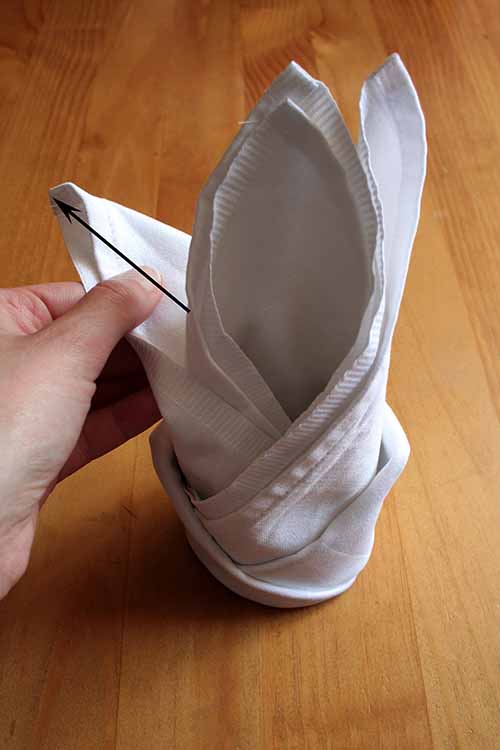
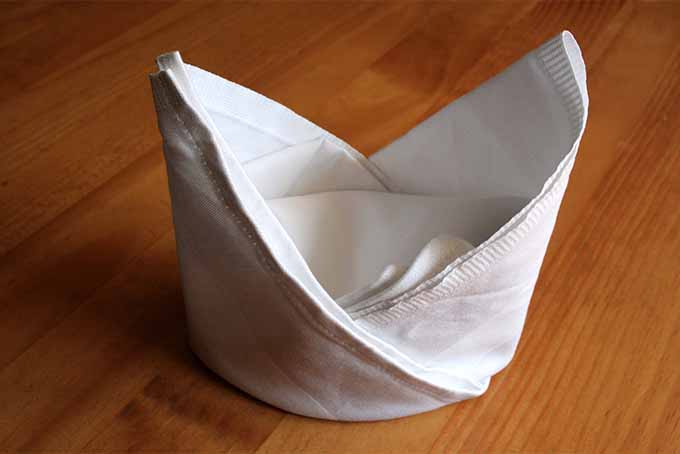
6. The Miter
What’s one very classic and traditional shape? The miter.
It resembles the tall hat commonly worn by bishops, with a peaked top.
This form requires some patience when it comes to the individual steps, but it’s well worth the concentration and patience required. If you follow each step closely, the miter shouldn’t be a problem for you to create at all.
1. Spread the napkin out on your work surface.
2. Fold the lower half upwards, halving the napkin, and form a crease.
3. Bend the left lower edge up to the center, and the right upper edge down to the center.
4. Flip over. Then bend the the top layer back to the left, so the tip of the triangle formed on the right is revealed.
5. Unfold the tip of the top triangle from underneath.

6. Unfold this piece again, and reorient on your work surface so it’s at the bottom.
7. Fold half of the triangle at the top (upper right in the photo below) to the middle.
8. Fold the peak of the diamond shape back to the middle.
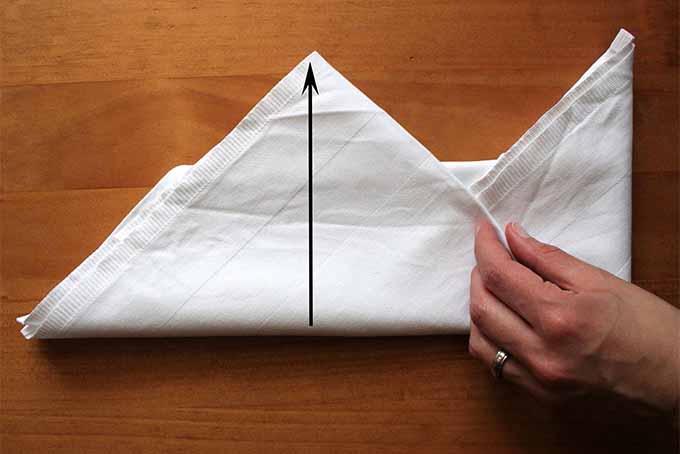
9. Flip over, then fold the right part to the center, and slip the right edge into the left one. Press or iron the creases.

10. Prop up, opening the arrangement in the center, and stand at each place setting.
Enjoy trying these out at your own get-togethers and gatherings – and let me know how your folding skills have evolved or what new things you’ve learned in the process by commenting below!
Sources Cited:
1) Katharina Enzinger. “Die Bestimmung der Serviette ist die, nicht geschont zu werden.” from Lothar Kolmer’s “Finger fertig: Eine Kulturgeschichte der Serviette.” 2008.
Photos by Nina-Kristin Isensee, © Ask the Experts, LLC. ALL RIGHTS RESERVED. See our TOS for more details.
About Nina-Kristin Isensee
Nina lives in Iserlohn, Germany and holds an MA in Art History (Medieval and Renaissance Studies). She is currently working as a freelance writer in various fields. She enjoys travel, photography, cooking, and baking. Nina tries to cook from scratch every day when she has the time and enjoys trying out new spices and ingredients, as well as surprising her family with new cake creations.


These are amazingly creative! I want to try a few variations of what you’ve shown.
I just have trouble coming to terms with my guests destroying the folds right in front of me.
Definitely better than using a napkin ring or just doing a normal fold
Thank you! Actually, I’ve experienced that some of my guests didn’t even unfold their napkins because they thought it was such an effort for me to fold them 😀 I tried to convince them that they should use it and it’s not just for looking at it. So, folded clots are definitely a talking point 😉
I have always appreciated this little added touch. It adds to the pleasure of enjoying a good dinner. Thin paper napkins can also be given different shapes, and I’ve seen this in many restaurants. Many traditional eateries still use only cotton napkins and you will always find the tables decorated with beautiful designs. Love these tips!
Thanks, I hope you can use some of these ideas at home! I agree with you, it may not be mandatory to use them, but it will for sure add a beautiful touch!
Oh, I love this. This is so cool. I love to set a pretty table, and this is like icing on a cake.
I learned a couple of these techniques, because I used to work in fine dining. I’ve only done it with linen though. I never thought of doing it with paper, but the floral with the ladybug is just darling.
I can’t wait to try out some of these.
I’m happy that you enjoyed my tips and ideas!
Linen is a nice material for those. But indeed, paper varieties can be used, too. At least if you want to jazz up the table without making it too fancy, they work really well. Have fun with the different shapes 🙂
These folded napkins are so beautiful, and lucky for me, easy to create. I have to admit that I’m not the craftiest person, but the instructions and pictures are easy to follow and very detailed. Since I love trivia, I also enjoyed reading about the history of napkins and some of the old customs. I’m looking forward to trying my hand at napkin folding the next time I have friends over for dinner. Thanks for sharing.
Great, thank you for reading the article. I wish you luck the next time you’re trying out one of the techniques. I’m sure it’ll work and you can surprise your friends with a beautiful setting 🙂
I agree with you, sometimes a little detail such as a good looking napkin can definitely be a game changer when it comes to how people are going to perceive the party that you’re throwing and at the end of the day, how they perceive you in general. I think that this is definitely a form of art, you need to practice a lot and they end up looking just right for almost every occasion. All of the designs were lovely, but definitely my favorite one was the lotus flower and the fan one, I will try them in the next family reunion.
Thanks for sharing!
The fan is the first one I learned how to do, when I worked in a “fancy” restaurant. It’s simple, but you can make it look even nicer at home by pressing the folds. We obviously didn’t have the time for that at work.
The lily one is pretty quick and easy as well. Actually, none of them are really hard after a little practice, but they make a huge difference. Such a nice added touch for taking just a little extra time.
Right, when pressing the folds it will stay stronger. When one has got the time, this can be helpful. I can imagine that there’s no time in restaurants for that. This experience must have given you lots of practice with folding, right? 😉
I also think that none of them is unbelievably complicated once you’re familiar with it. And after a while, it makes quite some fun 🙂
I did find it fun, actually. Still do. I was just thinking on this, and it gave me an idea.
I frequently have left over paper ones from parties and get togethers. I don’t want to waste them, but putting out Happy Birthday on Easter or whatever just … won’t work. So, I was thinking, I could make some of these pretty folds and use the finished products as decorations (as long as the themes don’t really show). Maybe double up a couple of different prints to create a design.
That’s a great idea, most of the techniques make it possible to cover seasonal or themed prints. I also like the tip to combine some for a complete new style. I’m sure this will work pretty well 🙂
Thanks for the input – I also have some single paper ones left in my drawer that live a lonely life, but are well-suited for making nice and new designs!
Thanks, I agree with you. And once you’re familiar with one of the techniques, it will be a lot easier and quicker to prepare them. The lotus is one of my favorites, too. I love to arrange it with little accesoires that fit the theme of the dinner, or use patterned varieties – that looks great, too! Hope you have fun making some of those 🙂
They all look so beautiful and your illustrations of how to fold those styles are very clear and easy to follow. You put me to shame – I use torn-off squares of kitchen roll when it’s just family and paper serviettes in a square as they come out of the packet when we have guests.
Thank you, I’m glad you like the illustrations. But, you know, depending on the occasion, I do it the same way 😉 Nowadays, the paper ones come in good quality and wonderful designs and pictures on it, so there’s sometimes no need to fold them in special ways 🙂
My sister knows to do fold napkins and I’m always pleasantly surprised when I come to her house, she has a knack for art. I love the lotus flower, it’s pretty simple to make actually! The French Lily is a napkin fold I would use for glasses.
Great idea with the glass. I think the lily is indeed a nice choice for this.
I also like to use single flowers and put them into it. It’s not only the napkin itself, you can combine it with additional accessoires, that’s nice.
I hope you can surprise your sister with a stylish design on your own now 🙂
This is extremely useful. You mention that this great for fancy dinner parties, but I honestly fine the details just as important for more casual gatherings. Decorations and themes go a long way to making a party more impressive. These folds would work well even with novelty napkins for Halloween or Christmas parties. Gonna try them for my next get together.
Right, for more casual occasions I like to use paper varieties. Most of the techniques work with them, too, and the paper ones are available in so many colors and topics – like you note e.g. Halloween – that it makes fun picking models that fit the theme of a party. 🙂
Wow! thanks for the lesson, I’m gonna try making it myself. Wish me luck!
Sure, good luck! I hope you enjoy the various ideas – and feel free to let us know how it turned out!
I have always wanted to learn to do this! I tried once and they looked awful so I gave up. However, the instructions here I think are more in-depth and hopefully I can do it. These make the napkins look beautiful and it may be outdated, but I think it really can make the difference. During a nice dinner party you can bring out your nice dishes, wonderful meal, and silverware, but I think the folded beautiful napkins really gives it that extra oomph.
I totally agree with you 🙂 It adds something special – especially because I have the impression this has become rare. I hope you can work with the instructions and you have fun trying out the different styles!
So, I have been practicing them all day but at least now I can say that I know have to make them easily ! It is absolutely great for the family dinner we are planning next week! I”m sure everyone’s gonna love them and I will try to teach it to my kids as well. They really enjoy crafts and DIY in general! Moreover, they can draw on them and let their imagination free!
Thanks – great article and accurate step-by-step tutorial!!!
These napkin formations are so cute! I love hosting dinner parties and these would definitely make the whole dinner more elevated and put together. Some of those folds seem a little difficult, but I will start with the easier ones and eventually work my way to the ones with more steps. I would love to try the folds on colorful napkins instead of white ones.
Thanks. Using colored types is definitely a great idea, especially when the colors of the cloth match the rest of the decoration. You can create some amazing looks with those. I wish you success with the techniques, I’m sure it will work out and you can surprise your guests 🙂
I know how to do origami and I’ve always wanted to learn napkin folding. However, whenever I try it (by myself, just for the sake of trying), I always fail. I’d love to try the techniques thought here~
I’m pretty sure that you’ll be able to create some nice foldings when you already know origami 🙂 (By the way, this is something I’ve ever wanted to do, but failed quite often).
Just work your way through the simple ones, and – with a bit of patience – you will hold a beautifully folded piece of cloth in your hands 😉
Ahahaha, we’re opposites then 😛 I find origami easier because papers don’t unfold as easily as napkins. I tried one of the techniques here (the fan) and I could say it was easy to follow and my output looks quite well 🙂 Thanks for the techniques~ I’ll practice napkin folding when I have the time~
I really wish I had the patience to give this a go but I just know I don’t have. It is such a beautiful thing, though, and makes the table look wonderful.
Don’t give up 🙂 The sail, for example, is really quick and easy to prepare, but still looks awesome on the table. It has not more than 3 actual steps. And once you’ve acquired a taste for folding, it will be done in an instant. Have fun!
Small touches like this really add to the class and table presentation of dinner parties, banquets, and other events like bridal or baby showers. I really think these directions were easy to follow, but you do get better with a little practice.
Exactly, and as you note, there are so many occasions for which one can make use of these. Especially if you can find napkins with special patterns or prints that fit to the theme of the party or the colors. It really makes fun trying out different things!
And you’re right about the practice, I have made the experience that this is also helpful to relax! don’t know why but sitting at the table and following the steps has some calming effect on me 😉
Thank you for the great post! I have always wanted to learn how to do this. Whenever I go to a restaurant, they always have the napkins folded different ways and I think it is amazing. Thank you!
Whilst I always loved the added touch of folded napkins, I’ve always imagined it as something overly complicated and time consuming. Due to this, ours are always presented with a napkin ring
The techniques you’re sharing seem very straight forward though, and I will try them out with the kids for our Sunday table!
Thanks for sharing!
I like using rings, too. They come in so many different styles, and sometimes it’s just less effort – especially for a larger number of guests. I think they can look fancy as well. But it’s nice for a change to make some of these designs, I hope they will be a success when you try some of these out. Have fun 🙂
Thank you for this great article Nina – the cloth napkin definitely needs to make a comeback, not just for the sake of hosting a classy dinner, but also because the use of disposable serviettes is simply needlessly wasteful! Another great little project if you really can’t get the techniques right is to make napkin rings with the kids – all you need are some old toilet roll cores and a bit of paint and imagination!
I”m quite sure anyone who has ever had people over to their house for dinner can tell you just how grateful they are for this article. I know I am! I didn’t know that napkin folding was so easy. I always thought that it would take months to learn and never bothered. Thanks for this post. Really amazing stuff.
It’s so nice to see some clear directions on how to do this. I like having a pretty table and I’ve wondered how to get serviettes into such pretty shapes. Now I know. I will have to reference this next time we have a dinner party. I like how it’s actually quite simple to make your table so pretty!
I have been frustrated trying to find a cloth napkin that is square and stays close to a square after being washed. Have you found a company that you like for purchasing your napkins I would appreciate any information or fabric that you find to be best for staying folded and looking in presentation.