
Chicken. The bird that feeds the world. And turkey ain’t too far behind.
Still, for poultry’s low cost and ability to be adapted to so many regional styles of food and recipes, folks sometimes struggle with keeping it moist and tender.
And keeping the meat moist WHILE getting a crispy skin? Forget about it!
There is an answer, folks. And that answer is dry brining.
What Is Dry Brining, You Ask?
It’s a pretty simple concept. It involves coating the exterior of chicken, turkey, or any other meat with salt.
Some folks will add spices at this time, but that’s a mistake. That is a dry rub and should be completed AFTER the brining process.
But I digress.
There are two types of brines – wet and dry. Most folks are more familiar with the wet variety. That is, soaking your bird in salt water.
But that’s a mistake for several reasons.
First, a wet brine involves lots of water, lots of salt, blood, mess, and a tub sitting in your refrigerator.
But more importantly, it adds water to the meat.
But shouldn’t water make the fowl juicier?
Nope.
The “juice” is a little bit of water but it is mostly the fats, lipids, and oils of the bird.
Your mission, if you choose to accept, is to contain those fats, lipids, and oils. Lock them in so that they can’t escape.
And in doing so, you’ll gain a super crispy skin in the process. Moisture is not a friend of caramelization or browning (aka the Maillard Reaction).
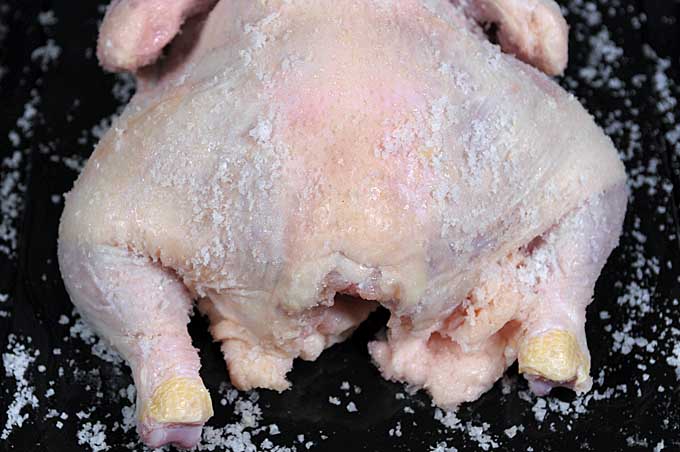
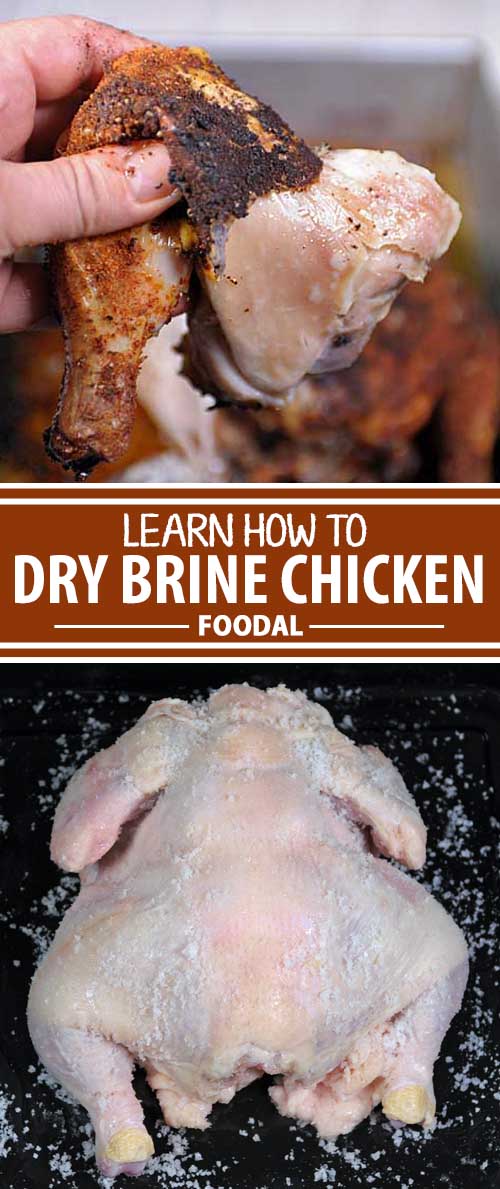
The salt that is used to cover our uncooked chicken pulls water from the skin, which means a drier surface that becomes nice and crispy much more quickly when the cooking process begins – trapping the remaining moisture where it belongs: in the meat.
But there is another step that can take this process to a whole new level.
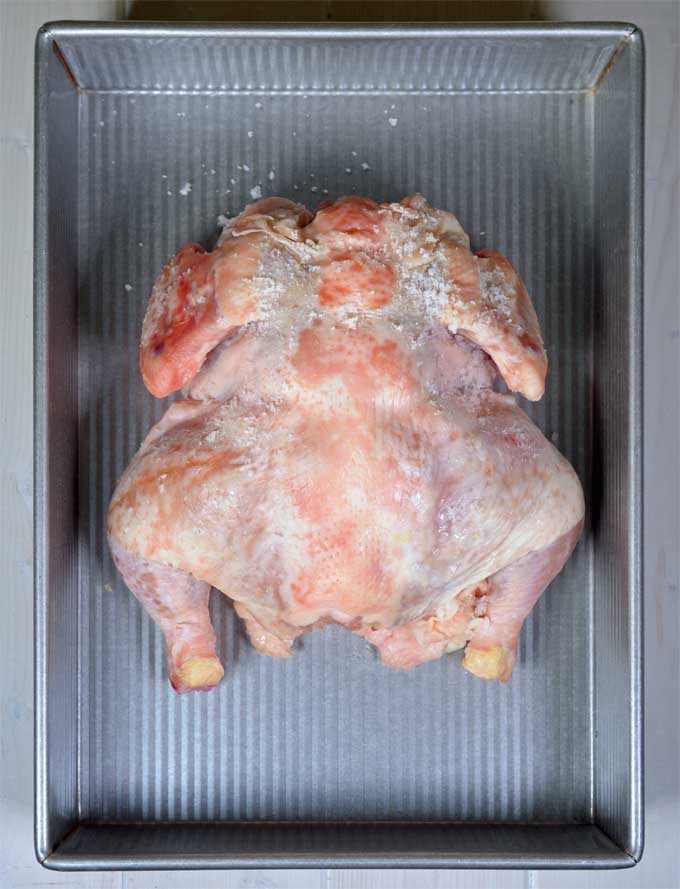
After dry brining, stick your bird in the refrigerator for a couple of hours, perhaps as many as 24, depending on how much time you have.
The cold, dry environment will work to wick out the remaining moisture from the skin – leaving your bird looking like it spent too much time on the slopes in Aspen.
This, my friend, is a good, good thing.
Your bird is now sealed up like Otzi the Iceman. Bada bing, bada boom.
Don’t go over 24 hours, though – after that, you risk drying out the fat layer under the skin. We don’t want the dryness to penetrate the meat and draw moisture out of the interior.
And don’t be afraid to use lots of coarse salt. Over-salting is pretty dang hard to do when it comes to brining. When in doubt, add more.
Take a look at the steps below, try it out, and I guarantee that you will not prepare your fowl any other way in the future.
You have been reborn into the world of dry brining.
How to Dry Brine a Chicken or Turkey
This is a quick and easy process, but the wait time can vary between 2 and 24 hours. So, it’s not necessarily made for a “rush dinner onto the table” night, unless you’ve planned ahead.
Step 1 – Mop Up any Liquids
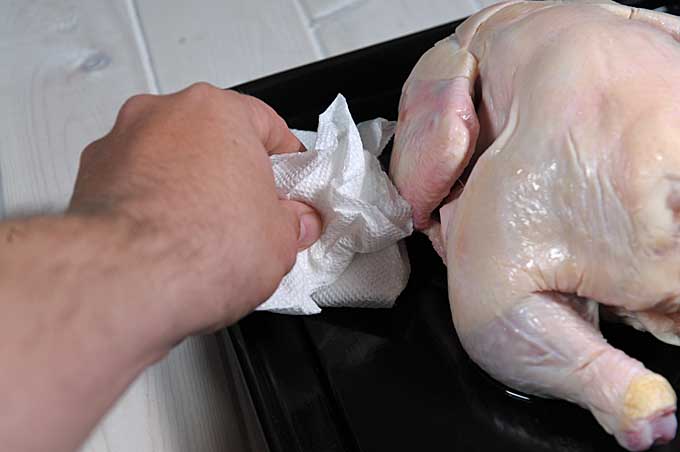
Gently rinse your bird over a sink and allow the bulk of the water to drain off. Place it in a shallow pan and use a paper towel to mop up any loose liquids.
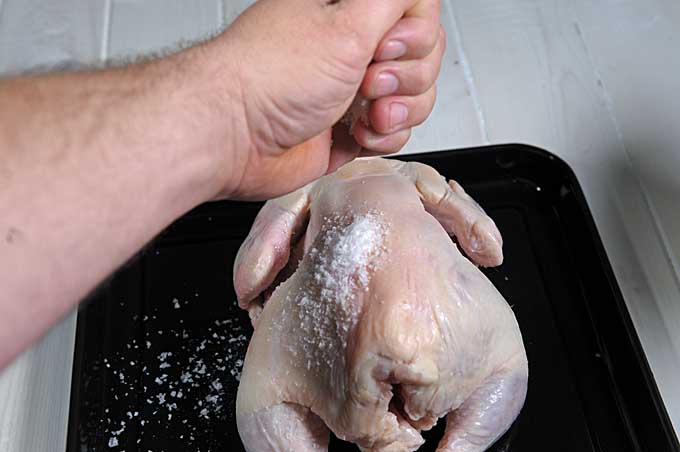
Step 2 – Apply the Salt
Apply a copious amount of coarse salt to the skin, ensuring that you cover all cracks and crevices.
I generally like a medium grit sea salt but kosher or any other kind of natural, processed, or flavored salt will work. Regular table salt, on the other hand, has smaller grains and should be used more sparingly. It isn’t ideal for this process.
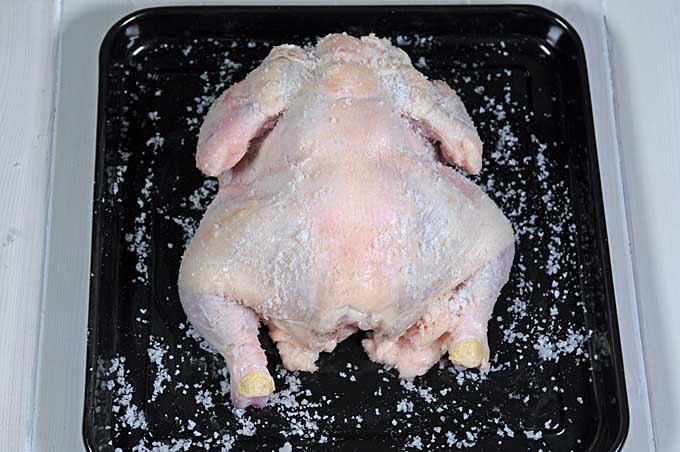
Work the salt into the skin and when in doubt, add more. Don’t be afraid.
Step 3 – Chill in the Refrigerator
Place the bird in the fridge UNCOVERED and allow it to remain in the chilly, dry atmosphere for a minimum of 2 hours. Up to 24 is better.
Why?
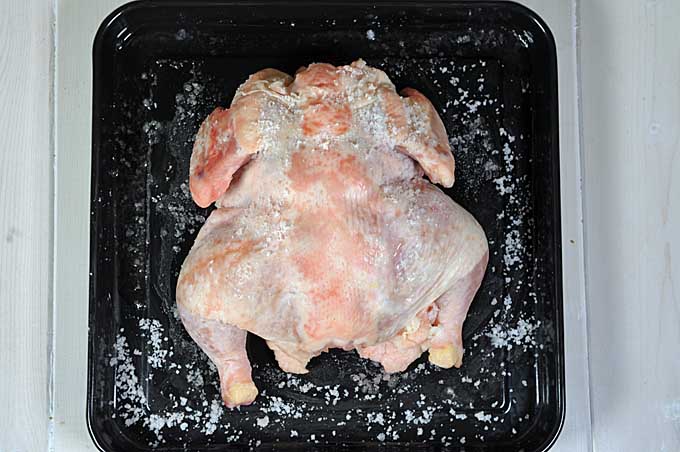
Contrary to the more popular notions of basting and marinades, you WANT a dry skin. This hardened skin actually traps the moisture inside, and it also makes for the most crunchy and delicious skin imaginable no matter if you roast it, grill it, or smoke it.
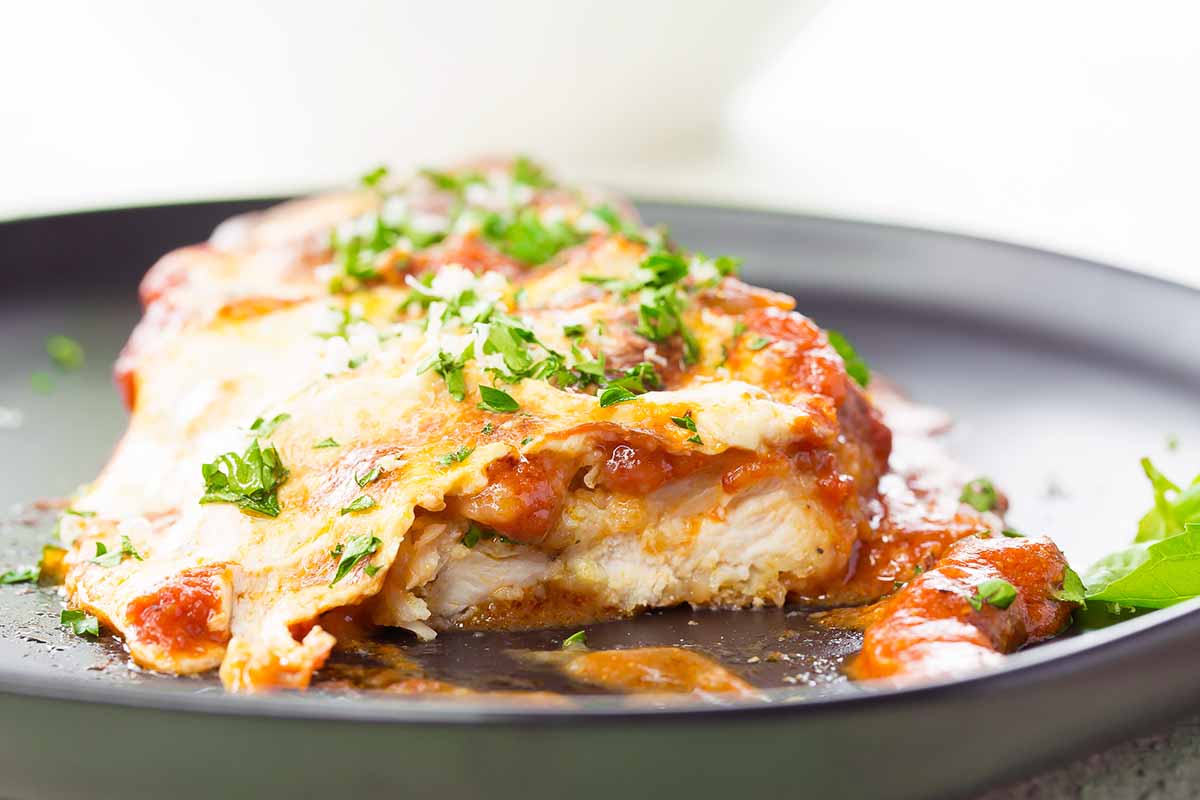
Step 4 – Add a Dry Rub (Optional)
Your final step, right before cooking, is to add a dry rub. Now, this is optional. You can use a paste like barbecue sauce, wet mustard, or some other form of sauce.
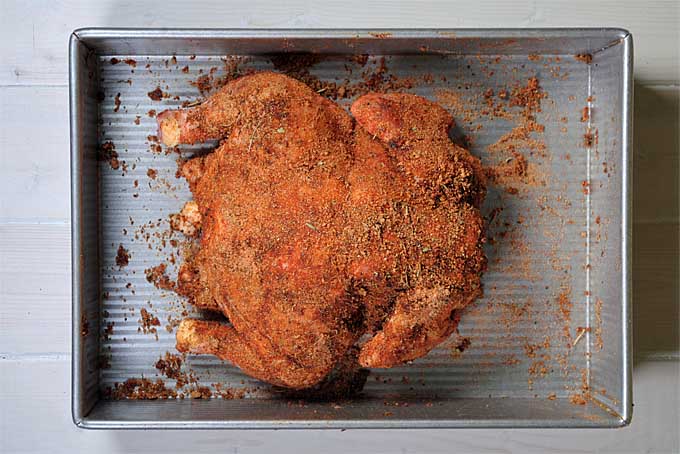
But I guarantee that you’ll find a dry rub a much better fit – a brine and a rub together is a match made in heaven!
Get my all-purpose chicken dry rub recipe now.
Step 5 – Cook It!
Roast it, throw it on the grill, smoke it, beer can it, spatchcock it, rotisserie it. However you cook it, I guarantee the insides will be the juiciest bird that you’ve ever tasted and you’ll have a lovely crusty outer skin.
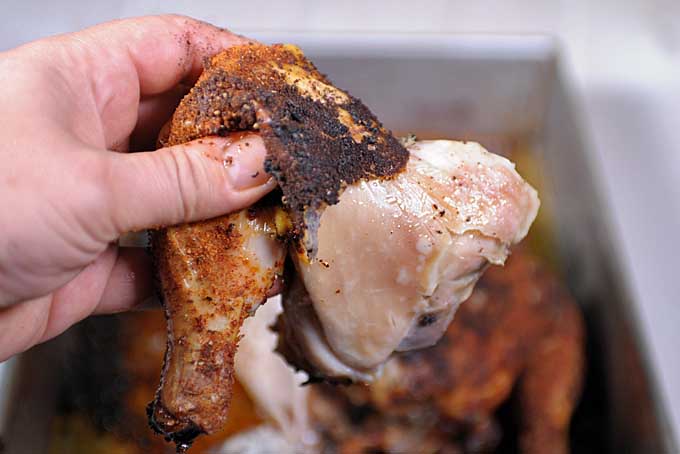
Just don’t serve it to friends, neighbors, or relatives unless you want to be the nominated cook for every holiday and event.
What about you? Do you have any poultry dry brining tips and techniques that you’d like to share with the community? Let us know in the comments below.
And don’t forget to check out all of our chicken and poultry recipes and protein preparation and cooking advice!
Don’t forget to Pin It!
Photos by Mike Quinn, © Foodal / Ask the Experts, LLC. ALL RIGHTS RESERVED. See our TOS for more details.
About Mike Quinn
Mike Quinn spent 20 years in the US Army and traveled extensively all over the world. As part of his military service, Mike sampled coffee and tea from all virtually every geographic region, from the beans from the plantation of an El Salvadorian Army Colonel to "Chi" in Iraq to Turkish Coffee in the Turkish Embassy in Kabul, Afghanistan. He spent nearly a decade in the Republic of Korea where he was exposed to all forms of traditional teas. Mike formerly owned and operated Cup And Brew, an online espresso and coffee equipment retail operation.


I like to try different ways to cook. My question is, with all the salt in your dry brine, does it not leave the chicken salty??? Or do you rinse the salt off???
Hi Dwayne, you don’t need to wash the salt off if you are using a salt-free dry rub.
I read that you leave the salt. This is ridiculous. I thought I’d rinse but also read not to. Also ridiculous. I dry brined a beautiful chicken, brushed off the salt and roasted. It was so salty I wanted to scream. My advice is dry brine, rinse, pat dry and season, then roast. If you have time, chill in the fridge after you RINSE off the salt. I am trying to help here but people who just repost bad advice without trying the recipe gets my dang shorts in a giant twist till next Tuesday.
No way. Follow the directions… it works.
Prior to adding dry rub, do you brush the salt off the bird? Most dry rubs contain lots of salt so wouldn’t this make for a very salty bird? Would this work on a duck?
If you are using a commercial dry rub, you’d either want to find one with no salt or brush some of the extra salt away. That’s why we recommend making your own dry rubs. Like this one: https://foodal.com/recipes/poultry/dry-rub-for-chicken/
That one would work perfectly well for duck (and turkey).
I didn’t see anywhere if the cavity of the bird is salted as well?
Hi Rick, no, there’s no need to salt the inside of the cavity. Enough will penetrate from the outside. We’re looking to dry the skin and protect the lipids underneath the skin, and basically make a barrier against evaporation of the remaining water (and oils) on the inside.
Did you roast this bird breast down, and can I still cook my stuffing in the pan with the bird if I brine it and use a dry rub?
I just ate (well tried to) the saltiest chicken of my life after reading this article. Had to toss it or it was going to kill me and my family.
“When in doubt add more salt” not the best advice I have ever read.
Thanks for your feedback Phil, and sorry you weren’t able to enjoy the chicken. Any chance you purchased poultry that was already injected with salt? This is common with Kosher or frozen meat. How much salt did you use, was it Kosher or table salt, and was it the skin or the meat itself that was oversalted? We’ll review the recipe, and try to get the bottom of why you might have had these disappointing results.
Hi Phil… just wondering how long you left it in the refrigerator before you made your chicken. I’ve used this technique many times and what I’ve learned is a MINIMUM of six hours (I usually go eight) is needed AND you salt the skin only. I never use table salt… kosher sea salt only. I tried it one time on boneless, skinless chicken breasts and it didn’t work well. Also, I’ve used this technique for dry brining chicken thighs, legs and breast (with skin on) pieces and it always turns out well whether I’ve roasted them in the oven, smoked them, air fried them, or pan fried them.
I had the same experience. It was inedible. I used a plain young chicken with no sodium injected by the manufacturer. The skin was crispy and it looked delicious, but it was so sad to look at that brown, crispy chicken and then bite into the salt bomb.
Also, I used Kosher salt and both the skin and meat were overly salty, though the skin far worse than the meat.
Usually a really salty final product is the result of using too fine a grain of salt, or salt that has been iodized. Even if it’s ‘kosher,’ salt shaker granules are far too fine. The larger crystals dry out the skin over time, while table grind salt changes the chemistry too much. (No judgment here, I learned this by tossing out a chicken or two in my time).
Learning how to dry brine has been life-altering. Best chicken I ever made in my life.
P.S. Pat chicken dry before brining, pat chicken dry before cooking. I have not experienced meat too salty to eat from dry brining.
My husband and son won’t eat the skin because they don’t like it “squishy”. I am very excited to try this and am hoping they will love it. I was wondering if I could use a butter rub with herbs mixed in or will it cancel out the effect of the dry brine?
Hi Sheena,
Yes, you could certainly rub the poultry with herb butter before cooking rather than applying a dry rub. Our best advice is to remember never to use a Kosher or sodium-injected bird if you plan to brine it. Let us know how yours turns out!
Do you have to turn the bird over during the brining process, so that both sides dry out?
Nope, there’s really no need but you can place a rack inside the pan if you like.
That much salt didn’t make chicken skin salty and bitter?
Can you oil fry a dry brine chicken or turkey?
Can you wash off salt after brining in order to rub with olive oil and pepper before cooking, and if so should I add some salt before cooking? Thanks and Happy Thanksgiving.
Sandy, I wouldn’t wash it off. The whole idea is to remove the water. You cold brush the dryer parts with a very light coat of olive oil to help pepper or a saltless rub to stick.
Also, if you are doing a turkey, you might want to go a little lighter on the dry brine. I’ve found it’s harder and harder to find a turkey that doesn’t already have a liquid brine injected from the processing plant. You might want to check yours.
I too ended up with an unbearably salty chicken. And no, it wasn’t sodium injected or anything like that. I used kosher salt. The meat itself ended up veeeeery salty I’m not sure what I did wrong
Amazing! My husband always runs the smoker, but I thought I would try my hand at it. The chicken turned out amazing. The skin was a little weird tasting, but the meat was delicious! Trying again today with a different dry rub. I use my home grown birds so I know where they have been and eaten!
Thank you!
This is the most disgusting chicken I’ve ever eaten. You should be banned from posting your recipes on the internet. ????????
Any chance you used regular table salt for your brine, John? Large crystal, coarse salt is always recommended for dry brining, whereas it is possible to over salt if you’re using something with a smaller crystal structure. Stick with coarse kosher salt or something of that nature for this recipe. A general rule of thumb to keep in mind is 1 teaspoon of kosher salt per pound of poultry. We hope you’ll give the recipe another try! The article has been updated to provide a little more detail on the salt that is recommended.
I stick to my wet brine, never let me down but I’m not trying to convince people what method is better. Everybody should try and decide what they like best.
I am trying to dry brine two duck legs. These instructions do not mention duck. Torn because amount of salt is so varied with all of the recipes and instructions I’ve read. Some get as specific as 1/2 tsp per pound up to a tablespoon per pound. Some are pretty general. The pictures here show a liberal use of salt and I understand not to bury your goods! Just the skin and using a larger-grind sea or kosher salt are the two pervasive rules. Adding spices is another common choice. I’m leaning toward not necessarily measuring the salt for my duck legs. Any advice? Thanks millions!
Thanks for your message, Esther! How big are your duck legs? 1/2 teaspoon per pound is a general rule of thumb that I’ve used in the past with good results, and like you said- always be sure to use coarse salt for dry brining.
Good luck!
I always dry brine my chicken and turkey and the meat is always extremely tender and delicious, but my rule of thumb is ….. less is more.
I just get a small handful of sea salt crystals, unground, and pat then over the bird until it’s covered.
5 to 6 hours in the fridge is enough, I find.
I have shared this post with so many friends and acquaintances.
I also use it with wing, leg quarters and skin on chicken breasts.
Just a note… I would not use this method on skinless, boneless chicken breasts or thighs.