The cake is baked, and the frosting is whipped to perfection. It’s time to start decorating now, right?

Whoa, Betty Crocker! Slow down for a sec.
Before diving right into your bowl of frosting, it’s crucial to prepare everything that you’ll need.
And… well… actually learn how to decorate.
Get ready for the ultimate crash course: Basic Cake Decorating 101!
We’ve outlined everything you will need to have the most successful day of decorating.
In addition to listing all of the ingredients you’ll need to gather, we provide expert advice on the important tools and correct cake prep.
Better yet – we’ve included a 10-step basic decorating tutorial with photos that will coach you through each stage of the process.
There’s a lot that goes into decorating, long before the frosting goes anywhere near your dessert.
Let’s go over the main ingredients you will need first. It seems obvious, I know. But you may find yourself forgetting a thing or two!
Round Up Those Ingredients
First, you need to decide what delicious dessert items you will be using to create your edible tower.
There are four main components to consider:
The cake, the frosting, the filling, and the decorations.
Cake: The Star of the Show
This is the main item of your dish, your prima donna. There are a wide variety of options for you to choose from, all depending on personal considerations like taste preference, dietary restrictions, and color combinations.
If you are looking to build from classic flavors, try our basic recipes – like chocolate cake or vanilla butter cake.
These flavors actually combine well, so you can even layer one of each.
Frosting: Ice, Ice, Baby!
Ah, my favorite part – the frosting!
As a kid, I used to lick it right off a cupcake and throw the rest away. Though my picky palate has since matured, I still consider frosting to be of great importance.
And you should, too!
It’s not only a delicious component of any treat, it is also responsible for maintaining the freshness of desserts.
Because it completely envelops a cake, it creates a barrier that limits air exposure, therefore preserving moisture and extending the keeping quality.
The terms “icing” and “frosting” can be used interchangeably. Whatever you want to call it, you have plenty of options to choose.
Buttercreams, glazes, whipped cream, and more – you can customize your sweet coating in many different ways.
If you’re like me and adore frosting, we have a selection of homemade recipes that you should definitely try:
- American-Style Buttercream
- Swiss Meringue Buttercream
- Chocolate Ganache Glaze
- Cocoa Fudge Frosting
- Paleo Coconut Whipped Cream
- Super Easy Spiced Glaze
For the buttercreams, you can choose to use the original recipes, which are both flavored with vanilla extract. If you want to add any food coloring to personalize your treat, it is best to work with one of the vanilla buttercreams as a neutral base to get the brightest colors.
If you want another flavor instead of vanilla, you can opt for one of the suggested variations to create a variety of flavors like chocolate, citrus, and much more.
It’s all up to you, chef.
Filling: Fill ‘Er Up!
While you can stay simple by using your frosting as the filler between the layers, consider other options for a fun combination of flavors and textures.
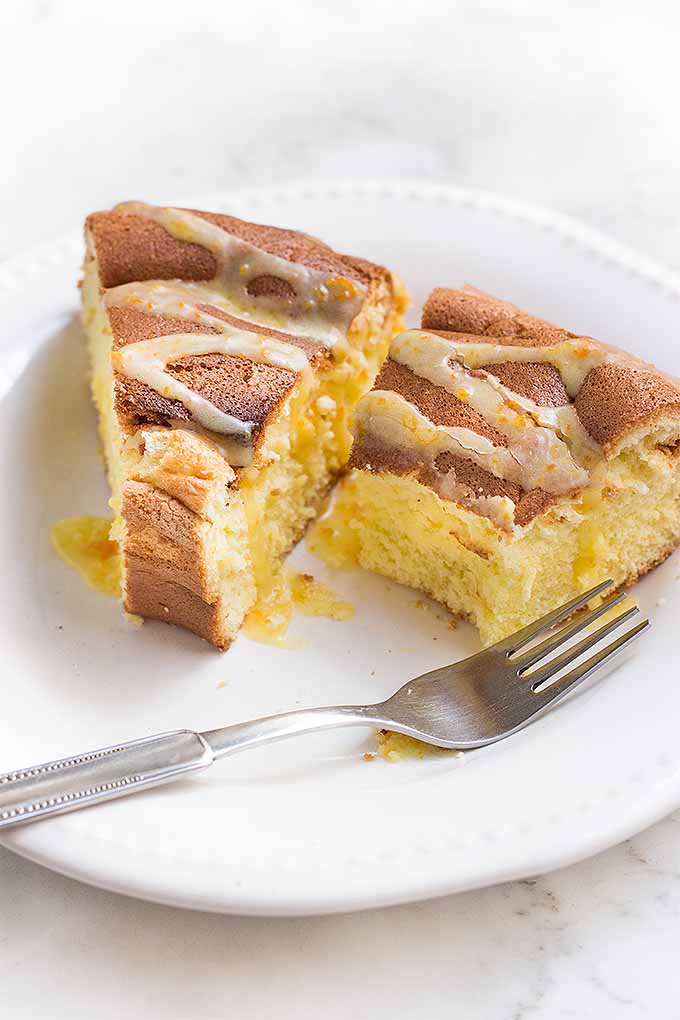
Lemon curd is a great filling in between layers, for a touch of flavorful brightness, bitterness, and tang. Also consider using jams and jellies in the center for a sweet, fruity filling.
Chocolate ganache is rich and decadent. For just a hint of indulgence, you can use cooled ganache as a filling, and decorate the rest with a buttercream frosting.
If using more liquidy fillings like jams and curds, I recommend piping a small border of frosting around the edge of the cake first – this creates a barrier to prevent the filling from oozing out, keeping the outer appearance of the dessert looking clean and neat.
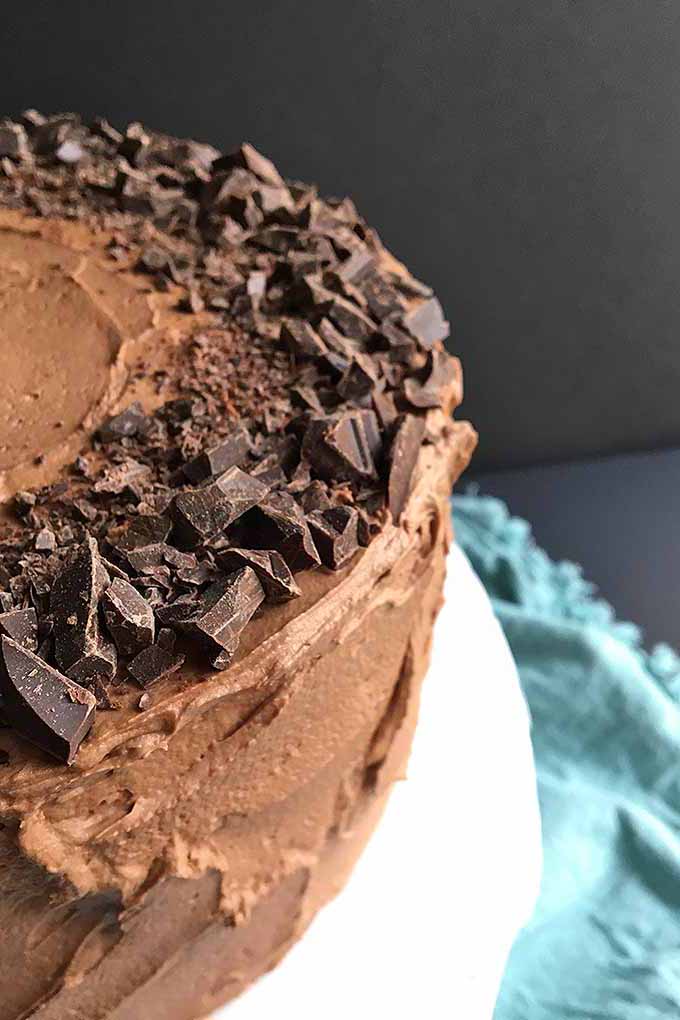
Decorations: The Finishing Touches
The cherry on top, so to speak, is what you want for the finishing touches.
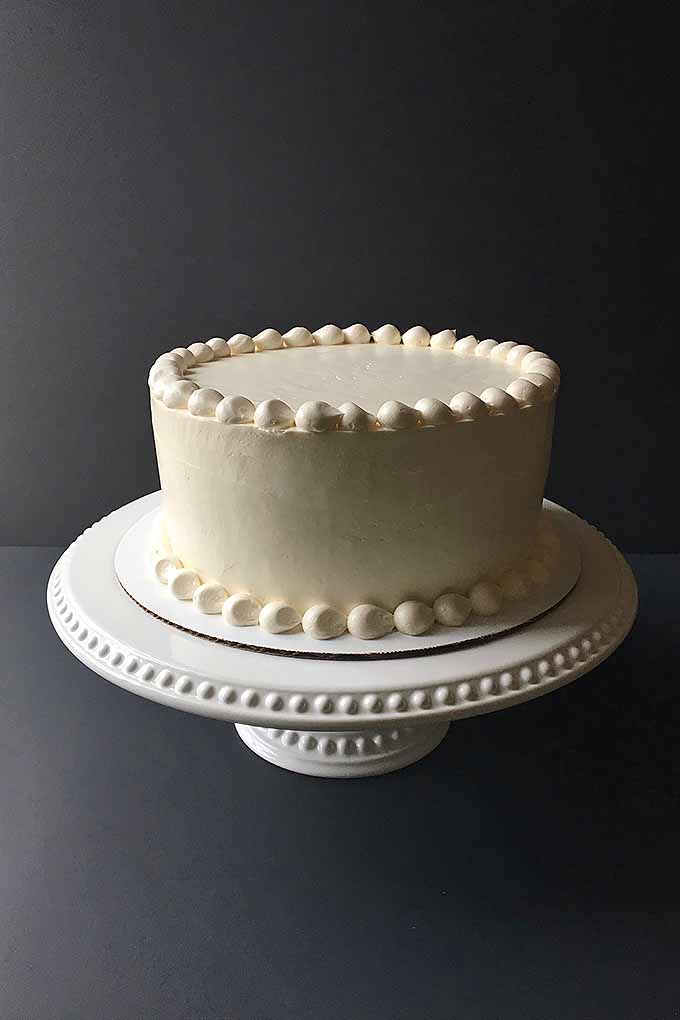
Want to stay modern and minimal? You can make a sleek statement by displaying your dessert with only the frosting, and no extra decorations or borders.
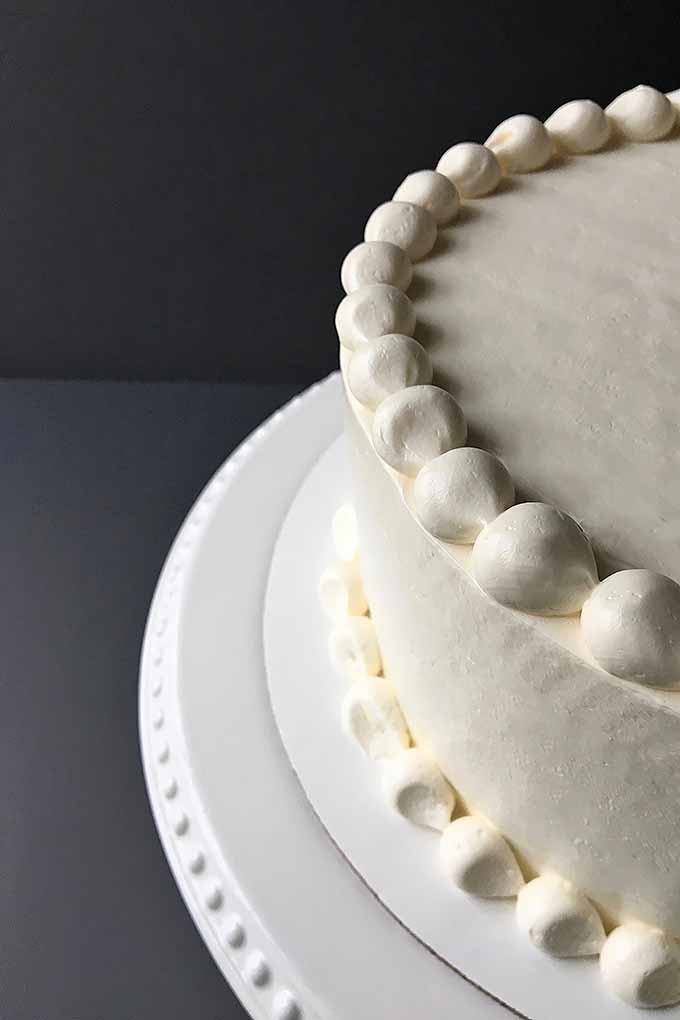
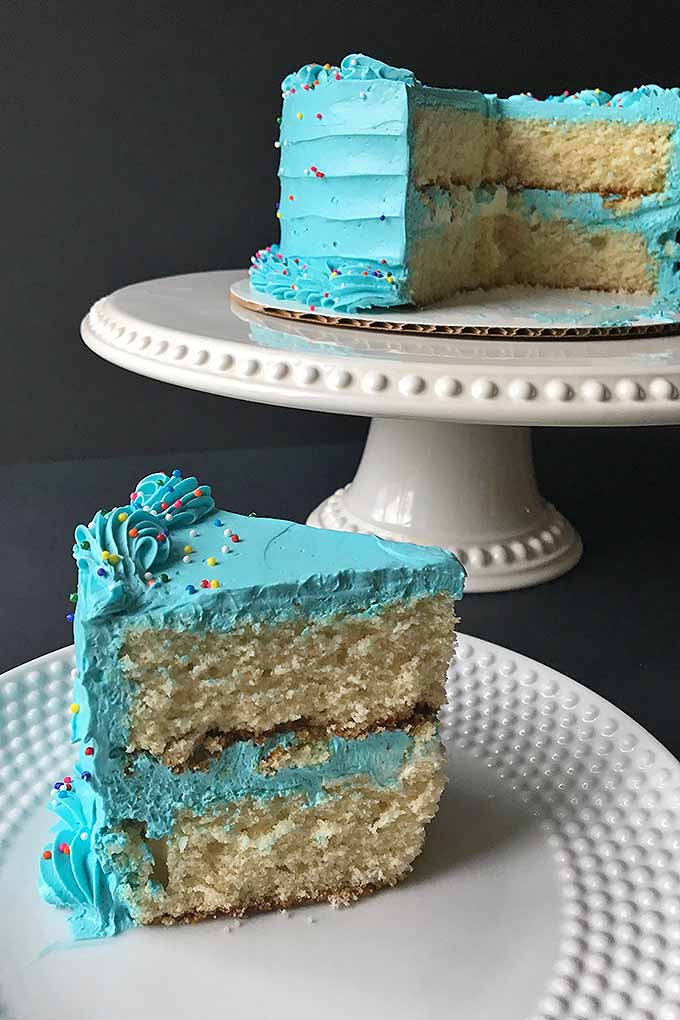
Top and bottom borders create a more complete presentation. Take a look at Restaurant Eve’s Birthday Cake for inspiration! We’ll go over the ins and outs of piping borders in more detail in the tutorial below.
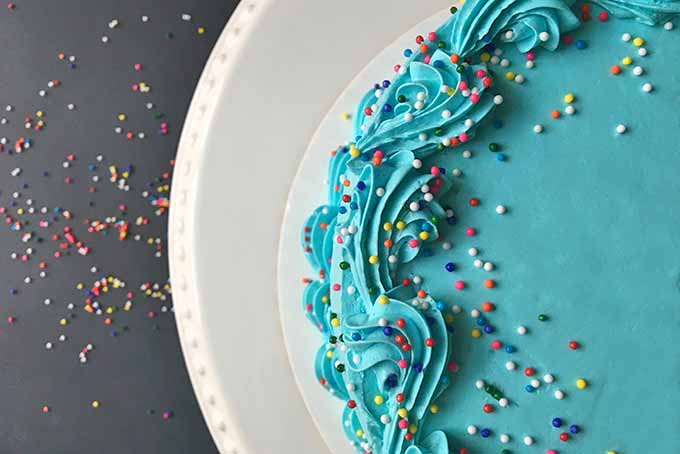
Rainbow sprinkles or chocolate jimmies are classics that will never get old.
You can even make your own homemade sprinkles with royal icing by using a decorating technique called the transfer method – you pipe small dots or lines with the royal icing on parchment paper and let them dry until hardened.
Play around with this transfer method by piping different designs with royal icing, like piping rosettes if you want decorations that are feminine and delicate.
But if you want some extra pizazz, use garnishes that complement or enhance the flavors of your finished dessert.
For example, fresh fruit on top gives the dessert an extra pop of color, and balances the richness from the icing. Use chopped chocolate to highlight the chocolaty decadence of a chocolate cake with chocolate buttercream and ganache. Or top your vanilla confection, Black Forest, or Chocolate Mole Cake with homemade maraschino cherries.
For the spring and summer, use candied flowers as a dainty, elegant garnish.
Get Ahead with the Proper Tools
A cake is only as good as the tools used to make it! Read our list of tools that you will need to have on hand. We explain some of these items in more detail in a separate review.
These include:
- Turntable
- Cake board
- Offset spatula or metal bench scraper
- Spatulas
- Serrated bread knife or cake leveler
- Piping bags and tips
- Extra bowls
- Washcloths or paper towels
Now that you’re equipped with all the right tools, let’s move on to how your cakes need to be prepped before decorating!
Prepping Your Cake
Now that you have all of your tools and ingredients ready to go, it’s time to focus on prepping your baked bases for decorating.
Keep reading below – we share all of the details that you should keep in mind.
Cool Completely
It really is tempting to decorate as soon as your baked items come out of the oven.
Here’s my advice:
Don’t do it.
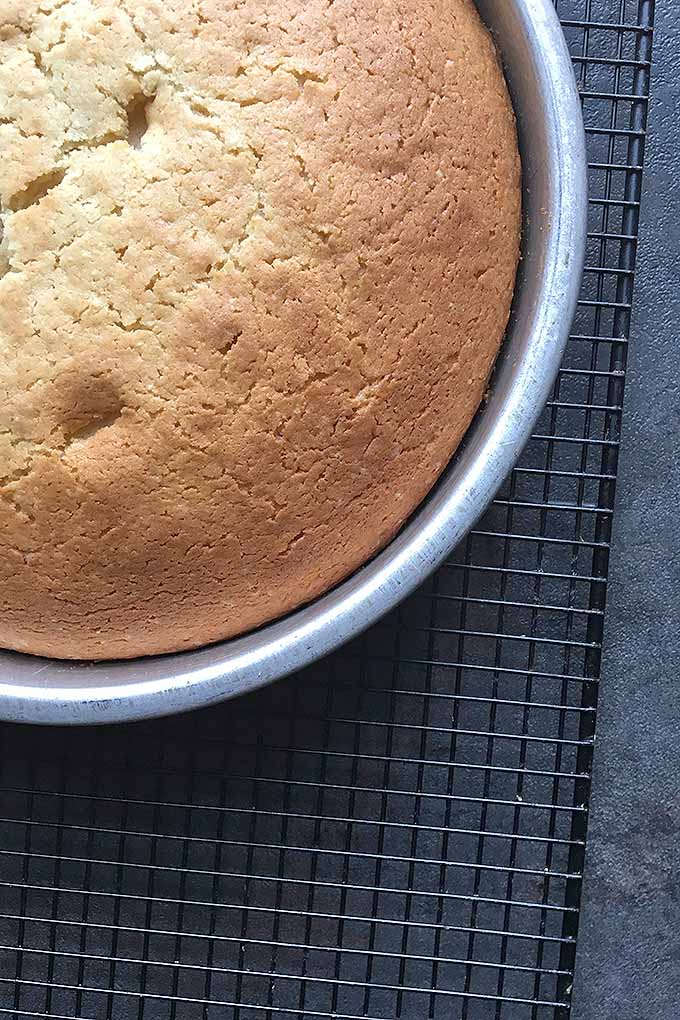
You must wait for cakes to be completely cool before you start decorating. This is because the final texture and crumb are still developing as they cool.
More importantly, your baked items must release all of their heat before you apply any toppings.
After all, frosting is a mixture of butter and sugar – two ingredients that melt very easily.
When applied to a hot dessert, the icing that you put all of that hard work into making will melt. Everywhere.
Avoid a hot, gloopy, melting mess by waiting for your cakes to cool completely.
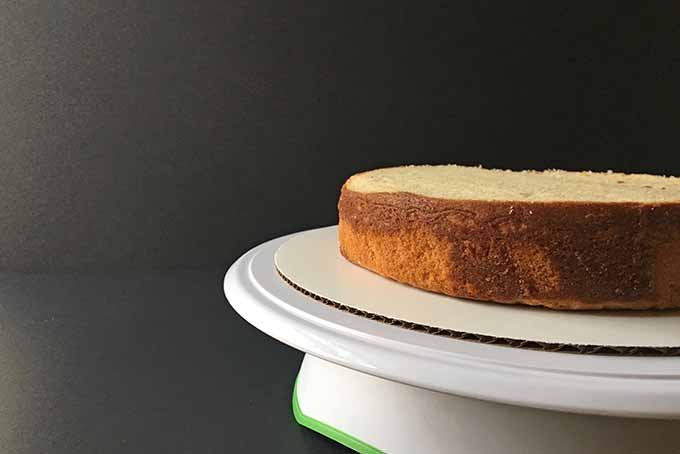
Cut the Top for a Flat Surface
In order to end up with a finished dessert that has perfectly even and angled edges, there is one essential step to take, well before you frost your dessert:
Take a look at your cake rounds. If the tops are curved with a little hump or mound, it is absolutely necessary to cut off the tops.
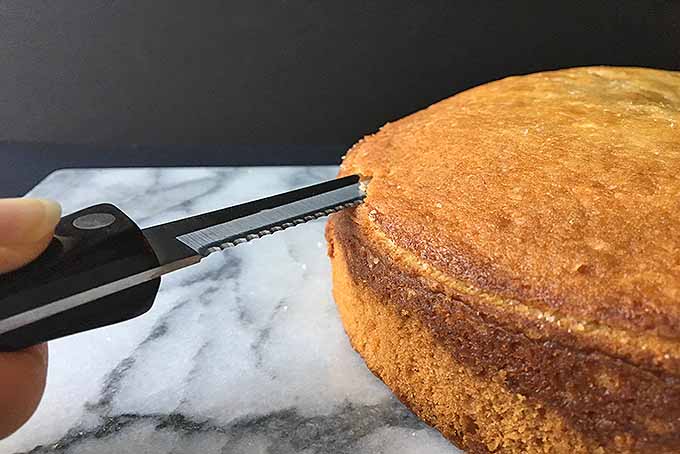
I may have failed shop class in middle school, but I do understand that it is much easier to build off of a flat structure than one that is rounded.
From a visual standpoint, your finished product will look cleaner, neater, and more professionally designed with all of those gorgeous right angles!
To achieve this perfect pastry plateau, use a serrated knife or cake leveler and carefully saw the rounded portion off of the top to make a flat surface.
Go at a slow pace – especially if you are using a serrated knife – to ensure that you are a cutting an even line across the entire round.
After gently brushing off any crumbs, your layers are ready for decorating!
10-Step Decorating Tutorial Time!
We’ve laid the foundation. Now, let’s work on building our edible tower, step by step. Or, rather, layer by layer…
We will explain each step of decorating a basic 2-layer cake with classic, smooth sides and a bottom and top piped borders, so you can easily follow along.
Step 1 – Prep the Turntable
Make sure the turntable spins smoothly. You may need to adjust. Read below for typical troubleshooting with both metal and plastic turntables.
With metal turntables, spraying WD-40 or greasing with oil where the top wheel attaches to the bottom stationary base tends to help loosen the wheel, and help it rotate more smoothly.
For plastic turntables, they often have a lock switch that many people (including myself) forget to unlock before decorating.
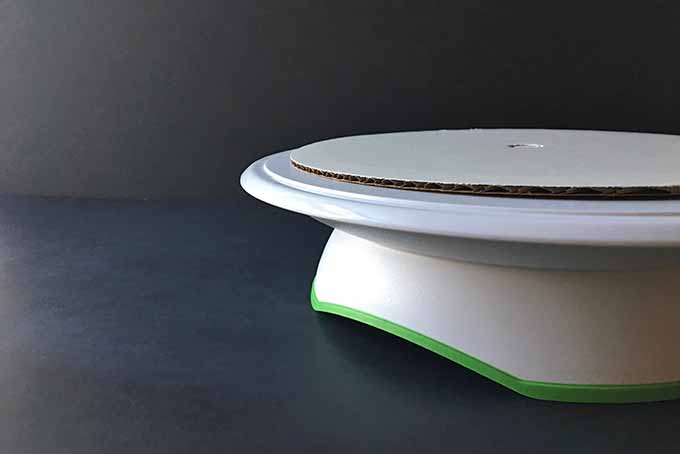
Place a small, damp washcloth or paper towel on top of the turntable. The washcloth keeps the board from shifting as you are spinning the turntable while decorating.
Place an appropriately sized cake board on top.
Step 2 – Apply The First Cake Layer
Place a prepared cake round on top of the cake board. Make sure it is centered on the board.
Here’s a tip: spread a small amount of frosting on the middle of the board, then place the bottom cake layer on top.
The frosting acts as cement to keep it from sliding around the board as you are decorating. It’s much easier to decorate if your cake is anchored in place!
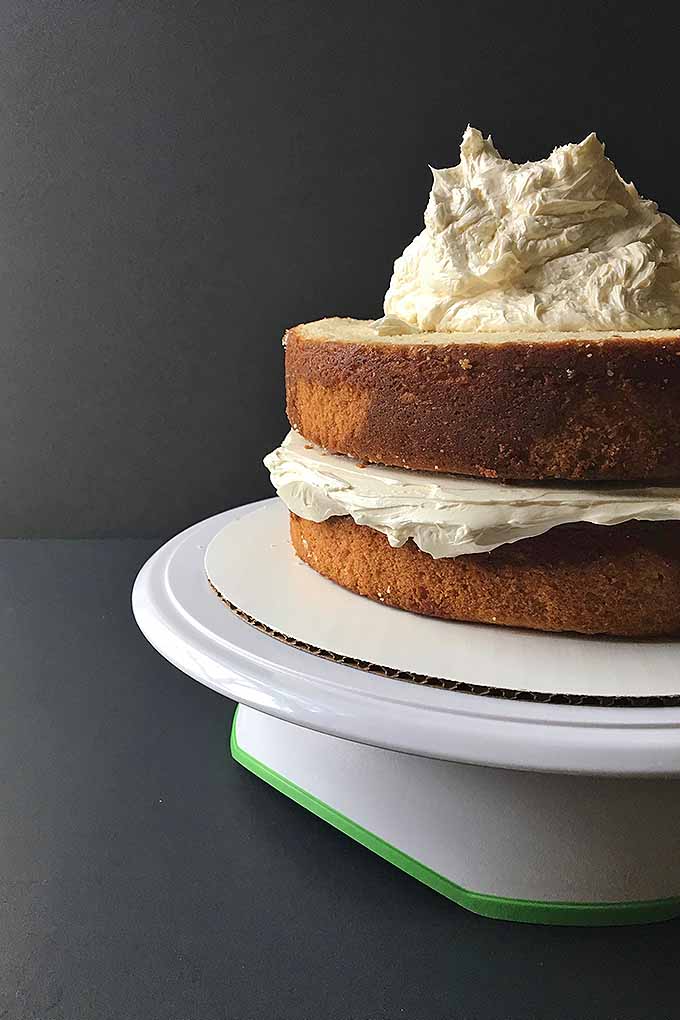
Step 3 – Apply The Filling
Place a large dollop of your chosen filling or frosting in the center of the first layer. If you like a thicker layer of filling, add more.
Spread the filling evenly with an offset spatula until it reaches a little past the edges.
Step 4 – Apply The Second Cake Layer
Place the other prepared cake round on top of the filling. Align it with the bottom layer, making sure the sides line up together.
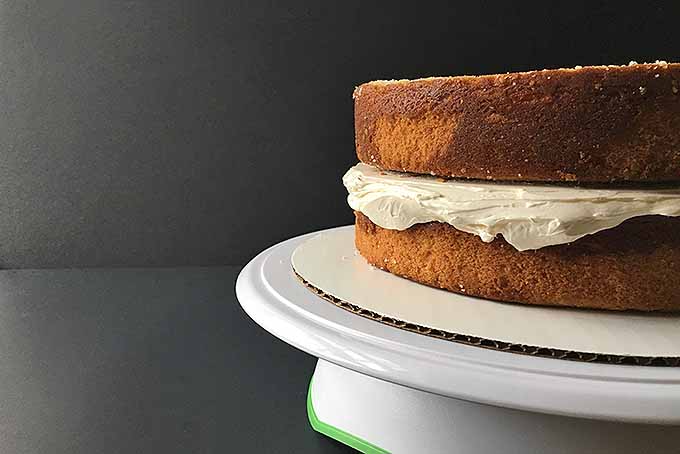
Press down gently on the top layer to impress it onto the filling evenly.
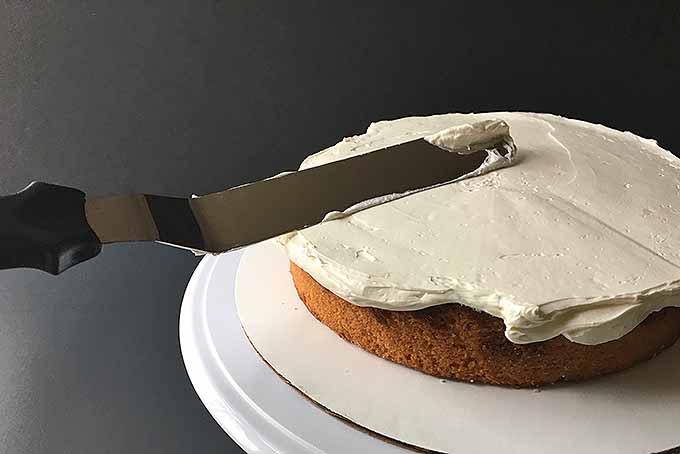
Step 5 – Apply The Crumb Coating
The crumb coating is a thin layer of frosting that is applied before adding the top layer of frosting.

It acts as a barrier, sealing and trapping any crumbs into the coating. This protects the top layer of frosting from mixing with the crumbs (those nasty rascals!), resulting in a smooth top layer.
Just they way we want it!
Place a dollop of frosting on the top of the cake. Spread evenly in a thin layer with an offset spatula, using the turntable to spin it around as you push the icing towards the edges.
If more is needed, apply a small amount of frosting on the side of the cake, and gently spread it all the way around, using more icing as needed.
Before you go for more frosting from the fresh batch, use a smaller bowl that is separate from your main frosting receptacle to scrape your spatula, and clean off any extra icing that has crumbs sticking to it.
Keep spreading it around the sides to cover completely in a thin layer, using the turntable to spin the cake.
Do not press too hard. You may still be able to see the cake underneath, but there will be a thin film of frosting covering it.
Refrigerate for 20 minutes, or until the crumb coating has hardened.
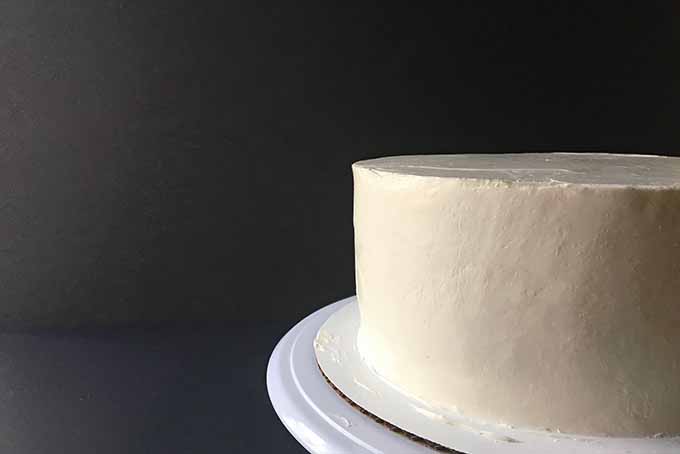
Step 6 – Apply The Top Layer of Icing
Using the same technique as you did to apply the crumb coating, place a larger dollop of frosting on the top layer of the chilled cake.
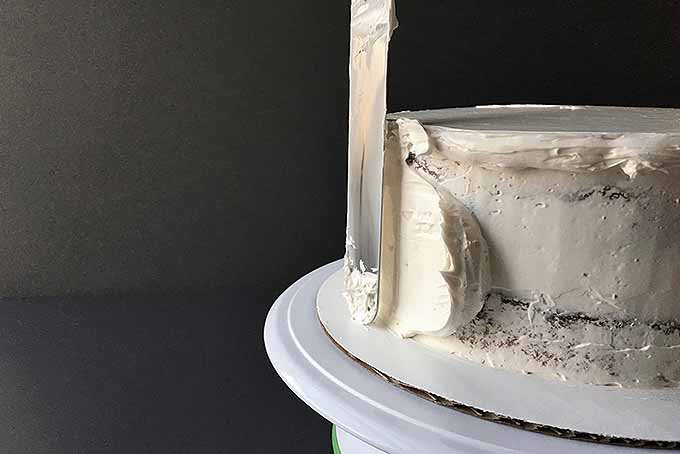
Spread around the top with an offset spatula until it is completely covered with an even, thick layer. Use the turntable to spin it around as you push excess icing towards the edges.
Apply a small amount of frosting on the sides, and gently spread it all the way around, using more as needed. Keep spreading it around the sides until completely covered in a thick, even layer, using the turntable to spin it around.
Step 7 – Fix the Edges and Smooth the Sides
The edge of the cake, where the top meets the side, will have some excess, uneven icing around it. But there’s a way to fix this.
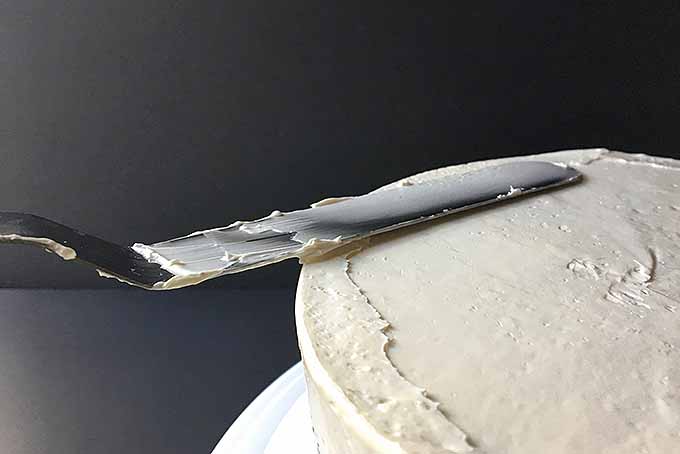
Using the edge of an offset spatula or metal bench scraper, lightly press down and push the icing towards the center, blending the excess with the rest of the icing.
To get a cleaner top layer on the top and sides, dip your offset spatula in hot water and wipe with a towel. Gently run the spatula around the sides and top. The heat from the metal will gently melt the top layer of the frosting, creating a smoother appearance.
Wipe away any excess icing that is on the board with a damp towel.
Step 8 – Pipe the Borders
Fit a pastry bag with your desired tip and fill the bag with frosting.
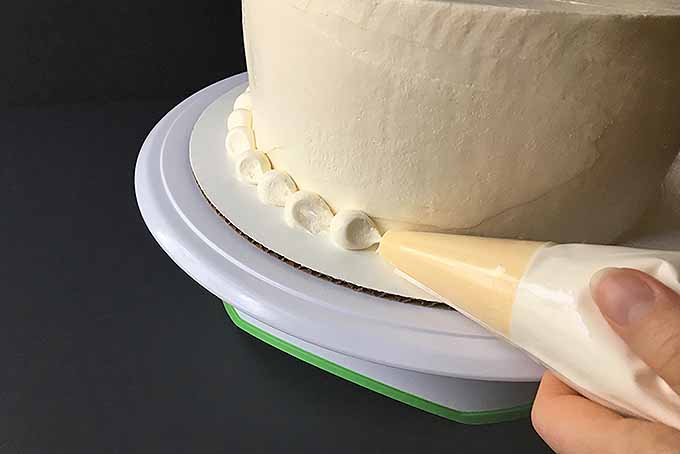
To decorate the bottom border, place the end of the tip at a 45° angle where the bottom of the cake meets the board.
Pressing gently on the bag in one short burst, pipe out the desired shape, releasing pressure as you pull the bag away.
Repeat this process to create a bottom border, spinning the turntable as you continue to pipe.
To decorate the top border, place the end of the tip close to the edge on top, at a little less than a 90° angle.
As with the bottom border, press gently on the bag in one short burst, and pipe out the desired shape, releasing pressure as you pull the bag away.
Repeat this process as you did for the bottom, spinning the turntable as you go.
Step 9 – Add Garnishes
If you decide to add some decorations for the final finishing touches, I suggest pouring your garnishes in a separate bowl, then using your fingers or a spoon to decorate. This gives you more control, rather than accidentally dumping the whole container of sprinkles on the top of the cake!
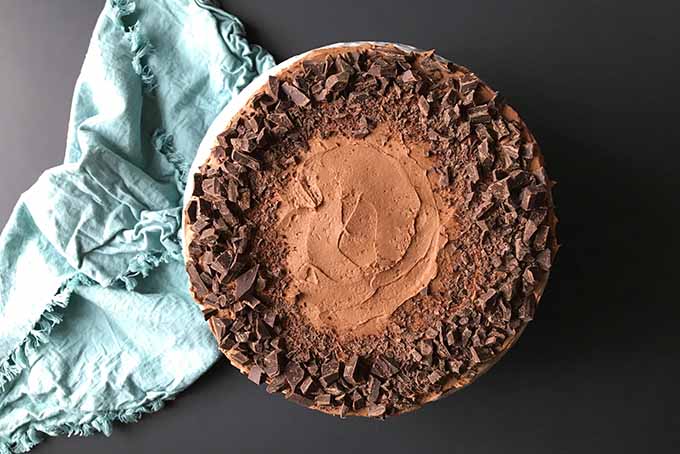
Apply your desired garnishes before storing the finished dessert in the refrigerator. If it is chilled before garnishing, the icing will be too solid for the decorations to stick.
Step 10 – Serve and Store
If you plan to serve on the same day that you’ve decorated your cake, you may leave it out at room temperature in a covered container.
A decorated cake is best served at room temperature – the icing and cake will have a chance to soften to the most enjoyable temperature and consistency.
If you will be serving it within one week, refrigerate in a covered container. Let it come to room temperature for 30 minutes before serving.
Of course, I wouldn’t blame you for eating it immediately…
Go Forth and Make Beautiful Desserts for Birthdays, Special Occasions… or Anytime!
With our guide and 10-step tutorial for basic decorating, you should now have all the confidence in the world to beautify your desserts like a pro. Really – you’re ready!
As with any baking venture, it helps to be as prepared as possible. Gather your tools and ingredients, establish an organized game plan, and be ready for Plan B if disaster strikes. You can always use my frosting-free way to decorate, if all else fails!
Fingers crossed!
Be patient as you go through the steps – it may take a few tries to get the motions correct. As you continue to decorate, frosting and piping with ease will become second nature.
Once you learn the basics, you can certainly add your own flair and find your own favorite designs and decorations to personalize your creations.
Do you enjoy decorating? What are your tried and true tips? Share your advice with other readers in the comments section below.
Don’t forget to Pin It!
Photos by Nikki Cervone, © Ask the Experts, LLC. ALL RIGHTS RESERVED. See our TOS for more details.
About Nikki Cervone
Nikki Cervone is an ACS Certified Cheese Professional and cheesemonger living in Pittsburgh. Nikki holds an AAS in baking/pastry from Westmoreland County Community College, a BA in Communications from Duquesne University, and an MLA in Gastronomy from Boston University. When she's not nibbling on her favorite cheeses or testing a batch of cupcakes, Nikki enjoys a healthy dose of yoga, wine, hiking, singing in the shower, and chocolate. Lots of chocolate.


Your cake creations are simply breathtaking, Nikki! You are truly an artist with a wonderful knack of explaining your daunting creations in a way that makes them seem possible for less artistic people like me to do! I’m just jealous of all the people who get to eat everything that you make!!!! It would be a dream to live with you, but I’d also be an extra 30 pounds!
Thanks for the detailed steps. loving it
Hi Nikki,
I am Very thrilled and happy seeing your detailed version. I love baking as a mom and not as a profession. Because I am scared to do more. Recently my friend requested me to do a birthday cake for 20 people. I am not sure where to actually start. Please help. She gave me the choice of any flavour just that I have to make eggless as her son is allergic to eggs. And I really want to bake for this adorable kid. I am unsure of the quantity and the right equipments I need for it
I am a beginner. I’m retired and enjoy baking . Thank you for all the explanations.
I really love it.
I’m glad you are enjoying baking in retirement, Florence, and hope you continue to make beautiful desserts!
Thanks very much I really appreciate it.
Well explained. Thank you very much.
Glad you enjoyed reading all these essential tips! Hope you make something pretty soon!
Thanks I have been trying to bake but I’m poor in decorations.
You are so welcome! I hope this gives you some basic guidance the next time you are decorating.
Nice explanation
I love it
Wow
I really appreciate you
Thanks very much
Thanks
I love giving people on here great helpful comments but this great too thx