
When you see fresh, juicy cherries piled high at grocery stores and farmers markets, what recipes immediately come to your mind?

We can sweetly savor all kinds of tasty goodies in the form of cobblers, pies, tarts, and frozen desserts…
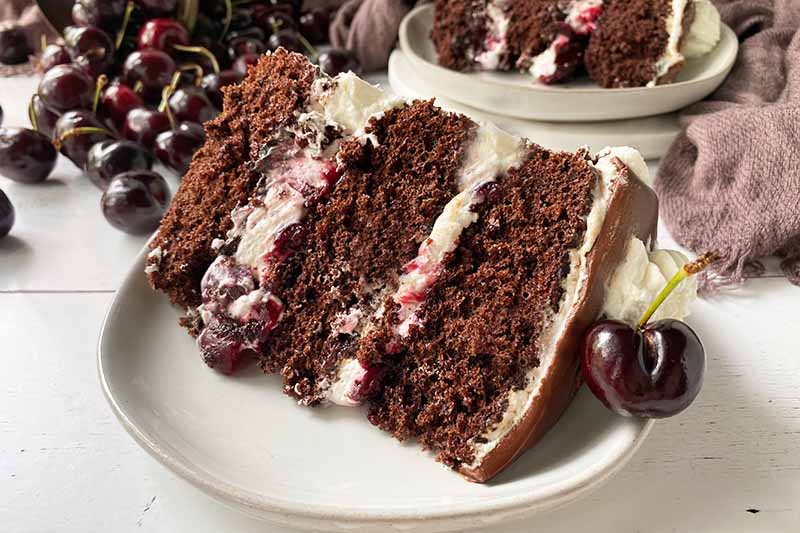
But these little drupes are iconic in a satisfyingly rich Black Forest cake!
Even though we can easily envision eating them fresh right from the bag, still warm from the summer sun, it’s fun to transform the fresh fruit into a delightfully sweet baked good that has earned showstopping status at the end of a meal.
Known as Schwarzwälder Kirschtorte in German, Black Forest cake is believed to be inspired by and named after a popular brandy originally distilled in the region of the Black Forest, or Schwarzwald, a large and densely forested mountain range in southwestern Germany.
Certain varieties of cherries, or Kirsche, from this region in Germany, as well as other surrounding areas in Switzerland and the Alsace region of France, are commonly used to make Kirschwasser – popularly nicknamed kirsch – which is a clear, white brandy distilled from sour cherries.
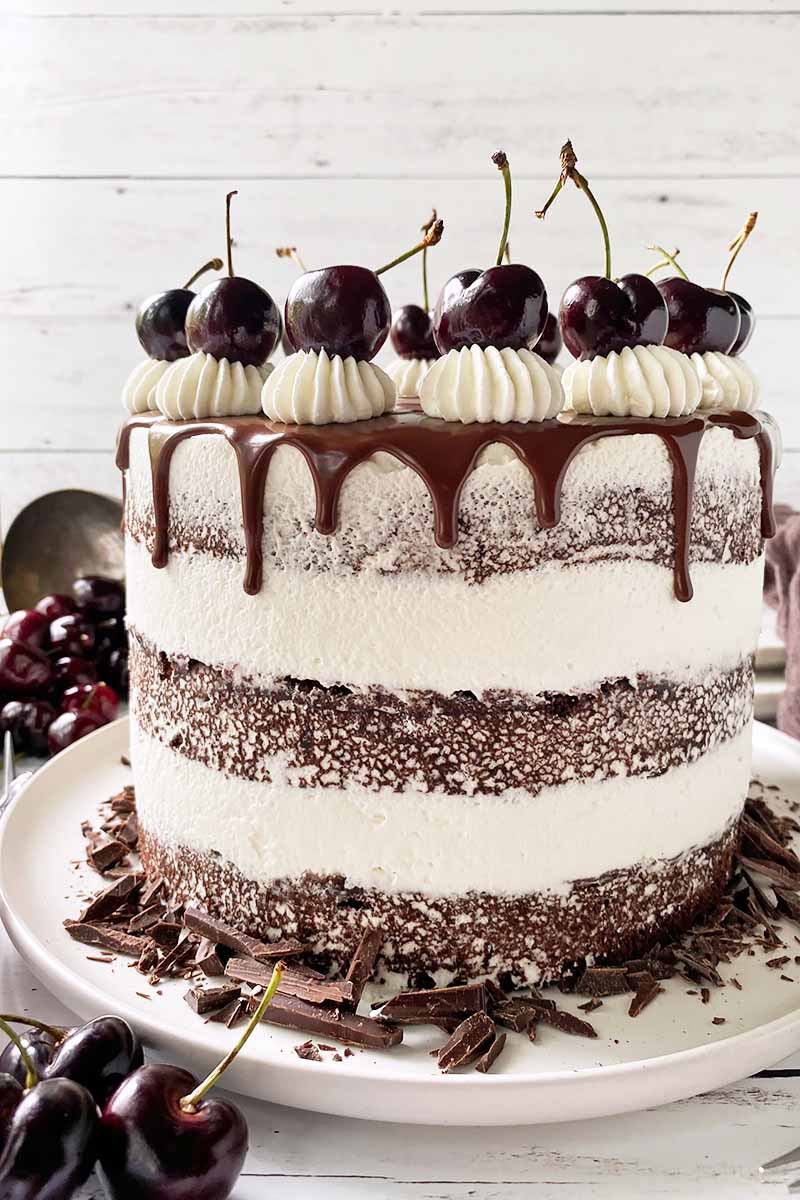
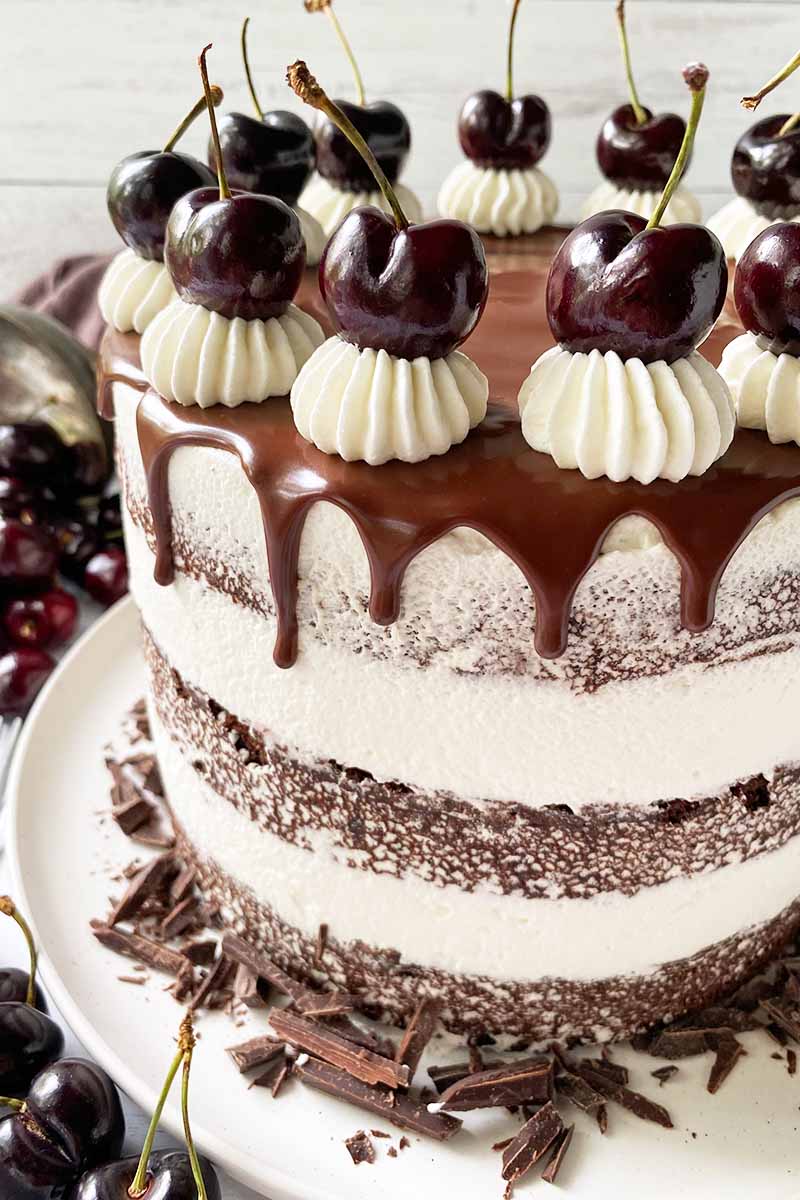
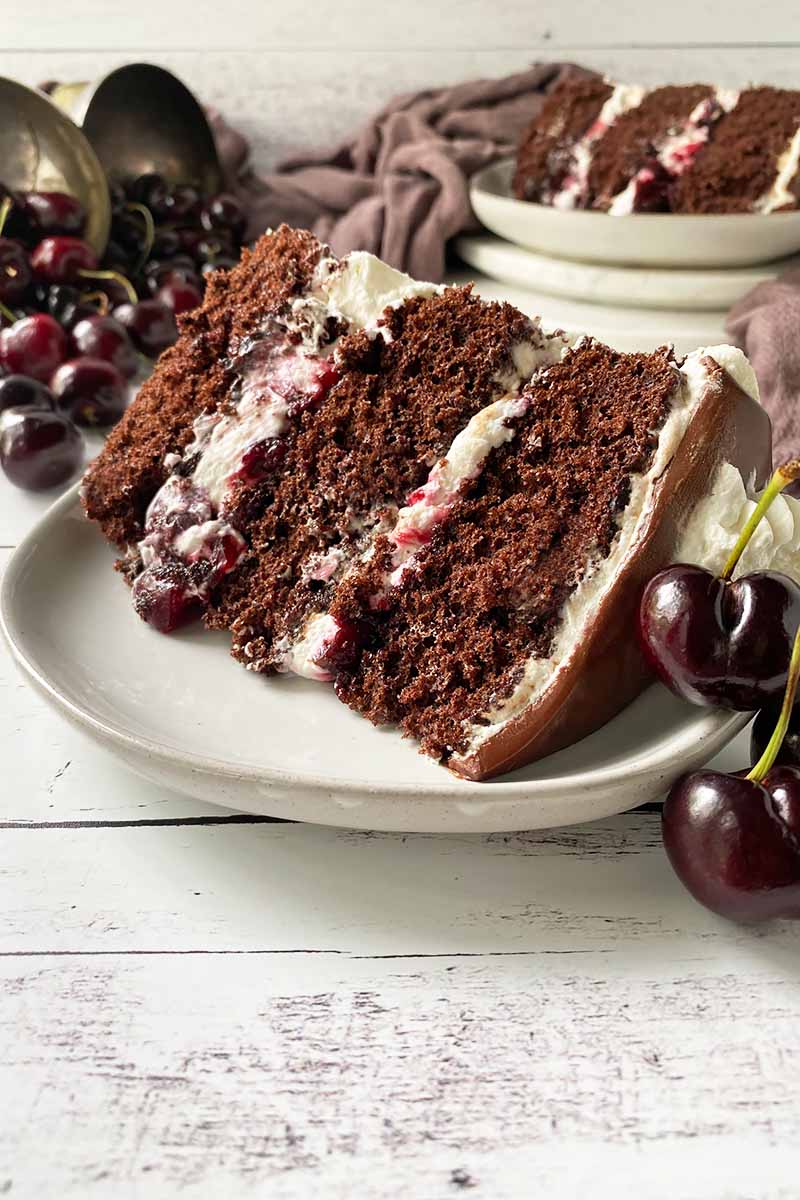
While there are quite a few versions of the Black Forest cake, it often includes deeply delicious layers of juicy red cherries, freshly whipped cream, and light chocolate sponge soaked in a kirsch syrup – with beautifully bold contrasts of colors you can’t ignore!
Shall we treat ourselves to a homemade version?
But here’s your official warning: there are no shortcuts here!
In this recipe, we’re making everything from scratch – the delicate chocolate sponge rounds, the thick and fruity filling, the kirsch syrup, and the fluffy whipped cream will all be crafted by your own hands.
All of our advice and suggestions, from expertly whipping up the batter to swiftly assembling it for the final presentation, will be of great use to you as you maneuver through each and every step of the prep, baking, and decorating processes.
Let our inspiration, and your insatiable sugar tooth, motivate you to bake the Black Forest cake of your dreams!
Print
Black Forest Cake
- Total Time: 5 hours, 30 minutes
- Yield: 12 servings 1x
Description
Black Forest cake is an impressive dessert with beautiful layers of sweet cherries, delicate chocolate sponge, and freshly whipped cream.
Ingredients
For the Chocolate Sponge Cakes:
- 8 large eggs, room temperature
- 1 cup granulated sugar
- 1 cup cake flour
- 1/2 cup Dutch-process cocoa powder
- 1/2 teaspoon baking powder
- 1/8 teaspoon fine kosher salt
For the Cherry Filling and Soak:
- 1/2 cup granulated sugar
- 3 tablespoons cornstarch
- 1/4 cup plus 2 tablespoons cherry liqueur, divided (preferably kirsch)
- 4 cups halved and pitted sweet fresh cherries (about 1 1/2 pounds whole cherries)
For the Whipped Cream and Assembly:
- 3 cups heavy whipping cream
- 1/2 cup powdered sugar
- 1 teaspoon vanilla extract
- Fresh cherries, sprinkles, ganache, or shaved chocolate (optional, for decorating)
Instructions
For the Chocolate Sponge Cake:
- Preheat the oven to 350°F.
- Generously grease the bottoms and sides of 3 8-inch cake pans with butter or nonstick cooking spray. Line the bottom of each pan with an 8-inch parchment paper circle. Grease the parchment paper.
- Place the eggs and granulated sugar in the bowl of a stand mixer fitted with the whisk attachment. On high speed, vigorously whisk the eggs and sugar together until the mixture is very fluffy and pale in color, about 10-15 minutes. The mixture will nearly quadruple in volume, and should flow off the lifted whisk in a steady stream in thick ribbons.
- Whisk together the cake flour, cocoa powder, baking powder, and salt in a small bowl and set aside.
- Carefully pour the eggs and sugar into a large bowl. In 3 separate additions, sift the dry ingredient mix on top of the egg mixture. Using a flexible spatula or bowl scraper, very carefully and slowly fold the dry mix into the eggs, trying not to deflate the volume. Continue folding until the ingredients are fully combined and a dark brown batter forms.
- Using your spatula, distribute the batter evenly between the three greased cake pans.
- Transfer the cake pans to the oven and bake without disturbing them for 15-20 minutes, or until the cakes have risen and the top springs back lightly when you very gently tap it with a finger.
- Immediately remove the pans from the oven and place onto cooling racks to rest for 5-10 minutes. Quickly invert each pan and peel off the parchment paper from the base of each cake. Turn the cakes right side up on the cooling racks.
- Allow the cakes to cool completely before decorating, for at least 4 hours or up to one day.
For the Cherry Filling and Soak:
- While the cakes are cooling, prepare the cherry filling.
- Whisk together the sugar, cornstarch, and 1/4 cup cherry liqueur in a medium saucepot. Place over medium heat on the stovetop. Whisking occasionally, heat until the sugar has dissolved and the liquid starts to bubble.
- Stir in the cherries and continue stirring occasionally over medium heat. Cook until the liquid released by the cherries reduces and thickens significantly, about 10-15 minutes – the liquid should have a thickness similar to a thick pie filling.
- Remove from the heat. Pour the mixture through a fine mesh strainer into a heatproof bowl, stirring without crushing the cherries, to strain out about 1/4 cup of liquid.
- Whisk the remaining two tablespoons of liqueur into the liquid and set aside to cool completely at room temperature. This will be used to soak the top of each cake round when assembling.
- Transfer the cherries and remaining liquid to a separate bowl and set aside to cool completely at room temperature. The liquid will thicken slightly.
For the Whipped Cream:
- When ready to assemble, pour the whipping cream into the chilled bowl of a stand mixer fitted with a chilled whisk attachment. Whisk at medium speed until slightly fluffy, about 1-2 minutes.
- Add the powdered sugar and vanilla extract. Continue whisking at medium speed, gradually increasing the speed to high as the mixture thickens, until stiff peaks form, another 3-5 minutes.
- Immediately transfer the whipped cream to the refrigerator. Store in the refrigerator for no longer than 30 minutes prior to assembly.
To Assemble:
- If necessary, level the top of each cake, reserving any cake crumbs for another use.
- Set out the whipped cream, cherries, and cherry soak. Transfer about 1/2 cup of whipped cream into a piping bag fitted with a 1/2-inch round tip.
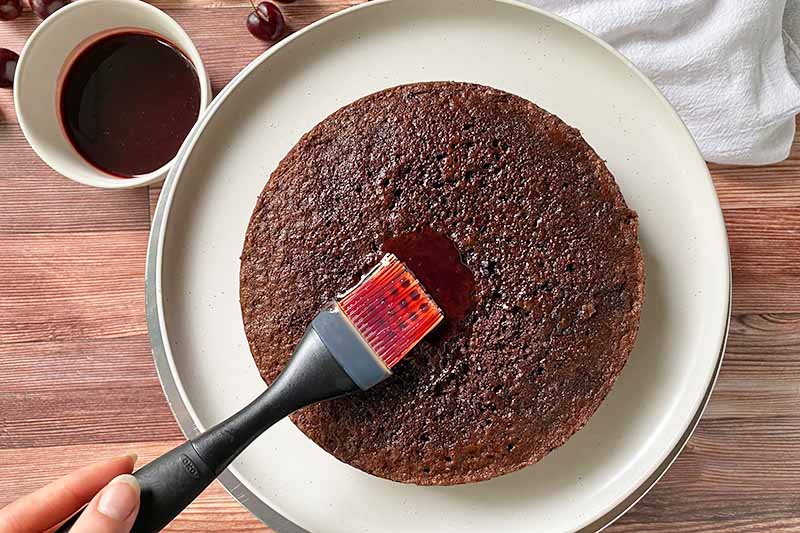
- Working quickly, place one cake layer on a flat surface such as a cake stand, serving plate, or turntable. Using a pastry brush, evenly brush about half of the cherry juice soak on top.
- Top the cake with approximately 1 cup of whipped cream from what remains in the bowl and spread evenly in a flat layer. Pipe a 1/2-inch dam of whipped cream around the perimeter of the cake.
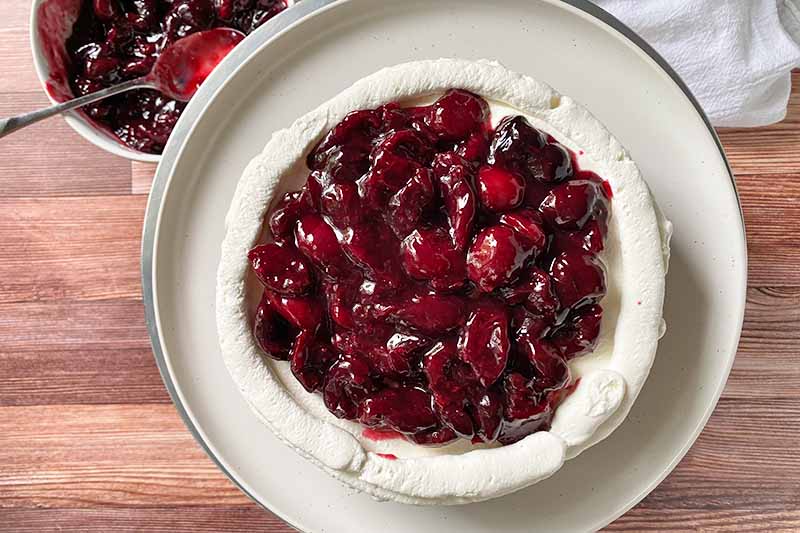
- Spread about half of the cherries inside the dam.
- Repeat with the second cake layer.
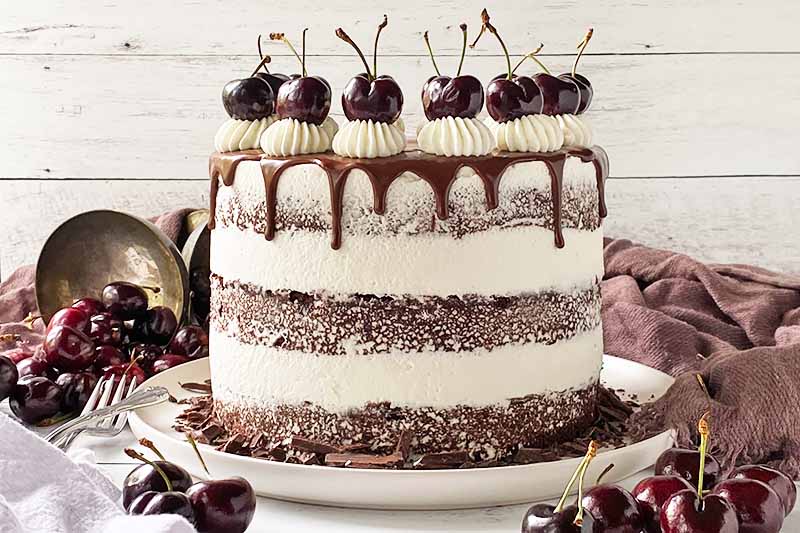
- Place the final cake layer on top. With the remaining whipped cream, frost the top and outside of the cake. If desired, decorate the top of the cake with more whipped cream, or any additional decorations like fresh cherries, sprinkles, ganache, or shaved chocolate.
- Immediately transfer the cake to the refrigerator and let chill for at least 1-2 hours before serving. Due to the delicacy of the whipped cream, this cake will keep for up to 2 days max in the refrigerator.
- Prep Time: 1 hour
- Cook Time: 30 minutes
- Category: Cake
- Method: Baking
- Cuisine: Dessert
Cooking by the Numbers…
Step 1 – Prep the Pans and Ingredients
As with decorating any layered cake, make sure you are ready and motivated to complete this creative challenge, and that you have reviewed all the steps to properly baking a cake.
With all of your hard work over the next few hours, the results will be breathtaking!
Here we go…
Preheat the oven to 350°F.
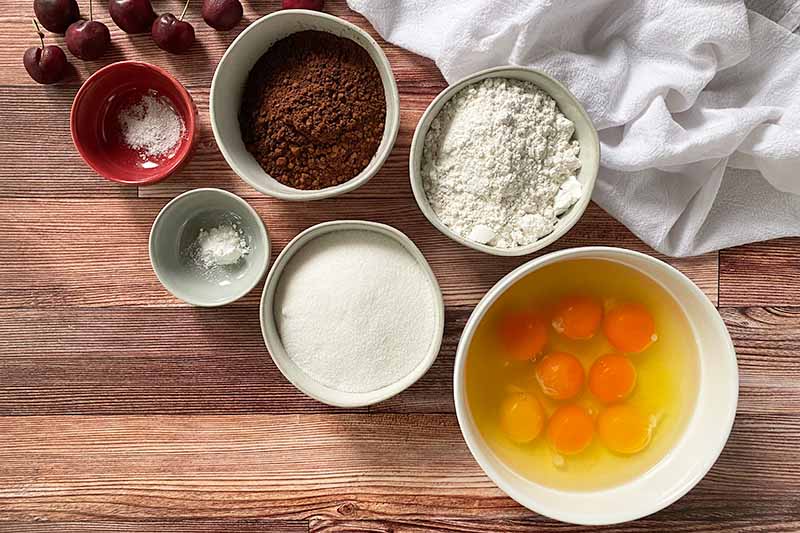
Measure all of the ingredients for the chocolate sponge rounds, starting with eggs. They will whip more efficiently at room temperature, so you can crack them now and leave them to sit out as you continue your prep work.
Measure out the granulated sugar, flour, Dutch-process cocoa powder, baking powder, and salt.
And make sure you have all the correct ingredients!
Dutch-processed cocoa powder is treated with an alkalizing agent, reducing its acidity and bitterness and causing it to darken in color. It will give the final sponge a beautiful chocolate flavor and deep brown hue.
Because you’re using this specific style of cocoa powder, baking soda will not react strongly to it, due to the cocoa powder’s reduced acidity.
You therefore need to use baking powder, which contains an acid in addition to baking soda, so that its leavening power is fully activated to help the batter rise. While the whipped eggs will provide plenty of their own aeration, a little baking soda will only help to bolster and reinforce successful leavening.
While we are nowhere near ready for the filling and decorating yet, be sure to have all of the following ingredients on hand, which you will measure and prep later:
For the filling, make sure you have granulated sugar, cornstarch, kirsch, and about 1 1/2 pounds of fresh whole cherries.
If kirsch is not available, you can substitute another cherry-forward spirit or liqueur, like Herring cherry liqueur. For a dessert with no alcohol, simply use an equal amount of water instead.
For the whipped cream frosting, make sure you have enough heavy whipping cream, powdered sugar, and vanilla extract.
Set out three 8-inch round pans. Generously grease each pan, using either unsalted butter or a nonstick cooking oil spray. Pay particular attention to the sides of the pans!
A sponge batter has a tendency to stick more easily – and annoyingly – to an improperly greased pan. And if they are accidentally overbaked, their excessively crumbly texture can also be a burden when removing them from the pans.
To prevent this from happening, don’t be stingy with the greasy coating!
After greasing, you should also line each pan with a piece of parchment paper the same size as the bottom of the pan – you can easily create these by stenciling the circumference of a pan onto pieces of parchment paper, and cutting them out with scissors.
Step 2 – Prepare the Batter
Compared to more dense and rich butter cakes, sponge cakes are very light and fluffy, and a little drier than what you might expect. They don’t usually contain any butter or oil.
A vigorously whipped mixture of whole eggs and sugar creates an aerated base, and a small quantity of dry ingredients is very gently folded in to create a delicate batter.
What’s the biggest piece of advice I can offer when making sponge batter?
Handle it with TLC!
Let’s go over the instructions now:
Place the eggs and granulated sugar in the bowl of a stand mixer fitted with the whisk attachment.
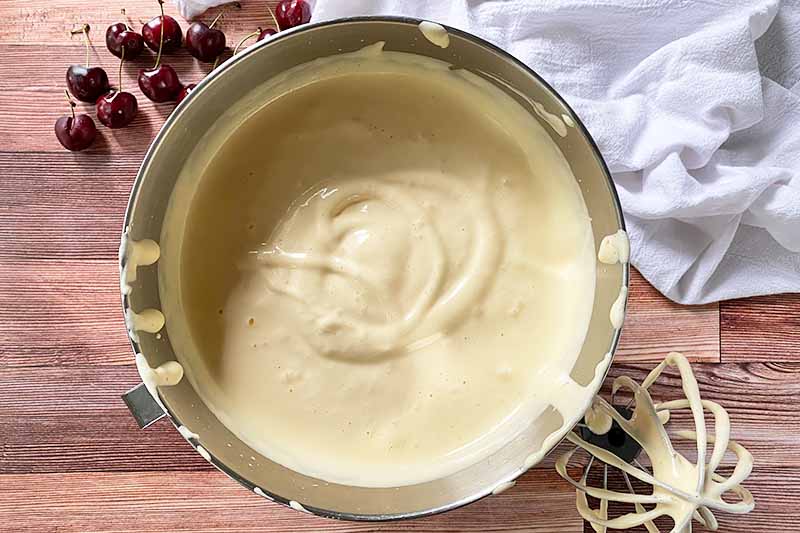
Whisk the eggs and sugar together on high speed until very fluffy and pale in color. After about 10 to 15 minutes, the mixture will nearly quadruple in volume!
To test, stop the mixer and allow some of the egg mixture to fall off the whisk – it should flow in a steady stream in thick ribbons that can hold their shape for about 3 seconds on the surface of the mixture.
If the mixture still seems too thin and runny, continue whisking for an additional 5 minutes.
While the eggs and sugar are whisking, you have some time now to whisk together the flour, cocoa powder, baking powder, and salt. Do this in a separate small bowl.
When the egg and sugar mix is ready, carefully transfer it to a very large bowl without deflating the air.
I prefer working in a big bowl, as opposed to a smaller stand mixer bowl, so that I have enough room for properly folding the ingredients together in a clean, efficient way.
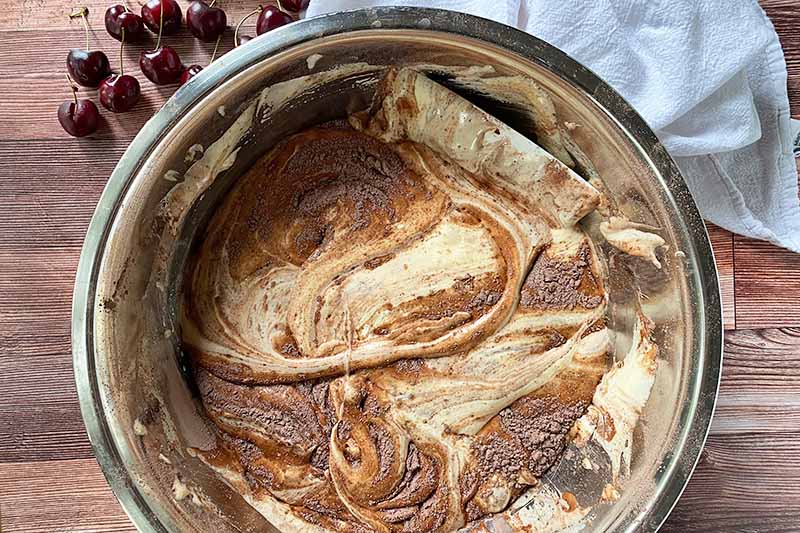
Scoop the dry ingredient mix into a fine mesh strainer or flour sifter and sift about 1/3 of it over the egg mixture. Using a flexible spatula or bowl scraper, very carefully and slowly fold the dry mix into the eggs, trying not to deflate the volume. When most of the dry mix has been incorporated, repeat with the remaining 2/3 dry mix in two separate additions.
Adding all of the dry ingredients at once will be too much to properly fold into the whipped eggs, overwhelming the mixture. It’s easier to do this in stages while maintaining the voluminous integrity of the aerated eggs.
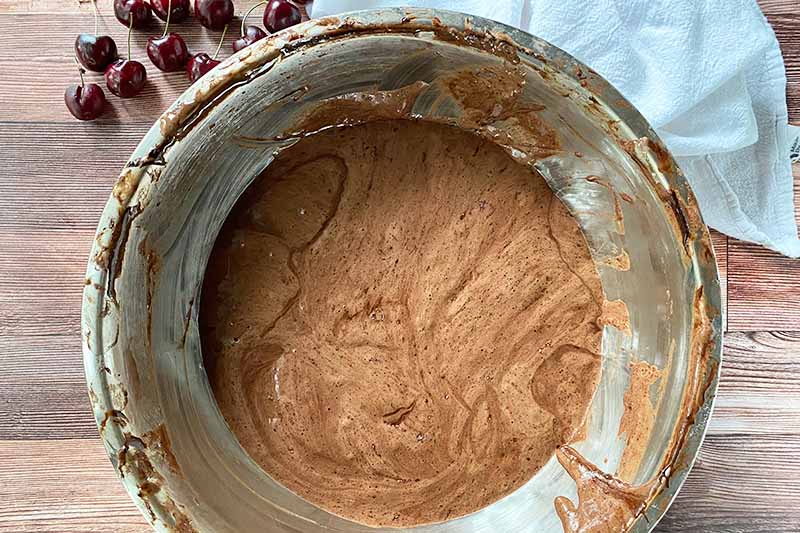
Continue folding until the ingredients are fully combined and a dark brown batter forms.
Step 3 – Bake and Cool
Working quickly so you don’t lose any volume, gently transfer the batter to the prepared pans, dividing it evenly among the three pans.
Immediately transfer the pans to the preheated oven, being sure there is space between each pan for even airflow.

Bake without disturbing the batter or opening the oven for 15 to 20 minutes. Try not to check before the 15-minute-mark, as opening the oven may cause the delicate rounds to deflate.
At this point, the cakes will have risen, and the tops should spring back very lightly when you gently tap them with a finger.
Immediately remove the pans from the oven and place onto cooling racks to rest briefly.
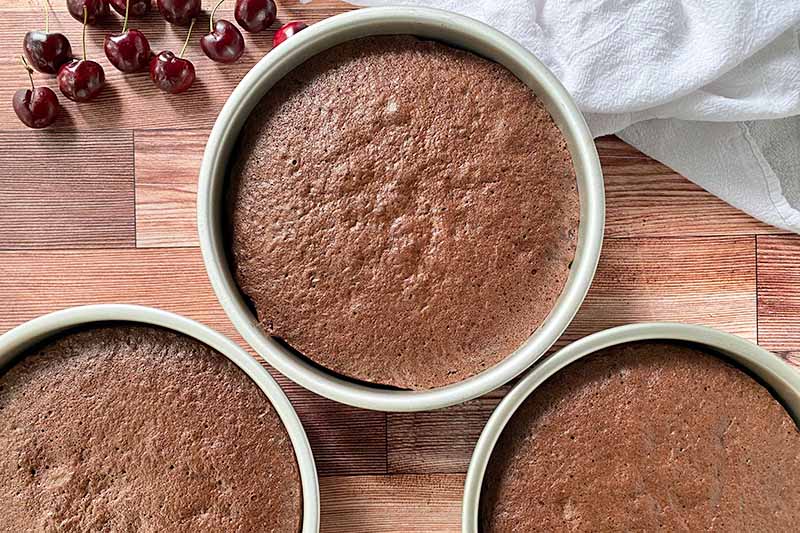
After 5 to 10 minutes, quickly invert each pan and peel off the parchment paper from the base of each round. Reinvert them so they’re right side up on the cooling racks.
You don’t want to wait to remove them from the pans beyond 10 minutes, as they may stick if left to cool fully.
Allow them to cool completely before decorating. This will take at least 4 hours.
The rounds may be baked up to a day in advance. When cooled completely, you can gently wrap each round in plastic film wrap, and store at room temperature until you are ready to decorate.
Oh, no… Did you end up with a flat, deflated discs? Don’t worry, we have some creative fixes for cakes that won’t rise.
Black Forest mini trifles, anyone?
Step 4 – Cook the Cherry Filling
While the cakes are cooling, you can prepare the cherry filling.
In a medium saucepot, whisk together the sugar, cornstarch, and 1/4 cup liqueur. Transfer the pot to the stovetop and heat the mixture over medium heat. Whisk occasionally until the sugar has completely dissolved and the liquid is bubbling gently.
Stir in the cherries and continue to stir occasionally over medium heat. Cook for another 10 to 15 minutes. The cherries will start releasing their juices, which will then thicken significantly.
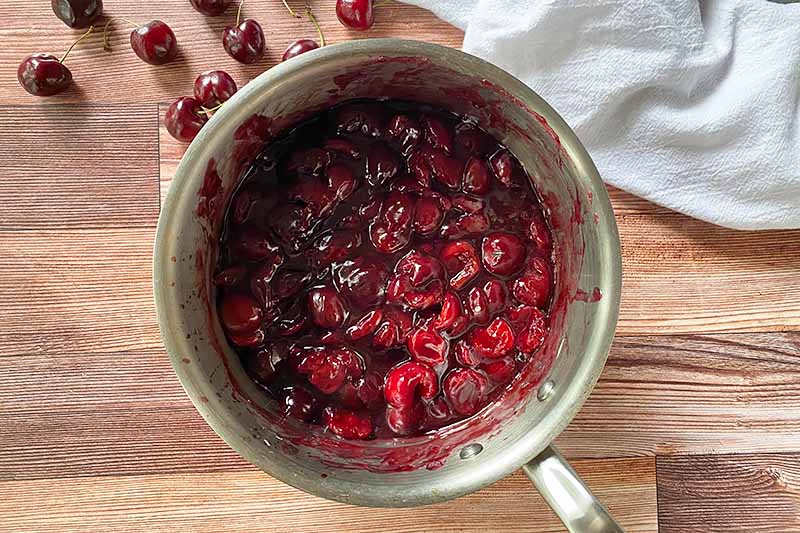
You are looking for a thickness that is similar to a fruit pie filling – it will be almost jamlike! If it still appears too runny, continue cooking for an additional 5 minutes, and note that it will thicken slightly as it cools.
Step 5 – Strain, Prepare Soak, and Cool
While the cherry mixture is still warm, immediately pour it into a fine mesh strainer over a heatproof bowl. Gently stir the mixture without crushing the cherries – you want the fruit to look plump and pretty when slicing into the cake!
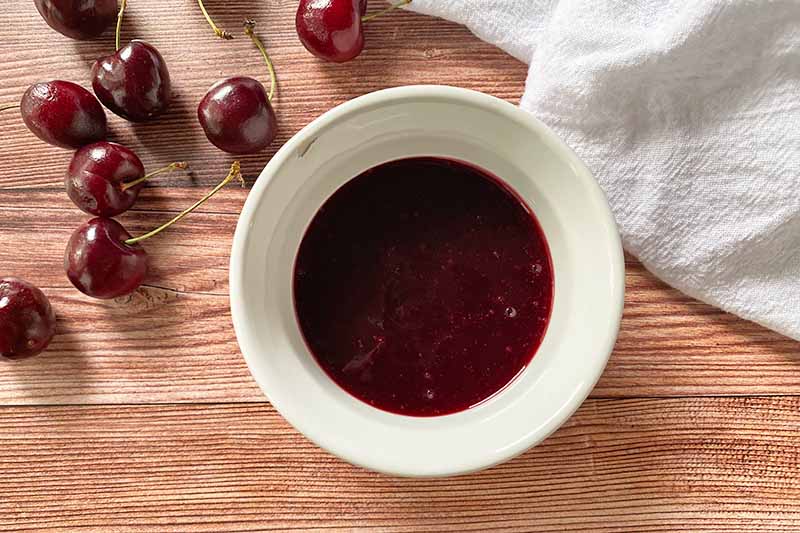
Strain the cherries until you have about 1/4 cup of liquid in the bowl, which you can measure separately in a liquid measuring cup.
To this small amount of liquid, whisk in the remaining two tablespoons of kirsch until combined. Set aside to cool completely – this is your tasty soak that you will brush over each cake round!
Transfer the cherries and any remaining liquid to a separate bowl and set aside to cool completely. The liquid will thicken slightly as it cools.
While this is cooling, transfer the clean bowl of a stand mixer and the whisk attachment to the refrigerator – a chilled bowl and whisk will help the whipped cream to stiffen more quickly!
Step 6 – Make Whipped Cream
When everything has cooled to room temperature – the cakes, filling, and soak – you’re ready to make the whipped cream!
But only make it when you are ready to start decorating!
Whipped cream isn’t like other frosting or icing recipes – due to its delicately whipped nature, it’s best when prepared fresh, soon before serving. The longer it sits after whisking, it will start to lose its aeration.
Remove the chilled bowl and whisk attachment from the refrigerator, assemble on the stand mixer, and pour in the whipped cream.
Whisk at medium speed until slightly fluffy, about 1 to 2 minutes.
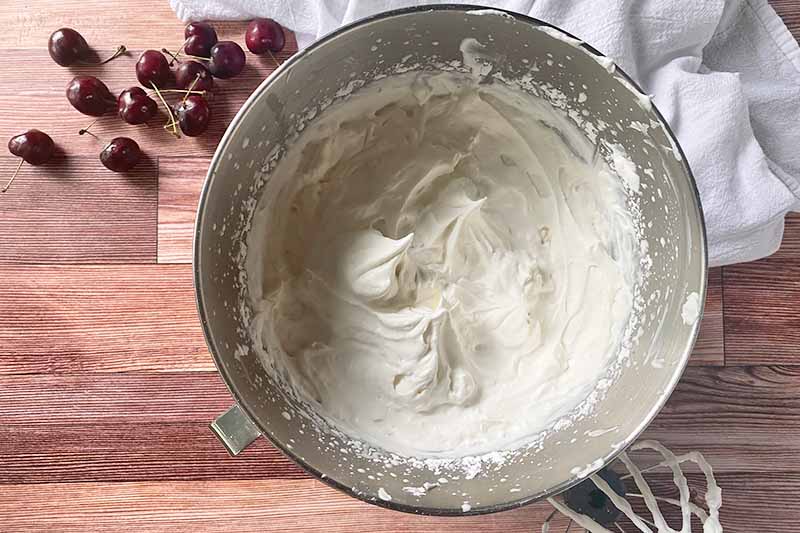
Add the powdered sugar and vanilla extract, and continue whisking at medium speed. Gradually increase the speed to high as the mixture thickens. Whisk until stiff and stable peaks form, another 3 to 5 minutes.
Be careful here! There’s a fine line between whisking too little, and whisking too much!
If the peaks are falling and not holding their shape, this means you whisked too little. Continue whisking for another minute, and check again.
If the peaks appear curdled, this means you whisked too much! You can either start over, or try gradually adding another 1/2 cup of cold heavy cream in a steady stream while whisking at medium speed to re-soften the peaks.
Immediately transfer the whipped cream to the refrigerator to chill while you get everything else ready for the assembling and decorating process. Store it in the refrigerator for no longer than 30 minutes prior to assembly.
Step 7 – Assemble and Decorate
Before you start assembling, quickly review our advice for decorating cakes. You may learn a new technique to try!
Note: If you are nervous to assemble and decorate a tall dessert, please feel free to only build two layers of cake instead of three. You can always save any extra whipped cream, cherries, and that extra round to make easy trifles!
And make sure you have gathered and organized all the decorating tools you prefer to use.
Are your sponge rounds looking a little domed on top? This will make decorating a little more difficult than it has to be! You can level the tops of each one, using a bread knife.
Reserve any crumbs for another use – like for cake pops!
Set out the whipped cream, cherries, and soak.
Transfer about 1/2 cup of whipped cream into a piping bag fitted with a 1/2-inch round tip – you’ll need this to cleanly pipe borders around each layer, and to pipe any final touches.
Working quickly – remember, the whipped cream is now sitting at room temperature as you are decorating – place one round on a flat surface such as a cake stand, serving plate, or turntable.
Using a pastry brush, evenly brush about half of the cherry juice soak to cover the top of the layer.
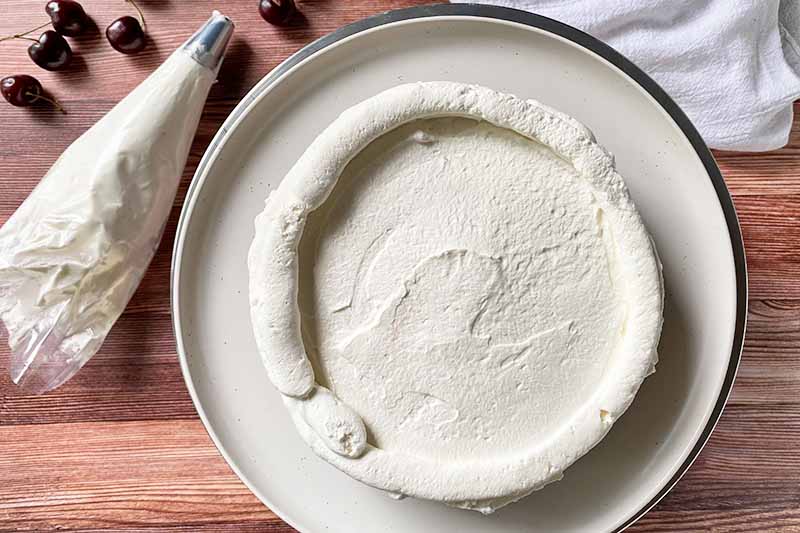
Top the cake with approximately 1 cup whipped cream and spread it evenly in a flat layer with a spatula. Pipe a 1/2-inch dam of whipped cream around the top border of the cake. This small wall will prevent the cherry filling from spilling out.
With a separate spatula or spoon, spread about half of the cherries inside the dam.
Repeat with another round placed on top, adding layers of the soak, whipped cream, and cherries.
Place the third and final round on top. Use any remaining whipped cream to frost the top and outside of the cake. You can also leave the sides bare, for a naked cake look!
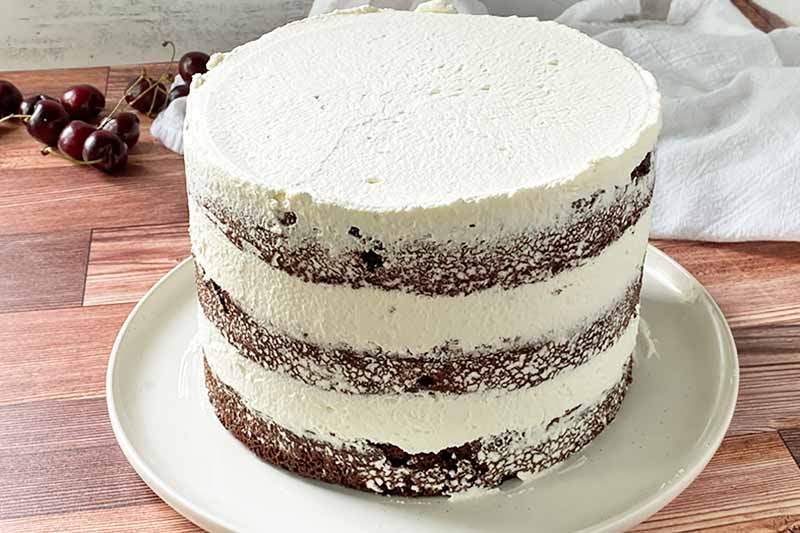
If desired, decorate the top with more whipped cream, or any additional decorations like fresh cherries, sprinkles, ganache, or shaved chocolate.
Step 8 – Chill and Serve
Is it pretty? Of course it is! Great job! Now, move it!
Immediately transfer the cake to the refrigerator and let it chill for at least 1 to 2 hours before serving.
Due to the delicacy of the whipped cream, the dessert will keep for up to 2 days in the refrigerator, though it should ideally be served the day you assemble it.
Slice into individual servings, and enjoy!
Do I Absolutely Have to Use Whipped Cream?
Absolutely not!
While this is a classic component in a Black Forest cake, we understand that whipped cream is very soft and delicate – and you need a swift decorating hand to use it!
It also doesn’t freeze well.
So it really isn’t the best choice if you like to work ahead!
If you want a dessert that is more stable when decorated, and you want to be able to make and assemble it in advance, you can easily swap the whipped cream for another style of frosting.
Consider trying our recipes for American-style buttercream or Swiss-style buttercream – vanilla is a tasty flavor option for either recipe, and these would make amazing replacements.
Do you have your own special way of making this kind of cake? What do you think of this homemade version, or do you prefer to use any shortcuts? Let us know in the comment section below.
Can’t get enough sweet, fruity flavors? If you want more cherry recipes, we have them! Here are three more homemade desserts to make for your friends and family after the last slice of cake is gone:
- Baked Cherry Einkorn Cake Doughnuts with Chocolate Glaze
- Cherry Cheesecake
- Dairy-Free Cherry Dark Chocolate Coconut Milk Ice Cream
Photos by Nikki Cervone, © Ask the Experts, LLC. ALL RIGHTS RESERVED. See our TOS for more details. Originally published on March 24, 2015 by Nina-Kristin Isensee. Last updated on July 1, 2023
Nutritional information derived from a database of known generic and branded foods and ingredients and was not compiled by a registered dietitian or submitted for lab testing. It should be viewed as an approximation.
About Nikki Cervone
Nikki Cervone is an ACS Certified Cheese Professional and cheesemonger living in Pittsburgh. Nikki holds an AAS in baking/pastry from Westmoreland County Community College, a BA in Communications from Duquesne University, and an MLA in Gastronomy from Boston University. When she's not nibbling on her favorite cheeses or testing a batch of cupcakes, Nikki enjoys a healthy dose of yoga, wine, hiking, singing in the shower, and chocolate. Lots of chocolate.
Almighty indeed. You don’t know how much I love a good Black Forest cake, especially on birthdays. I always ask for one whenever it’s my birthday. My wife loves to bake for me so she always tries her hand at baking these. I distinctly remember teaching her how to bake this particular cake a decade ago, but she swears she looked for the recipe herself and perfected it.
Wait, black forest cakes are from Germany? That’s new. Before this I just thought it was an American invention. While I was in Berlin, I only saw a couple of bakeries and didn’t really notice that they were selling these. In my defense, I was too busy eating currywurst, lol.
Anyway, black forest isn’t really my cup of tea, I’m not a huge fan of putting liquor into sweets, nor am I a fan of sweet cherries. Is there maybe an alternative to these ingredients?
You might replace the liquor and use fruit juce or syrup instead, that will work as well. I havent’ tried but concerning the cherries, you could have a try with berries or peaches and use the according jam.
I can well remember many a black forest gateaux being eaten whilst I was living in Germany. It was one of my favourite desserts after straight chocolate ice cream. I loved it and ate it as only a teenager could. The one thing I do remember is the wonderful morello cherries and cherry liquor in the gateau itself. Absolute heaven.
Thank you for rekindling old memories. I suspect, though, my waist line would not manage the quantities I used to eat it in!
This was a real favourite in the UK back in the 80s. We don’t see it as much these days but it’s still a fantastic dessert! The sponge is so moist yet remains firm underneath all the cream. I am reminded of Rum Baba – another favourite from that era!
I agree… Lets not worry about who baked it first. I’m going to concentrate on who bakes it Friday,lol. I have never tried it, baking or eating. The picture makes me really want to, though! It looks so yummy and the recipe looks like something I can handle.
I was just thinking that this recipe looks a lot more do-able than what I expected. I always thought these cakes were so pretty, but I just figured it would be difficult to make. This definitely looks like something I could handle though. I hope my finished product is as impressive as the photos. Beautiful.
I’d love to serve up something so pretty and tasty for a special occasion. I better make a practice one first. *wink*
There is something superbly fascinating about black forest cake that i really go gaga about, the way it melts in the mouth, leaving you craving for more and more, oh, the whipping cream, yes, the grated chocolate, the cherries, the chocolate vermicelli, i could go on and on about how this cake captivates me, my whole being, my, the weaknesses of a chocoholic 😉 …anyway, snap! I always thought its mighty hard to make/bake this cake but now the truth is clearer…with a recipe in hand and a will/can-do-attitude, i can conquer mountains in the kitchen 🙂
I cannot wait to try out this recipe. The pictures have my mouth watering! Forget calorie counting on the day it’s ready to eat. I’ll worry about that another day!
i stopped calorie counting a long time ago, with a sweet tooth, how on earth can you count calories?!…its a lost cause 🙂 …. indulge and live guilt-free, especially where that black forest cake is concerned 😉
From another person with a ridiculously persistent sweet tooth, I agree Diane. I do have to try to watch what I eat, especially the older I get, but some days… you just have to say “what the heck.”
I don’t see myself virtuously smiling and turning down a piece of cake that looks this incredible. Haha. I’m laughing at the thought. Gimme!
I’m not the biggest fan of cakes & frosting. If I’m going to have a cake I like it naked as the day is long. No frosting for me, thank you.
This… looks so amazing. I’m now craving Black Forest Cake (but my local bakeries don’t actually sell it! so your recipe will probably be tested soon!)
Wow….You’ve made it sound really do-able! I’ve always wanted to make a Black Forest cake, but every other recipe I looked at seemed to be overly complicated. Yours is explained well, and I feel confident in giving it a go.
I like that you can make the sponge ahead of time – definitely a labour saving tip for when you’re rushing to get ready for guests. And what a sharp intake of breath there will be at the table when I produce this beauty!!
Thank you so much for this simple recipe.
Thank you, I am happy that you are going to give it a try! I hope it will work out fine and you can impress your guests with this recipe 😉
Oh my god, this looks absolutely delicious! I never tried to make a cake similar to this and I actually never tried the German cuisine. If they have desserts like this I guess I should expand my knowledge more!
Thank you for the recipe, looks really delicious!
This one is a real classic, so you should have a try and indgule yourself!
Man, just looking at that makes me want to cheat on my diet so bad! I remember when Haagen Daaz used to have an ice cream flavor named after it that was all the rage. Is it possible to substitute other fruits in for the cherries like raspberry and what not? Not that I hate cherries, it’s just that I has way too much as a kid and now, I can’t stand the flavor in my food, even if it is in desserts.
Wow, a Black-Forest-ice-cream sounds delicious, I would like to try that.
Sure, you can replace the cherries if you like to, I haven’t tried this yet but I suppose other berries will work as well, like strawberries or blackberries, maybe blueberries. They’d make a nice substitute 🙂 So good luck when preparing your own Berry-Black-Forest cake!
This indeed is the mighty black forest, the first time around i tried making a black forest cake it didn’t turn out quite right but thankfully your instructions especially with the decorations will be very helpful.
I had no idea this was a German recipe. I love Black Forest cake. Never really thought about making it myself though. I always buy it at the bakery.
I can imagine that bakeries make wonderful cakes. Still, I hope that you try this recipe someday, too. It is not too hard if one takes enough time for preparation and stays patient. I’m sure it will taste excellent. However, enjoy this piece of German culture either way 🙂
What a classic – I saw this being baked by competitors in “The Great British Bake-Off” last year and it seems very complicated.
Oh really? How great that this was being baked in a show like that. I would be interested in how it differs from the versions I know. But indeed, it needs a certain amount of preparation, but from time to time, it makes fun to create something special like this – I think it’s a good choice to show some skills in a TV show 😉
I am half-German and it is a family tradition to make this cake for family gatherings or other similar celebrations.
My mother used to make it but I have not tried it yet because I always think it would never taste or even look like it supposed to. Now looking how simple the recipe is I feel encouraged to try it myself.
That’s great, I always like the idea of having traditions like those, and making the same treats every time. If you plan on preparing it, I wish you good luck, and let’s know how it turned out!
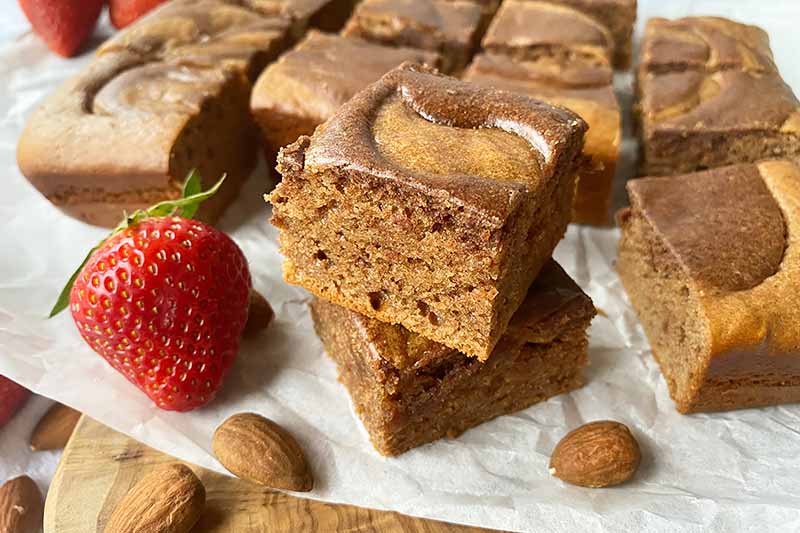
The recipe instructions say to cut the single sponge twice for three layers. However the photos only show two layers. Photos also show cherries on the first layer but the instructions explain that the cherries go on top of the second layer of sponge? I won’t make this until instructions are consistent to give advertised (photographed) result. Please explain inconsistencies.
Thanks for your message, Rena. The written instructions are accurate, but this article was published quite some time ago and paired with stock images. We’ve marked it for recipe testing and an update ASAP!