What’s a fun-filled celebration without cake?

I love any excuse to eat it: at birthday parties, weddings, graduation celebrations, or just a random weekday dessert splurge.
But before ripping off the candles and diving into a colorful pool of icing and sprinkles, let’s bring it back to the basics.
We’re going to share our favorite tips and tricks to help you make the most delicious cake possible.
With our guide to ingredients, tools and equipment, and baking and cooling advice, you’ll be making cakes like a seasoned pro before you know it.
Keep on reading for more!
Follow These Key Tips for the Best Desserts
I know from plenty of personal experience that baking can be complicated.
Especially when it comes to making cakes.
Sometimes, the perfectly fluffy, beautifully risen rounds of joy you were hoping to bake just don’t turn out.
Sometimes, you will find yourself crouched in the fetal position on the kitchen floor, rocking back and forth with zero hope left in your own abilities, because you realized midway through baking that you completely forgot to include the baking powder. And the sugar.
Even though you can still create delicious desserts with your cake failures, it’s best to go over some of the essential tips before you get started in order to minimize problems.
Looking for even more hacks and tips? I recommend consulting Foodal’s guide for improving your baking routine as well.
Plan Ahead
Here’s step number one, every single time:
Read through the entire recipe beforehand, so you know exactly what you are doing.
Make sure you have all of the tools needed, as well as all of the ingredients for the recipe. Check your refrigerator. You may need to make a quick grocery trip!
Oh, and one more thing: Don’t forget to preheat the oven before you start!
Once baking soda or powder mingle with any liquids in the batter, their leavening power is immediately triggered. And this continues after heat is applied.
You don’t want to lose any of the leavening, so you need to bake as soon as you pour the finished batter into the pans. Make sure the oven is hot in advance, so you’ll be ready to go.
Choose the Right Pans
The main goal is simple: bake a perfect dessert that actually comes out of the pan!
First, consider the type of pan you should use. Above all else, you should use light-colored metal pans for baking.
Without thinking, I used some dark-coated pans to make my first batch of vanilla cakes for this recipe.
I didn’t get the greatest results…
Dark-colored varieties absorb a greater amount of heat than light-colored types. As a result, the batter will develop a dark crust on the bottom very quickly, and may burn.
And that’s what happened with mine!
The photo below shows the bottom of two vanilla cakes. No, the top one is not chocolate.
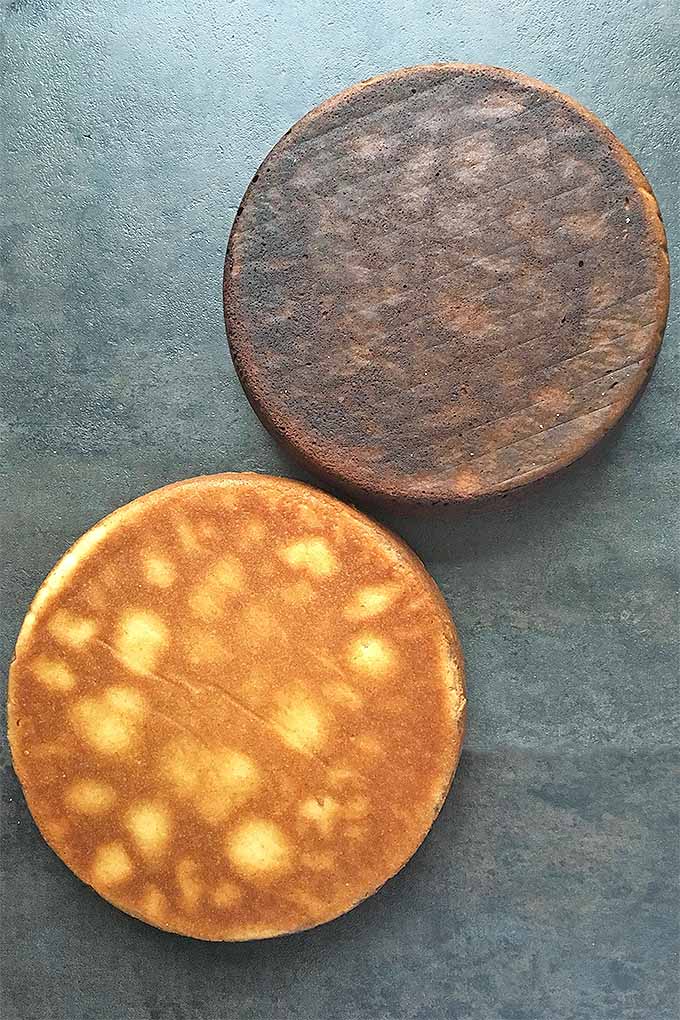
These were both prepared with the same vanilla batter, and baked at the same temperature and length of time. Can you guess which one was baked in a dark pan?
As you can see, this one was burnt beyond recognition.
If you only have dark-colored pans, the general rule of thumb is to decrease the recommended baking temperature by 25°F.
This helps to promote more even baking, with less risk of a burnt bottom.
Properly Prep the Pans
There are a variety of ways to prep these, but I’m partial to a certain method. Follow my favorite technique below to ensure that your treats come out cleanly with no issues, every time:
1. Make paper liners for the bottom of the pans. To get the right size, outline the bottom of the pan on the parchment paper, cut out, and set aside.
2. Lightly coat the bottom and edges of the pan with nonstick cooking spray.
3. Line the bottom of each pan with one parchment paper liner.
4. Lightly spray the parchment with more nonstick cooking spray. Your pans are now nonstick, and ready to go!
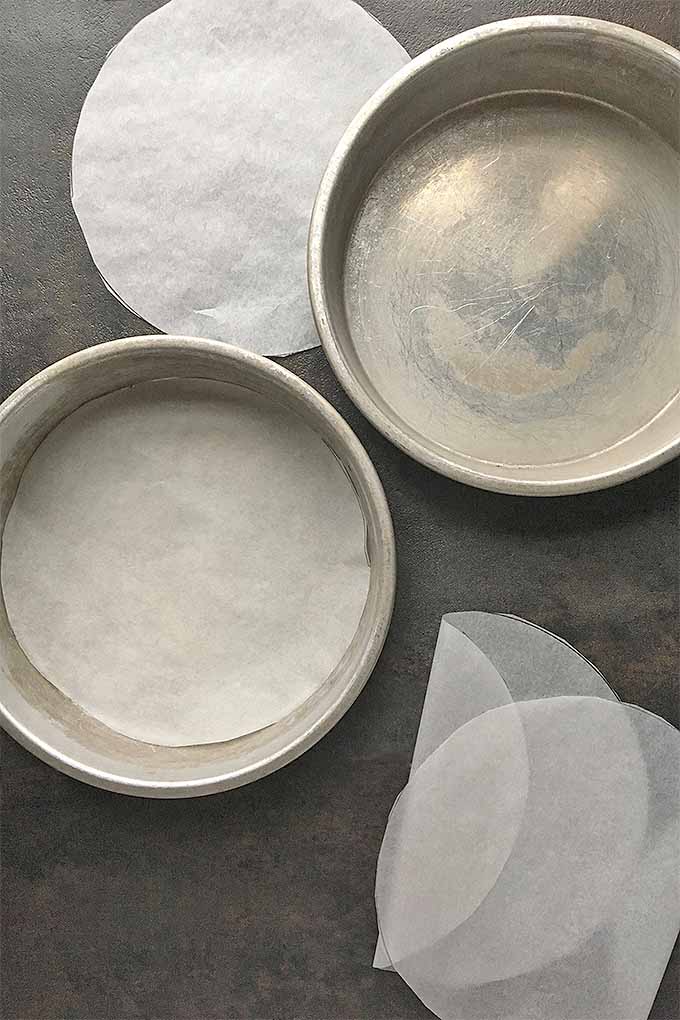
Through personal experience, I have found that it is not necessary to coat the pans with flour after greasing – the nonstick cooking spray and paper liners are effective enough to prevent the finished cakes from sticking.
It’s one less step you need to take, and it’s less of a mess. No flour, no fuss!
I maintain the same rule of simplicity with my nonstick cooking spray – I have the best success with plain, oil-based cooking spray rather than the types that have flour added.
Cake or All Purpose Flour: What’s the Difference?
Do you need cake flour to make a cake? It makes sense, but is it necessary? And what exactly is cake flour?
Well, there are many styles of flour: bread, cake, all purpose, and durum, to name a few. You can learn even more about all of these different types in our guide to flour.
One of the main differences between types of flour is that the protein content level varies among different varieties of milled wheat.
The protein content determines the strength. Keep these simple equations in mind:
- Higher protein content = stronger flour
- Lower protein content = weaker flour
Baked goods that have a chewy, firmer texture need stronger flours that can produce stronger gluten networks. Breads, bagels, and pizza dough are all prime examples of products that often use stronger flours like bread flour.
Items that have a softer and more tender texture need weaker flours, which will prevent the gluten network from developing too much strength and elasticity. Cakes, cookies, and biscuits are tender products that often use weaker flours like cake flour.
Despite the crazy range of flours you could buy, there is one that is reliable for a variety of baking needs, and it remains true to its name.
The beautiful thing about all purpose flour is that…
It’s all purpose!
Because its protein content is in the middle of the spectrum between strong and weak flours, it is purposefully milled for use in all common baking products, from hearty breads to tender cakes.
While cake flour can be substituted in equal weights for the all purpose flour in this recipe, it is not necessary.
You can certainly experiment and taste for yourself the subtle difference of tenderness. But you have my blessing, love, and approval to use all purpose flour to make your cakes.
It’s totally fine. No one will yell at you.
Just be careful to avoid overmixing the final batter. While you want all of the ingredients to be fully incorporated, the cake can get tough if the proteins in the all purpose flour are given an opportunity to develop a strong gluten structure when mixed too thoroughly.
Keep your dessert tender by mixing only until the ingredients are all incorporated into a uniform batter.
And how do you create a uniform batter? Read below!
Create an Emulsion
A butter cake’s soft, moist, fluffy texture relies on a successfully emulsified mixture – a smooth blend of fats with the other ingredients.
Everything needs to be combined in a way that makes a smooth and uniform final batter that has not separated or curdled.
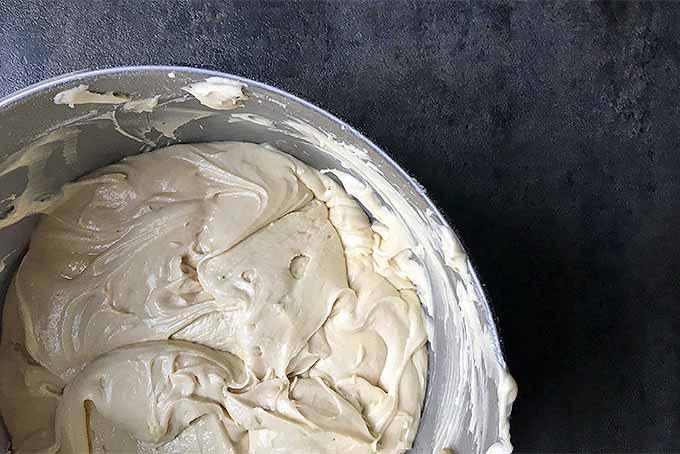
Emulsions are best formed when all ingredients are close to the same temperature, so you want your ingredients to be at room temperature for best results.
Chilled milk products, butter, eggs, or any other liquid ingredient should not be added to your batter straight out of the fridge. Before starting your recipe, take these products out of the refrigerator and place on the counter for about 20 to 30 minutes.
Another important factor for butter cakes is to gradually add the liquid ingredients to the batter.
The liquids must be added a little a time – if added too quickly or all at once, they cannot be properly absorbed and will cause the batter to curdle.
First, the eggs are added one at a time, and each one is thoroughly mixed before adding another.
Second, the other liquid ingredients are added gradually, alternating with the dry ingredients. Switching between liquid and dry slowly balances the batter and helps with the final emulsion.
Scrape the sides and bottom of the mixing bowl periodically as you stir the batter, to ensure that all of the ingredients are fully incorporated.
Remember, don’t overmix!
Bake Gently, Cool Thoroughly
For any kind of cake, baking and cooling are the final factors that need to be handled with care.
Position your rack in the very center of the oven to get the most even heat distribution, and make sure your pans don’t touch each other or the back or sides of the oven as they are baking. Again, this facilitates an even heat distribution all around the dessert.
Try not to disturb the cakes as they are cooking. The more the pans are jiggled or manipulated, the more of a chance there is that the delicate structure will be destroyed, resulting in a sunken bottom and other types of unevenness.
Avoid opening and closing the oven door – keep all that heat in the oven for the best results.
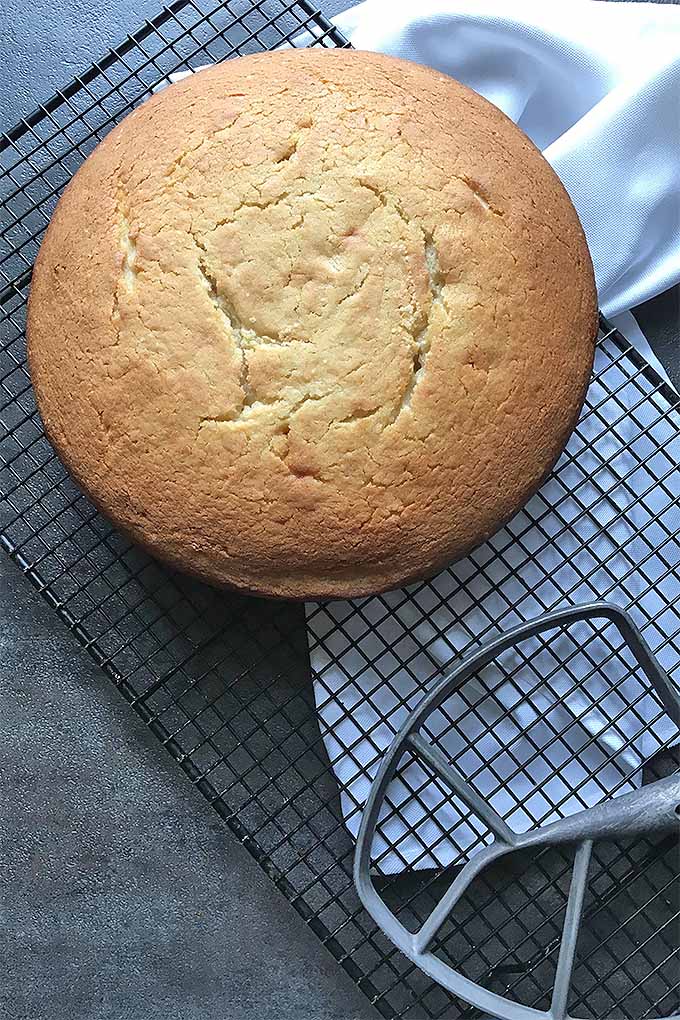
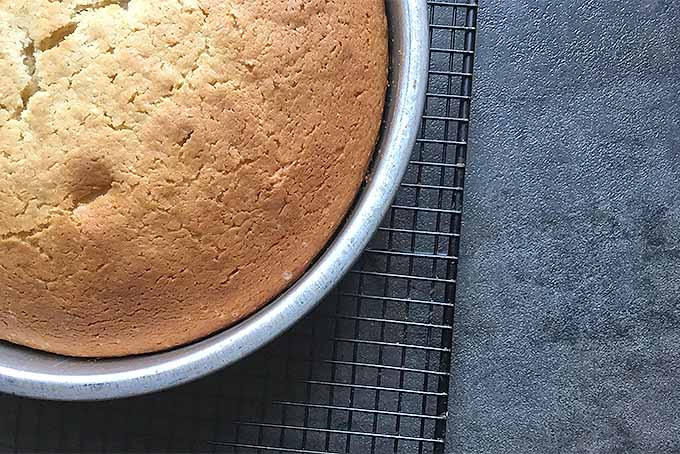
When done, remove the pans promptly from the oven and place on a cooling rack.
They need to cool significantly in the pans before they are removed. They are still developing their final structure as they are cooling, and are very delicate straight from the oven.
Let them cool in the pans for at least 30 minutes. Then run a paring knife around the edge to loosen, and invert.
Remove the parchment paper from the bottom, flip right side up, and place them back on the cooling racks.
At this point, they are still too hot for decorating, and the final texture is still developing as it gradually cools. Allow them to cool completely before using and storing.
Ignore them for awhile. Watch TV, play cards, read a book, drink a glass of wine… Anything that will keep you distracted!
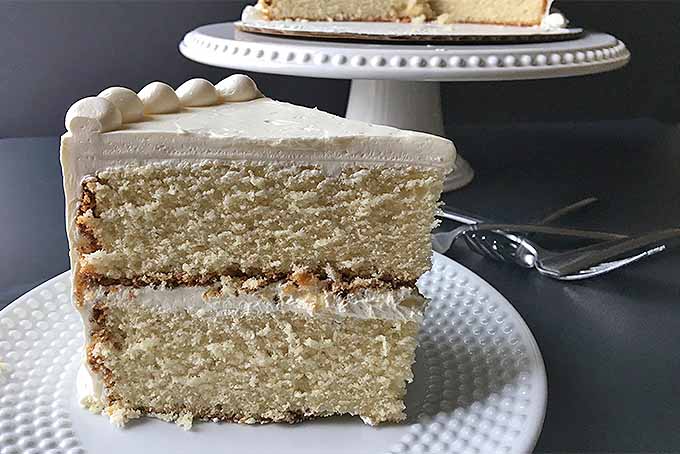
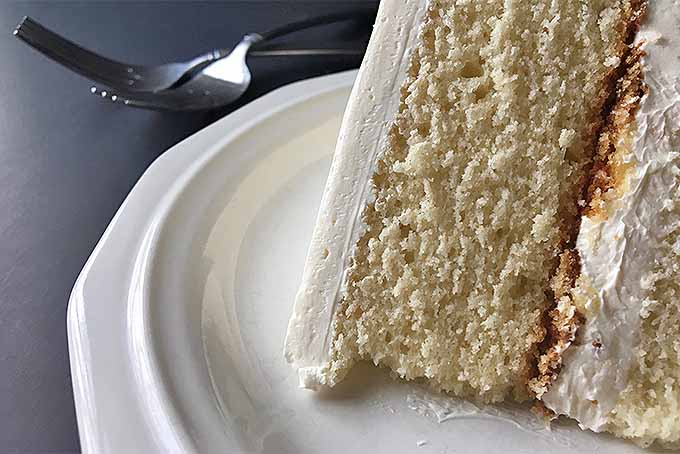
Learn the Basics to Make the Perfect Treat
Keep our guide for basic cake baking close in the kitchen with you. Our advice, tips, and tricks will help you through the process to ensure a perfect cake – every time!
Use our recipes for vanilla butter cake and chocolate cake to get you started with applying your new skills and confidence in the kitchen.
We also have a great paleo carrot cake recipe for you try!
After your fluffy mounds of joy have finished cooling, we’ll guide you through what comes next – decorating! Our recipes for frostings like cocoa fudge frosting, Swiss meringue and traditional American-style buttercream are delicious.
And our step-by-step cake decorating tutorial will definitely help you out!
Need some extra help with choosing the right tools for beautifying your baked treats? Read our guide on the best decorating tools every baker should own!
Do you have any of your own advice for baking perfect cakes? We’d love to hear it! Post in the comments below.
Don’t forget to Pin It!
Photos by Nikki Cervone, © Ask the Experts, LLC. ALL RIGHTS RESERVED. See our TOS for more details.
About Nikki Cervone
Nikki Cervone is an ACS Certified Cheese Professional and cheesemonger living in Pittsburgh. Nikki holds an AAS in baking/pastry from Westmoreland County Community College, a BA in Communications from Duquesne University, and an MLA in Gastronomy from Boston University. When she's not nibbling on her favorite cheeses or testing a batch of cupcakes, Nikki enjoys a healthy dose of yoga, wine, hiking, singing in the shower, and chocolate. Lots of chocolate.


Good info, will try soon.
I need to know why my cake crumbles after it’s baked. Cannot cut without cake falling apart and making crumbs. Hoping you will reply. Have called many resources. Thank You!
Hi, Rosemarie! Crumbling is a very common problem. There are a variety of reasons why this happens:
(1) The cake may have been overbaked. You may need to bake it a few minutes less than usual.
(2) The batter is too dry – there may be too much flour or too much leavening (like baking powder/soda) in your recipe. Try decreasing these dry ingredients.
(3) The batter was mixed improperly. Overmixing is a common issue. Be sure to follow your directions carefully, to create the most homogenous mixture without incorporating TOO much air in the process.
Hope this helps!
Hi!!
Can we use curd instead of buttermilk? If yes, what’s the quantity of curd should I use?
Hello, Neha! If you’re referring to the thick and fermented milk product, curd is going to be far too thick to use a substitute for my specific cake recipe. Buttermilk or whole milk will still be in a fairly liquid state, and is what I recommend to achieve the appropriate taste/texture/rise.
Thanks for publishing this blog, really awesome. Only experienced professionals can do this.
Thank you so much for your kind words, madhaviragu! These tips are for both pros and home bakers, or pretty much anyone who is a sugar monster (such as myself…)
Hi! Thanks for sharing this awesome article. But how do we know when the cake is baked perfectly done? I’ll really appreciate your response, thank you so much & salam from Indonesia ????
Hello, and welcome to our website, Prita! This is a GREAT question – There are a few key factors I like to use to help determine when your cake has been beautifully baked to perfection. Here are my usual go-to’s for most cake recipes:
– When you lightly touch the top of the cake, it will spring back slightly. If it sinks in, it needs more time in the oven.
– When you insert a cake tester or toothpick, it should come out dry, or with a few crumbs clinging to it. If there is still wet batter on the tester, it needs more time in the oven.
Let me know if you have any more questions. I’m more than happy to help!
Thanks for this article. It is very easy to read and understand yet very informative. I’m a newbie at baking and need all the tips I can get.
Your cakes all look good.
I would like to learn more about baking and Icing or frosting.
There is one flour that is so fine, it pours through the sifter…finer than any cake flour. It’s Wondra. I’ve been using it exclusively since it came out in 1967!
Hi, I would like to make a small one-layer cake (9”). We eat a lot of cake with drink weekly, and I want it simple and delicious. Please help.
There are so many delicious single-layer options, Renee! Can we please have an invitation to your house? We’re fans of anywhere that dessert is plentiful… 😉
You’ll find lots of great options in the cake section of our site. A few favorites are Riesling Apple Cake, Lemon Rhubarb Spelt Cake, Strawberry Cake, and Maple Blueberry Coffee Cake. You can find all of these using the search function at the top of the page.
Not all of these are originally written for a 9-inch round pan, but it should be easy enough to make the necessary adjustments to bake time. Please let us know if you need any additional assistance, and happy baking!
Why??? After making probably 35 carrot cakes a year by request by my family, does the fully shaped smooth top form craters as it cools when it comes out of the oven?
Hi Janet,
This depends a lot on the recipe that you’re working with, and from there, several factors can be involved. Sinking after being removed from the oven is normal for some types of cake (and a little icing goes a long way in terms of masking imperfections on the surface if the cake is otherwise baked correctly and up to par in terms of texture!). But sinking and forming craters can be the result of an unbalanced recipe or a lack of proper technique as well- underbeating egg, using ingredients that are too warm, failing to thoroughly mix dry ingredients before they are incorporated with the wet mixture, overmixing and deflating whipped egg, using too much leavening, baking in an oven that is not at the correct temperature, opening the oven door during baking, transferring the cake out of the baking pan too soon after it is removed from the oven, or cooling in a place that is too cold can all result in fallen cakes with uneven tops.
I’d have to see a photo to know exactly what you are talking about, but it’s likely that the craters you described are the result of overmixing, and introducing too much air into the batter. Cakes made with baking powder should not be overmixed, and the batter should be put into the oven to bake immediately, rather than allowing any time for it to rest on the counter. Tapping the pan a few times right before you put your pans in the oven can also help extra air that has been incorporated to quickly rise to the surface.
Beyond that, I would recommend checking the expiration dates on all of your ingredients, measuring carefully, and mixing thoroughly in the case of dry ingredients, gently when combining wet and dry. Check your oven’s temperature with an internal thermometer to ensure that it is accurate, and do not open to the door to check your cake before it’s done, since this will release heat and cause the temperature to decrease. Baking is truly a science and there may be other factors at play as well, if double checking these does not fix your problem. Hoping to be able to help you to get to the bottom of this! Please feel free to reach out with more specifics if you like, and happy baking!
Why do my loaf cakes sink in the middle? The pan is 16” long, light metal.
Zella, see my response to Janet above. Hope this helps!
Wow!!! This information is quite interesting and educative…I’m going to try it. I really love cakes and I will love to be a perfect Baker.
Thanks ma’am
Hi
I am Vani from bengaluru, india. Want to start a home bakery. I am new to this field. I was a swimming n fitness coach. Now jobless n investment on anything gives a kind of fear. So can’t invest on learning now. So was searching something that can help me learn online n experiment n slowly start the business. Found this site which is really cool n informative. I am sure this will guide me learn n start bakery soon. Hope I will get guidence
Pls share ur email address if u don’t mind.
We are so excited that you are inspired to start a home bakery! We have so many amazing baking recipes and how-to guides to help you through this new adventure. If you have any questions, be sure to write a message on our contact page: https://foodal.com/contact-us/
Why are my cakes hard around the edges? I have a brand new oven with a convection option….I follow the oven’s recommendations on baking on the bottom rack. I use Fat Daddio’s brand cake pans…I’m at my wit’s end! ugh.. please help
Ah, I’m sorry this is a frustration! Because you are using a convection option, you may need to adjust the time of baking. Convection setting bakes cakes more evenly and efficiently, so I would recommend baking your cakes about 10-15 minutes less than you would with a traditional oven.
And even though the oven may recommend the bottom rack, I would still bake the pans in the very center, where air circulation and heat distribution is typically the most even.