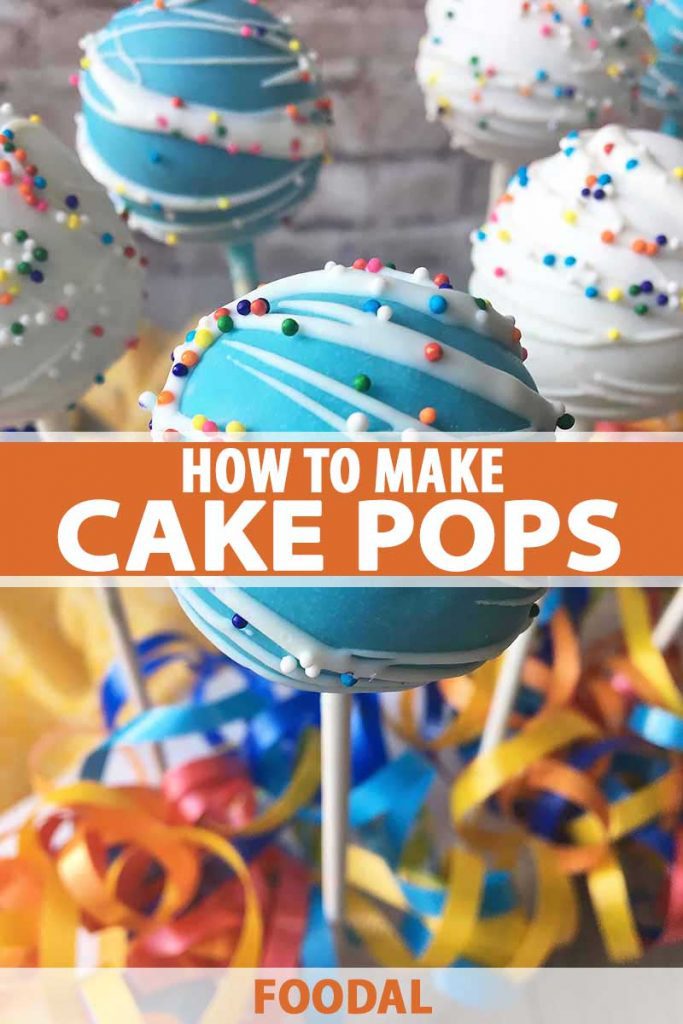
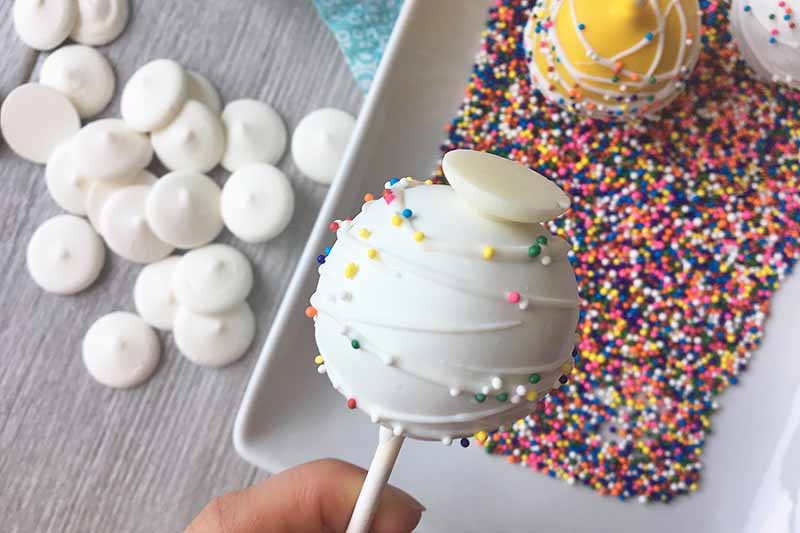
More beautiful than brownies, cuter than cupcakes, more petite than pie, cake pops are one of the most adorable treats you’ll ever hold. And one of the most delicious desserts you’ll ever eat!

I can’t imagine any other dessert that makes me smile and giggle with an unnecessary amount of happiness more than cake pops.
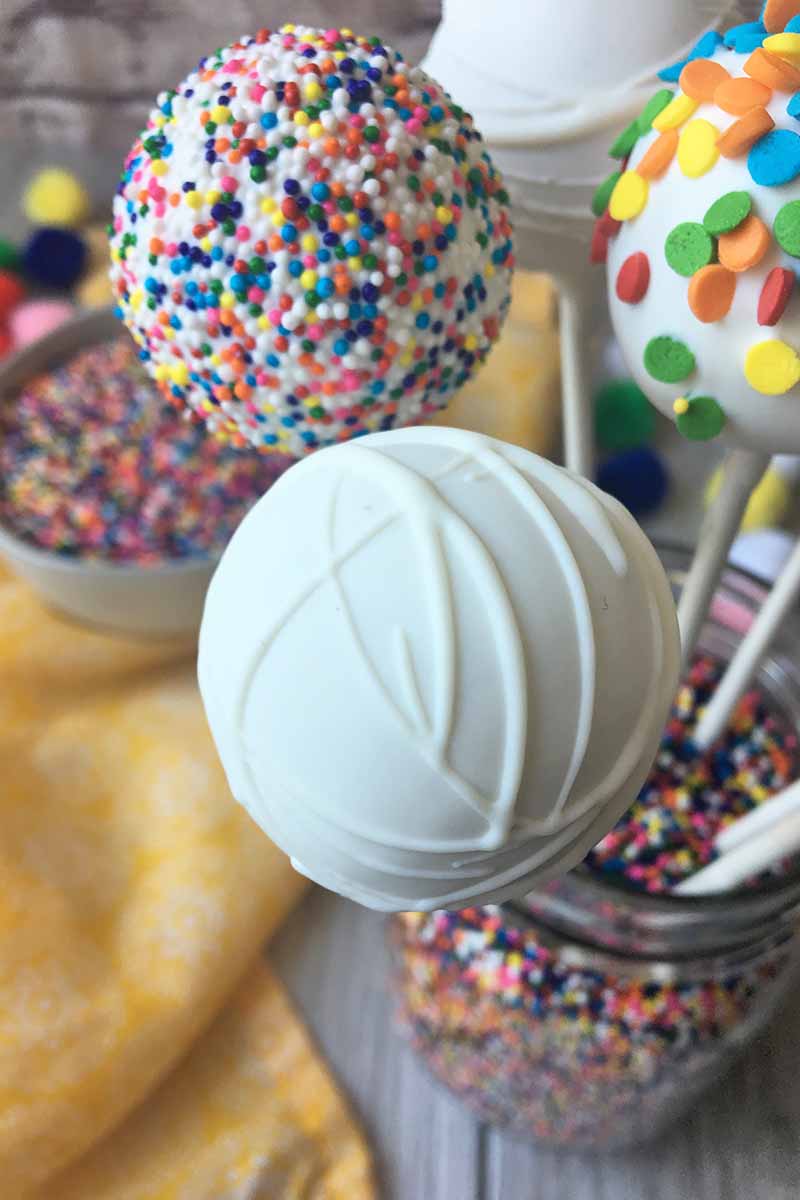
Covered in colorful icing and bedazzled with sprinkles, they’re so pretty! And so much fun!
They are the perfect sweet ending for so many occasions, especially for any event that has a theme, since they can be easily customized with bright colors and decorations.
And because they’re bite-sized, one pop is the perfect serving to keep you partying and celebrating without weighing you down.
If you want to make these little delights for an upcoming party, but need a little guidance, learn how to make them right here!
While they might seem like a breeze to make, a time-intensive process is actually required to prepare them the right way.
And it can get very messy very quickly if you’re not organized.
This article goes over all the basics you’ll ever need to know to make the most gorgeous handheld treats, without splattering your kitchen in an explosion of confetti jimmies and melted chocolate smears.
I’ve been there. To this day, I’m still stepping on tiny rainbow nonpareils…
Learn from my mistakes, and follow my step-by-step photo guide that thoroughly explains each stage of the process.
From getting neat and organized in the beginning, to applying the very last sprinkle on top, I share all the advice you need to make the perfect pops – so keep reading!
Print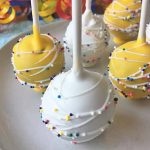
Perfect Cake Pops
- Total Time: 2 hours 5 minutes
- Yield: 20-30 cake balls 1x
Description
Want to serve perfect cake pops for a party? Need some help with the process? Learn all the basics on how to make them with Foodal’s step-by-step guide.
Ingredients
- 2 8-inch baked and cooled cake rounds, any flavor
- 1/2 cup icing, any flavor
- 3 12-ounce bags of chocolate candy wafers, assorted colors
- Vegetable shortening
- Sprinkles and decorations, assorted colors
- 20–30 skinny wooden lollipop sticks
- Large foam board
Instructions
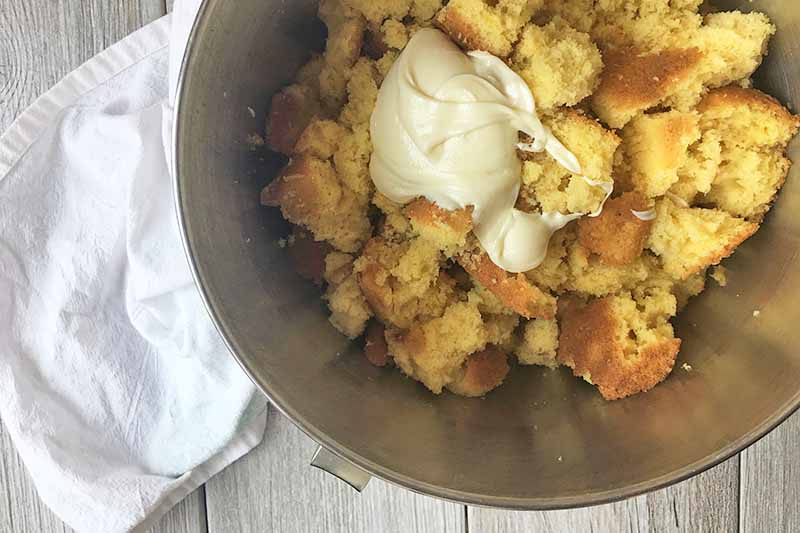
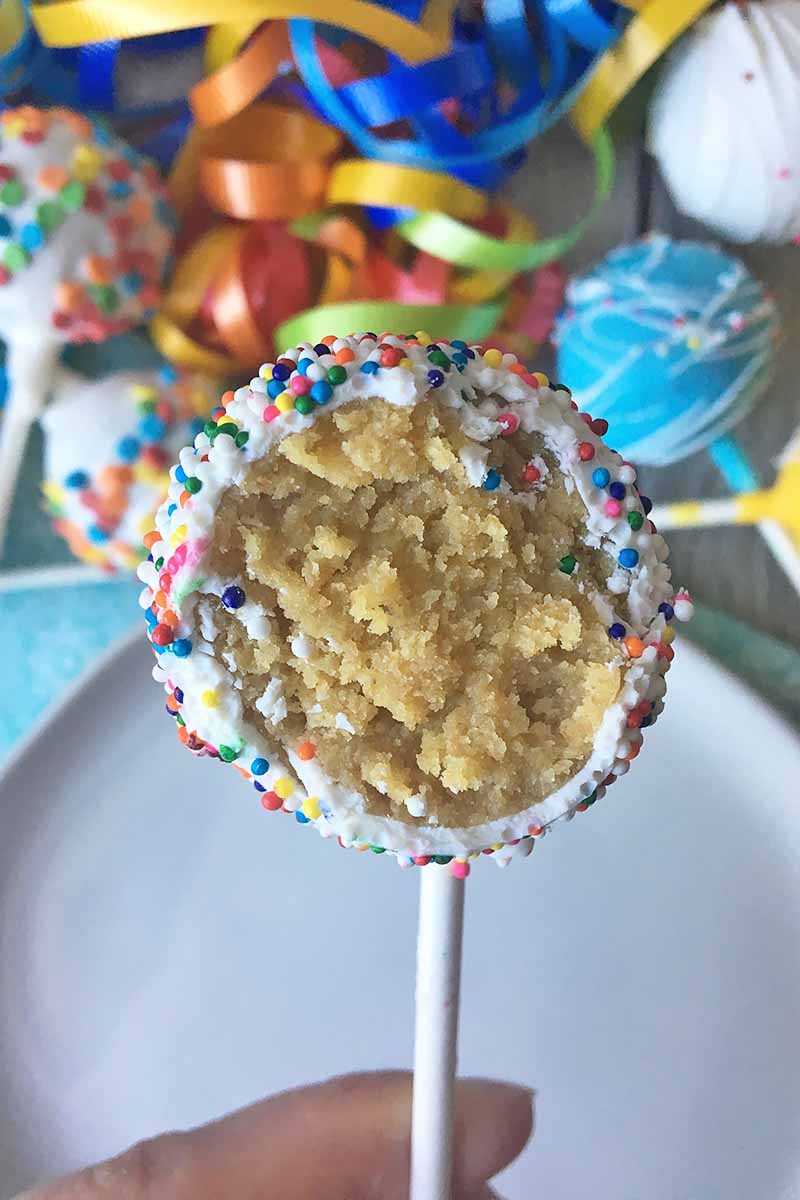
- In a large bowl or in the bowl of a stand mixer, crumble the cake rounds until no large chunks remain.
- By hand or with the paddle attachment, mix in the icing a little at a time, starting off with just a couple of tablespoons. Mix until a dense, but still crumbly, dough forms that you can mold into balls with your hands. Be careful that the mixture does not get too soft and moist. You may not need to use all of the icing. Refrigerate the mixture for 30 minutes, until chilled.
- Measure about 2 tablespoons of the cake mixture and roll into a tight, uniform ball with your hands. Place the balls on a baking sheet lined with parchment paper. Refrigerate for about 1 hour.
- When ready to dip in chocolate, remove the chilled balls from the refrigerator and let sit at room temperature for about 5 minutes.
- Melt the chocolate candy wafers according to package instructions. If it looks too thick for dipping, mix in vegetable shortening one teaspoon at a time to thin it. Let cool slightly, stirring occasionally, for 5 minutes.
- Dip a lollipop stick in the melted chocolate, and insert in the cake ball, pushing halfway to stop at the center. Allow to harden at room temperature, or place back in the refrigerator for a couple minutes.
- Dip the cake ball in the chocolate until completely covered. Gently tap the stick against the edge of the bowl to remove excess melted chocolate.
- If using decorations on the base layer, immediately apply before the coating sets.
- Stick each pop upright in the foam block to harden and set. Wait for 15 minutes to apply another layer of decorations. Allow to set completely before serving immediately, or storing in the refrigerator until ready to serve. These can be stored for up to one week.
- Prep Time: 2 hours
- Cook Time: 5 minutes
- Category: Cake
- Method: Baking, No-Cook
- Cuisine: Dessert
Decorating by the Numbers…
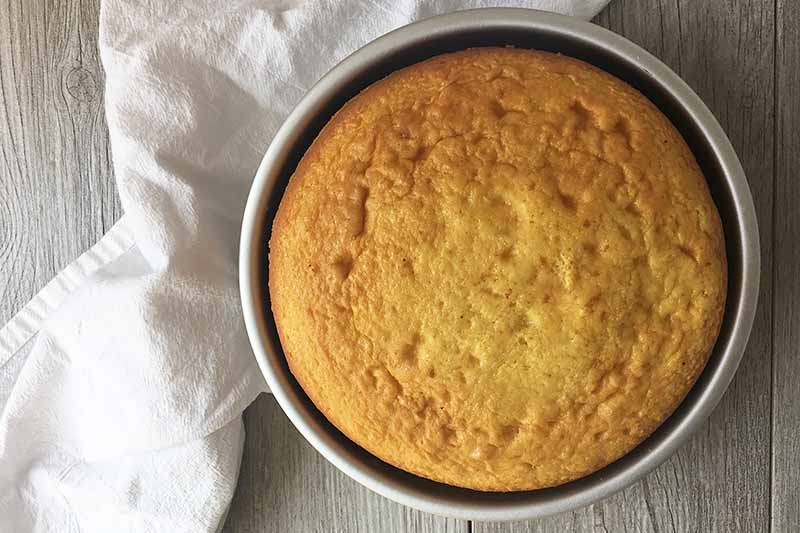
Step 1 – Bake
For the cake base, you can use your favorite recipe, in whatever flavor you prefer. Vanilla and chocolate are my go-to flavors for crowd-pleasing pops.
For fun variations, you can try using recipes like carrot or banana. For more inspiration, take a look at all of our recipes to find one that you like.
Or, you can use our DIY yellow cake mix. But you can also use a store-bought boxed mix. Like I did. With my pops.
Still tastes amazing!
Whatever you use, whether you’re working from scratch or taking a few shortcuts, make sure it’s a simple recipe. Small ingredients like nuts and dried fruit will be fine once they’re tightly rolled together to form balls. However, I would not use any recipes for upside-down cakes – it would end up as a sticky mess in ball form!
Once they’re baked, make sure that they are completely cool before crumbling and decorating.
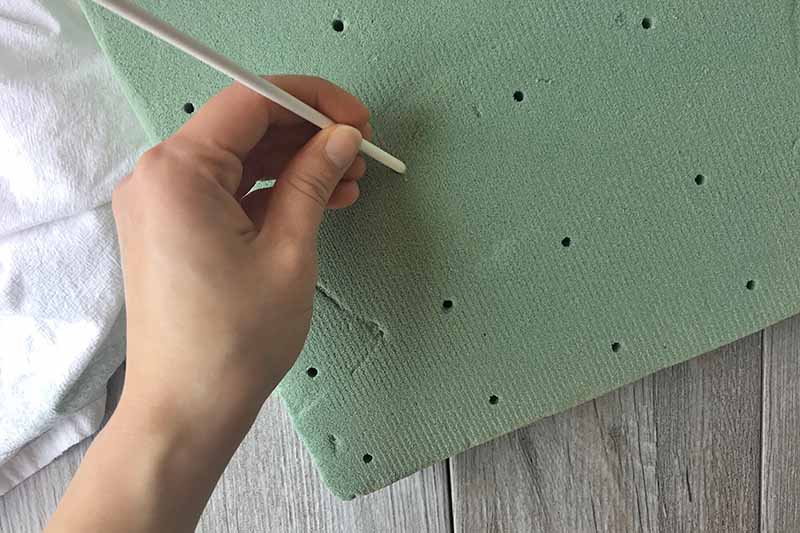
Step 2 – Gather and Prep
This step is essential! Take the time to gather and organize all the tools and ingredients you’ll need for each step.
I like to use the checklist below to make sure I have all of my essentials:
- Make sure there is space in your fridge to chill the pops.
- Prep a sheet pan with parchment paper.
- Prep your Styrofoam block with holes the same size as the sticks.
- Set out the baked cake and icing.
- Set out a large bowl, or your mixing bowl, for making the balls.
- Set out mixing spoons, spatulas, and scoopers for portioning.
- Place your candy wafers in microwave-safe bowls for melting.
- Place your sprinkles or other decorations in bowls on a tray.
- Put your candy sticks in a jar.
- Have extra plates available to place dirty spoons and miscellaneous items.
- Have a wet washcloth and dry washcloth for cleaning and wiping.
Don’t be fooled by how cute and small they are – a lot of maintenance and care is required to make them look so perfect! But when you prep your work station, tools, and ingredients, you’ll work more quickly and efficiently.
All hail the cake pop master!
Step 3 – Mix Together
Just like the cake, the icing you use is totally up to you, depending on the flavor profile you want.
Try any of my recipes for icing: classic fluffy frosting, Swiss meringue buttercream, or cocoa fudge frosting will all be divine choices.
Vegan? Try our non-dairy option for icing!
There is just one very important rule to follow:
DON’T. ADD. TOO. MUCH. ICING.
You need just enough to moisten the cake to mold and form it into balls. The base itself already has a high fat content, so you don’t need to add too much extra icing.
If there is too much icing, the pops will be waaaaaay too soft. Which leads to quite a few problems:
They won’t hold their shape properly, they’ll fall off the sticks when you dip them, they’ll cause the chocolate to crack once it sets…
Just, no.
As someone who was silly enough to dump in a HUGE bowl of icing on my very first time making these, take my advice: Work with small scoopfuls of icing, pretty please!
In a large bowl, or in the bowl of a stand mixer, crumble your cake. If using a stand mixer, you can use the paddle attachment to break it up on low speed.
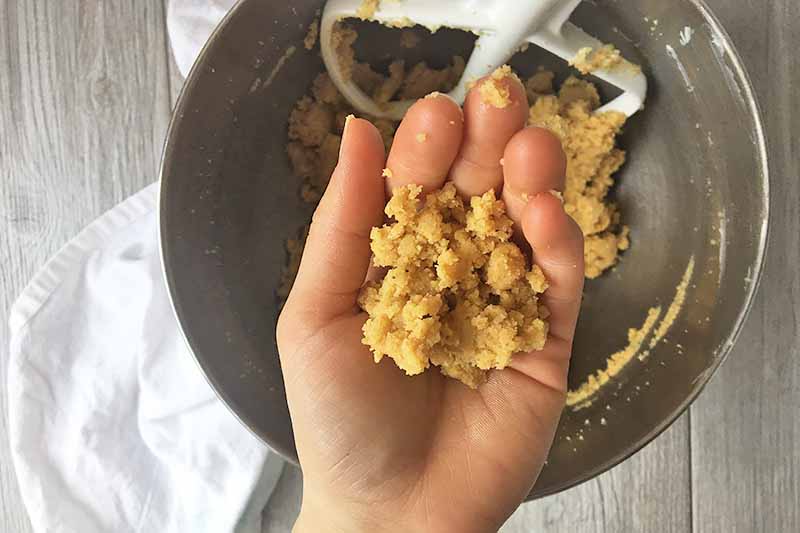
By hand or with the paddle attachment, mix in the icing a little at a time, starting off with just a couple tablespoons. Mix until a dense but crumbly dough forms that you can mold into balls with your hands.
Step 4 – Form the Balls
Once the icing has been completely incorporated into the base, let it chill in the refrigerator for about 30 minutes.
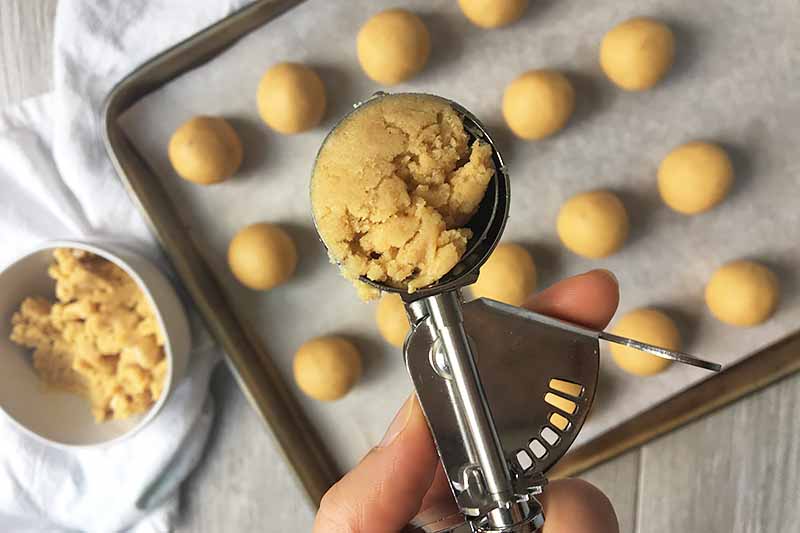
Measure about 2 tablespoons of the cake mixture, using a tablespoon or a small cookie scoop.
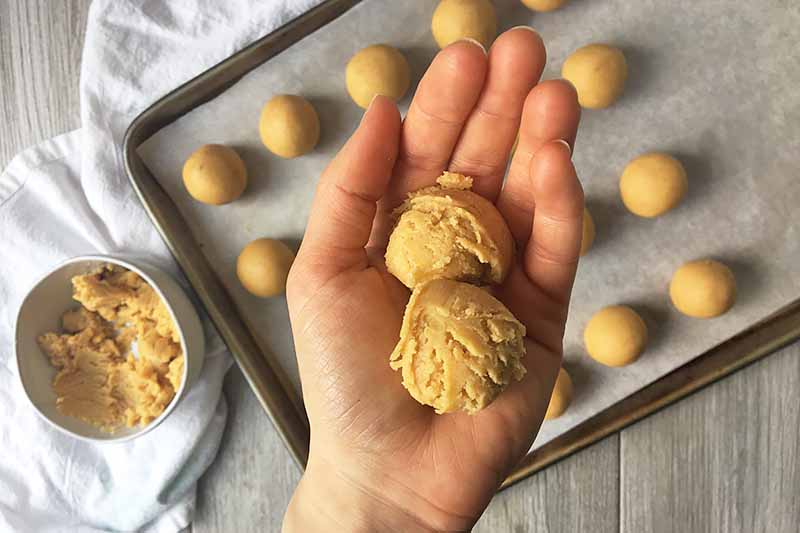
With your hands, roll into a tight, uniform ball, applying gentle pressure to press the mixture together with no cracks or openings.
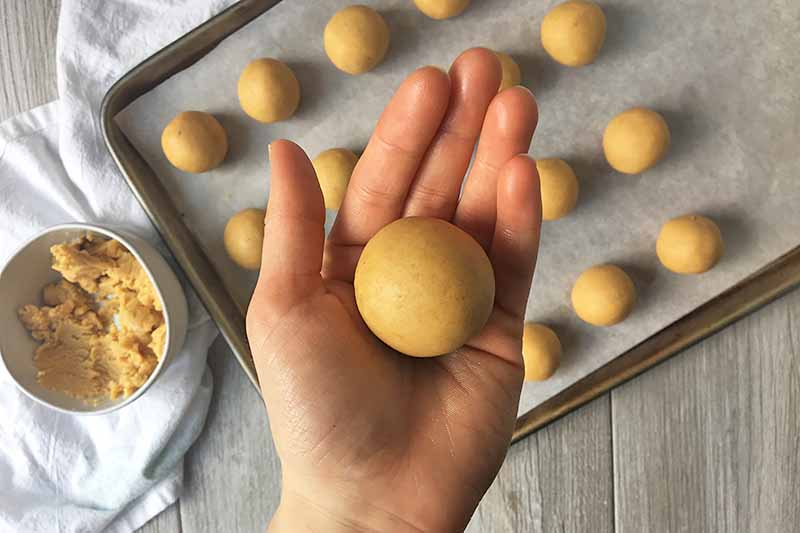
Place the balls on a baking sheet lined with parchment paper.
I would definitely use parchment paper for this, rather than a silicone baking mat. The nonstick coating collects all the oil from each pop at the bottom, which you’ll need to wipe off before coating in chocolate.
Skip this unnecessary step! The parchment paper absorbs any extra oil that seeps out of each ball.
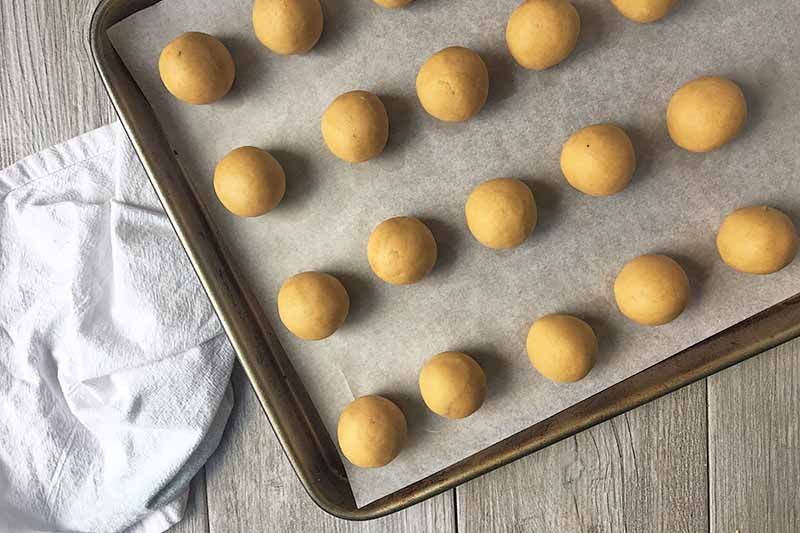
Refrigerate for about 1 hour to allow them to chill and harden before coating.
One of the biggest concerns with decorating these fun desserts is trying to avoid any severe temperature changes, to ensure the melted chocolate coats smoothly and sets without any issues.
You don’t want the cake balls to be too cold or too warm before you dip them, but just firm and chilled enough.
If they are too cold, the chocolate will set prematurely and crack as it settles. If they are too warm, they will be too soft to dip properly in the melted chocolate.
Step 5 – Melt the Coating
Chocolate candy wafers are the easiest and most accessible type of chocolate to use to cover the cake balls. Also known as candy melts, these are typically found in the cake decorating aisle of most grocery stores or craft stores.
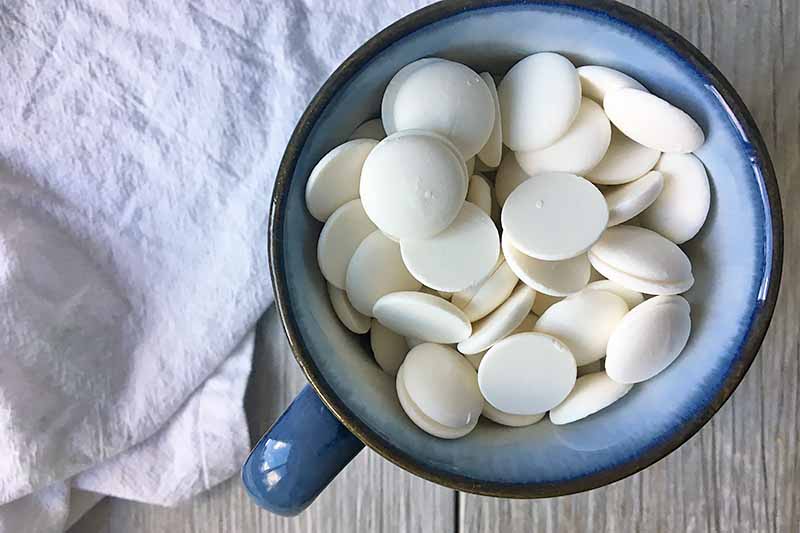
Made with sugar and vegetable oils, these typically include no cocoa butter like regular chocolate does. With their small wafer shapes, they are easy to melt and re-melt. And with a variety of colors available, you can customize your desserts however you wish!
Follow the package instructions for melting procedures. I like to use a mug for my melted chocolate, as I can use the handle to control how I dip each cake pop.
Once melted, allow the chocolate to rest, stirring occasionally, for about 5 minutes to cool slightly.
Again, we are avoiding any extreme temperature differences – letting the coating cool for a few minutes before dipping brings it closer to the temperature of the cake pop.
Chocolate too thick? Stir in vegetable shortening just a few teaspoons at a time to get a thinner consistency that will make the cake pops easier to dip.
Step 6 – Insert the Sticks
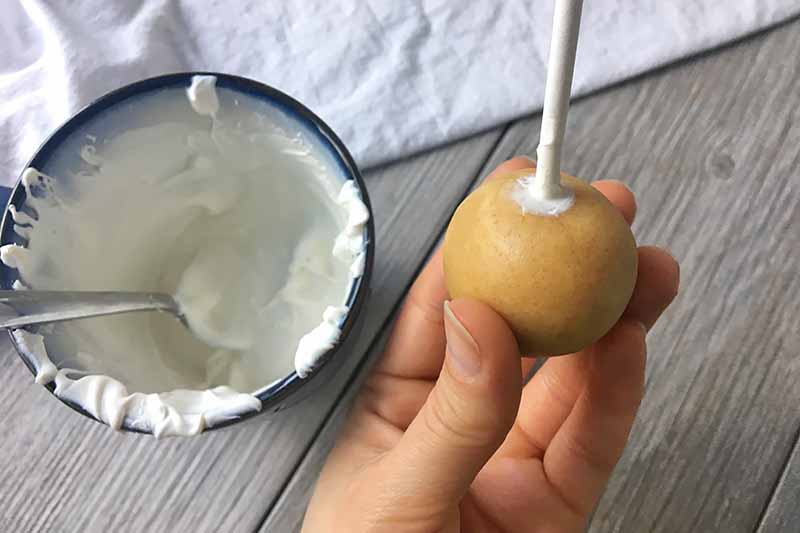
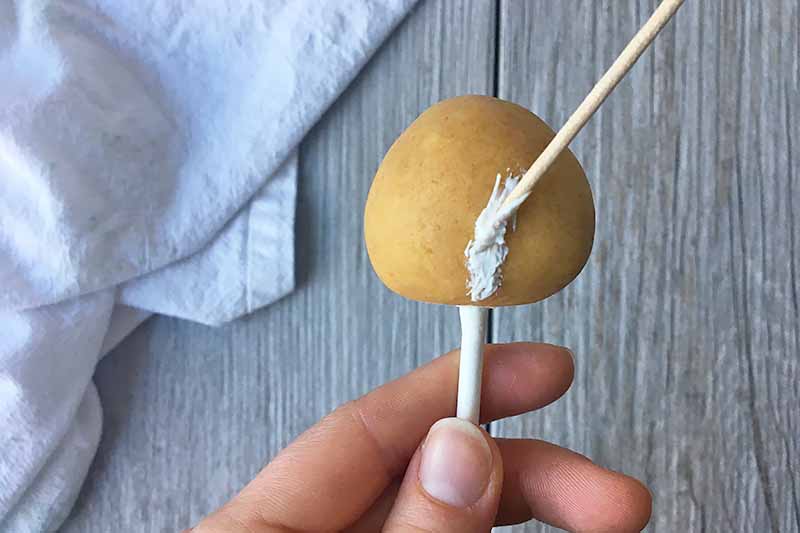
Dip each stick in just a little melted chocolate, and insert it in the center of each ball, pressing just about halfway down into the cake. This helps to secure the stick inside.
Remove any excess icing on top, and put back in the fridge for just a few minutes to set the chocolate.
Step 7 – Troubleshoot
Finding cracks on the chilled cake balls? Don’t dip them in the melted chocolate just yet! Cracks in the cake will definitely lead to cracks on the coating.

Here’s an easy solution: take a little bit of melted chocolate on a toothpick or your finger and cover the crack, as if you’re filling in a pothole.
Let the chocolate set completely before moving on to the next step.
Step 8 – Dip
Remove the cake pops from the fridge. Let them sit at room temperature for about 5 minutes, so they can come to temperature slightly without getting too soft.
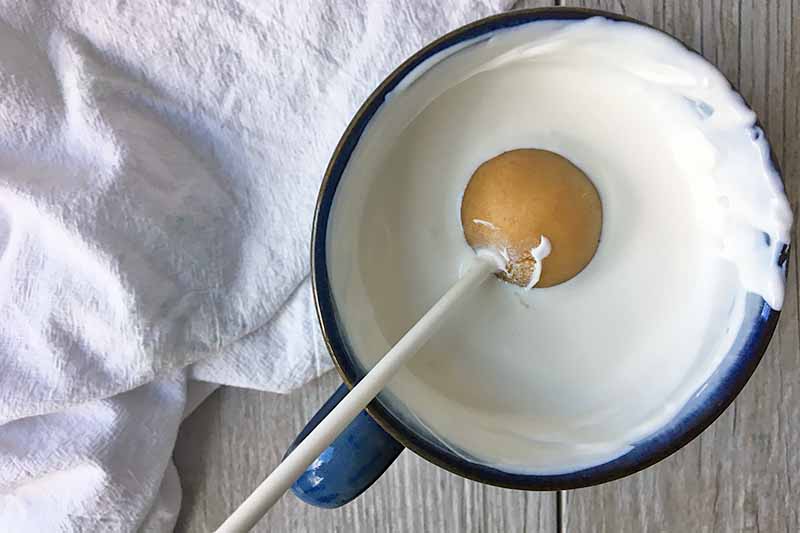
Once the chocolate has cooled slightly, dip each one by one in the chocolate, swirling it to completely coat the surface.
Gently tap the cake pop on the side of the bowl to remove any excess, using your fingers or a toothpick if necessary to guide the excess melted coating back into the bowl.
Keep tapping and swirling the stick until all excess chocolate is removed, and you have a smooth, even layer of chocolate.
If the chocolate gets too thick or too cold to work with, re-warm in the microwave, and stir in a little more vegetable shortening.
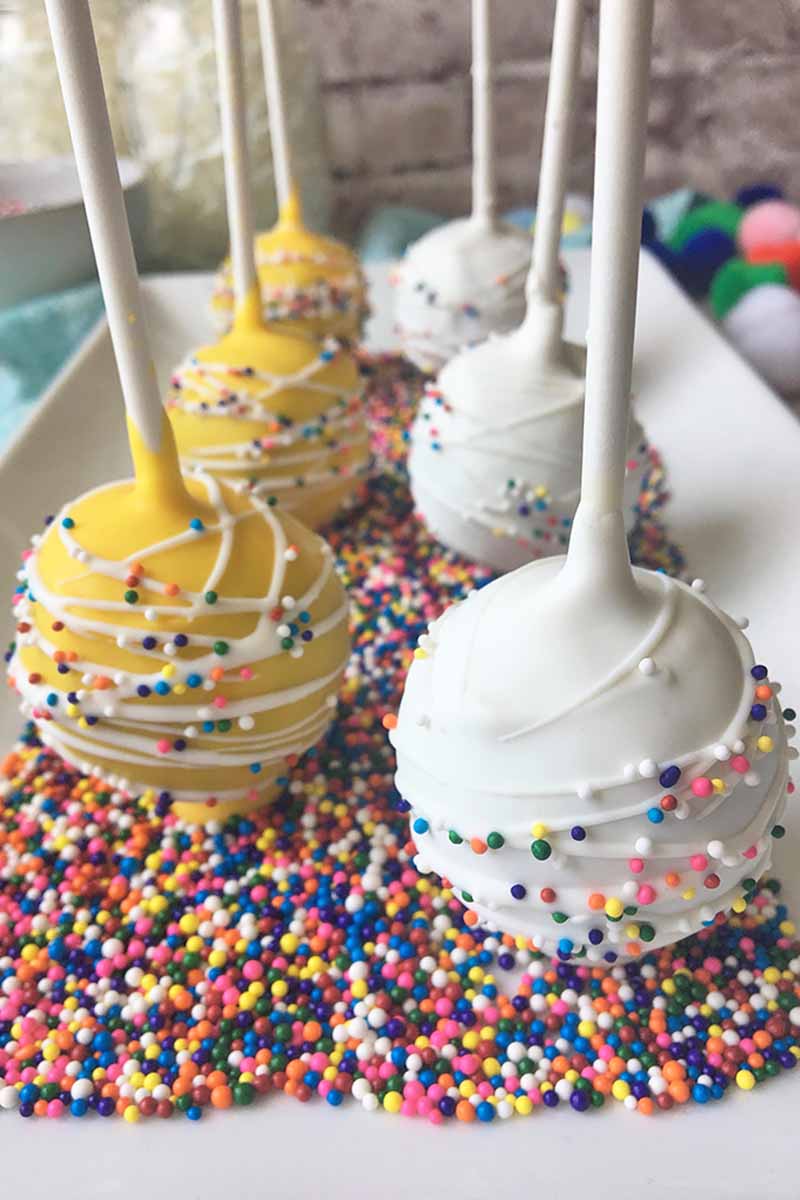
Step 9 – Decorate and Set
If using, immediately apply any sprinkles while the chocolate is still wet and has not yet set. The chocolate will harden quickly, so you want to work fast to make sure the sprinkles stick.
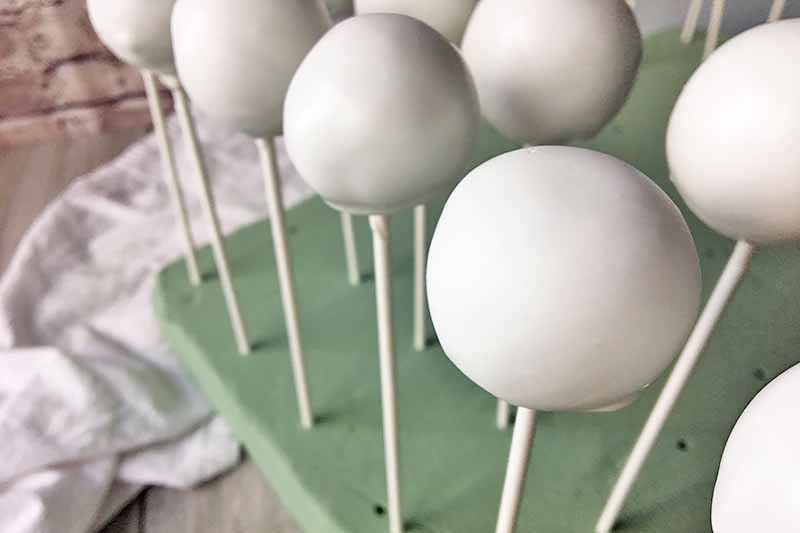
Insert the dipped cake balls upright in the prepared foam block to set the coating. Allow the coating to completely set before serving or adding an additional layer of decorations.
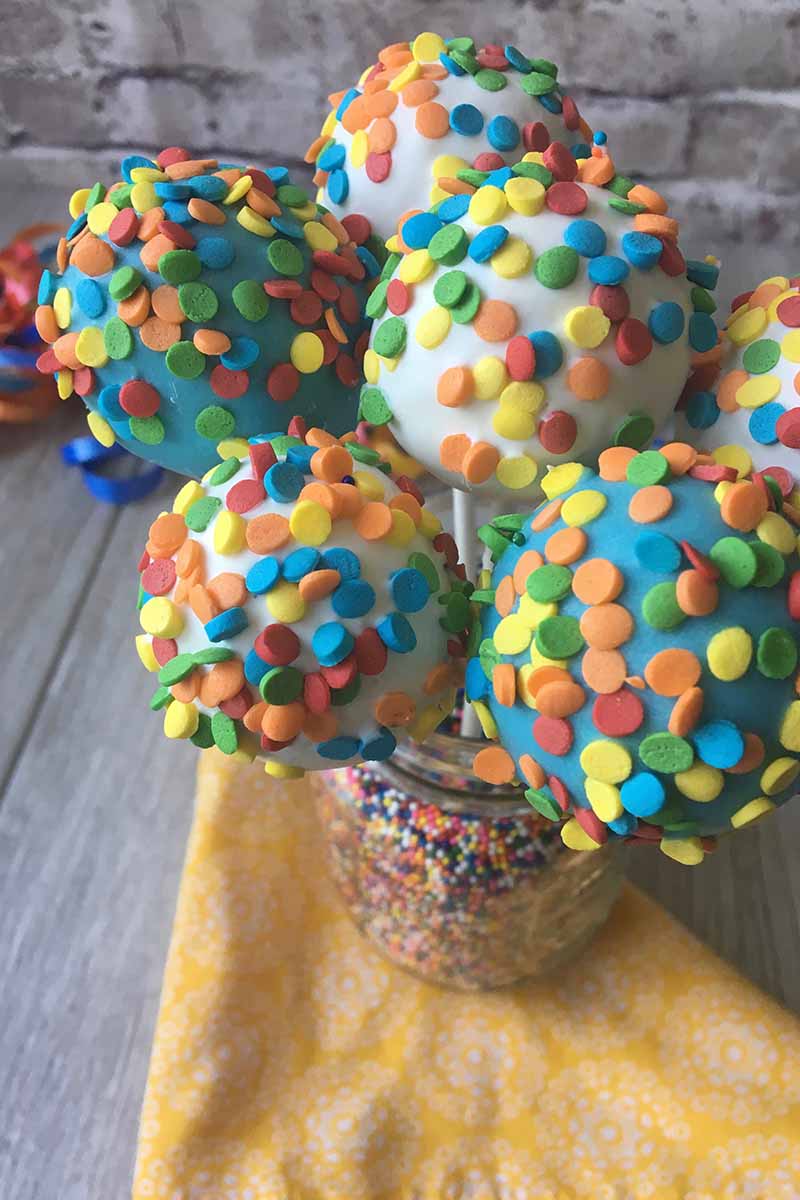
Step 10 – Apply Optional Second Layer of Icing/Decorations
Once the first layer has set, you have the option of applying a second layer of icing and decorations. Let your creativity roam free – I like to apply drizzles of chocolate, and add extra sprinkles.
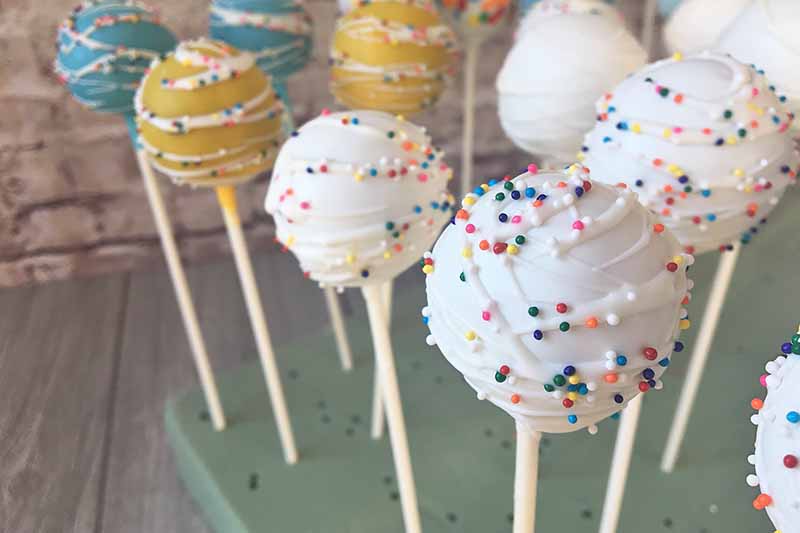
Place them back in the foam block, and let the second layer set undisturbed until completely hardened.
Fun Tip: Want your pops to stand up on their own, with no platter, jars, or cups to worry about? Stick one extra chocolate wafer on top of each pop with a little bit of melted chocolate to give them a flat surface to rest on!
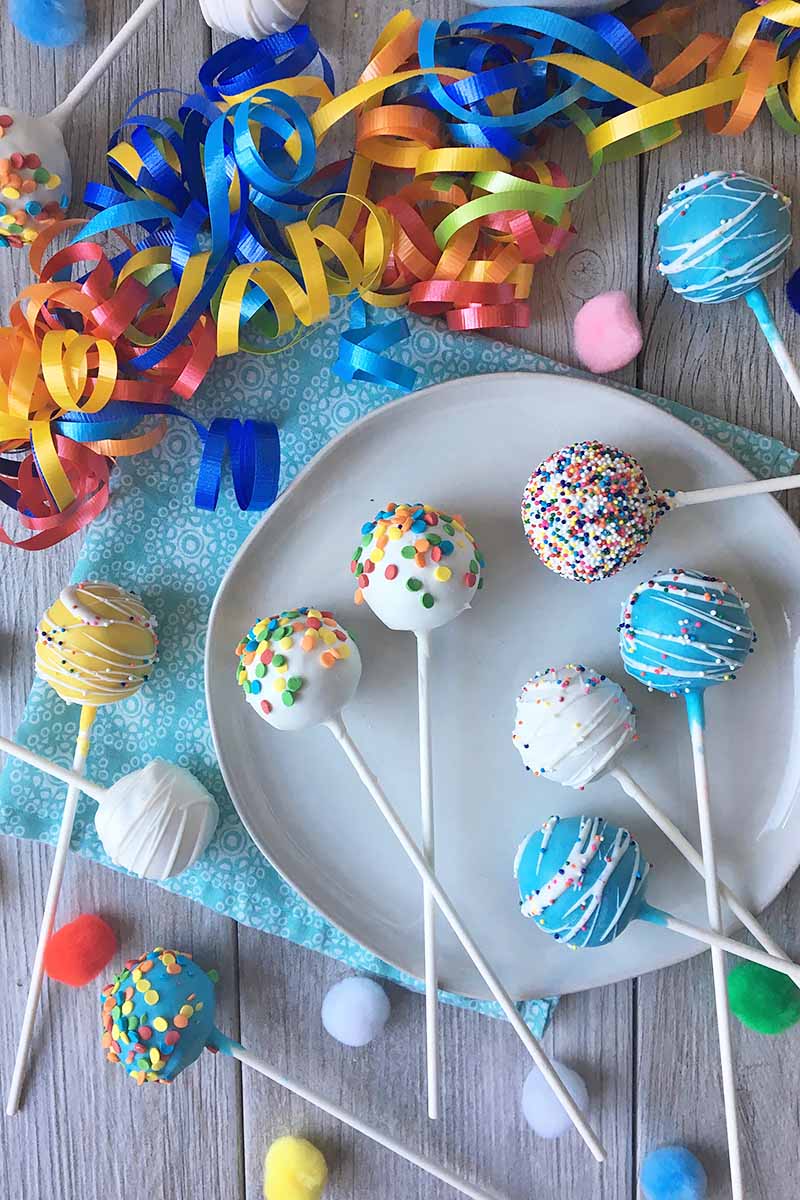
Step 11 – Serve and Store
Once the chocolate has completely set, your bite-sized desserts can be eaten immediately, or they can be stored in the refrigerator for up to a week.
You can carefully wrap each individual treat in cellophane and store on a large platter. Or, you can keep them upright on the Styrofoam block, and gently cover with a large sheet of plastic wrap or aluminum foil.
Serve whenever you’re ready to bring all the sweet joy to the party!
A Sweet Treat Like No Other
It’s so true! Cake pops are a unique dessert that acts as both a cute party favor and a tasty treat.

While the process is more time-consuming to put together than other desserts, it’s well worth the time and effort if you want to create an unforgettable finale at your next party.
If you are new to this entire process, I would suggest starting with an easier base, like store-bought marshmallows, to get comfortable and confident with the technique! We have a recipe for chocolate-covered marshmallow pops that utilizes the same methods. It’s an easy, and still very cute, way to start.
Once you understand the basics, feel free to customize your decorations and designs however you wish!
Make the most out of the cake supplies section of your grocery store or craft store – there are so many options for icing and decorations to fit any theme or holiday.
Want to go even more DIY? You can even make your own sprinkles and decorations, using my recipe for hardened royal icing.
Have you made these miniature desserts before? Do you have any suggestions for those who are making them for the first time? Give us your best advice in the comment section below, and be sure to rate our recipe!
Would you like to tailor these to specific seasons? Take a look at more of our cake pop decorating guides:
Photos by Nikki Cervone, © Ask the Experts, LLC. ALL RIGHTS RESERVED. See our TOS for more details.
Nutritional information derived from a database of known generic and branded foods and ingredients and was not compiled by a registered dietitian or submitted for lab testing. It should be viewed as an approximation.
About Nikki Cervone
Nikki Cervone is an ACS Certified Cheese Professional and cheesemonger living in Pittsburgh. Nikki holds an AAS in baking/pastry from Westmoreland County Community College, a BA in Communications from Duquesne University, and an MLA in Gastronomy from Boston University. When she's not nibbling on her favorite cheeses or testing a batch of cupcakes, Nikki enjoys a healthy dose of yoga, wine, hiking, singing in the shower, and chocolate. Lots of chocolate.


It works really well. I recommend this recipe – it is easy and if you know what you are doing then you will get it done in less than 2 hours!
I use my small crock pot to melt the melting chocolate. Easier than using the microwave, so much faster.
What temp should the mini crock pot be on when adding the candy melts? No one ever stated that. There is a low, high and warm setting.
If you want to use your Crock-Pot, high temperatures will burn the candy. Be sure to use the low heat setting.
At what point can I freeze these? After forming into balls or before forming into balls? Can I freeze the completed pops? Thanks! I’m making these for a fundraiser!
Hi, Michelle! I would suggest freezing them *after* you form them into the balls, but *before* you decorate them with the coating. When are you ready to decorate them, thaw them in the fridge for a couple hours. Hope everyone enjoys them at the fundraiser, and let me know how you decorate them!
I can’t understand how to form balls make cake mix I tried making after mixing cake batter and it was so sticky how I get the cake mix to form balls..that’s the only problem I have a I’m excited to make them they are such a cute desert..
You have to bake the cake first. After it has cooled you break the cake up and mix it with icing…at this point you make balls.
I would like to make white candy coated cake pops with gold and silver lines to decorate them. What should I use for the gold and silver ?
Hello, Fran! What a fun idea for decorations!
You have a few options, depending on what is available online or at your local craft store. You can purchase edible gold or silver glitter/powder, or you can purchase edible gold or silver paint.
If you are using glitter/powder:
After applying the base chocolate coating on the cake pop, let it dry completely. Once it is completely dry, pipe horizontal lines with the same color of chocolate coating around the cake pop. Working quickly before the lines set, lightly sprinkle the glitter on the wet lines. Allow that layer to dry completely. Use a brush to gently brush away all excess glitter. The glitter should only stick to the horizontal lines and not the base coating.
If you are using paint:
You can paint lines/other designs by hand once the base chocolate coating has set completely.
After dipping cake pops into chocolate and while they are setting up and hardening, oil will sometimes ooze through the chocolate. I’ve tried using 1/2 the recommended oil when making the cake and the oozing persists. Any suggestions as to how to prevent are much appreciated.
What a frustration, Terri!
Here are my thoughts:
1. Reduce the amount of frosting you add with the cake. More frosting increases the fat content in the final cake pops, which increases the risk of fat seeping out. If you can reduce the frosting, and still get a moldable cake base, you’ll lower the chances of fat seepage.
2. Really pay attention to the temperature of your cake pops as you’re decorating. Be sure to closely follow my Cooking by the Numbers section – you’ll see that I routinely put the cake pops in the fridge throughout all of the steps. The more the cake base is out at room temperature, the more risk you have the fat separating from the cake and seeping out. While you don’t want the cake pops to be too cold before you dip in the chocolate (which causes cracks, as I wrote), you also don’t want them sitting out at room temperature for an unnecessary length of time. I suggest working in batches, leaving the majority in the fridge while you work with only 5 to 10 at room temperature.
Hope this helps! And keep practicing – cake pops are a labor of love, but yield beautiful works of art!
You bake the cake and then crumble it to mix it with the icing.
I have a CakePops mold – can I still use these to get it to work? I have trouble getting mine to stay on the sticks and get frosting on them. Can you help me?