
We occasionally link to goods offered by vendors to help the reader find relevant products. Some of these may be affiliate based, meaning we earn small commissions (at no additional cost to you) if items are purchased. Here is more about what we do.
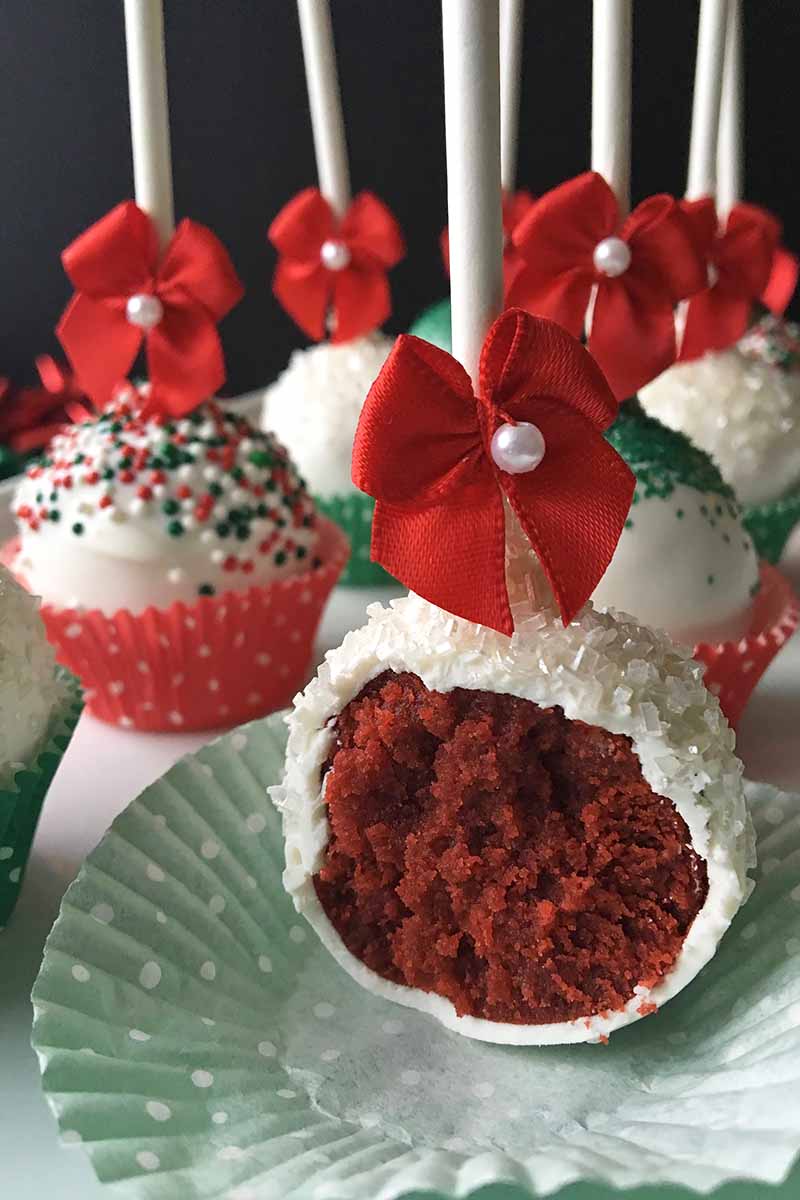
I’m spreading Christmas cheer to not just cookies this year…
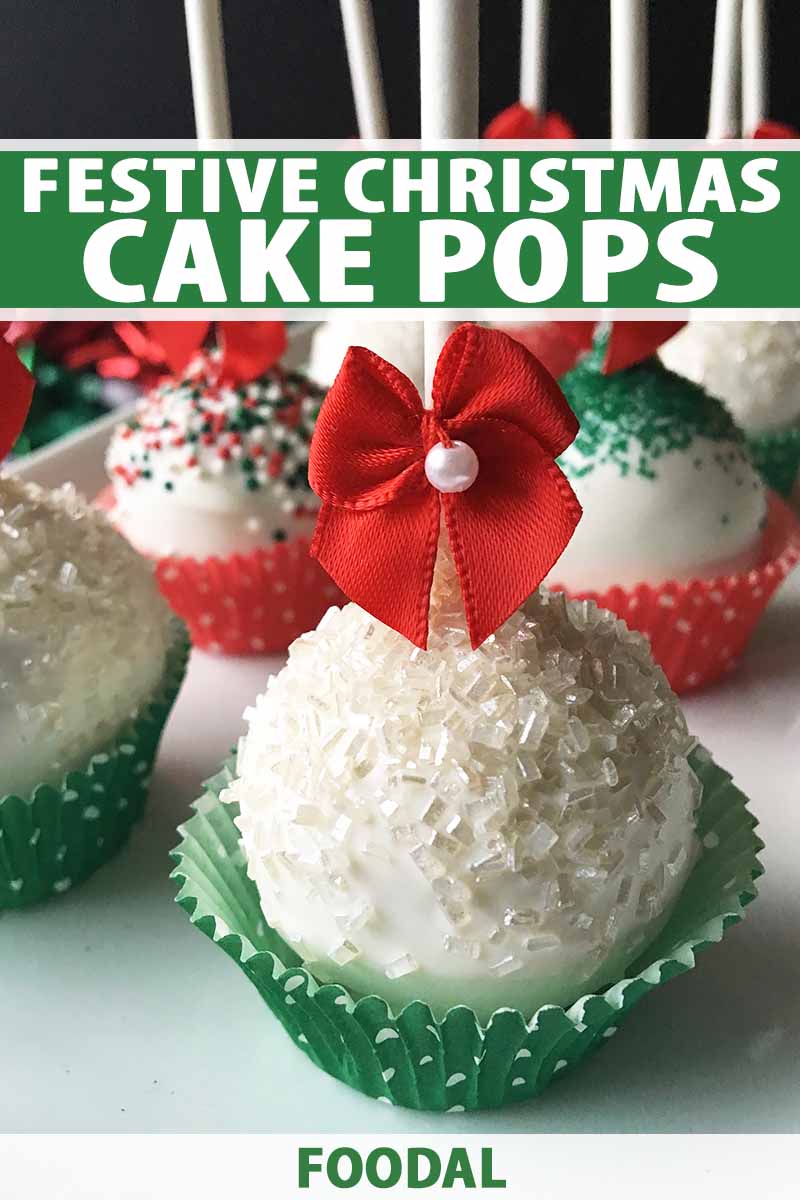
My cake pops need some good tidings, too!
And since you’re already super busy with holiday shopping, cooking feasts, baking sweets, decorating your home, picking out a tree, hosting parties, Christmas caroling, wrapping presents…
(Whew!)
I’ve kept the decorations sweet and simple for you.
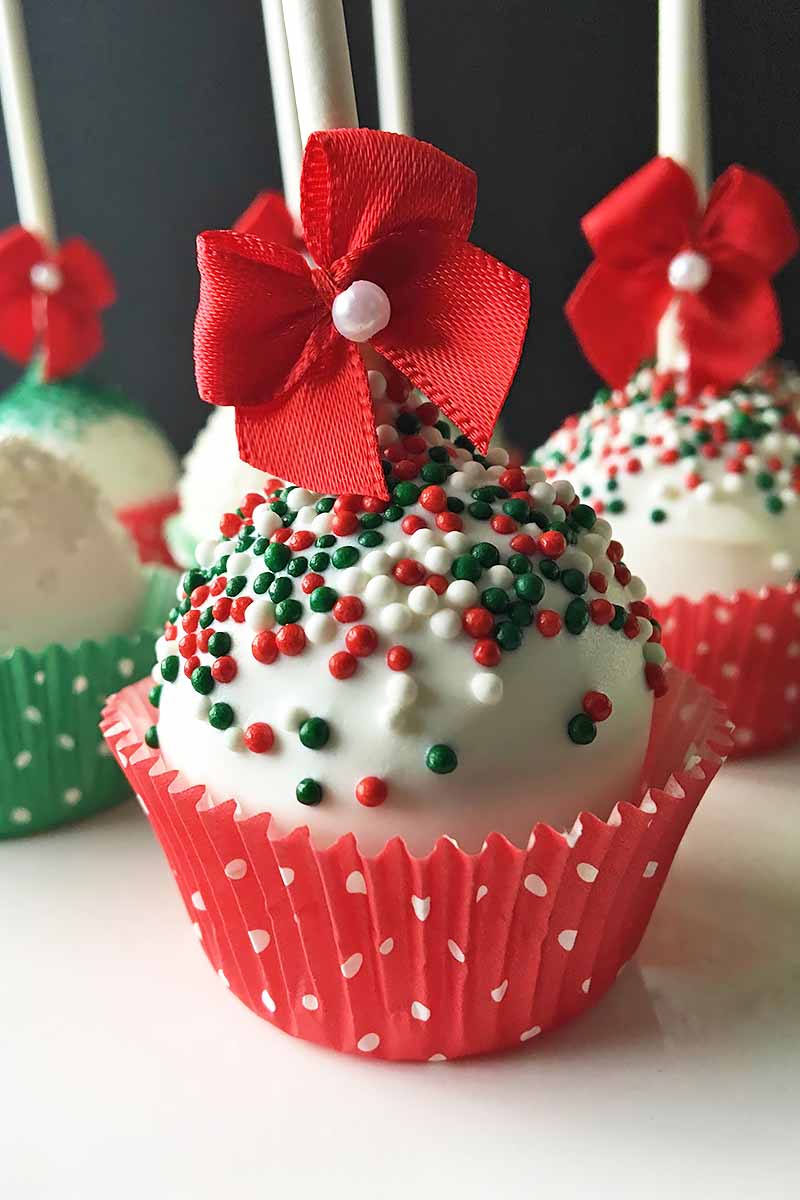
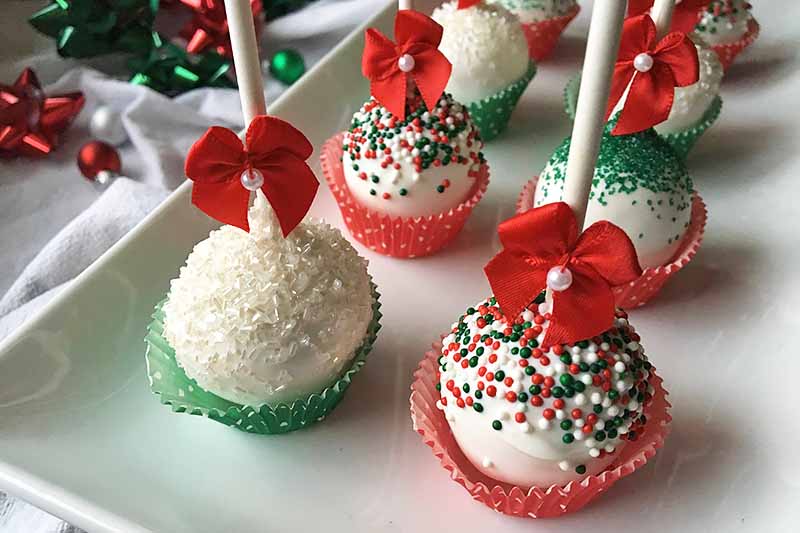
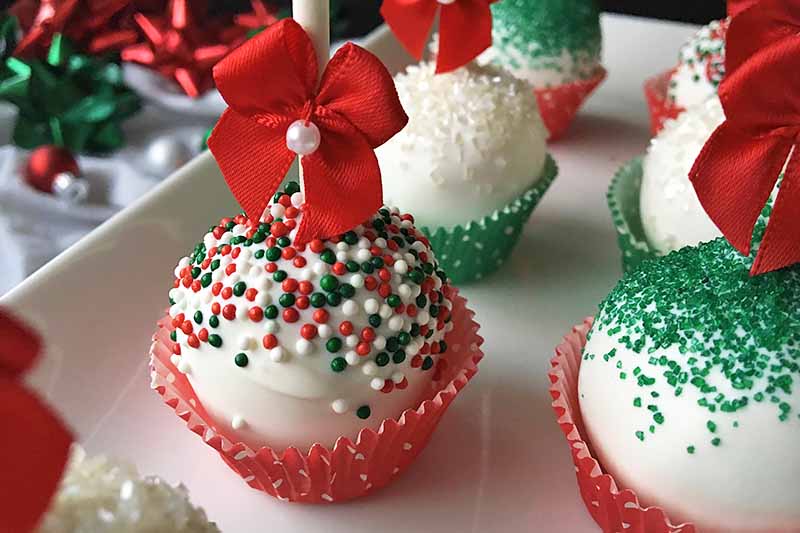
Decorating will be easy – dip the balls in melted chocolate wafers with your favorite holiday colors (red, green, and white are always a welcome color palette this time of year!), and cover them with assorted sprinkles.
Once you finish admiring the festively hued decorations outside, take a big bite into the colorful center made with vibrant red velvet cake (recipe coming soon!).
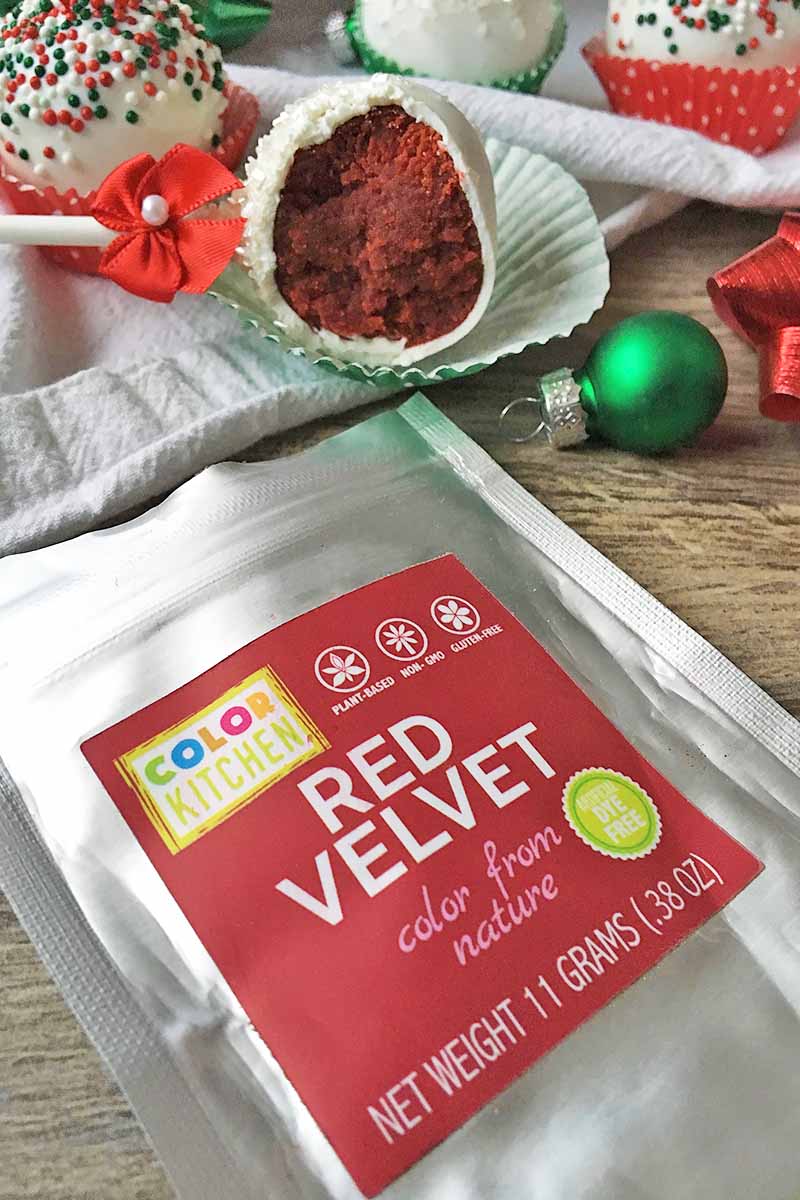
Kudos to the ColorKitchen’s all-natural Red Velvet Pigment for helping the red velvet cake base be the merriest and brightest! Shop for the company’s line of plant-based concentrated powder pigments, dessert mixes, and sprinkles on Amazon.com.
Shouldn’t Santa enjoy something different this year, aside from his usual milk and cookies?
Make these holly jolly pops instead, with the recipe right below!
Print
Festive Christmas Cake Pops
- Total Time: 2 hours, 5 minutes
- Yield: 30-40 cake pops 1x
Description
Tired of decorating cookies for the holidays? Spread the Christmas cheer to cake pops instead, with red velvet cake and fun sprinkles.
Ingredients
- Two 8-inch red velvet cake rounds
- 1 cup prepared vanilla frosting
- 3 12-ounce bags chocolate wafers, assorted colors
- Vegetable shortening, as needed
- 30–40 wooden lollipop sticks
- Sprinkles and sanding sugar, assorted colors
Instructions
For the Cake Base:
- In a large bowl or in the bowl of a stand mixer, crumble the cake until no large chunks remain.
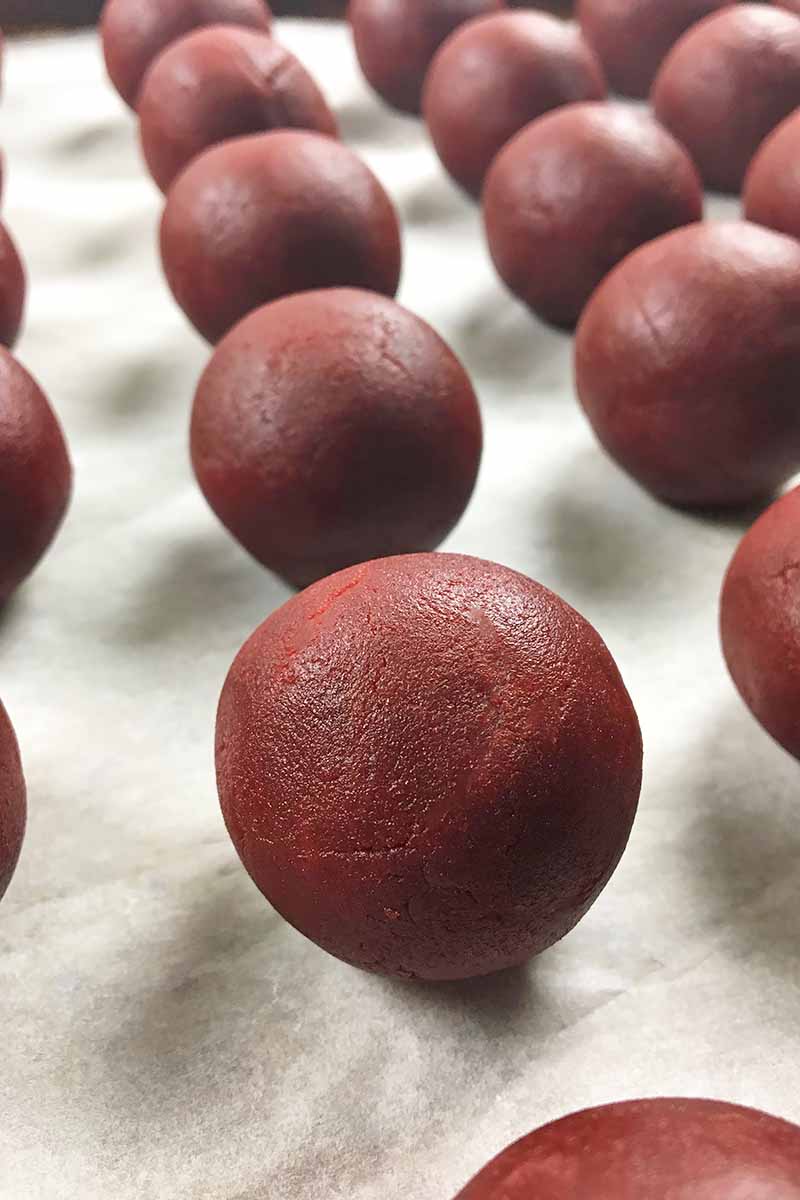
- By hand or with the paddle attachment, mix in the frosting a little at a time, starting off with just a couple of tablespoons. Mix until a dense but still crumbly dough forms that you can mold into balls with your hands. Be careful to avoid adding too much, so the mixture does not get too soft and moist. You will not need to use all of the icing. Refrigerate the filling for about 20 minutes.
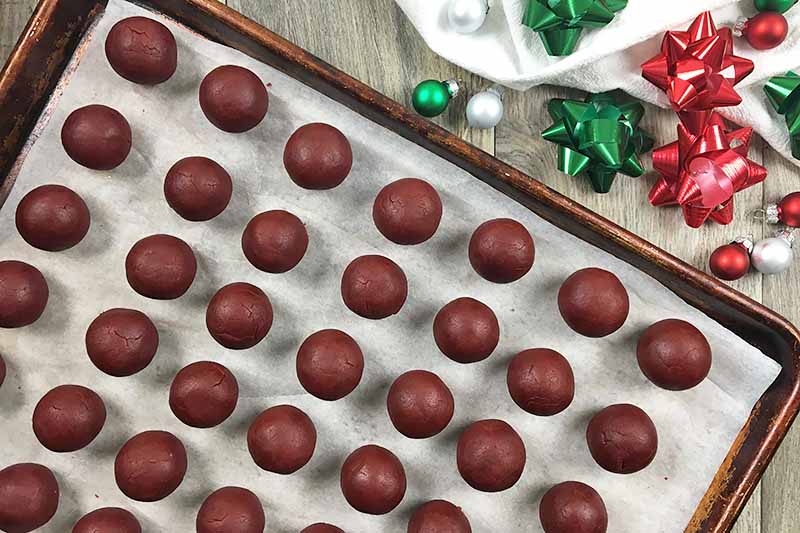
- Measure about 2 tablespoons of the cake mixture and roll into a tight, uniform ball with your hands. Place the balls on a baking sheet lined with parchment paper. Refrigerate for about 1 hour.
- When ready to dip in chocolate, remove the chilled balls from the refrigerator and let sit at room temperature for about 5 minutes.
For the Candy Coating Layer and Sprinkles:
- Melt the chocolate candy wafers according to package instructions. If it looks too thick for dipping, mix in vegetable shortening 1 teaspoon at a time to thin it. Let cool slightly, stirring occasionally, for 5 minutes.
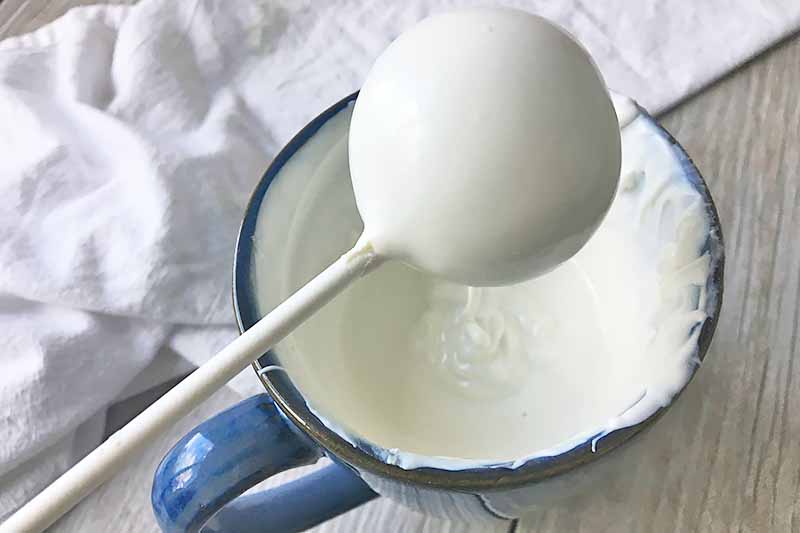
- Dip a lollipop stick in the melted chocolate, and insert in the cake ball, pushing halfway to stop at the center. Allow to harden at room temperature, or place back in the refrigerator for a couple minutes.
- Dip the cake ball in the chocolate until completely covered. Gently tap the stick against the edge of the bowl to remove excess melted chocolate.
- Once the excess chocolate is removed, immediately apply the sprinkles before the coating sets.
- Optional: For cake pops that stand up on their own, apply one chocolate wafer on the top of each cake pop, flat side facing up, using some additional melted chocolate as the glue.
- Stick each pop upright in the foam block to harden to set completely before serving immediately, or store in the refrigerator until ready to serve.
- Prep Time: 2 hours
- Cook Time: 5 minutes
- Category: Bite-Sized
- Method: baking, no-cook
- Cuisine: Dessert
Cooking by the Numbers…
Step 1 – Prepare the Cake Balls
Follow Foodal’s step-by-step guidelines on how to make perfect cake pops: prep and chill the balls with the icing, insert the sticks in the center, and chill for an additional 5 minutes to set the sticks.
Step 2 – Apply the Base Layer Coating
Remove them from the fridge and let sit at room temperature while you melt the chocolate.
Melt the white chocolate coating and let cool slightly for about 5 minutes. Once it has cooled slightly, dip each one in the chocolate, swirling it to completely coat the surface.
Gently tap it on the side of the bowl to remove any excess, using your fingers or a toothpick if necessary to guide the excess melted coating back into the bowl. Keep tapping and swirling the stick until all excess chocolate is removed, and you have a smooth, even layer.
If the chocolate gets too thick or too cold to work with, re-warm in the microwave, and stir in a little vegetable shortening.
Step 3 – Apply Sprinkles and Base
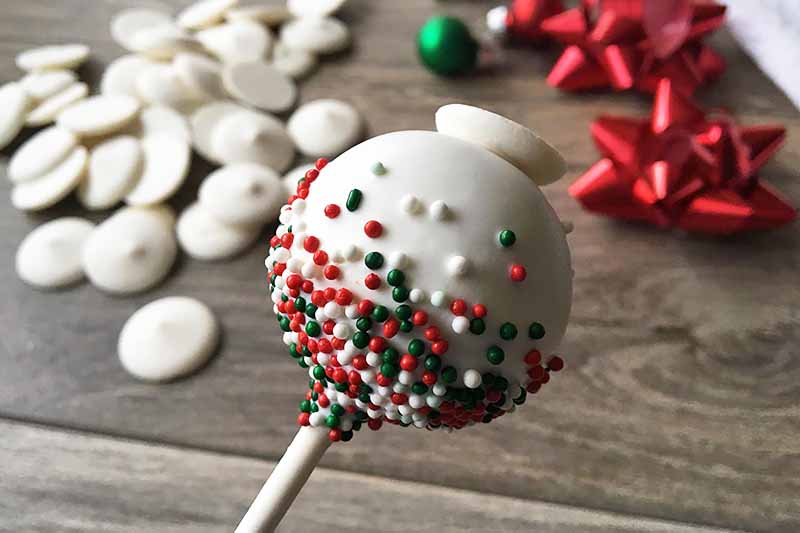
Apply any sprinkles while the chocolate is still wet and has not yet set. The chocolate will harden quickly, so you want to work fast to make sure the sprinkles stick.
If you want your pops to stand up on their own, apply one extra chocolate wafer on top of each pop with a little melted chocolate, with the flat side of the wafer facing up.
Use a fun variety of colors to celebration the holiday season! You can even try making your own sprinkles, using my recipe for royal icing.
Step 4 – Set and Serve
Place the pops back on the foam block to completely set, about 20 minutes. Once the chocolate has completely set, your bite-sized desserts can be eaten immediately, or they can be stored in the refrigerator for up to a week.
You can carefully wrap each individual treat in cellophane and store on a large platter. Or, you can keep them upright on the foam block, and gently cover with a large sheet of plastic wrap or aluminum foil.
Who Really Needs Milk and Cookies?
Well, I sure won’t be missing milk and cookies as much if I’m enjoying a few of these festive pops!
Even though I used a red velvet base for this recipe (which I also used for my Valentine’s Day ones), use whatever cake you like best! Chocolate, vanilla, even pumpkin spice (remember my Halloween-themed pops?).
I hope you’ll have a holly jolly time decorating these cute little desserts. Get the whole family involved to make and decorate them. Maybe this will be your new holiday tradition…
Don’t forget to rate the recipe! And I’d love to hear from you if you decide to make these, and be sure to let me know how you decide to decorate them.
For more holiday-themed treats, feast your eyes on these recipes:
Photos by Nikki Cervone, © Ask the Experts, LLC. ALL RIGHTS RESERVED. See our TOS for more details.
Nutritional information derived from a database of known generic and branded foods and ingredients and was not compiled by a registered dietitian or submitted for lab testing. It should be viewed as an approximation.
About Nikki Cervone
Nikki Cervone is an ACS Certified Cheese Professional and cheesemonger living in Pittsburgh. Nikki holds an AAS in baking/pastry from Westmoreland County Community College, a BA in Communications from Duquesne University, and an MLA in Gastronomy from Boston University. When she's not nibbling on her favorite cheeses or testing a batch of cupcakes, Nikki enjoys a healthy dose of yoga, wine, hiking, singing in the shower, and chocolate. Lots of chocolate.
Was really helpful! The designs are so cute and festive *(^_^)*
Highly suggested 😉
Love this recipe the wafer at the bottom is genius! I’d like to make them for Christmas – Can you send a link for the bows? I can’t find bows small enough anywhere!
Maria Tomei
The extra wafer really is a smart way to keep the cake pops sturdy and upright – adorable for displays! You can try these mini ribbon options, available now from Amazon in different colors.