It was a dark and stormy night, when suddenly a burrito lost its balance and fell into the depths of a glistening pool that was, in fact, a deep-fryer…

Wait, what?
Countless famous dishes come with about a dozen different versions of their history, and the chimichanga is no different.
Let me put you all at ease by saying that the great chimichanga debate is still ongoing. Thanks for nothing, Wikipedia!
Was it Woody Johnson (founder of Macayo’s Mexican Kitchen) in Phoenix, Arizona, who they say purposefully dunked a burrito into a vat of oil as part of a culinary experiment?
Or was it Monica Flin from Tucson, who they claim clumsily knocked a rolled handheld into a deep-fryer and shouted, “Chimichanga!” in place of a curse word?
The true history remains a mystery.

But at the end of the day, does it really matter who invented the deep-fried burrito, as long as we all get to enjoy them together?
Yup, that’s what I thought.
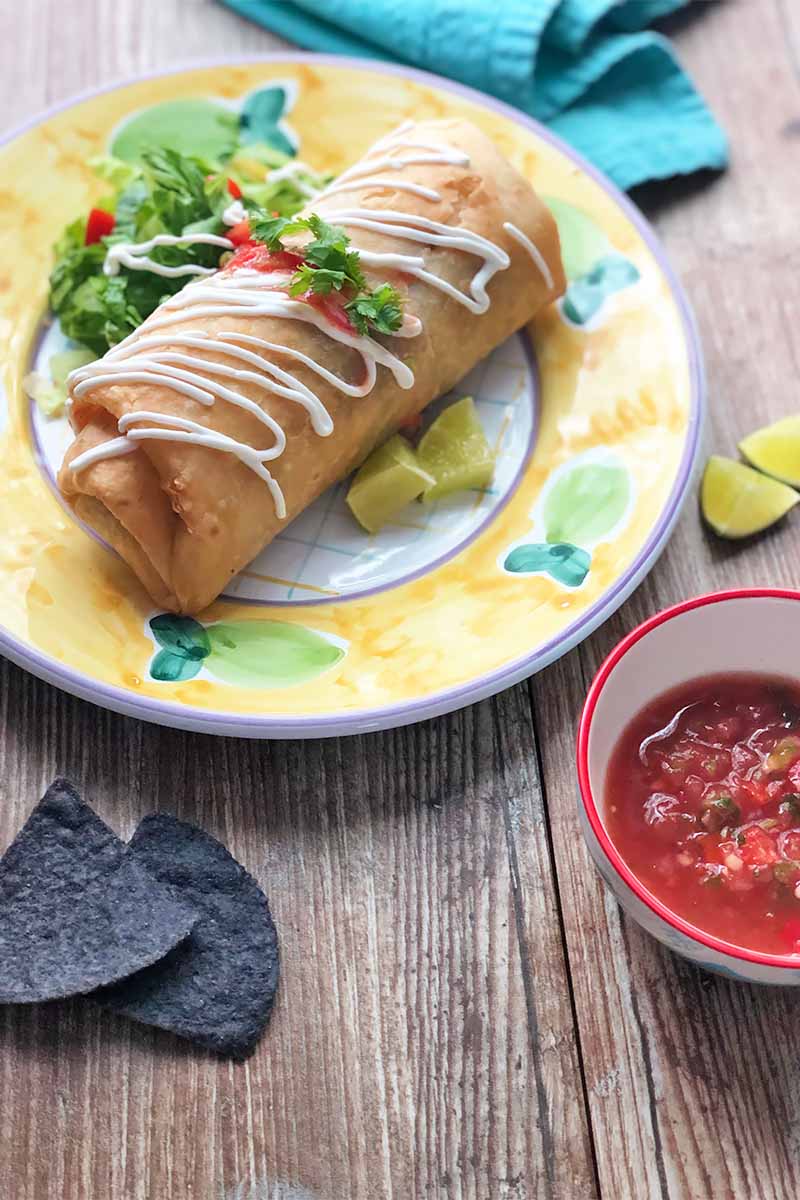
While many burritos are crammed with a variety of goodies, ranging from sour cream to avocado to crunchy shredded lettuce, I find that when it comes to the chimichanga, it’s better to be a purist.
As the stuffed tortilla bubbles and floats in the fryer, its insides get to know each other. And I don’t know about you, but hot lettuce doesn’t sound all that appetizing to me.
For these extraordinarily flavorful homemade chimis, I put the focus on the beef.
Who’s got the beef? I do.
For a quick substitution, if you don’t have eight hours to spare while the Crock-Pot does its business, ground beef will work like a charm. But if you can plan your chimichanga excursion ahead of time, you’ll thank me when you taste this fall-apart-tender, juicy meat.
A single chopped chipotle in adobo (a dried, smoked jalapeno) has enough heat to give the whole roast a hefty kick of spice. If you’re feeding a crowd that likes to flirt with fire, toss another one into the mix.
The sour cream will chill everybody out. A cold bucket of cervezas never hurt either.
Pierce your pre-fried burrito with toothpicks, as items may shift in flight.
Seriously. You know that moment of panic when you lower your chimichanga into the hot oil and its flap slowly begins to rise and your beef begins to escape?
No? Good. I’m glad I was able to be the guinea pig for this process!
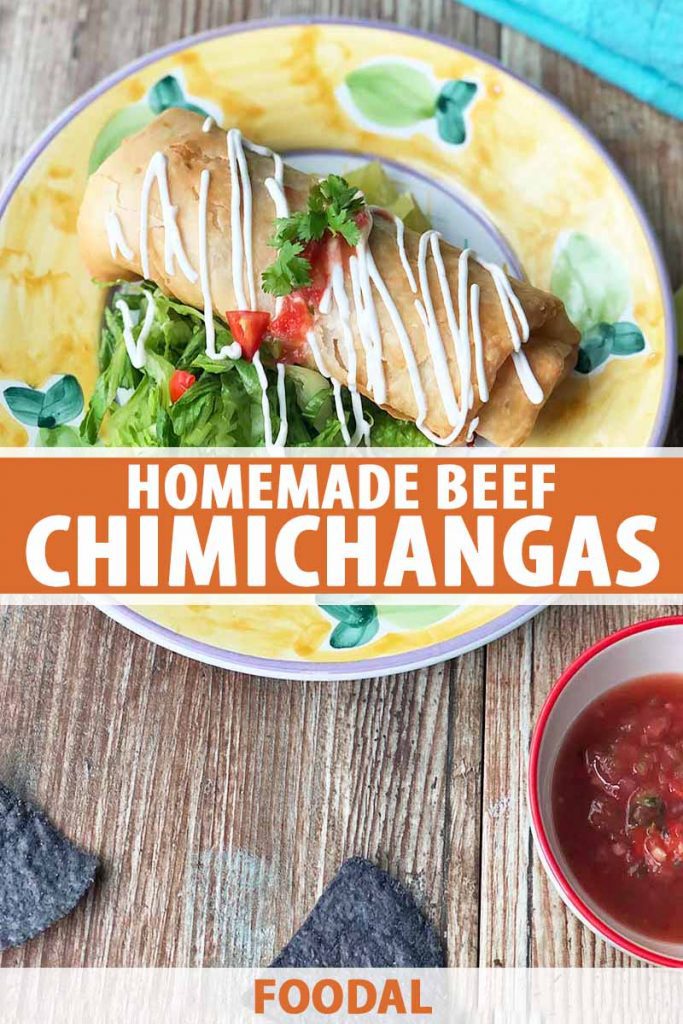
A citrusy dollop of pico de gallo (preferably homemade), some crunchy shaved radishes, and a smear of smooth guacamole later, and you’ve got yourself a chimichanga that will stand up to takeout from any Mexican restaurant.
Just don’t forget the toothpicks. Leave out that step, and it will really ruin your day.
Print
Beef Chimichangas
- Total Time: 8 hours, 15 minutes
- Yield: 6-8 servings 1x
Description
Made with a melt-in-your-mouth combination of juicy, slow-cooked beef and ooey-gooey cheese, these chimichangas are a game changer.
Ingredients
For the Chimichangas:
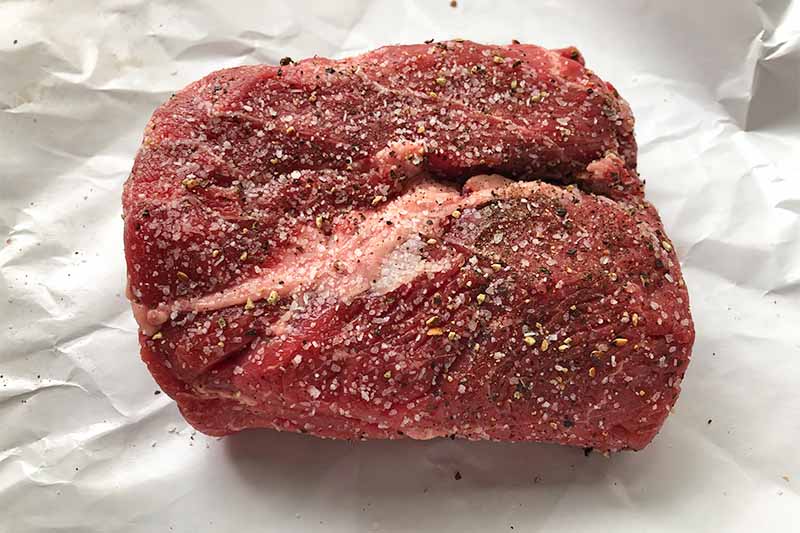
- 2-pound boneless beef chuck roast, trimmed of fat
- 1 1/2 teaspoons coarse salt, divided, plus more to taste
- 1 1/2 teaspoons freshly ground black pepper, divided
- 2 tablespoons vegetable oil
- 1 large yellow onion, chopped (about 2 cups)
- 1 canned chipotle pepper in adobo, rough chopped
- 1 4-ounce can diced green chilies
- 2 cups low-sodium or homemade beef stock
- 1 tablespoon ground cumin
- 1 1/2 tablespoons chili powder blend
- 1 tablespoon garlic powder
- 1 teaspoon dried oregano
- 1 dried bay leaf
- 8 burrito-size flour tortillas
- 2 cups shredded sharp cheddar cheese
- Toothpicks
- Vegetable oil, for frying
For Serving:
- 1 cup sour cream
- 1 cup jarred or homemade salsa
- 1/4 cup rough chopped fresh cilantro
Instructions
- Pat the roast dry. Season it all over with 1 teaspoon salt and 1 teaspoon pepper, pressing to make sure it adheres.
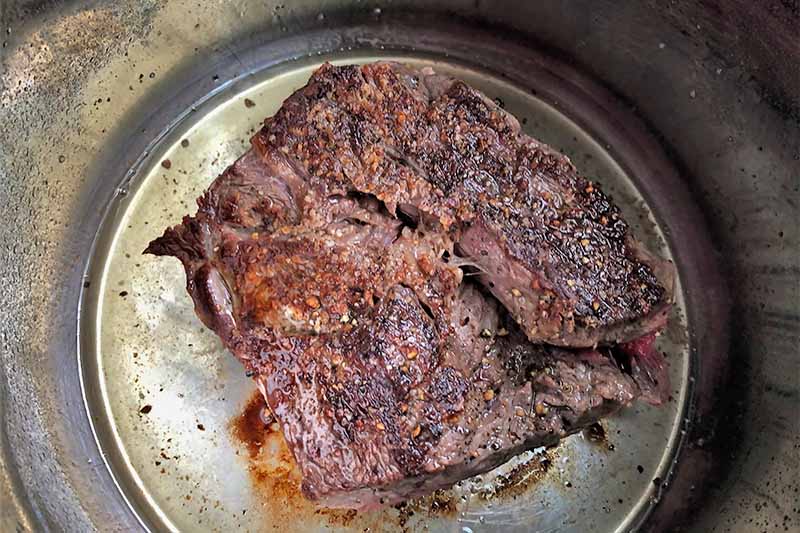
- In a large heavy-bottomed skillet over medium-high heat (or using the Sear or Saute setting in your slow cooker), add the vegetable oil and swirl to coat the pan. Sear the roast until a golden brown crust forms on all sides, about 1-2 minutes per side. Set it aside.
- Add the onions, chipotle pepper, and diced chilies to your slow cooker. Pour in the broth, then stir in the cumin, chili powder, garlic powder, oregano, remaining 1/2 teaspoon salt, remaining 1/2 teaspoon pepper, and bay leaf. Transfer the roast to your slow cooker.
- Cook on low heat until the beef is tender and falling apart, about 6-8 hours.
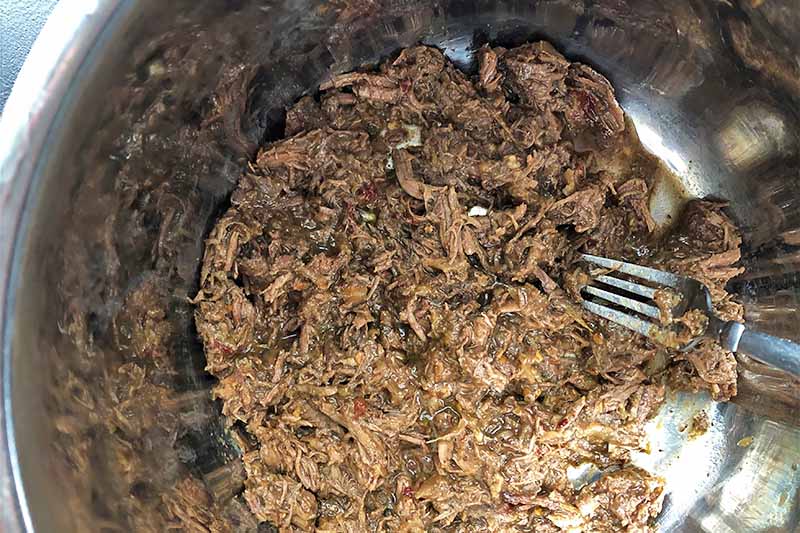
- Remove the bay leaf, transfer the roast to a cutting board, and shred the meat with two forks. Season to taste with additional salt.
- If the tortillas were in the fridge, warm them in the microwave for 30 seconds to make them more pliable.
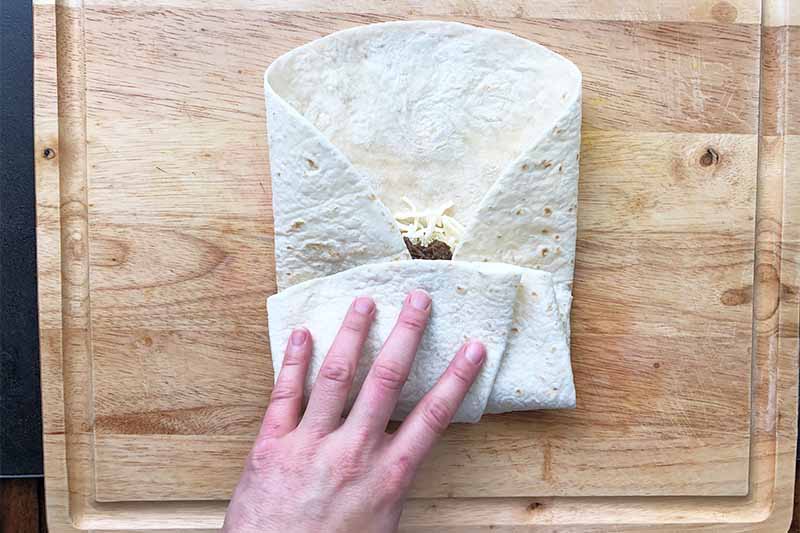
- Lay the tortillas on a clean work surface and fill them with about 1/2 cup of the beef mixture (making sure it’s not too liquidy) and even portions of the cheese. Fold both sides over the meat and then roll the tortilla from the bottom, making sure to secure it tightly.
- Use toothpicks to secure the seam on each one so that it won’t come undone while frying.
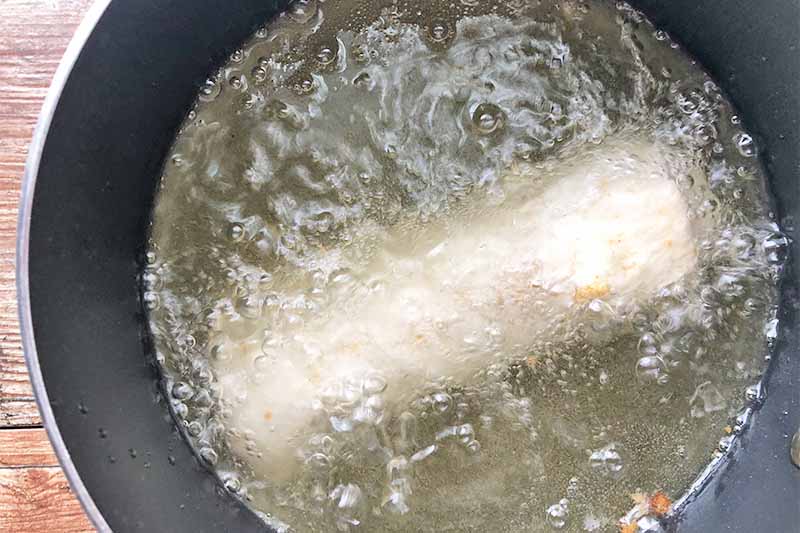
- In a heavy-bottomed saucepot or Dutch oven, heat about 6 inches of oil over medium heat until it reaches 375°F, or fill your deep fryer and allow it to preheat according to the manufacturer’s directions. You’ll know the oil is ready when you dip the handle of a wooden spoon in it and it bubbles immediately.
- Fry until the tortillas are golden brown and crispy, about 4-5 minutes. Using a slotted spoon, remove the chimichangas from the oil and place on a paper-towel lined plate to sop up any excess oil.
- Slice each chimichanga in half, and serve immediately with the sour cream, salsa, and cilantro.
- Prep Time: 10 minutes
- Cook Time: 5 minutes
- Category: Beef
- Method: Stovetop, Deep Frying
- Cuisine: Tex-Mex
Cooking By the Numbers…
Step 1 – Sear the Roast
Pat the roast dry – the drier it is, the better the sear will be. Season it all over with 1 teaspoon of the salt and 1 teaspoon of freshly ground black pepper, pressing to make sure it adheres.
In a large heavy-bottomed skillet placed over medium-high heat, add the vegetable oil and swirl to coat the pan. Sear the roast until a golden-brown crust forms on all sides, for about 1-2 minutes per side.
Alternatively, if your slow cooker has a Sear or Saute setting, you can do this step right in there.
Or, if this isn’t an option on yours and you’re in a hurry, you could just place the roast into the slow cooker and add the remaining ingredients. But searing the meat first adds another layer of flavor and helps to lock in the juices.
Step 2 – Chop the Onions and Add the Remaining Ingredients to the Slow Cooker
Chop the onions and the chipotle pepper.
You’ll have leftover chipotle in the can, which you can save and use for other recipes, like our chipotle lime salmon.
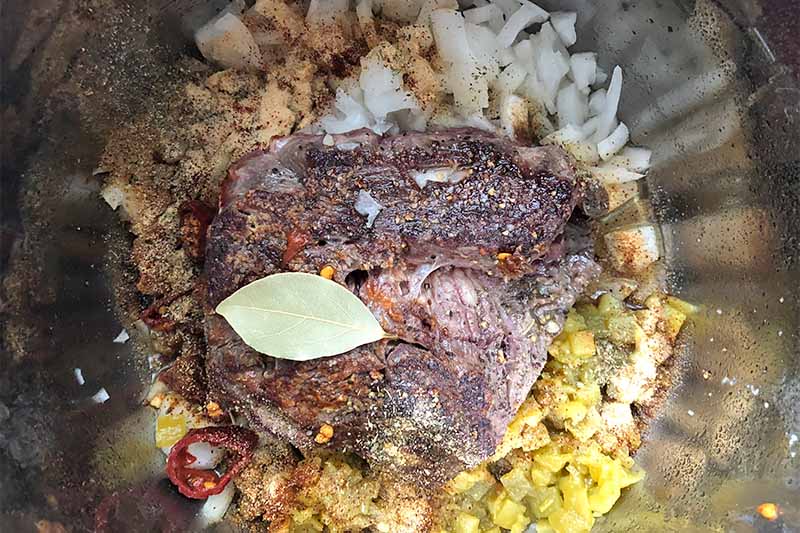
Add the onions, chipotle pepper, and diced green chilies to your slow cooker. Pour in the beef broth, then stir in the cumin, chili powder, garlic powder, oregano, remaining 1/2 teaspoon of salt, remaining 1/2 teaspoon of pepper, and the bay leaf. Transfer the roast to the slow cooker.
Cook on low heat until the beef is tender and falling apart, about 6-8 hours.
Step 3 – Shred the Meat
Remove the bay leaf and shred the meat with two forks on a cutting board. Return the meat to the slow cooker, and stir to combine with whatever flavorful liquid remains. Season to taste with additional salt.
To impart even more flavor into the beef, transfer the remaining contents of the slow cooker (including the shredded beef) to a large pot first, and boil until the liquid has almost evaporated. Or, do this using the Sear setting on your slow cooker.
Step 4 – Build and Roll the Chimichangas
If your tortillas were in the fridge, warm them in the microwave for 30 seconds to make them more pliable. You might like to wrap them loosely in a damp paper towel first.
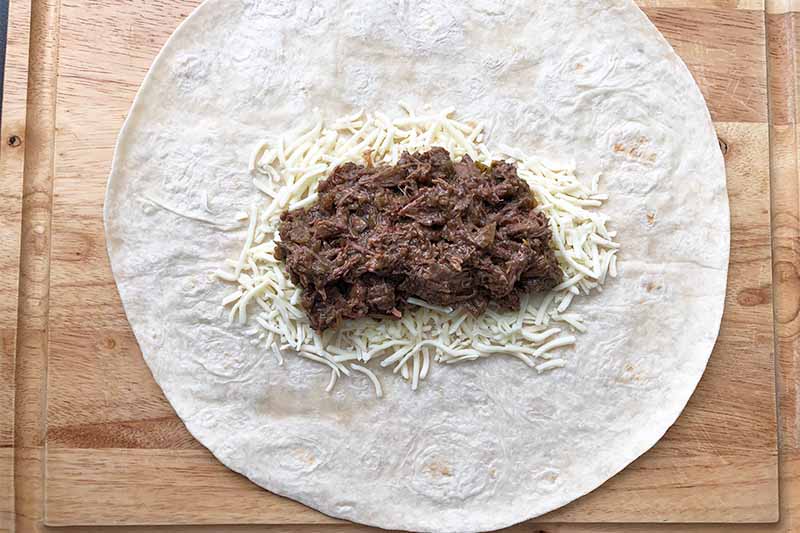
Lay the tortillas on a clean work surface and fill them with about 1/2 cup of the beef mixture. If you didn’t reduce the sauce, use a slotted spoon and let it drain a bit first, making sure it’s not too liquidy. You don’t want to deep fry ingredients that are too wet.
Top each with even portions of the cheese.
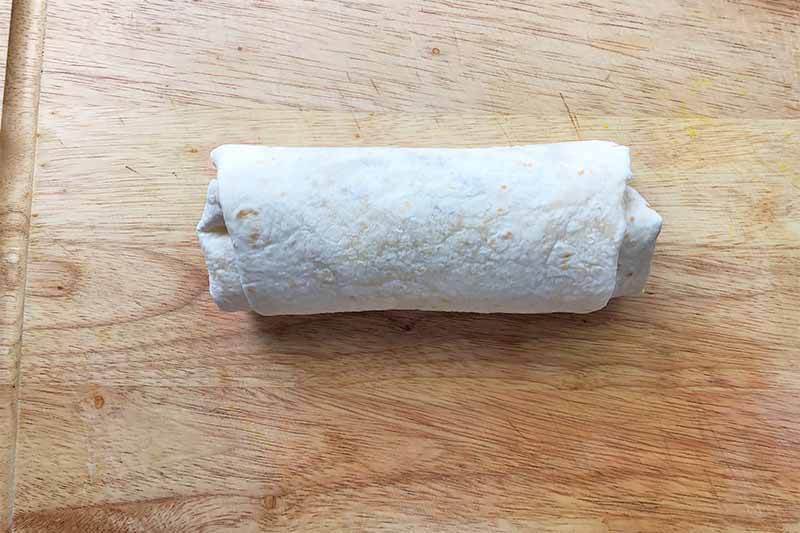
Fold both sides over the meat, and then roll each tortilla up from the bottom, making sure to secure it tightly. Use toothpicks to secure the seams so that they won’t come undone while they are frying.
Step 5 – Fry the Chimichangas and Serve
In a heavy-bottomed saucepot or Dutch oven, heat about 1 inch of oil over medium heat until it reaches 375°F, which you can test with a thermometer. You’ll know the oil is ready when you place the handle of a wooden spoon in it and it bubbles immediately.
We use vegetable oil in this recipe, but you can use any of our recommended high-heat oils for deep frying.
You can also use your deep fryer, following the manufacturer’s directions to fill it with oil and preheat.
Fry the chimichangas until the tortillas are golden brown and crispy, about 4-5 minutes. Keep an eye on them in case they need to be turned for more even-cooking. Work in batches when you fry these, if you need to.
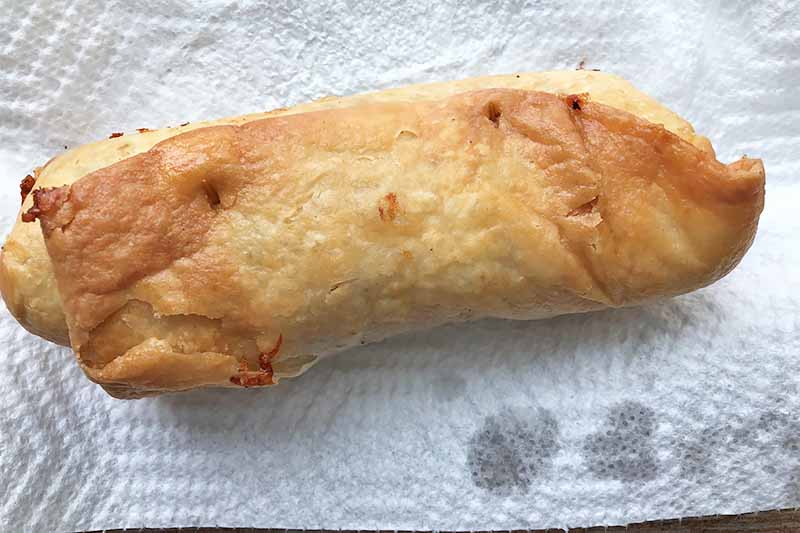
Using a slotted spoon, remove them from the oil and place on a paper-towel lined plate to sop up any excess. Remove the toothpicks.
Slice each chimichanga in half (or keep it whole), and serve immediately with sour cream, your favorite variety of salsa, and chopped cilantro.
Just a Quick Dip in the Fryer
If a deep-fried burrito doesn’t sound like your cup of tea, I’ve got good news for you:
A generous misting of an oil-based spray and a ride in a hot oven will still cruise you straight to chimichanga country. Give this baked version a whirl, and let me know how it goes!
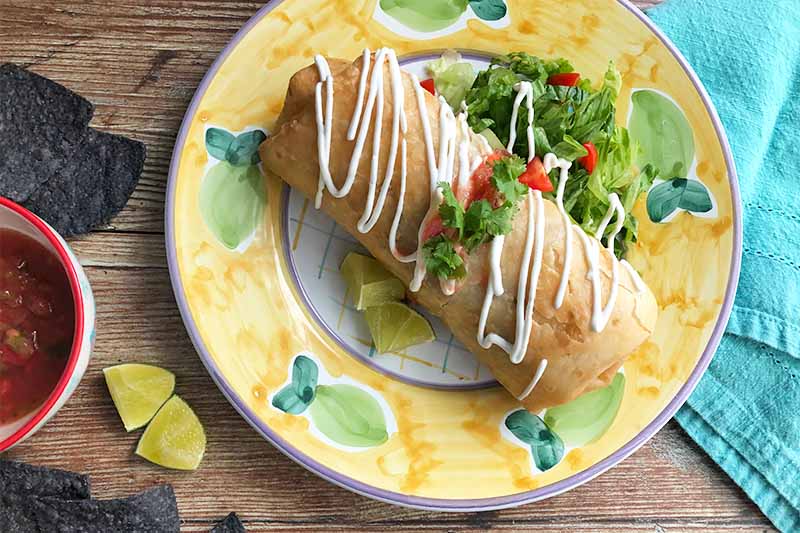
For an extra spark of spice, hit each hot tortilla with a dusting of paprika and cumin just before serving.
Did this recipe get you in the mood for tortillas, tomatillos, and all things Tex-Mex? Give these zesty dishes a whirl next:
- Slow Cooker Tex-Mex Chicken
- Spicy Sweet Potato Quesadillas
- Salmon Tacos with Tomatillo Guacamole and Red Cabbage Slaw
This golden beef-and-cheese wrap may be my jam, but you can feel free to choose your chimichanga fillings as you wish.
Citrusy chicken? Roasted veggies? How will you build yours? Share your chimi contents in the comments below! And don’t forget to give this recipe a five-star rating if you loved it.
Photos by Fanny Slater, © Ask the Experts, LLC. ALL RIGHTS RESERVED. See our TOS for more details. Originally published on January 13, 2011. Last updated on December 30, 2020.
Nutritional information derived from a database of known generic and branded foods and ingredients and was not compiled by a registered dietitian or submitted for lab testing. It should be viewed as an approximation.
About Fanny Slater
Fanny Slater is a home-taught food enthusiast based in Wilmington, North Carolina who won the “Rachael Ray Show” Great American Cookbook Competition in 2014, and published her cookbook “Orange, Lavender & Figs” in 2016. Fanny is a food and beverage writer, recipe developer, and social media influencer. She was a co-host on the Food Network series “Kitchen Sink,” was featured on Cooking Channel’s longtime popular series “The Best Thing I Ever Ate,” and continues to appear regularly on the “Rachael Ray Show.”