Were you one of those kids – like myself – who would plop jumbo olives onto each fingertip, and pretend you were from outer space?

Mom’s repeated demands to absolutely not open the oversized jar of olives stored in the pantry became weakened whispers in the wind that fell on deaf ears.
How can you listen to a parental figure when you’re too busy being an alien lifeform determined to rule the cosmos and destroy Planet Earth?
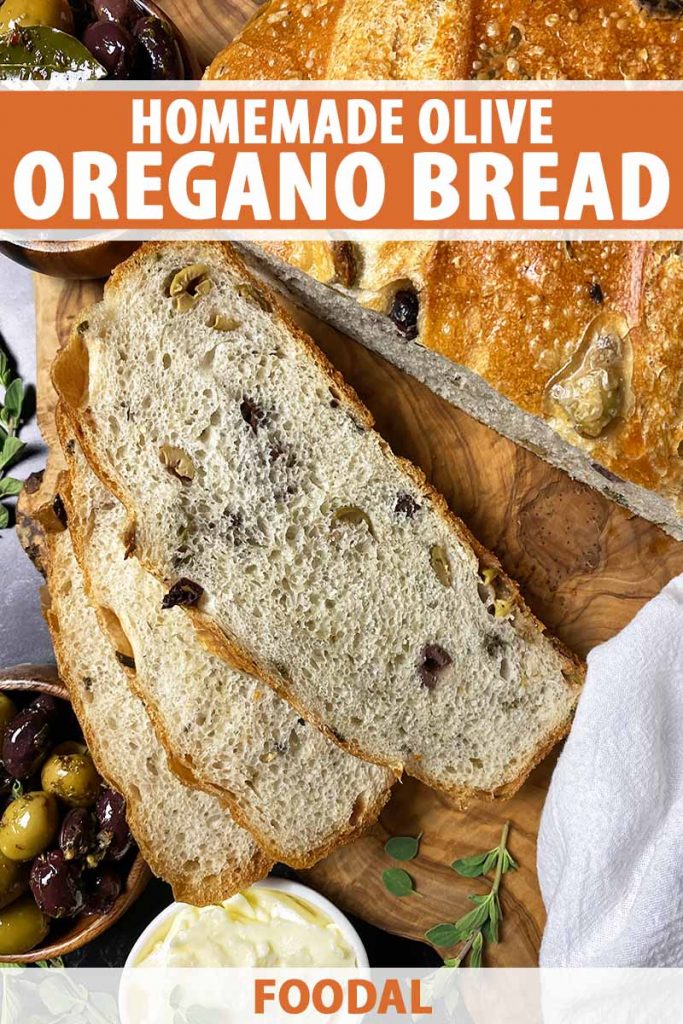
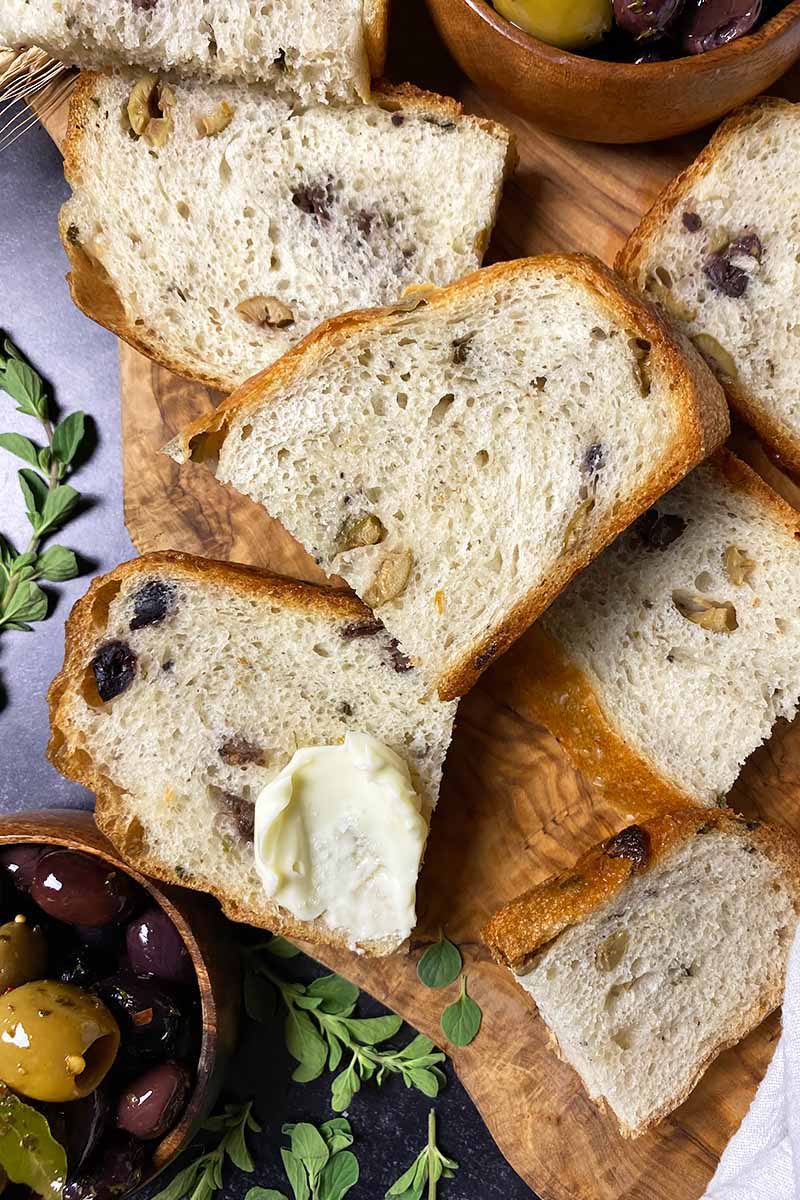
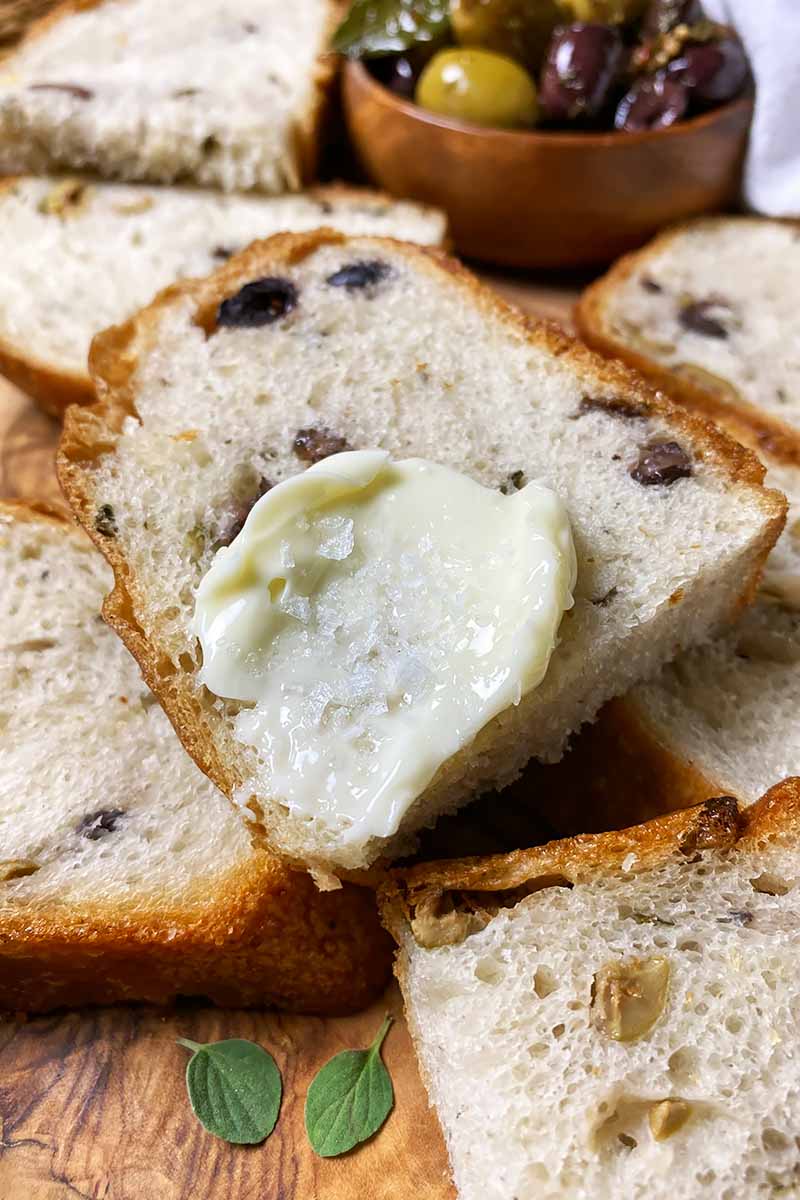
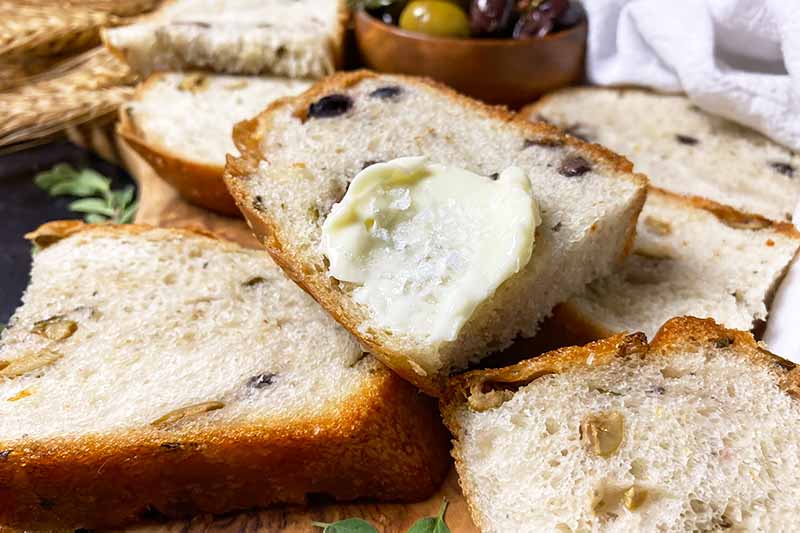
I don’t play with my olives anymore, but they are just as delightful plucked off a fingertip for a snack as they are mixed into my olive oregano bread!
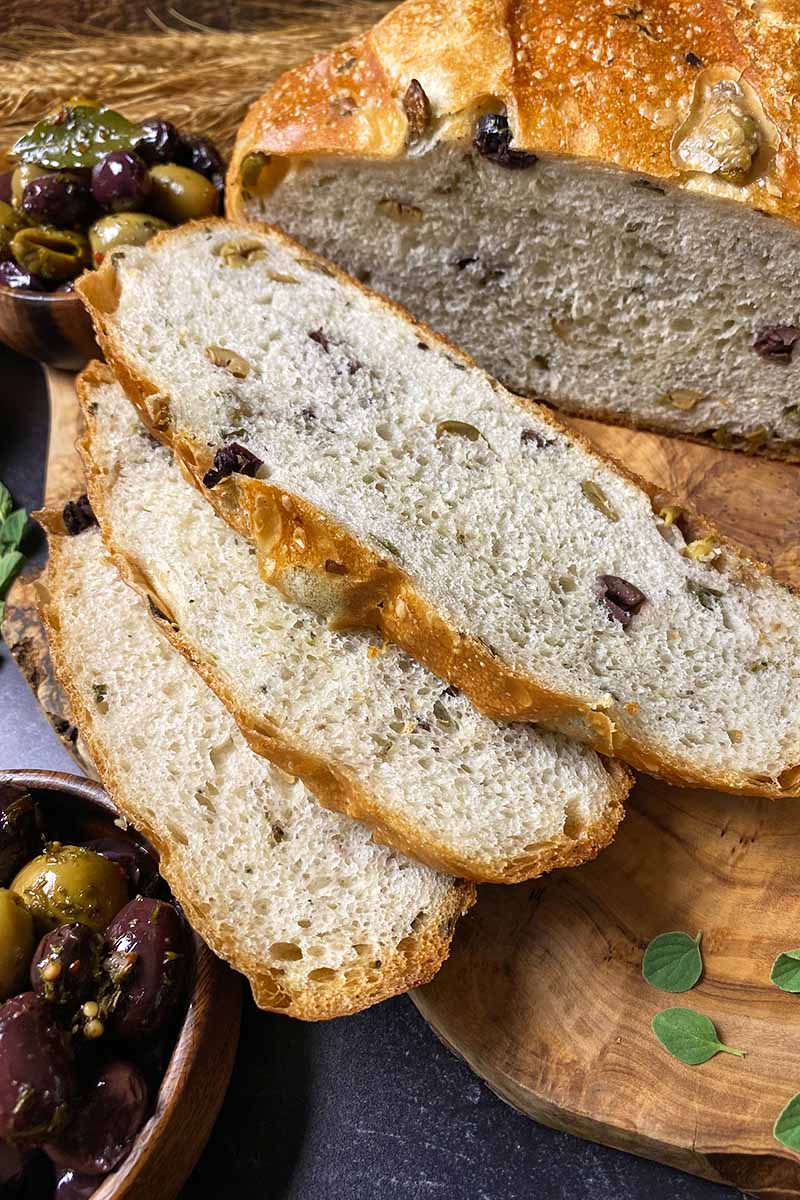
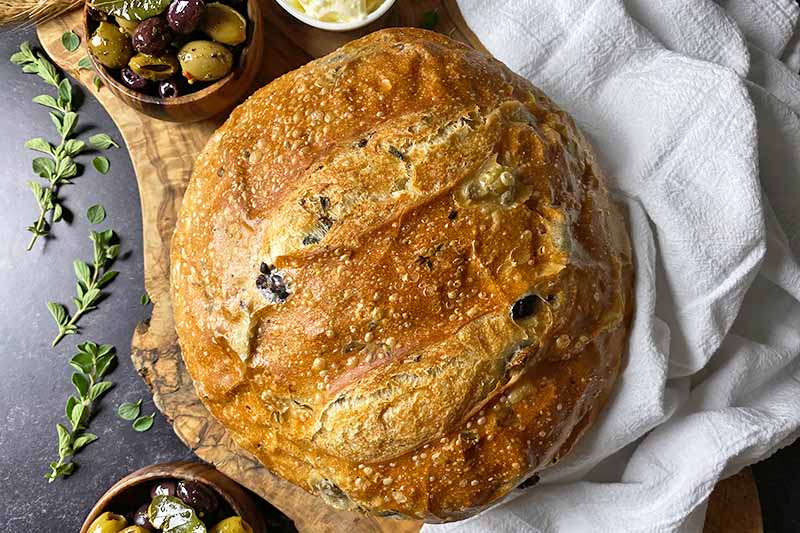
Briny and meaty, chopped olives bring hearty chunks of flavor and texture to this crusty white loaf.
And accompanied by a flurry of fresh oregano leaves, the dough makes its aromatic presence known, amplified to the extreme when it is baking in the oven.
The yeasted bread base is easy to make and shape with no sourdough starter required, though you will still need to dedicate a lengthy amount of time to the proofing steps. This is a typical necessity to achieve a phenomenal loaf with a tender yet sturdy gluten network.
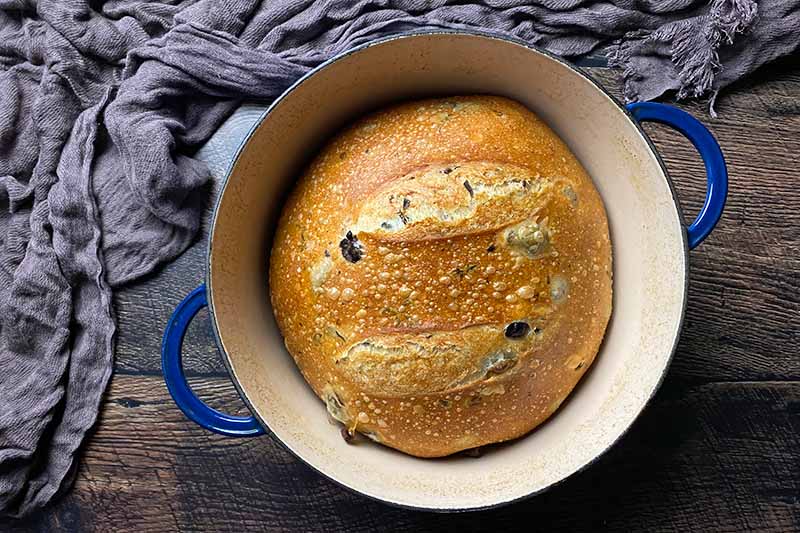
You might have already noticed something special with the baking process here – you proof and bake the dough in a Dutch oven!
Allowing the dough to complete its final rise in a Dutch oven is an easy method to coax it into a perfectly rounded shape as it rises and bakes, and it eliminates the risky step of transferring a delicately risen mound from one vessel to another before baking.
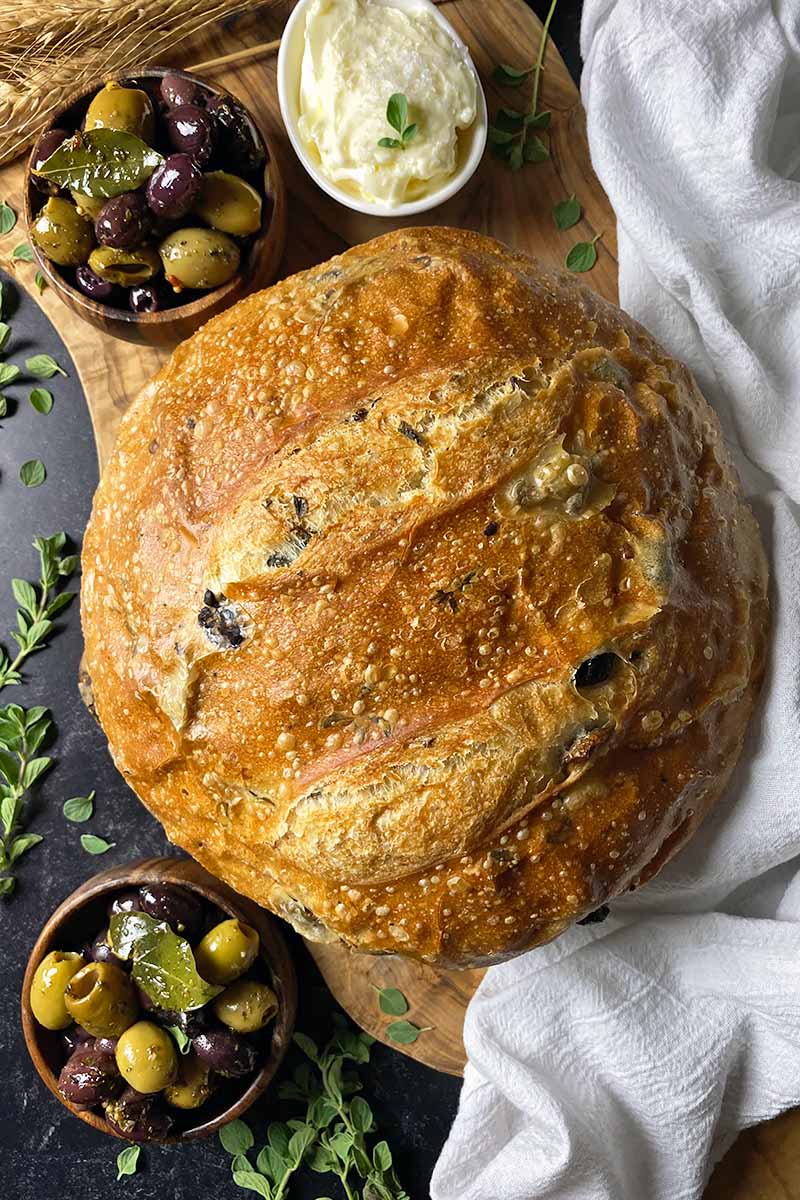
The Dutch oven also serves as a hot and steamy sauna for the dough – by keeping the lid on for the first half of the baking process, the steam that develops and is trapped in the enclosed pot helps the surface stay moist and expand effortlessly, which prevents a thick crust from forming prematurely.
Once the lid is removed, the dry heat creates a thin and crispy dark crust, with the aid of olive oil gently rubbed over the exterior of the shaped dough.
The sound of the deep golden-brown crust crackling underneath the swift movement of your bread knife will send delightful shivers down your spine!
Serving suggestions are easy and aplenty for this recipe, and I’m happy to offer you a humble few:
Slather toasted slices in softened butter, dip them in a seasoned mix of EVOO, cheese, and balsamic vinegar, use them for making sandwiches, top them with a fresh salad, make panzanella…
You’ll even want to find ways to use the ends of your loaf, no joke.
There’s no stopping you. Not even your mom yelling at you to stop stealing the olives. Just give her a slice or two of your freshly baked oregano bread, and even she’ll approve of your plans for galactic domination.
Print
Olive Oregano Bread
- Total Time: 4 hours, 30 minutes
- Yield: 1 large round loaf 1x
Description
Olive oregano bread is a tantalizingly aromatic recipe baked in a Dutch oven to obtain a beautiful golden-brown thin crust.
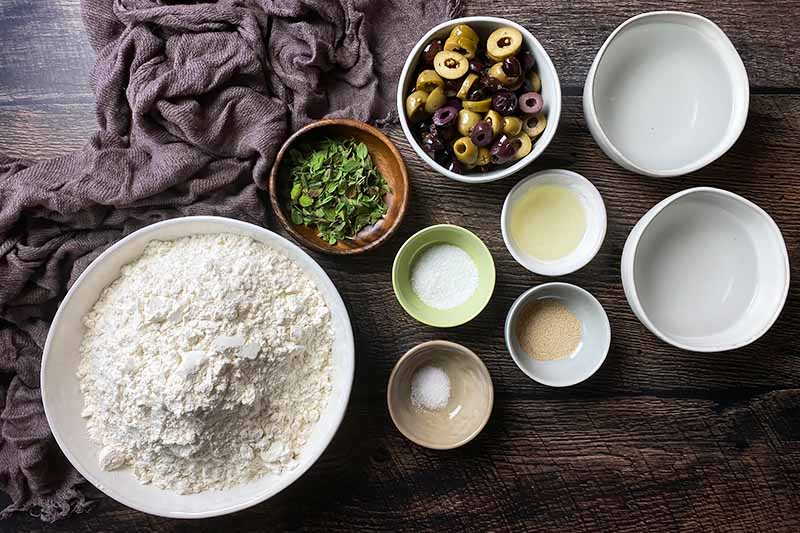
Ingredients
- 1 1/2 cups warm (110-115°F) water, divided
- 1 teaspoon active dry yeast
- 1/8 teaspoon sugar
- 3 1/2 cups bread flour, plus more for kneading and dusting
- 1 teaspoon kosher salt
- 1 cup roughly sliced assorted pitted olives
- 1/4 cup roughly chopped fresh oregano leaves
- 1 tablespoon pure, light, or refined olive oil, plus more for greasing
Instructions
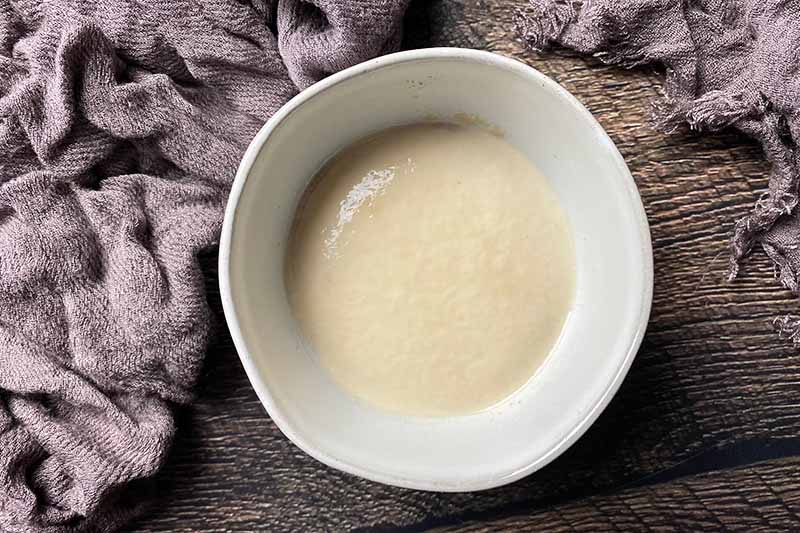
- Pour 1/4 cup warm water into a medium bowl. Evenly sprinkle the yeast and sugar onto the water, and whisk by hand to blend. Let the mixture sit for 5-10 minutes, or until the yeast is activated and the mixture looks frothy.
- Whisk together the flour and salt in the bowl of a stand mixer fitted with a dough hook attachment. Pour the activated yeast and the remaining water into the bowl.
- Mix together on medium speed until the dough is smooth and elastic, but still slightly sticky, about 8-10 minutes.
- Remove the dough from the bowl and place on a lightly floured work surface. Gently knead by hand the olives and herbs into the dough until completely incorporated, using flour as necessary to prevent excessive sticking, about 2-5 more minutes.
- Lightly grease a large bowl about triple the size of the dough with olive oil. Transfer the dough to the bowl and cover with a clean kitchen towel or plastic wrap. Let the dough rise at room temperature until doubled in size, about 2-4 hours.
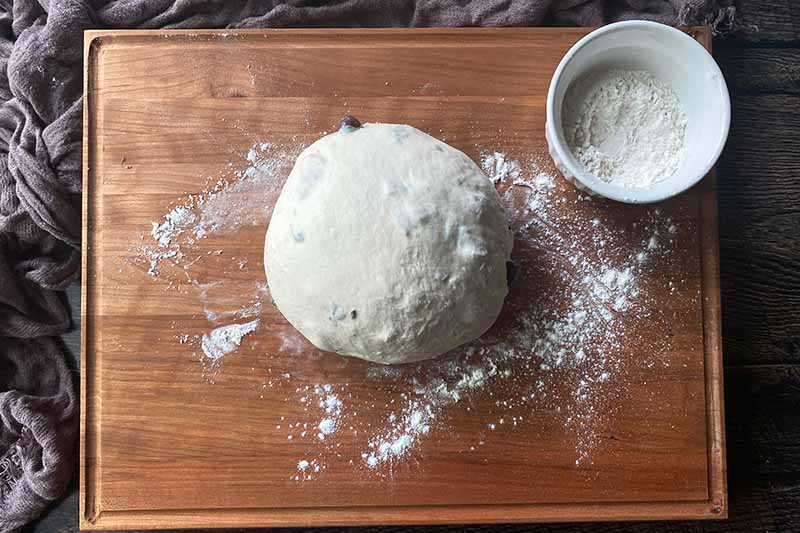
- Turn the dough onto a lightly floured work surface and punch it down. Shape it roughly into a ball, and cover completely with a clean kitchen towel or plastic wrap. Let stand for 10 minutes.
- Shape the dough into a very tight ball by rolling it on the work surface between your palms, keeping the seam at the bottom.
- Liberally coat the bottom and sides of a large Dutch oven or a heavy ovenproof pot with a capacity of at least 5.5 quarts with olive oil.
- Place the dough seam-side down in the center of the pot and cover with the lid. Let the dough rise until doubled in size, about 1-3 hours.
- Position the oven rack in the center section. Preheat the oven to 450°F.
- Remove the lid of the Dutch oven and gently rub 1 tablespoon of olive oil over the surface of the dough. Score the bread with a sharp paring knife or bread dough razor with 2-4 slashes.
- Replace the lid and transfer to the hot oven. After 30 minutes of baking, remove the lid and reduce the oven temperature to 400°F. Continue baking until the bread has risen and is a deep golden brown on the exterior, about 20-30 more minutes.
- Remove the Dutch oven from the oven. Immediately and carefully remove the bread from the Dutch oven. Place the bread onto a cooling rack and allow to cool completely before slicing.
- Prep Time: 30 minutes
- Cook Time: 50 minutes
- Category: Dutch Oven
- Method: Baking
- Cuisine: Bread
Cooking by the Numbers…
Step 1 – Prep
Measure out the bread flour, active dry yeast, granulated sugar, kosher salt, warm water, and olive oil. The water should be between 110 and 115°F, or the yeast may not activate properly.
Pour 1/4 cup of the warm water into a small bowl and evenly sprinkle the yeast and sugar on top before whisking together to blend completely.
Let the bowl sit at room temperature until frothy and activated, for about 5 to 10 minutes depending on the strength of the yeast.
As the yeast is activating, continue your prep work.
Set out a Dutch oven or a large ovenproof pot that is at least 5.5 quarts in capacity. Whatever you choose, you absolutely will need a lid for the pot.
Set out a large mixing bowl. Prepare your stand mixer by setting out its bowl and dough hook.
Set out a whisk, plastic wrap or clean kitchen towels, and a pliable bench scraper – the tool I swear by to scrape out any kind of sticky dough from a bowl or work surface!
Remove the pits from the olives, if you need to. Roughly slice the olives on a sturdy cutting board with a sharp knife. Roughly chop the oregano leaves. You do not need to finely mince the olives or the oregano, as they will be crushed a little more when you incorporate them by hand into the dough.
Step 2 – Knead
Whisk together the flour and salt in the bowl of a stand mixer. Pour in the activated yeast mixture and remaining cup of warm water.
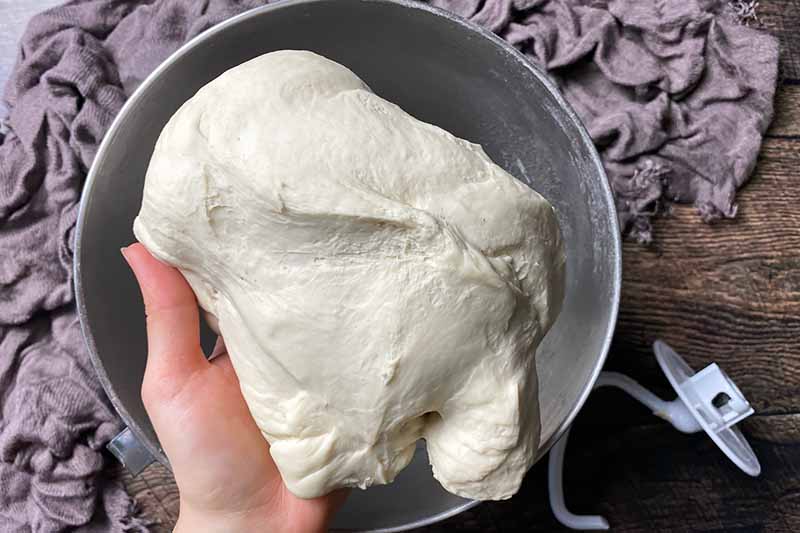
Mix together on medium speed with the hook attachment until the dough is smooth and elastic, for about 8 to 10 minutes. It will still feel slightly sticky.
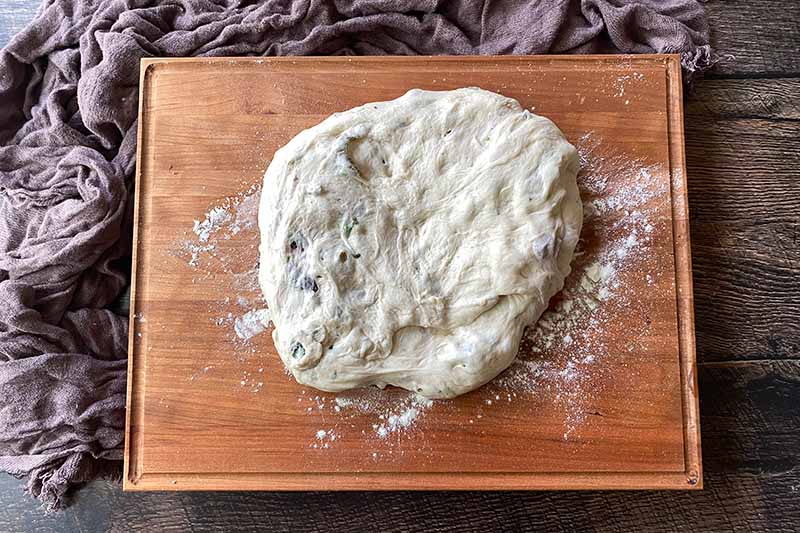
Step 3 – Incorporate the Olives and Herbs
Remove the dough from the bowl and place on a lightly floured work surface. You may need to a spatula to scrape any remaining pieces in the bowl.
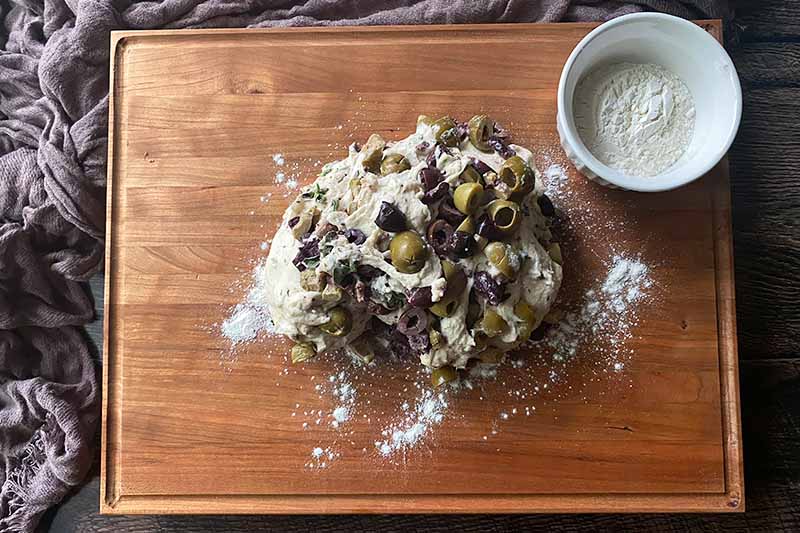
Begin to gently knead by hand the olives and herbs into the dough, using more flour as necessary to prevent excessive sticking.
The olives and herbs will mostly retain their size and shape, breaking down slightly as you knead them into the dough – providing a beautiful presentation when you slice into the bread!
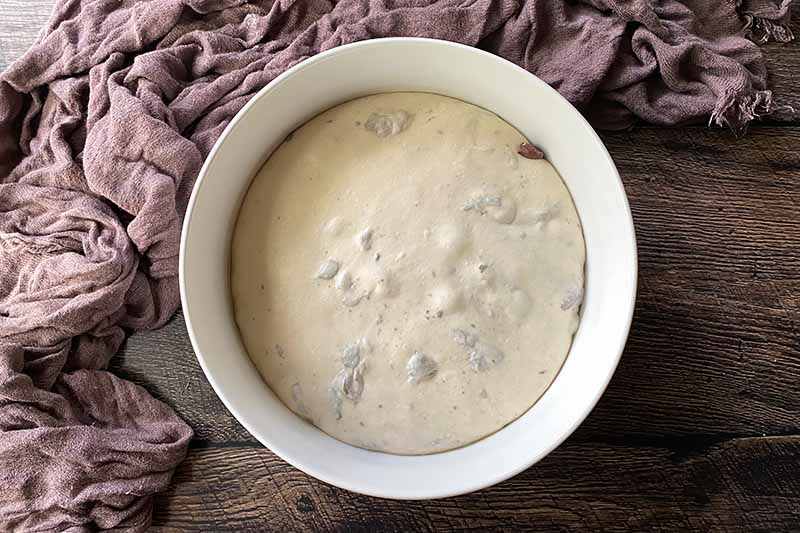
Step 4 – First Rise
Grease a large bowl lightly with oil. Transfer the dough to the bowl, rotating the dough to coat it with the oil, and cover the bowl with a clean kitchen towel or plastic wrap.
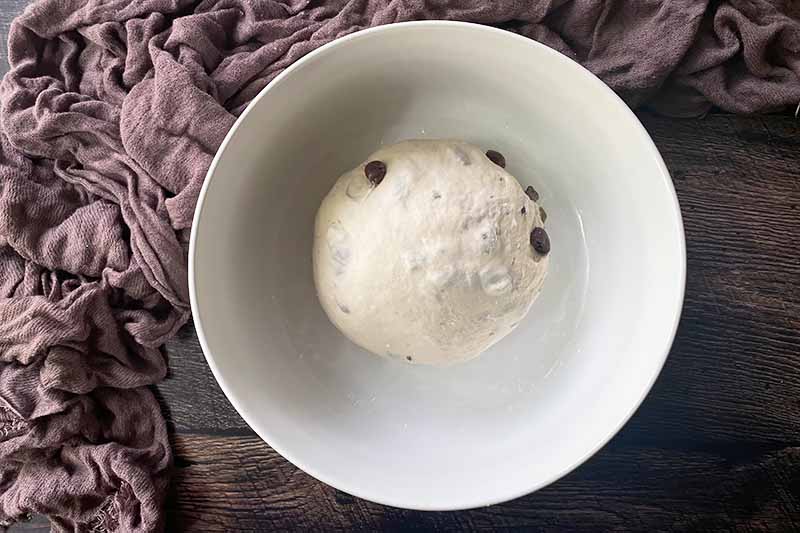
Let the dough rise at room temperature until doubled in size, for about 2 to 4 hours.
The amount of time required for it to rise will depend on multiple factors, such as the strength of the yeast, the proportions of ingredients and how they were mixed, and your home’s temperature and humidity levels.
Be patient! It may take up to 4 hours, or perhaps even longer, for the dough to rise properly.
It’s always a smart strategy to calculate the amount of time from when you aim to serve the bread to the time when you should start making the dough if you wish to eat the bread the same day that you bake it, while taking your home environment into consideration.
You don’t want to realize it’s 11 o’clock at night and you’re still baking!
Step 5 – Punch Down and Rest
When the dough has doubled in size, turn it out of the bowl onto a lightly floured work surface and punch it down once or twice to redistribute the gas.
Shape the dough roughly into a ball, and cover it with a clean kitchen towel or plastic wrap. Let it stand on the work surface for 10 to 15 minutes at room temperature in order to relax the strong gluten network that has developed.
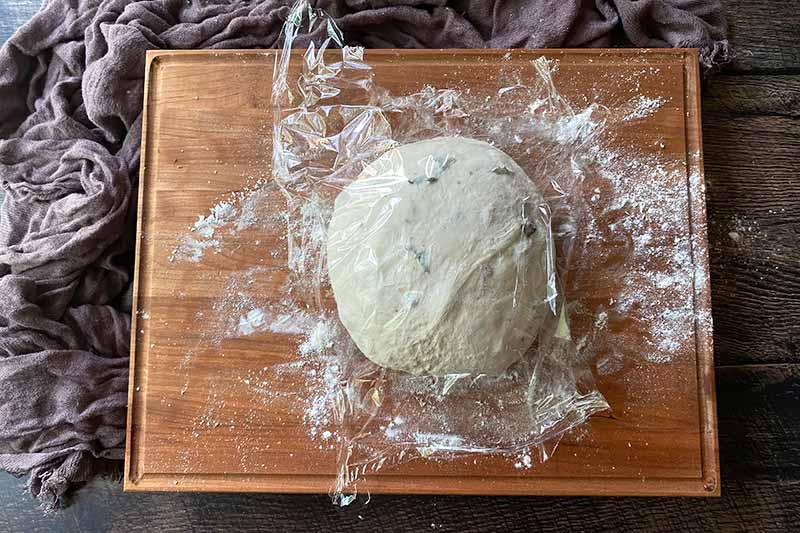
By relaxing the gluten network, you’ll be able to more easily shape a taut, well-formed sphere before the second rise.
Step 6 – Shape
Remove the towel or plastic wrap. Shape the dough into a very tight ball by rolling it on the work surface between your palms, using more flour to prevent sticking.
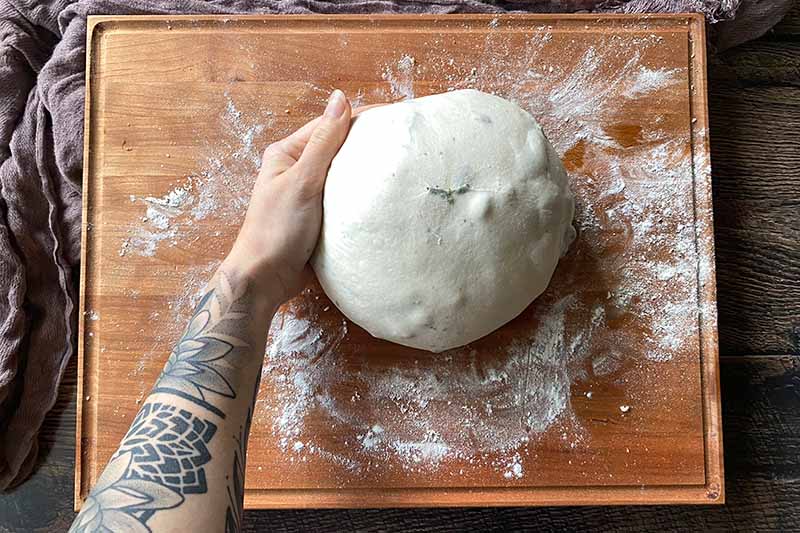
Keep the seam at the bottom of the ball, as this side will form the bottom of the bread when it’s placed in the Dutch oven. The top should be very smooth and round.
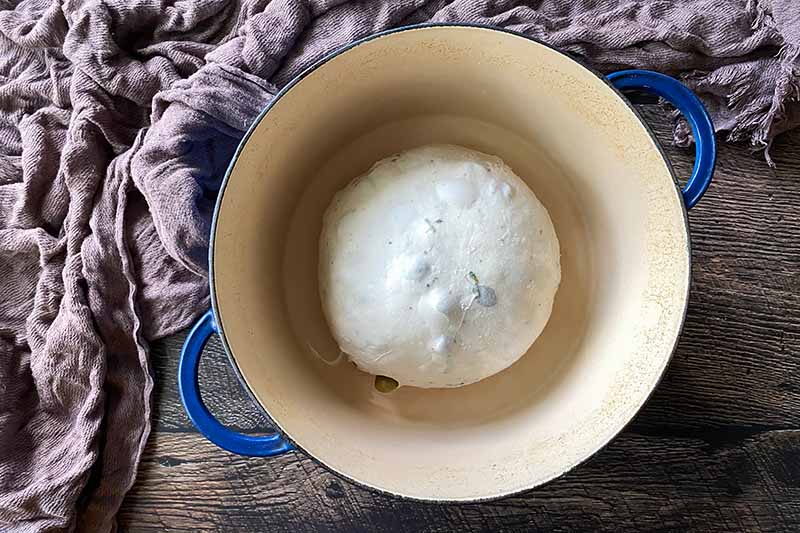
Step 7 – Transfer to Greased Dutch Oven and Rise
Liberally coat the bottom and sides of your Dutch oven with olive oil. If you don’t use enough oil, the bread may stick as it bakes.
This is a good time to remind you to use pure, light, or refined olive oil – not extra virgin olive oil!
A more processed oil will have a higher smoke point than extra virgin olive oil, and will therefore be the better choice to use when you are baking bread in a Dutch oven at a very high temperature.
Place the dough seam-side down with the rounded side up in the center of the pot. Cover with the lid.
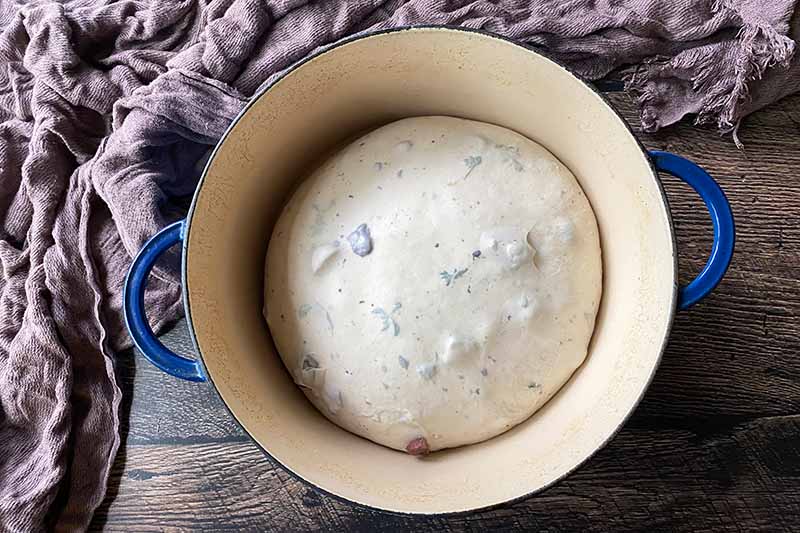
Let the dough rise again at room temperature until doubled in size, for about 1 to 3 hours.
When it is nearly done rising, this is the appropriate time to prepare your oven. Position the oven rack in the center section and preheat to 450°F.
Step 8 – Bake with Lid On
Gently rub the exterior of the shaped dough with 1 tablespoon of olive oil.
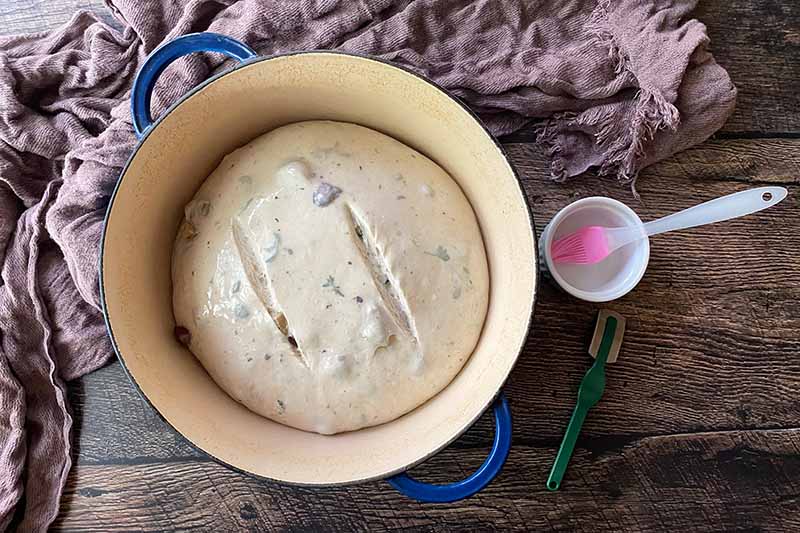
Score the bread with a sharp paring knife or bread dough razor with 2 to 4 slashes cut into the top. You can score an “X,” a small grid, or a square in the surface of the dough. Scoring will help the crust to expand without splitting.
Place the lid back on top and transfer the pot to the hot oven.
Bake for 30 minutes with the lid on. Steam will develop, and the lid will keep it trapped inside. This moisture helps the dough rise without developing a thick, hard crust too early in the baking process.
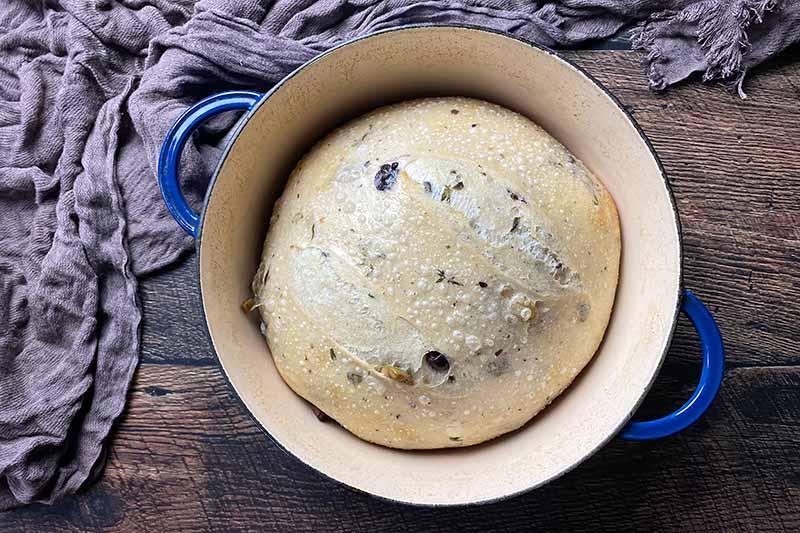
Step 9 – Remove Lid and Finish Baking
After 30 minutes of baking, open the oven door and carefully remove the lid from the Dutch oven. The lid will be very hot, so don’t forget to use an oven mitt or a thick kitchen towel!
You will notice that the bread has risen significantly, and that it has started developing some color.
Close the door and reduce the oven temperature to 400°F.
Continue baking until the bread develops a deep golden-brown crust. This will take between 20 and 30 minutes.
Step 10 – Remove and Cool
Carefully transfer the hot Dutch oven to a trivet on your countertop, or place it on your stovetop.
Immediately and carefully remove the bread from the Dutch oven. If you wait too long before removing the bread, it may stick slightly to the bottom, and this may cause some ripping.
You can remove the bread with a wooden spoon held in each hand, or by using a clean kitchen towel in each hand to gently lift the loaf.
If you have a baking partner helping you in the kitchen – hello, family! – you can tilt the Dutch oven slowly upside down while someone else quickly catches the loaf in a clean kitchen towel.
Place the bread on a cooling rack and allow it to cool completely before slicing.
You can also enjoy it while it’s still warm – just give the bread at least 30 minutes of cooling time so the interior sets properly before slicing.
How Can I Customize the Savory Flavors?
With countless varieties and so many potential combinations of olives and herbs to use, your bread can be as unique as the baker making it!
As for the olives, choose your favorite kind – you can’t go wrong with kalamatas or a Greek blend – or try something new by visiting your local deli or supermarket. Don’t be afraid to ask for recommendations!
I advise sticking with pitted options for convenience, but if you see something whole that catches your eye, you can take the extra time to pit them at home before you begin baking.
And the herbs! Fresh, bountiful herbs! If oregano isn’t a big hit amongst your family and friends, or if it’s not available to purchase, replace it with an equal amount of any fresh, hearty herb like rosemary, thyme, or sage.
What combination will you decide to use? Is there a flavorful type of olive you think would work well in this crusty bread? I’ll gobble up all of your ideas in the comment section below!
Active dry yeast typically comes in a multi-pack or a jar, so you know what that means… we have more baking to do before that expiration date approaches! Take a look at our fun selection of bread recipes, or bake one of our current favorites now:
Photos by Nikki Cervone, © Ask the Experts, LLC. ALL RIGHTS RESERVED. See our TOS for more details. Originally published by Lorna Kring on October 5, 2015. Last updated on September 28, 2022.
Nutritional information derived from a database of known generic and branded foods and ingredients and was not compiled by a registered dietitian or submitted for lab testing. It should be viewed as an approximation.
About Nikki Cervone
Nikki Cervone is an ACS Certified Cheese Professional and cheesemonger living in Pittsburgh. Nikki holds an AAS in baking/pastry from Westmoreland County Community College, a BA in Communications from Duquesne University, and an MLA in Gastronomy from Boston University. When she's not nibbling on her favorite cheeses or testing a batch of cupcakes, Nikki enjoys a healthy dose of yoga, wine, hiking, singing in the shower, and chocolate. Lots of chocolate.