Jump to the Recipe
I love toasted marshmallows.
Everyone has their own technique for roasting, whether it’s a slow toast to melt the middle, a quick char to speed up the process, or something in between. I like to start slow to get a gooey center, and end by catching the marshmallow on fire for that tasty smoky flavor.
One of my favorite coffee shops in high school used to offer a s’mores package. They would bring out a flaming tub of ethanol chafing fuel with marshmallows, chocolate, and graham crackers. I spent many a Saturday night sipping coffee and building s’mores with my friends.
When neither bonfire nor chafing fuel are available, I’ve been known to get creative with my toasting methods: I’ve roasted pillowy sweets in a fireplace, over a gas stove, and with a kitchen torch. My attempts at toasting over a candle have yet to be successful.
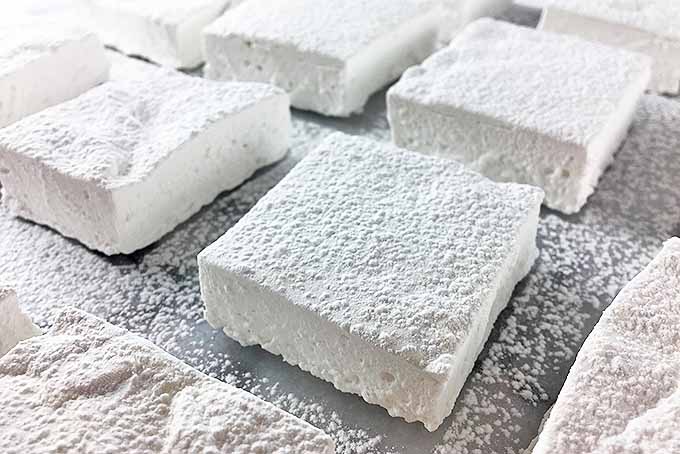
The very, very best kinds of marshmallows are the ones you make at home. And it is unbelievably simple to make homemade marshmallows – they require just seven ingredients, a bit of precision, and a few hours of patience while they set.
You will need a candy thermometer that reaches at least 250°F for making this recipe.
When it comes to cooking sugar, whether you’re making homemade caramels or some other kind of tasty homespun treats, estimating the heat level isn’t going to do it. Just a few degrees can make a huge difference in the final product, so stick within the 5° range that is noted in the recipe.
I also highly recommend using a stand mixer. The mixture gets very sticky, and can prove too tough for the motor of most handheld models.
Finally, this is a recipe where you absolutely need to use corn syrup. This ingredient prevents the sugar from crystalizing, and helps the final product to maintain a soft, chewy texture.
If you really must avoid corn syrup, it is possible to use an alternative sweetener like honey instead – but beware that the marshmallows won’t set quite as well.
Mix Things Up
There are so many ways to vary the flavors in this recipe!
Try substituting 1/2 cup of the water used in the syrup with juice, coffee, wine, or tea. Or you could substitute half of the water used for blooming with your preferred liquor.
You could even do both at once! Some great flavor combinations are:
You could also get creative with the flavor of the toppings. Try crushing up freeze-dried strawberries or dried rose petals and adding them to the powdered sugar and cornstarch mixture.
Or you could make a peppermint version of them, perfect for the winter holidays.
For a fun party favor idea, use this recipe to make our festive marshmallow pops. It’s a perfect recipe to get the whole family playing in the kitchen.
Good old-fashioned sprinkles or nonpareils are perfect, too!
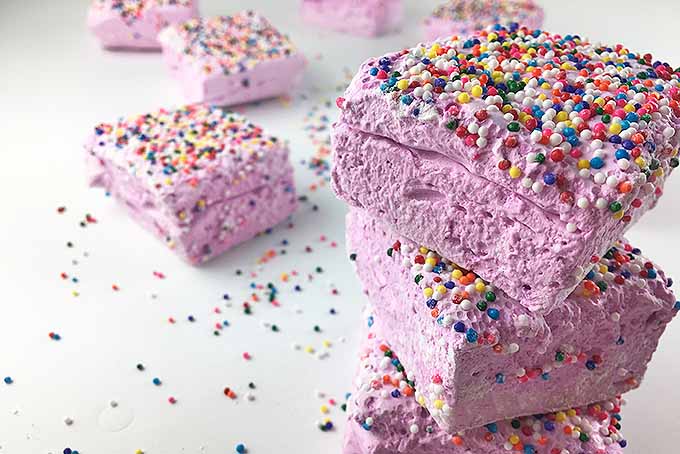
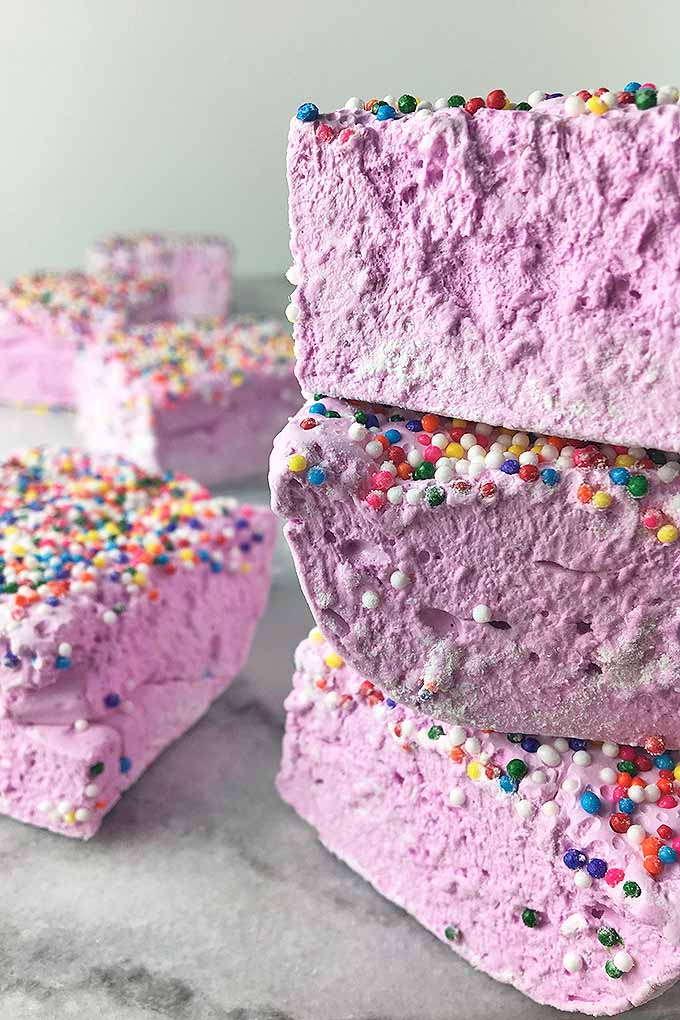
Do you live your life in Technicolor? If you want to make a batch of more colorful marshmallows, you can certainly add your favorite food coloring to a batch when you mix in your extracts or other flavorings.
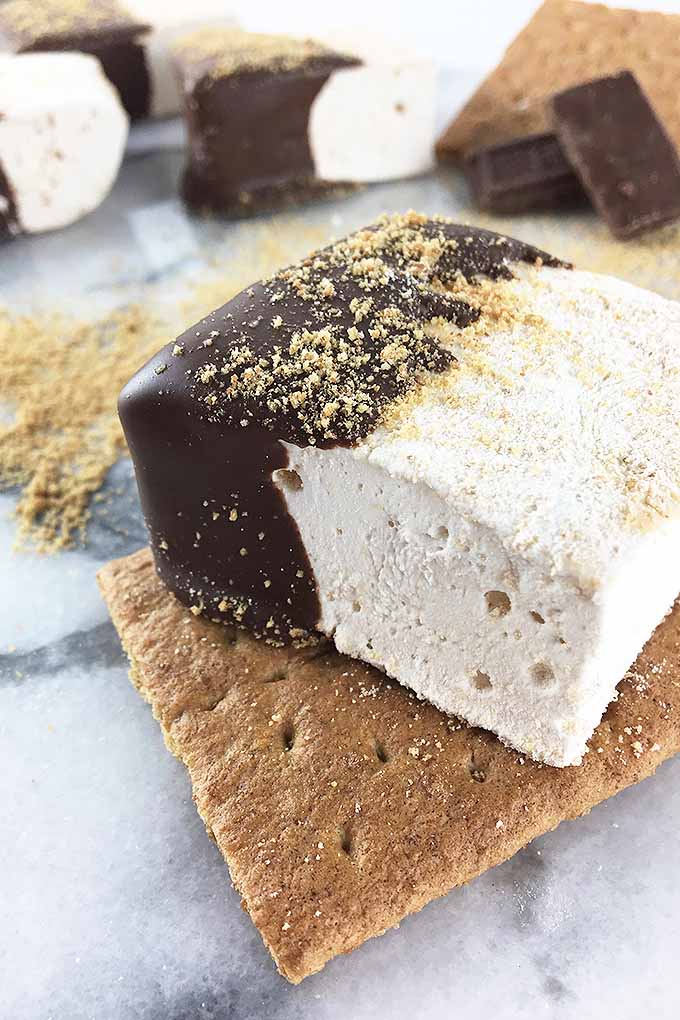
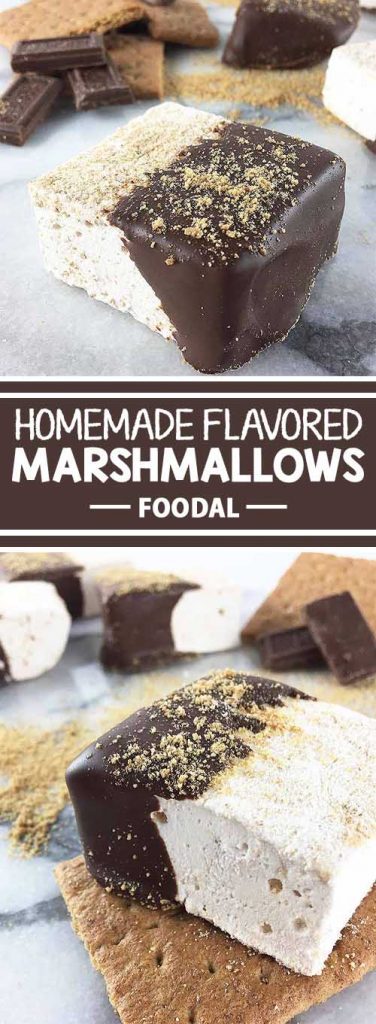
Make My Favorite Flavor: S’moresmallows
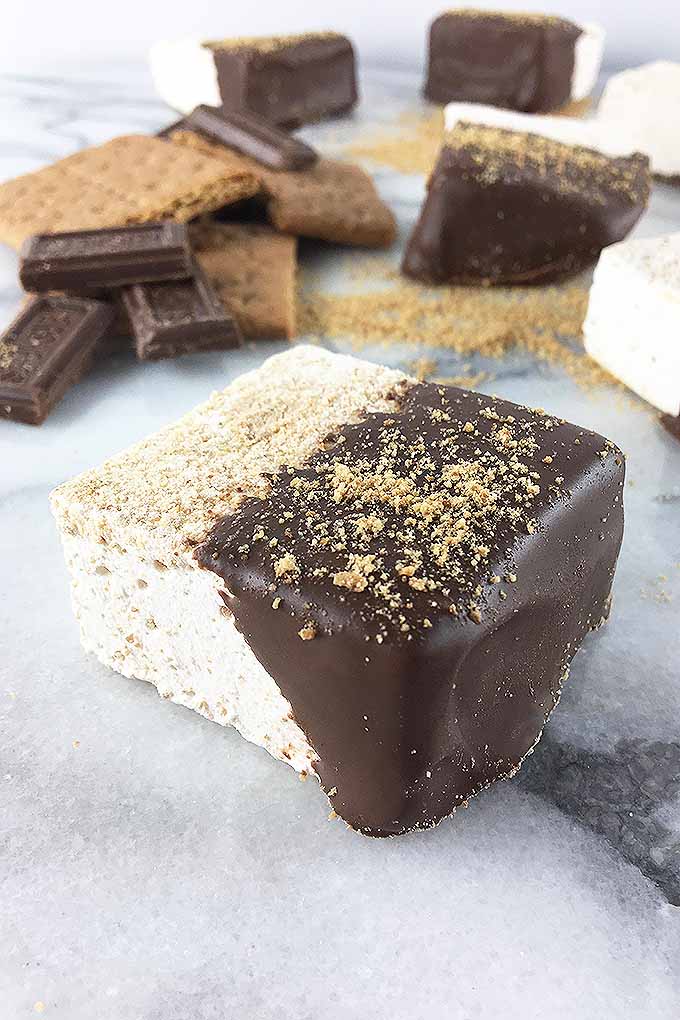
If you want to get really fancy with your flavors, you can even create a s’mores-inspired treat in a single bite! Here’s how:
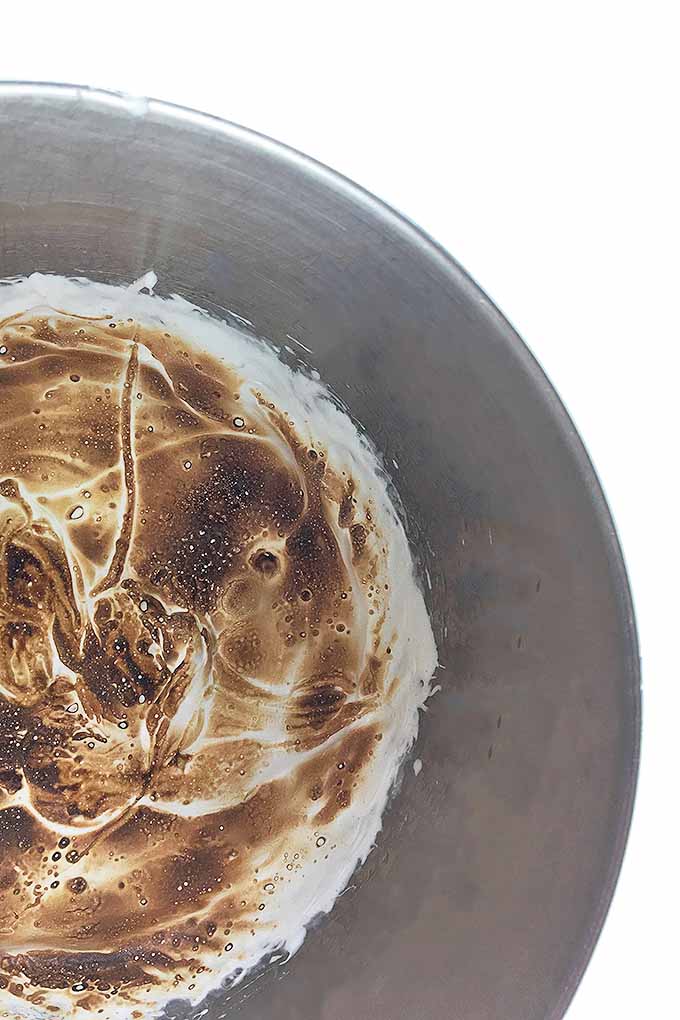
1. When your mallow is eight minutes into the whipping process, turn off the mixer and toast the top with a kitchen torch.
2. Continue to whip for another two minutes, then stop and torch again.
3. Repeat two more times, then whip for three more minutes.
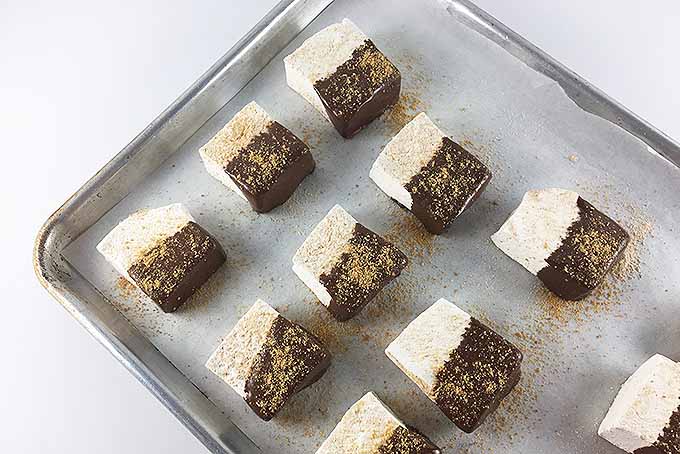
4. Add crushed graham crackers to the powdered sugar blend. Once they’ve set, dip in melted chocolate. You can use our homemade recipe for classic graham crackers, or our einkorn spelt graham crackers!
I like to give the dipped ‘mallows one last sprinkle of crushed graham cracker for a nice final touch.
The Recipe

| Servings | Prep Time |
| 16 square marshmallows | 30 minutes |
| Cook Time | Passive Time |
| 15 minutes | 4-6 hours |
|
|
|
|
We’ve got all the tips you need to make tasty homemade marshmallows. There are dozens of ways to mix up the flavor and shape. Learn more on Foodal now.
|
- 2 tablespoons (2 packets) gelatin
- 1 cup cold water divided
- 1 cup sugar
- 1 cup light corn syrup
- 1 teaspoon vanilla extract (or other flavoring, as desired)
- 2/3 cup Powdered sugar
- 1/3 cup cornstarch
- Stir together the gelatin and 1/4 cup cold water in the bowl of a stand mixer. Fit the mixer with the whisk attachment. Let sit while completing the next step.
- While the gelatin blooms, mix together the sugar, corn syrup, and remaining 3/4 cup of water in a small saucepan. Cook without stirring on medium-high heat until the syrup reaches between 235°F and 240°F, about 15-20 minutes.
- When the syrup nears its final temperature, turn the mixer on low speed. As soon as the syrup hits between 235°F and 240°F, turn off the heat and carefully pour it into the mixer bowl. Add the vanilla, then turn the mixer up to high.
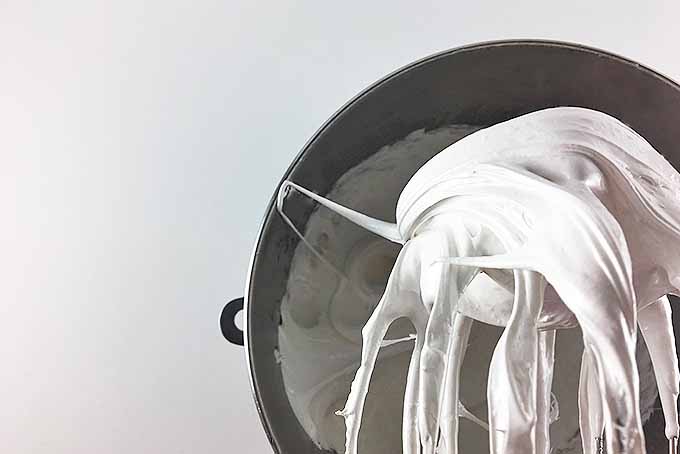
- Whip for 10-12 minutes, until the mixture is thick and glossy. The bottom of the bowl will still feel lukewarm.
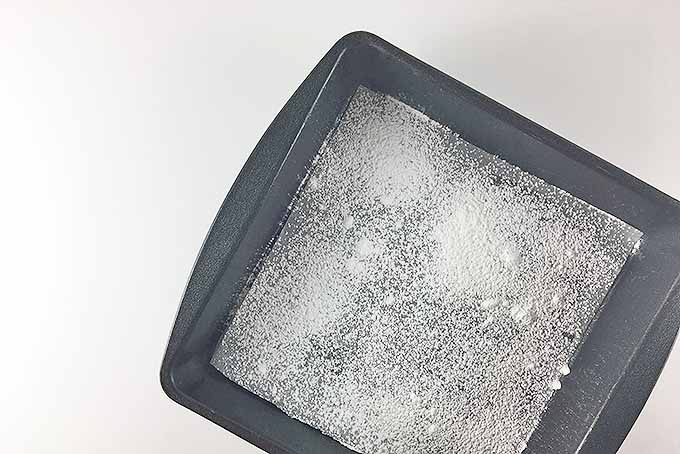
- While the mixture whips, prepare your pan. Line a square baking pan with parchment and lightly spray the paper and sides of the pan with oil. If making mini marshmallows, prep two half-sheet pans in the same manner. Combine the powdered sugar with the cornstarch, and sift a few tablespoons of it onto the pan.
- Spread the marshmallow onto the prepared square baking pan. If making mini marshmallows, work quickly and transfer the mixture from the mixing bowl into a piping bag fitted with a round tip. Pipe long strips onto the prepared half-sheet pans. Sift another few tablespoons of the powdered sugar and cornstarch mixture on top.
- Let set at room temperature uncovered for 4-6 hours, then cut them with a pizza wheel lightly dusted with the powdered sugar topping. Toss the pieces in the remaining powder mixture and enjoy!
Nutritional Information*
Cooking by the Numbers…
Step One – Bloom
Place the gelatin in the bowl of your stand mixer with 1/4 cup of cold water and stir together with a spoon until completely combined. Place back on the mixer and fit with a whisk attachment.
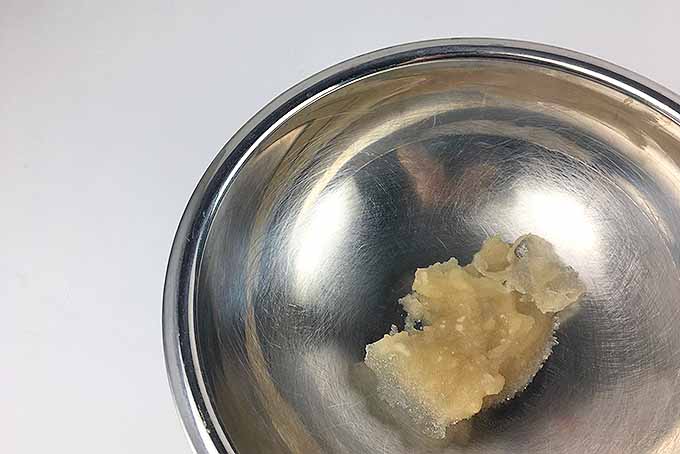
The bottom of the whisk attachment may not reach the small amount of gelatin and water at the bottom of the bowl to give it a thorough mixing, so it is best to combine these two ingredients with a spoon first.
This process is called “blooming” the gelatin. The water is hydrating and softening the granules so that they will dissolve quickly and evenly once mixed with the warm sugar syrup.
Step Two –Syrup Prep
Stir together the sugar, corn syrup, and remaining 3/4 cup of water in a small saucepan. Heat on medium-high, keeping a thermometer handy to check the temperature. A traditional candy thermometer or instant-read thermometer works best for this.
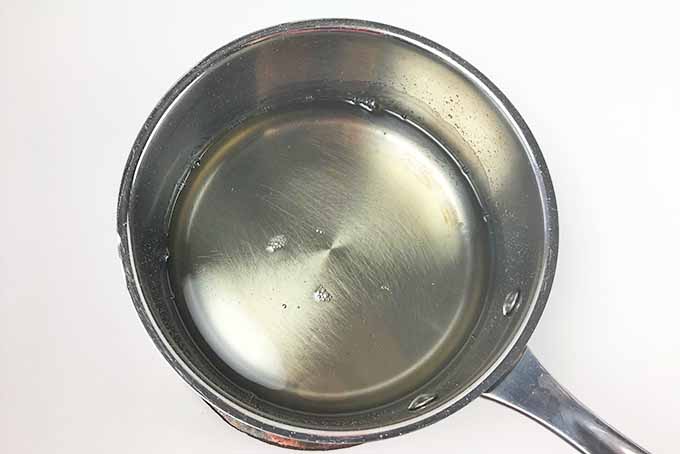
Sugar can be very finicky. It needs to be cooked in a very clean pot to avoid crystallization, and it does not want to be stirred! Let the sugar boil without disruption until it reaches between 235°F and 240°F.
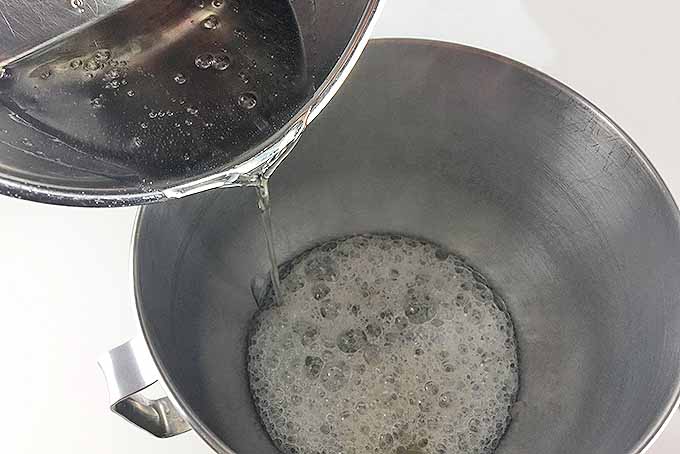
Step Three – Pour
Right before the syrup reaches temperature, turn the mixer on low speed. Once the syrup is ready, turn off the heat and carefully pour the sugar into the mixer bowl.
Sugar burns are some of the most painful, so be very careful! While we’re on the topic, it’s probably a good idea to familiarize yourself with our post on kitchen safety.
Pour as much of the syrup as you can out of the pot, but do not scrape down the sides. You don’t want to risk pouring any pieces of crystalized sugar that might be stuck on the pot into your marshmallow.
With the mixer still running on low speed, pour in the vanilla extract. Then turn the speed up to high.
If you want to use food coloring, add a few drops of your desired color along with the vanilla extract.
If you’d like to mix up the flavoring, you can try other types of extracts. I love using peppermint or almond. Or be sure to check out my note about flavors above for more suggestions.
Step Four – Whip
Let the mixture continue to whip on high speed for 10-12 minutes, until it is glossy and voluminous, and has cooled down to a lukewarm temperature. The bottom of the bowl will still feel a little warm.
Step Five – Pan Prep
While the marshmallow whips, prepare your pan. Line a square baking pan with parchment paper and spray the bottom and sides of the pan with oil. If you are planning to pipe out mini marshmallows, you will need to prepare two half-sheet pans.
Mix together the powdered sugar and cornstarch. Sift a few tablespoons of this mixture onto the pan and set the rest aside for later.
Step Six – Spread
When the mixture is glossy, thick, and lukewarm, spread it out onto the pan. It will begin to set very quickly, so you’ll want to work swiftly.
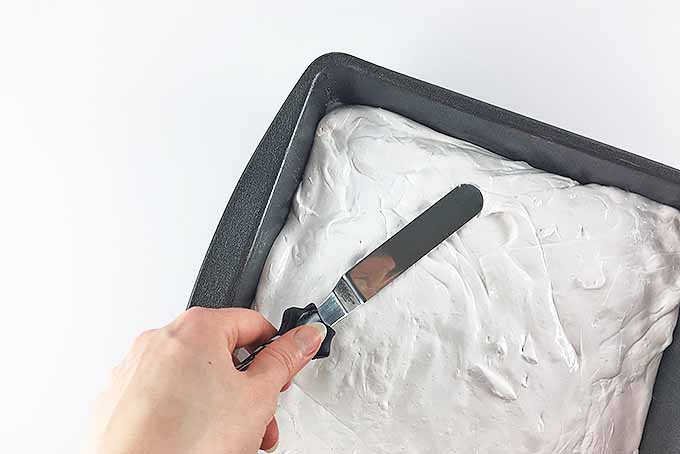
I like to use a bowl scraper to ensure I get every last bit out of the bowl, and a small offset spatula to smooth it out. You can even use your hands to spread out the marshmallow.
Spray your utensils (or hands!) liberally with cooking spray to minimize sticking – it’ll make the whole process far less messy.
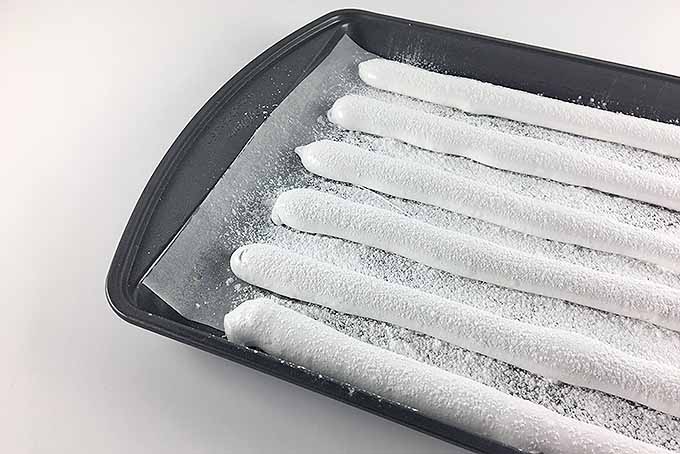
If you’d like to make mini marshmallows, transfer the mixture into a piping bag fitted with a round tip instead of spreading it onto the tray. Pipe the ‘mallow out onto the prepared baking sheets in long strips, leaving 1/2 inch between each row.
Sift another few tablespoons of the powdered sugar and cornstarch mixture over the marshmallows.
Step Seven – Set
To set, let the marshmallows rest at room temperature for 4-6 hours. This is the hardest part for me because, despite all its virtue, I still have little care for patience.
The tray doesn’t need to rest at any particular temperature, as long as it’s not in the fridge or in the oven. But they do need to be exposed to the air or they won’t dry properly No need to cover these!
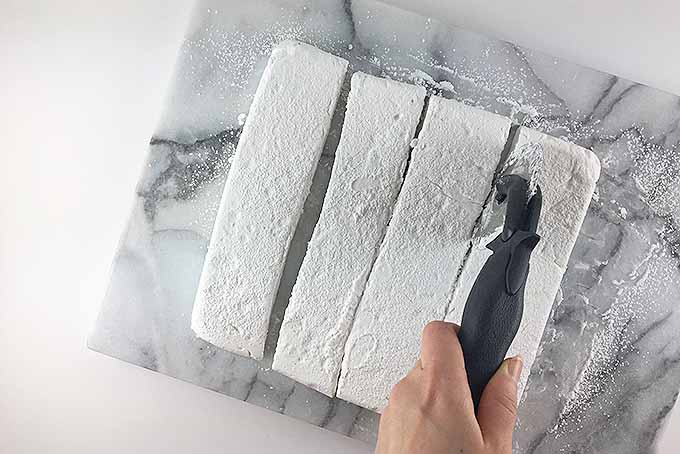
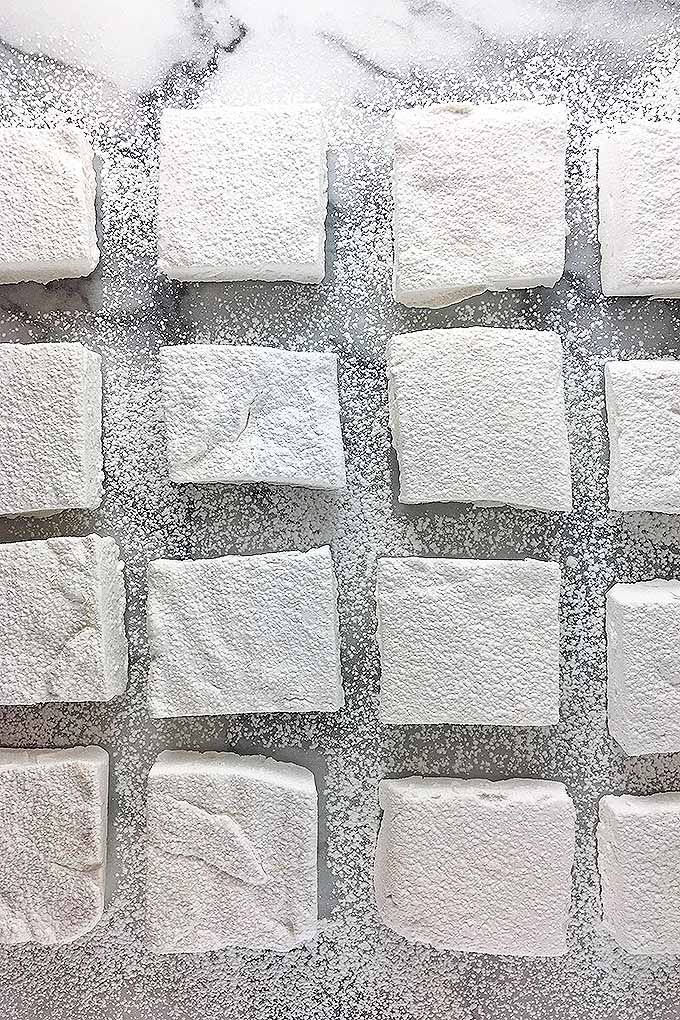
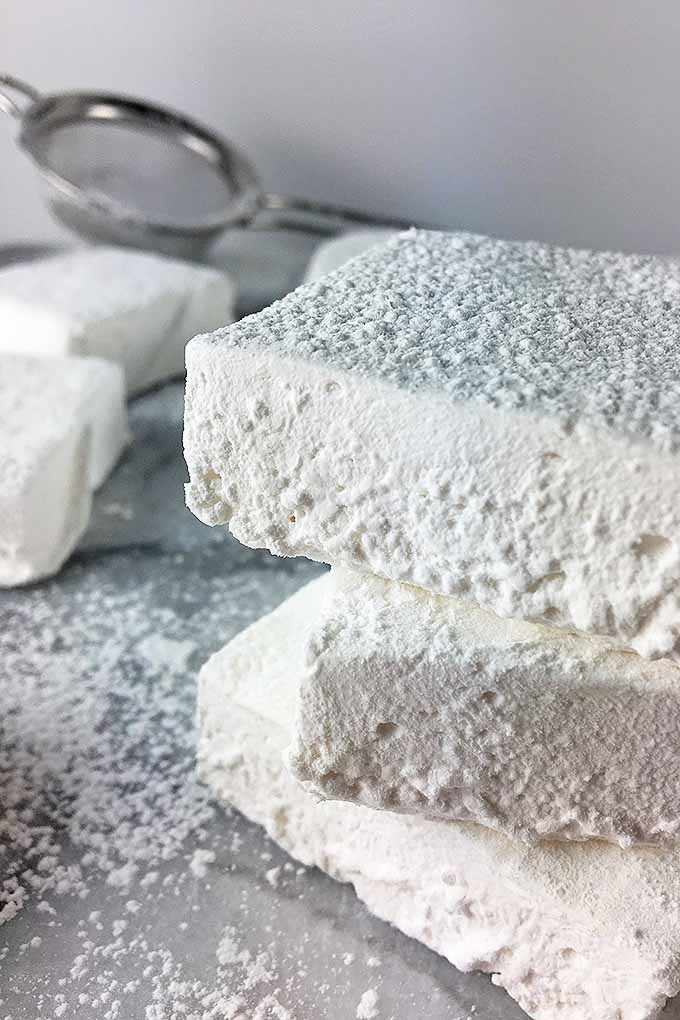
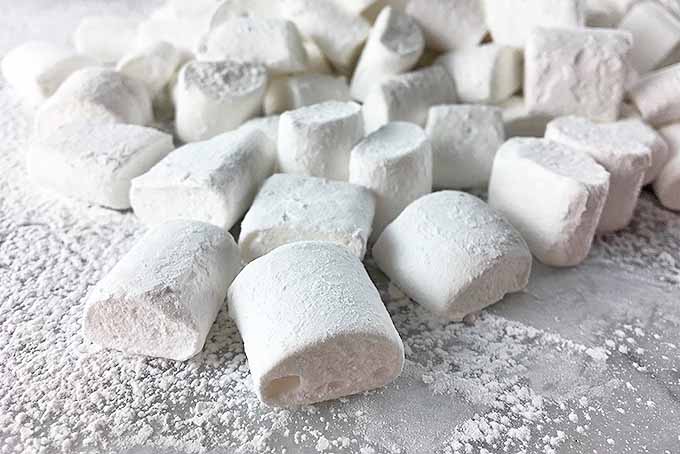
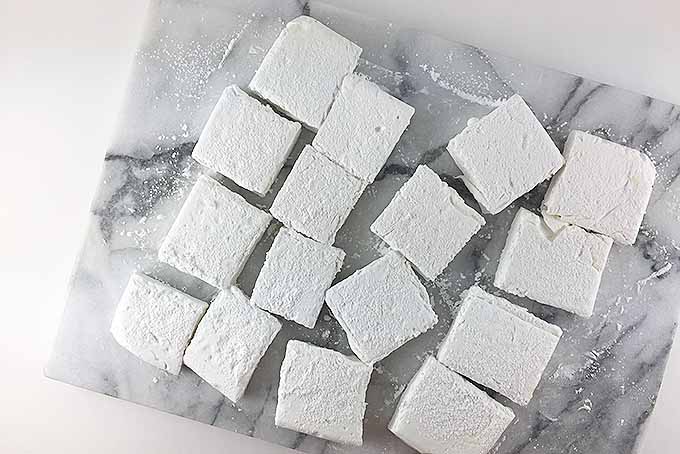
Once firm, invert the tray of marshmallow onto a cutting board dusted with the powdered sugar and cornstarch mixer, and cut them using a pizza wheel or a sharp knife dusted with the powdered sugar and cornstarch mixture.
If making mini marshmallows, transfer each strip to a cutting board.
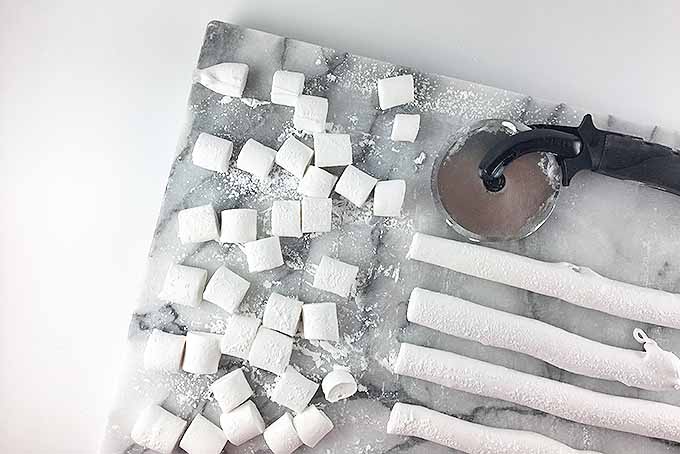
I like to cut a tray full into 2-by-2-inch cubes, or cut the strips for mini marshmallows into small cross-sections.
You can also make fun shapes by cutting them out with miniature cookie cutters dipped in the powdered sugar and cornstarch mixture!
Toss them in the remaining powdered sugar and cornstarch mixture and they’re ready to enjoy.
A Great Gift that’s Super for Snacking and Desserts
Homemade marshmallows make an excellent gift. I’ve given them to my youngest brother for Christmas several years in a row, and he’s always eager to find out what flavor he’ll receive next.
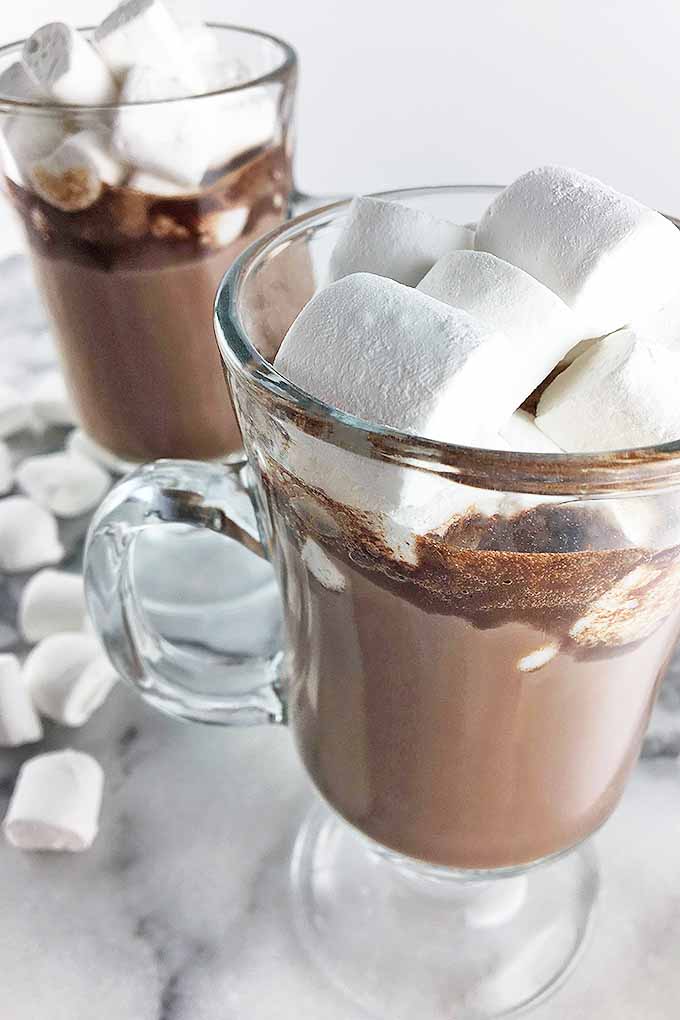
These mallows are tasty on their own, and they’re one of my favorite kinds of homemade candies. But they can also be used to replace the store-bought version in any other marshmallow application.
Stir in melted butter and your favorite cereal for a Rice Krispie-style cereal bar, use them as decoration on cakes and cupcakes, use them in baked banana boats, or float in a steaming mug of hot cocoa.
To store, let them sit at room temperature for another 2 hours before placing in an airtight container. They will keep at room temperature for 2 weeks.
What kinds of flavors and shapes can you dream up? Share your ideas in the comments below!
Don’t forget to Pin It!
Photos by Nikki Cervone, © Ask the Experts, LLC. ALL RIGHTS RESERVED. See our TOS for more details. With additional writing and editing by Nikki Cervone.
*Nutritional information derived from a database of known generic and branded foods and ingredients and was not compiled by a registered dietitian or submitted for lab testing. It should be viewed as an approximation.
About Kendall Vanderslice
Kendall’s love of food has taken her around the world. From baking muffins on a ship in West Africa and milking cows with Tanzanian Maasai, to hunting down the finest apfelstrudel in Austria, she continually seeks to understand the global impact of food. Kendall holds a BA in Anthropology from Wheaton College and an MLA in Gastronomy from Boston University, and has worked in the pastry departments of many of Boston’s top kitchens. Based in Somerville, Massachusetts, Kendall helps to run a small community supported bread bakery and writes about the intersection of food, faith, and culture on her personal blog, A Vanderslice of the Sweet Life.

These were easy, fun, and delicious! I made orange marshmallows dipped in dark chocolate. Do you have a trick to minimize the amount of marshmallow that sticks to the bowl? I want to make mint next!
Yes! The best tip I have is to spray the bowl with non-stick spray and wiping off any excess with a paper towel. The marshmallow shouldn’t stick as much to the bowl.
How do you find it best to dip them in chocolate? And if you are dipping them, should you avoid dusting them with confectioners sugar first?
Hi, Jessica!
You will still need to dust them no matter what you decide to do. This is necessary to reduce stickiness as you are handling and storing them.
Before you dip them, just be sure to shake/pat off any excess cornstarch-powdered-sugar mixture from the surface.
I like dipping half of the marshmallow, and leaving the other half with no chocolate. That way, you can have more control by holding the marshmallow by hand as you dip. And it’s a beautiful presentation!
Melt your preferred chocolate in a medium bowl, and dip half of one marshmallow into the chocolate, allowing the excess chocolate to drizzle back into the bowl. You can also gently scrape the melted chocolate down the side of the bowl to remove for a cleaner base that isn’t too thick with chocolate. Place the dipped marshmallow on a sheet pan lined with parchment paper – the parchment paper is crucial for easy cleanup so the chocolate doesn’t stick to the pan as it cools.