When I was a little girl, I loved going to the bakery to help pick out cookies when we were hosting a special occasion at our home.
I would stand in front of the display case and point to the prettiest ones that I thought would help decorate our dessert table.
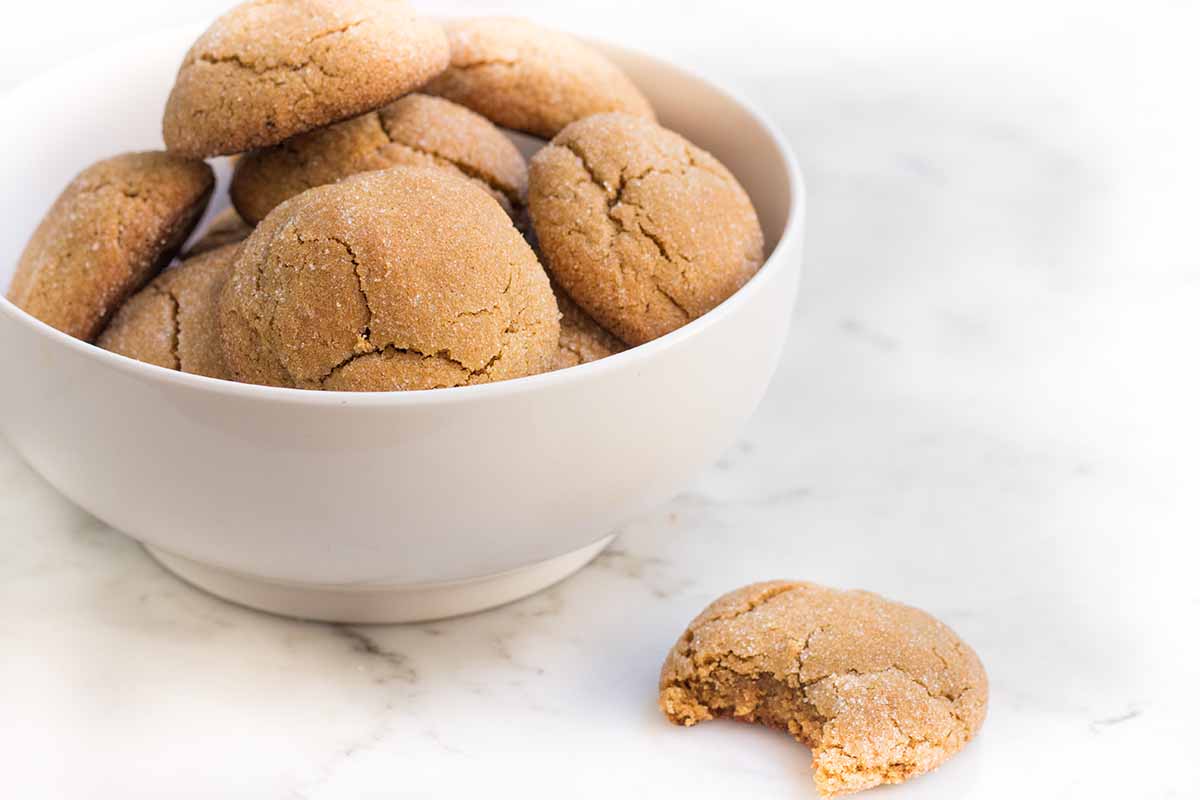
And I always had a favorite…
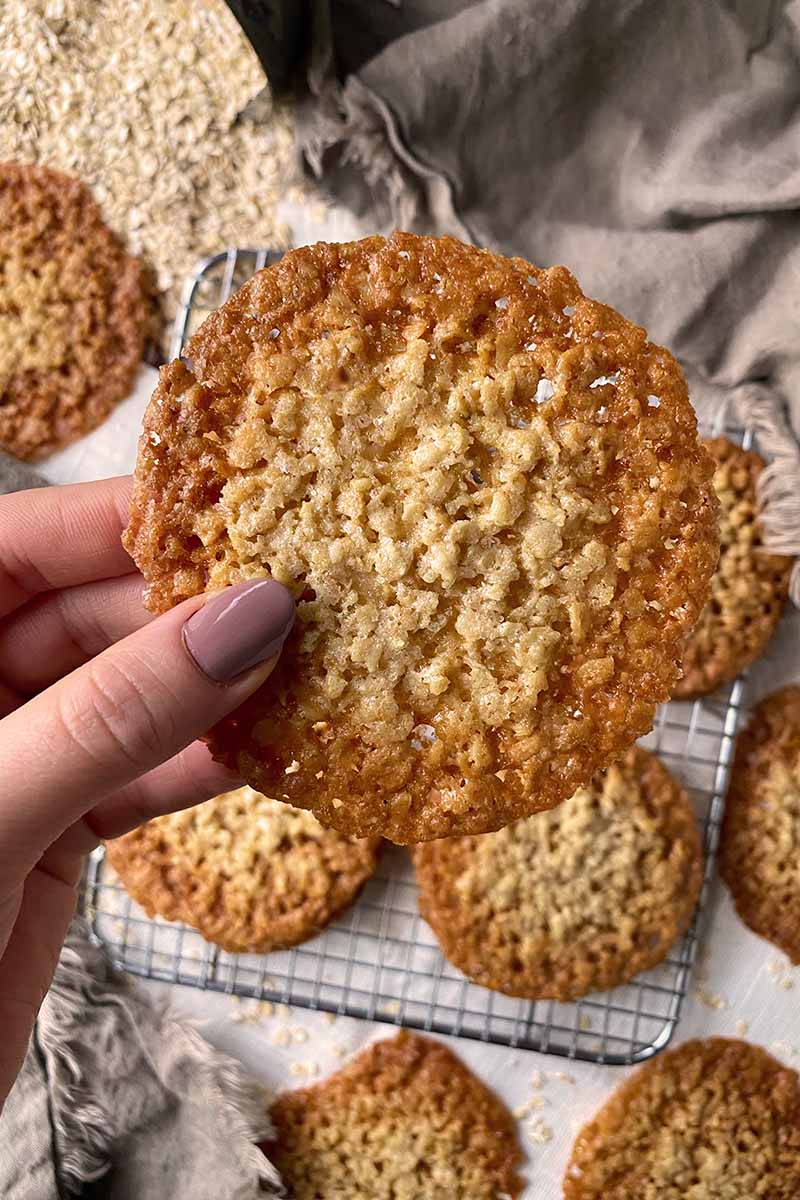
Lace cookies!

Thin, delicate, and covered in tiny holes, these beautiful rounds were always my first pick.
Sometimes with a layer of melted chocolate or decadent ganache sandwiched between them or drizzled on top, they make for the most memorable treat.
Around the time we were planning my first child’s christening, I came across a recipe for these beautiful, caramelized sweets.
I hadn’t even considered that I could recreate this childhood favorite of mine in my own kitchen.
I was even more excited that I already had all of the simple ingredients in my pantry and fridge!
That weekend, I made dozens upon dozens for the reception, expecting everyone would try just one to start… but then quickly come back for more.
And my prediction was right – they were a huge hit!
With basic baking ingredients like butter, oats, sugar, and flour, you probably have what you need already on hand to make these for your next special occasion.
All you need now is the recipe.
Take a look below, and get ready to make a breathtaking, sweet delight everyone will love.
Print
Lace Cookies
- Total Time: 1 hour, 30 minutes
- Yield: 24 cookies 1x
Description
Can you make a beautiful dessert with just a few simple ingredients? It’s certainly possible with these easy lace cookies.
Ingredients
- 1/2 cup (1 stick) unsalted butter, melted and cooled
- 1/2 cup granulated sugar
- 1/4 cup light brown sugar, gently packed
- 1 large egg, beaten
- 1 teaspoon vanilla extract
- 1 cup quick-cooking oats
- 2 tablespoons all-purpose flour
- 1/4 teaspoon kosher salt
- 1/8 teaspoon baking powder
- 4 ounces melted chocolate (optional)
Instructions
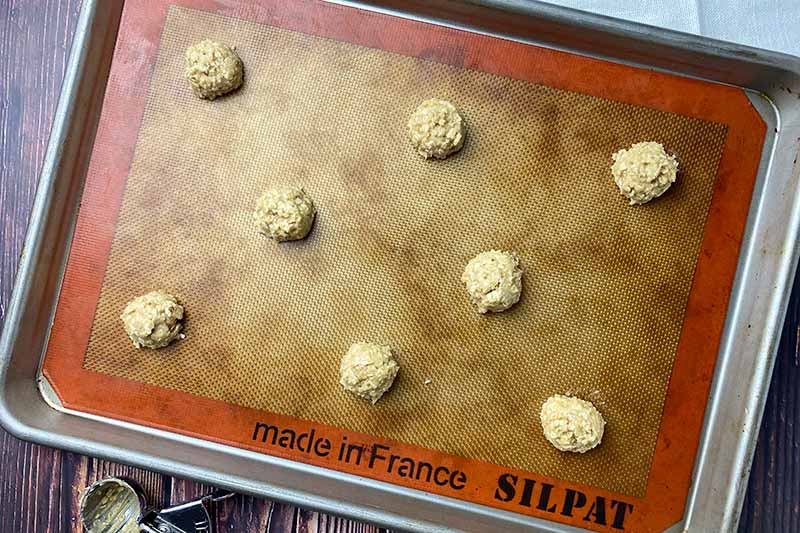
- Preheat the oven to 350°F. Line three half-size baking sheets with one silicone mat or parchment paper each.
- Whisk together the melted butter, granulated sugar, and brown sugar in a large bowl. Whisk in the egg and vanilla until completely combined.
- With a spoon or spatula, mix in the oats, flour, salt, and baking powder until completely combined. The mixture will resemble a thick yet soft and slightly runny batter.
- Using a 1-tablespoon cookie scoop, scoop out the batter and place 8 portions on a single baking sheet, leaving about 3 inches of space between each portion. Repeat with the remaining batter and baking sheets.
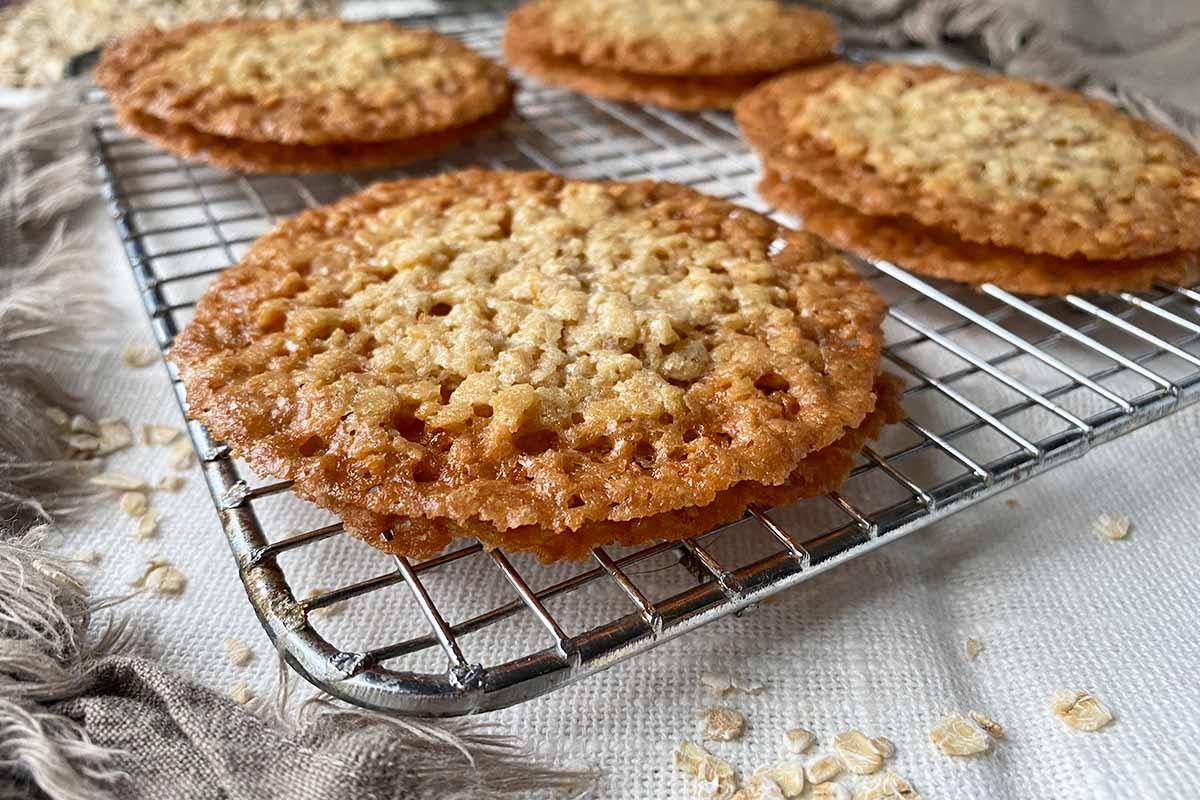
- Working in batches if necessary, transfer the baking sheets to the oven and bake for 10-12 minutes. The batter will spread significantly into thin rounds, and the edges will be a deep golden-brown color with slightly pale centers. If the cookies still look very pale, continue baking for an additional 2-5 minutes.
- Immediately remove the baking sheets from the oven. Allow the cookies to completely cool undisturbed on the baking sheets, about one hour.
- Using a small offset spatula, carefully remove each cookie from the silicone mat or parchment paper and serve.
- If using the melted chocolate, drizzle the tops of the cookies or create sandwiches. Allow the chocolate to harden completely before serving.
- To store lace cookies, gently place them on top of one another in an airtight container. Store them for up to one week at room temperature.
- Prep Time: 15 minutes
- Cook Time: 15 minutes
- Category: Cookies
- Method: Baking
- Cuisine: Dessert
Cooking by the Numbers…
Step 1 – Prep
Preheat the oven to 350°F. Line three half-size baking sheets with one silicone mat or parchment paper each.

Take note that the slippery material of silicone mats may cause the batter to spread more thinly than parchment paper.
Completely melt the unsalted butter in a small pot on the stovetop or in the microwave. Allow to cool slightly as you measure the remaining ingredients.
Measure out the granulated sugar, light brown sugar, vanilla extract, oats, flour, salt, and baking powder.
Beat the egg in a small bowl with a fork or whisk.
Step 2 – Make the Batter
In a large bowl, whisk together the melted butter and both sugars. Mix until they are completely combined. Add the beaten egg and vanilla extract, whisking once again until everything is completely combined.
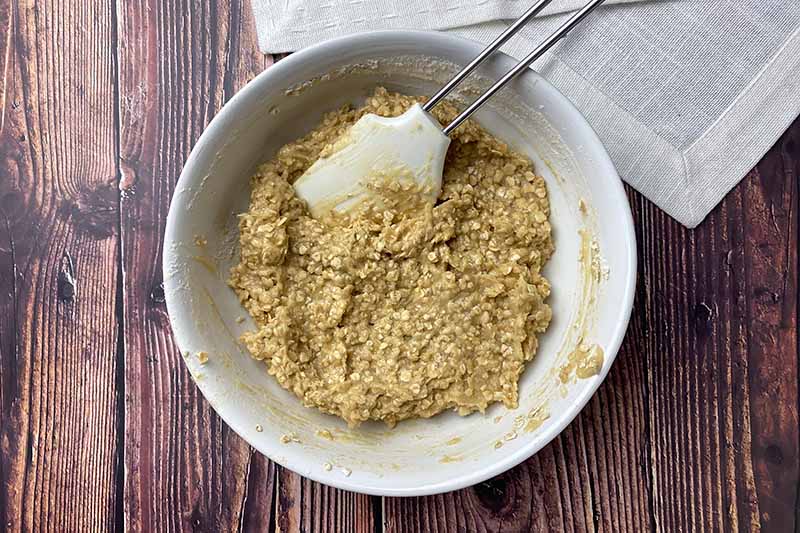
At this point, switch from a whisk to a mixing spoon or rubber spatula. Because the oats will get stuck in the whisk, it will be much easier to mix with a more suitable utensil.
Mix in the oats, flour, salt, and baking powder, continuing to stir until all of the ingredients are completely combined. The mixture will resemble a thick yet soft and slightly runny batter.
As the butter continues to set at room temperature, do not be surprised if the batter becomes slightly thicker and stiffer. This is normal!
Step 3 – Portion and Place on Baking Sheets
For the most consistent measurements, use a 1-tablespoon scooper utensil to create even portions.
Use the scoop to measure out portions of batter, ensuring that the batter is flush with the top edge of the scoop.
Gently drop each portion onto a prepared baking sheet, positioning 8 portions per baking sheet that are about 3 inches apart from each other.
You don’t want to overcrowd the pans – the batter will spread significantly. You want to leave enough space so that the batter can spread without running into the other portions as they bake.
You may have some leftover batter – if that is the case, you will need to place any remaining portions on a fourth lined sheet pan.
Step 4 – Bake and Cool completely
Transfer the baking sheets to the oven. Depending on your oven size, you may need to work in batches.

Bake for about 10 to 12 minutes, or until the mounds have formed into thin rounds that are a deep golden-brown color around the edges with a slightly pale-yellow center.
Do the rounds still look… really pale? They still need to spend some time in the oven – continue baking for an additional 2 to 5 minutes, and check again.
If some of the mounds did spread into each other a little – and this will happen, as factors such as subtle measurement variations, humidity in the air, and differences between baking sheet liners can all slightly affect the baking outcome – don’t panic.
The worst decision you can make is to try to fix anything while everything is still warm and setting. Just… wait!
Once they have cooled in the next step, they will easily break off into individual rounds at the points where they spread into each other.
Immediately remove the baking sheets from the oven.
Allow them to cool completely on the baking sheet. This will take up to one hour.
Do not agitate or disturb them as they continue to cool, as they may break. The cooling process sets each baked round into their final shapes – be patient!
Step 5 – Remove from Baking Sheets
Carefully remove each round from the pan using a small, offset spatula.
The thin metal blade of this nifty, and very useful, decorating tool is able to fit between the cookie and the silicone mat or baking sheet, helping to cleanly and swiftly detach each one with little risk of breakage.
While they may stick slightly if you try to pry them off by hand, they should come off easily with the offset spatula.
But still be gentle! They are very delicate and can break easily.
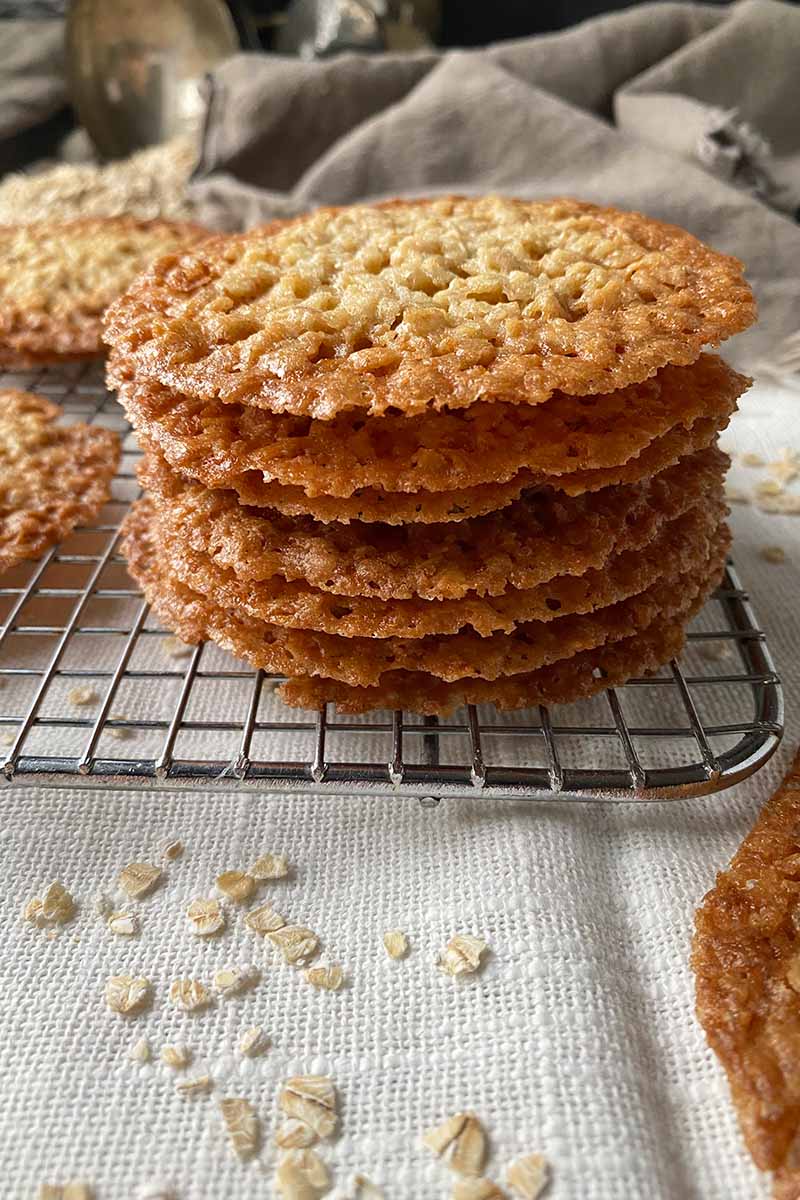
Serve immediately, or store them for up to one week in an airtight container at room temperature. You can gently place them on top of one another.
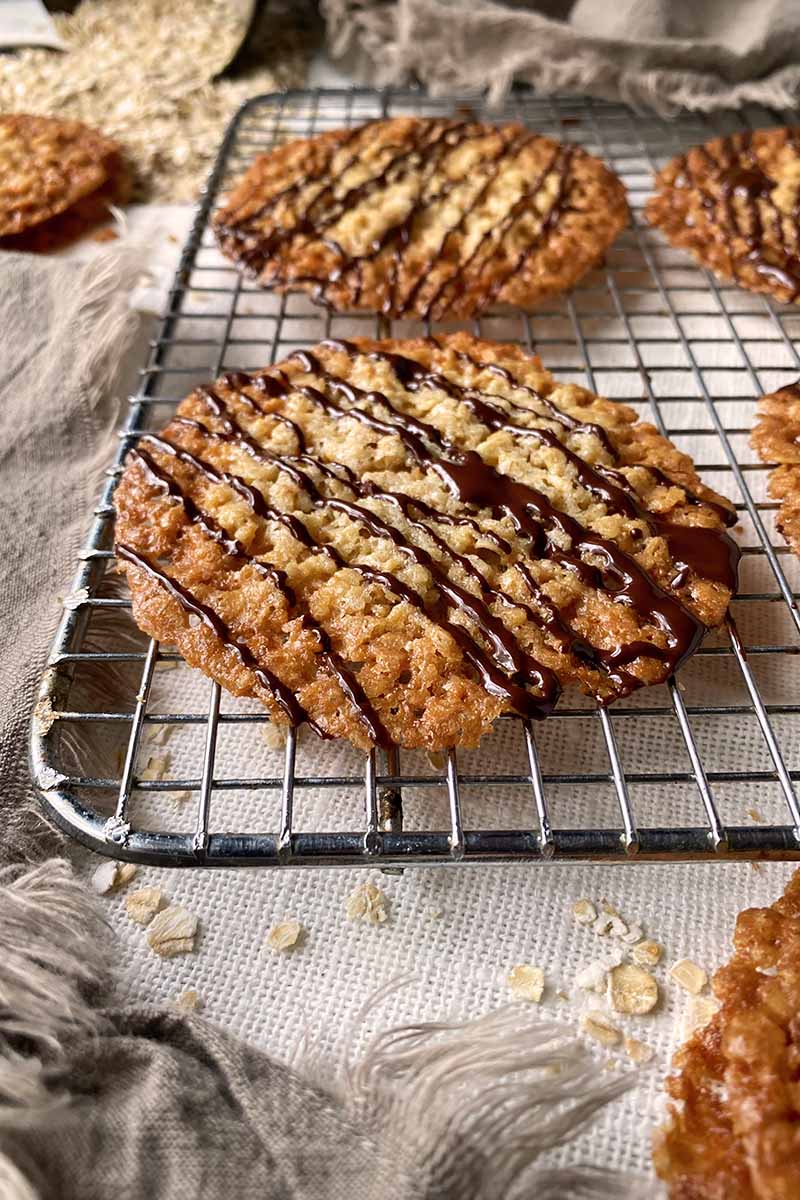
Step 6 – Decorate with Melted Chocolate (Optional)
Once they have cooled completely, you can choose to decorate them with melted chocolate. Use your favorite kind of chocolate – dark, milk, or white.
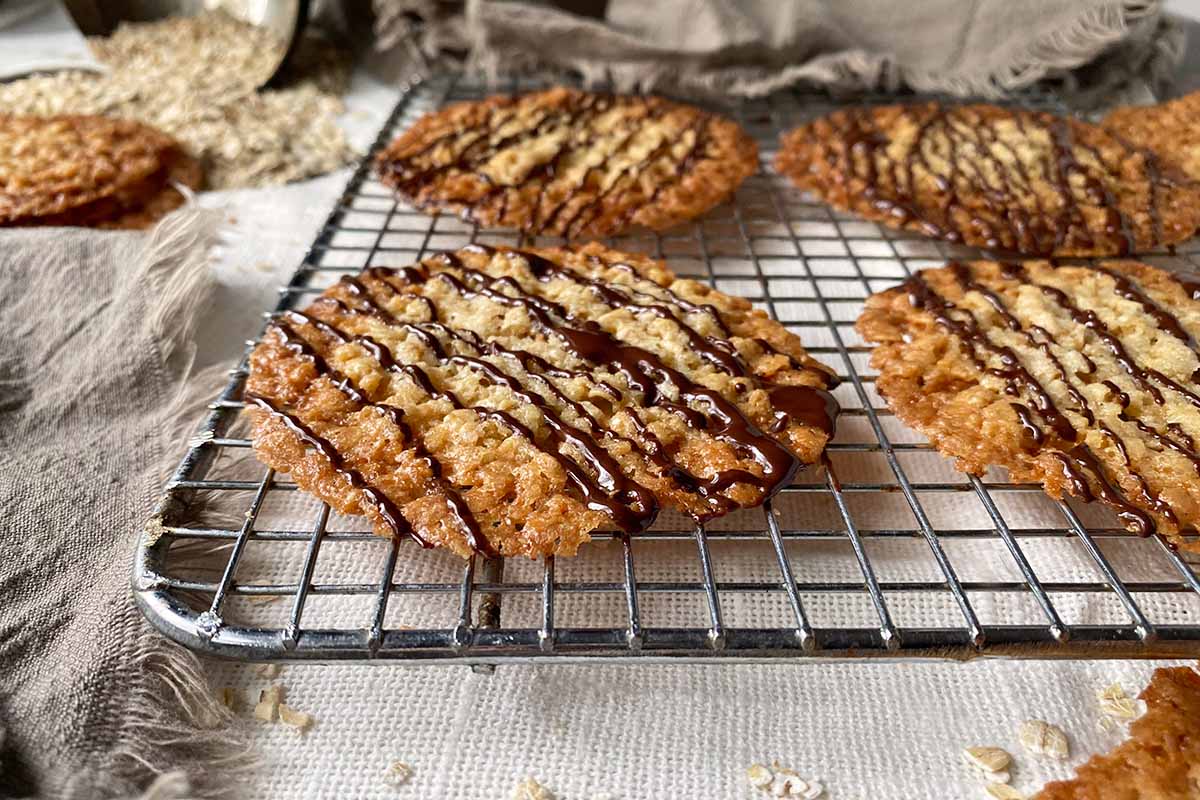
To make sandwiches, spread a thin layer of melted chocolate on one side of a cookie, and place another plain cookie on top of the chocolate layer.
You can also drizzle chocolate on top, or dip one half of a cookie in chocolate. The choice of chocolaty goodness is yours!
Place them on a cutting board, baking sheet, or tray and let the chocolate harden completely at room temperature before serving.
Love That Lace
Caramelized and delicate, lace cookies are a beautiful dessert to serve for any special event you are celebrating.
Weddings, birthdays, anniversaries – any of these fun occasions will surely be memorable, especially with the sweet help of these buttery, crispy treats!
While the dreamy chocolate provides a perfect decadent contrast, you can definitely serve them on their own without this indulgent extra ingredient.

This might be the case if your chocolate seizes on you! But we can help fix this melting mishap.
Have you made these before? How do you like to serve them? Give us all the details in our comment section below.
For more cookies featuring the hearty, nutty goodness of oats, read through these three recipe suggestions next when you’re ready to make another addictive batch of desserts:
- Salted White Chocolate Chip Oatmeal
- Chocolate and Pomegranate Oatmeal (Vegan and Gluten Free)
- Classic Oatmeal Chocolate Chip
Photos by Nikki Cervone, © Ask the Experts, LLC. ALL RIGHTS RESERVED. See our TOS for more details. Originally published on August 18, 2017. Last updated on October 23, 2023. With additional writing and editing by Nikki Cervone.
Nutritional information derived from a database of known generic and branded foods and ingredients and was not compiled by a registered dietitian or submitted for lab testing. It should be viewed as an approximation.
About Jennifer Swartvagher
Jennifer is an experienced journalist and author. Her work has been featured on TODAY Parents, The New York Times Blog, BlogHer, Scary Mommy, and scores of other parenting and cooking publications.

I am going to make these around Christmas! Pinned
Ah, a perfect Christmas treat! Thanks, Nicole, hope you enjoy the recipe.
Just found this recipe while I was searching for a cookie recipe to make with my grandaughters.
They look delicious and easy to make.
Wondering if we could add nuts? They want almonds and pecans in their cookies
Hi Sanda,
Lace cookies like these aren’t usually made with nuts, so we’re not sure how adding them to the batter might affect the resulting texture. But what you could try is sprinkling your choice of chopped nuts on top after you dip them in chocolate, for a nutty coating.
Hi, the recipe says 1 egg. The photo below shows 2 eggs and also the instructions mention 2 eggs. The photo also looks like there is much more butter than 2/3 of a cup.
Unfortunately I’m making this recipe at the moment.
Hopefully you are around to help me out.
Thank you
Katherine
Katherine, hi! We are so sorry you were having some difficulties. It was totally our fault! We have fixed the mistakes, and edited and updated the recipe. Let us know how they turned out, and if you have any other questions. No harm in having even more cookies to try and share, right?
The batter was too liquid and when I put in oven it ran all over the pan.
This is a mess.
Oh no, Becky! We’re sorry this was a fail!
The batter, though a little liquidy, should still hold its shape when you scoop it into tablespoons and place them on the baking sheet. If the batter looks waaaaaay too liquidy the next time you make the recipe, we have some suggestions:
Try adding a few more tablespoons of flour at a time until you get the right consistency. You can also add 1/4-1/3 cup more oats, if you prefer that rustic texture.
You can also chill the batter in your refrigerator for about 30 minutes to one hour to help set the batter, if it still seems too liquidy to scoop.
Make sure your oven is preheated all the way before baking. If it’s not preheated, the batter won’t set properly and will “melt” rather than bake.
We hope you try making this recipe again, with our helpful tips!
how long can u leave cookies in sealed container?
These can be stored for about 3 days between layers of wax paper in an airtight container at room temperature, or in the refrigerator for about a week.
Spreads out too much and not uniform. Not a pretty cookie!
Love the recipe. Making them for Christmas and was testing out. I just wish they were a bit more crispy. I didn’t want to leave them in oven and over bake.