Braided yeast breads are famous treats that are often served in the spring. Especially during the Easter holiday, they are a popular baked good where I come from.
Maybe it’s because their fluffy, light, and soft texture reminds us that the heavy foods and winter dishes will soon be a thing of the past!
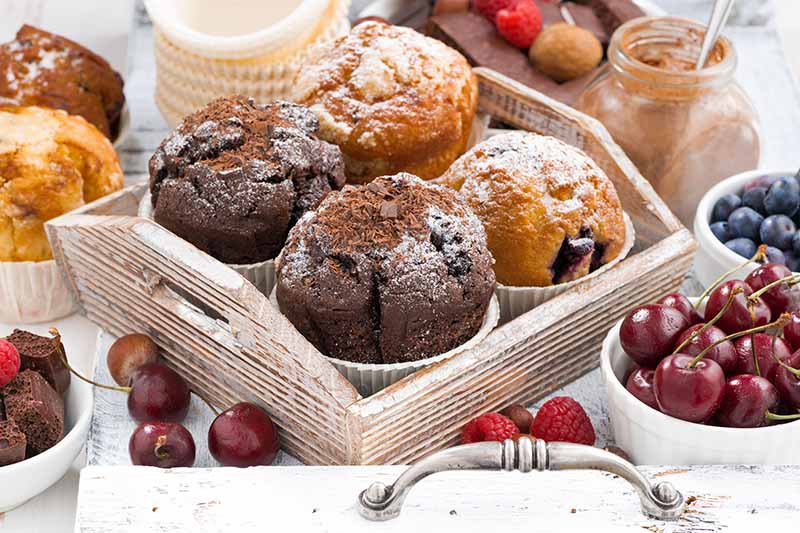
On its own or combined with nuts or fruits – such as almonds, cranberries, or rhubarb – braided breads are a true delight, and can be catered to everyone’s different tastes by featuring a variety of versatile ingredients.

That’s why it was so hard for me to decide which of my braided yeast bread recipes I would like to share with you next. Many of my favorite choices are utterly – but equally – delicious!
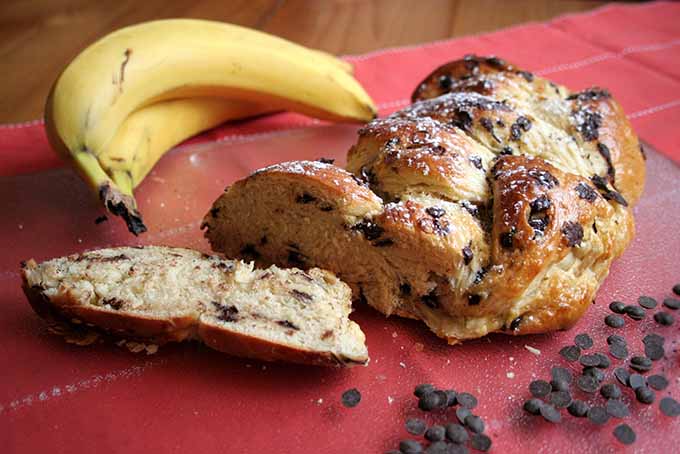
Finally, I decided to go for the combination of chocolate and banana. To me, that’s one fabulous mix that cannot fail. And it’s an entirely different experience from your classic banana quick bread recipe.
Bringing both together into a wonderfully shaped woven braid of dough seems like an absolutely amazing idea. Just the smell of the rising dough in the oven will make your mouth water – not to mention the aromas of baked banana and chocolate, tantalizing your taste buds.
With some butter or jam on top, this is everything you could possibly wish for, whether for breakfast or as a sweet treat (one that I’m sure the kids will love, too).
Or, you can easily turn it into a nice afternoon snack, with a dollop of whipped cream on the side!
A Note on Baking with Yeast:
Please don’t be at all afraid of using yeast in this recipe. With the instructions at hand, there is nothing to worry about, even though this is a sensitive type of dough. You can do it!
Just be sure not to heat up the ingredients too much. Otherwise, this will affect the yeast’s action in a negative way, and could prevent the loaf from rising.
Check out Foodal’s Complete Guide to Using Yeast for more information.
Adding banana gives the bread a fantastic, slightly sweet flavor, while keeping the braid soft and moist.
As for the chocolate – there’s no question that adding it to baked goods can never be wrong!

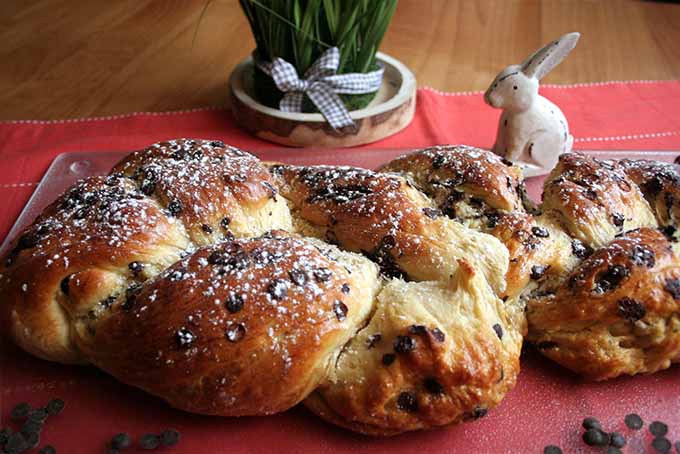
Here’s a great idea: make two loaves with this recipe – one for yourself, and an extra one to give away.
To do this, instead of forming three very long snakes of dough, you’ll have six shorter lengths of rolled dough instead that will be easier to manage.
Plus, you won’t have to worry as much about eating up your bread quickly while it’s fresh, if you share!
Also, each smaller loaf will be ready in just 20-25 minutes – so you don’t have to wait as long to be able to eat these up!
The Recipe

- 1 1/2 ounces or 1-2 tablespoons fresh yeast
- 1/4 cup sugar
- 6 tablespoons butter
- 1 cup whole milk at room temperature
- 4 1/2 cups all purpose flour
- 1/2 teaspoon salt
- 1 ripe banana
- 2 eggs
- 3-4 tablespoons chocolate chips divided
- Powdered sugar for dusting (optional)
- Crumble yeast into a small bowl. Add sugar and stir to combine thoroughly.
- In a saucepan, melt the butter over low heat. Add the milk, and then remove from the stove immediately.
- While still warm, combine melted butter and milk with the yeast and sugar mixture.
- In a large bowl, combine the flour and salt.
- Peel the banana. Thoroughly mash with one egg in a mixer or by hand, then stir to combine with the flour mixture.
- Add the milk-yeast mixture to the flour-banana mixture. Knead with a stand mixer with dough hook attachment or by hand until smooth.
- Form dough into a ball, cover with a clean kitchen towel, and leave to rise in a warm place for about 45 minutes, or until the dough appears to have doubled in size.
- Line a baking tray with parchment paper. Reserve about 1 tablespoon of the chocolate chips and set aside, then knead the rest into the dough. Divide dough into three equal portions.
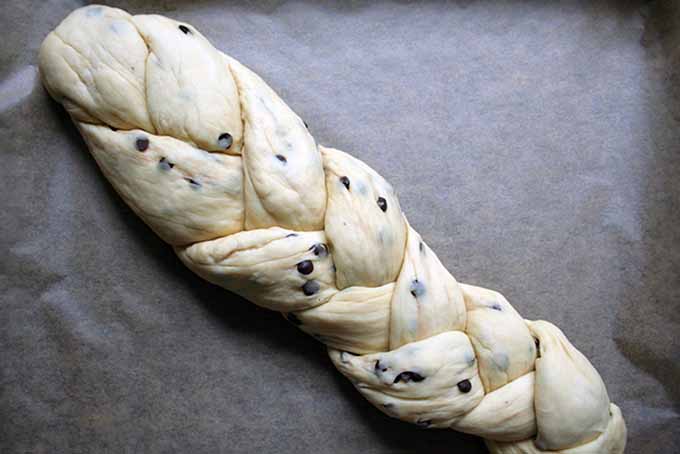
- On a floured countertop, form dough into three elongated, similarly sized rolls (with each snake of dough rolled out to be approximately 20 inches long). Braid these together.
- Place the braid diagonally on your baking sheet or tray, so it will fit. Cover and let rise in a warm place for another 25 minutes.
- Meanwhile, preheat the oven to 350°F.
- Whisk the remaining egg and brush to coat the top of the braid. Sprinkle the remaining chocolate chips on top – the egg should help them to stick. If any fall off onto the tray, stick them back onto the bread so they won’t burn.
- Bake for 25-30 minutes, or until golden brown on top. If you think the outer crust of your braid is getting dark too soon, cover it with aluminum foil around 10-15 minutes before the end of your total baking time.
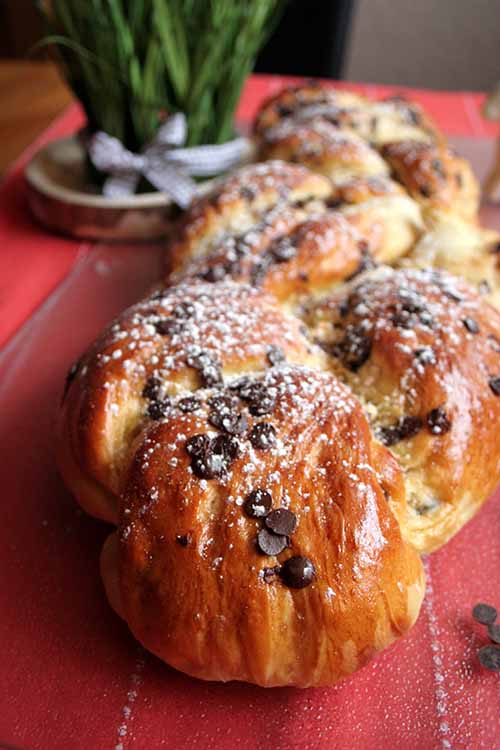
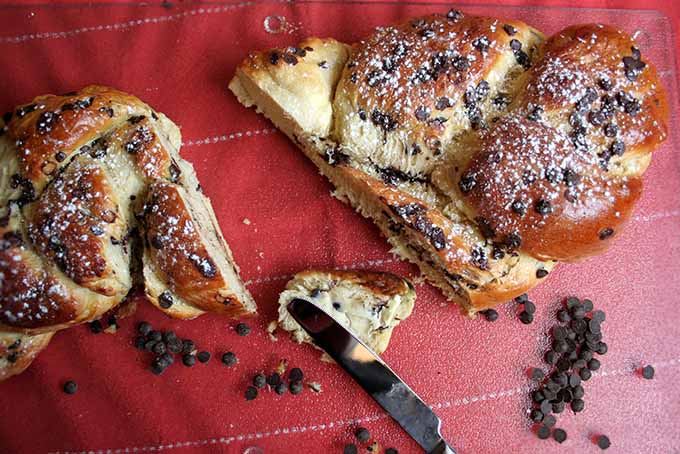
- Remove from the oven and cool on the baking sheet for at least 30-45 minutes. The cooling loaf can be moved to a wire rack if necessary after that, but you may risk tearing it if you attempt to move it while it’s still hot. Dust with powdered sugar if you like, then slice and enjoy!
Cooking by the Numbers…
Step 1 – Mix Yeast and Sugar
Place your sugar and yeast in a small bowl. Be sure to combine the fresh yeast thoroughly with the sugar, and break up any chunks.
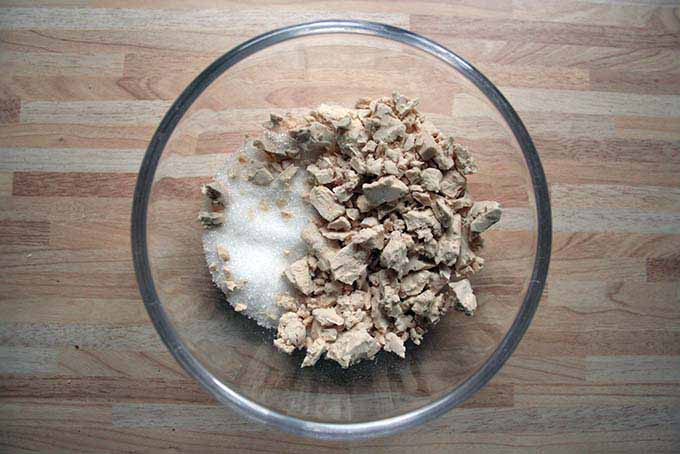
You can use a simple stainless steel spoon to help break up these chunks as you stir, or elect the help of a wooden spoon, perhaps even a mortar and pestle.Set this aside.
Step 2 – Melt Butter and Mix with Milk
In a small saucepan, you’ll want to get to melting your butter before mixing it in with the other ingredients. Of course, remember to melt your butter on low to avoid burning!
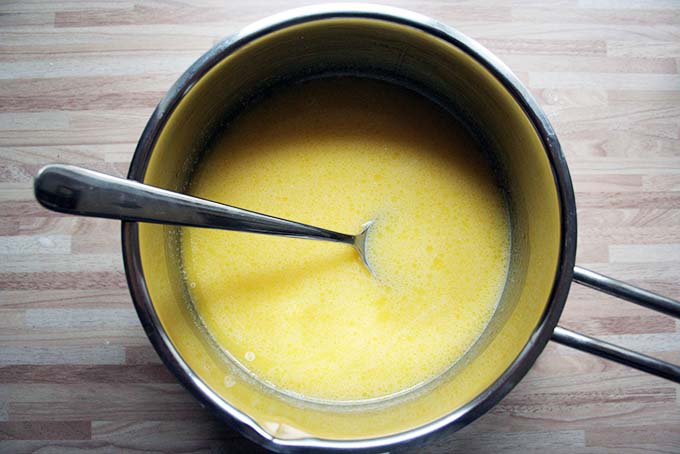
Once it’s melted, add your measured milk and stir it in quick, and then remove this mixture from the heat immediately.
Step 3 – Combine the Mixtures Made in the First Two Steps
Next, you’ll want to add the melted butter and milk to the yeast and sugar you combined earlier. Do this right away, while the ;butter mixture is still warm (but not hot!) – warmth will help to activate the yeast, but too much heat will kill it.
With a spoon or other stirring utensil of your choice, mix these ingredients together until completely smooth.
Step 4 – Combine Flour with Salt
Since there’s a bit more flour to this part of the recipe than other ingredients, make sure you find yourself a larger bowl. Put your flour in, measure your salt, and stir them together. Set aside.
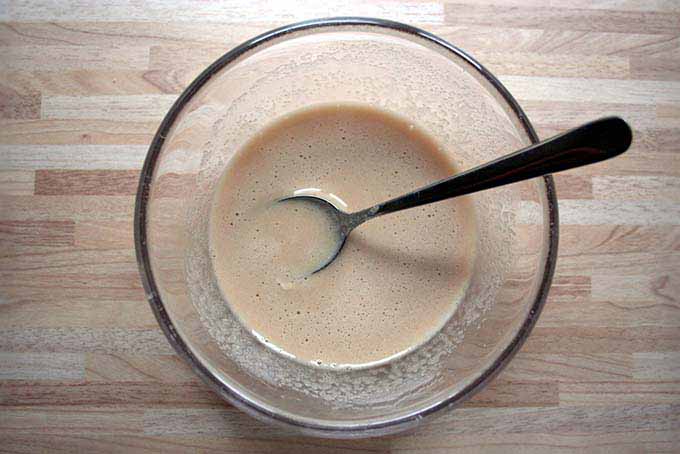
Step 5 – Peel and Mash Banana
Here’s the fun part! Peel your chosen banana, and mash it in a small bowl.
You can use a mixer for this part, or do it the old fashioned way: with a fork or other utensil, like a potato masher. You’ll also want to throw one egg into this mix at this point, which will make the mashing process a bit easier, too. I like to lightly whisk the egg in another small bowl before combining it with the banana.
Once the egg and banana are smoothly combined, mix this gradually into the flour and salt blend that you put together in the previous step.
Step 6 – Combine Both Mixtures
Now, everything comes together. Mix the yeast, milk, sugar, and butter combo from the earlier steps with the banana, flour, and other ingredients that have just been newly combined, until you have a smooth dough.
If you have a standing mixer, now’s the time to use it! A dough attachment will be your best help.
However, if you like to roll up your sleeves and knead your own dough by hand, you can do that too.
Step 7 – Form the Dough into a Ball
Once your dough is combined, well-formed and well-textured, form it into a nicely rounded ball.
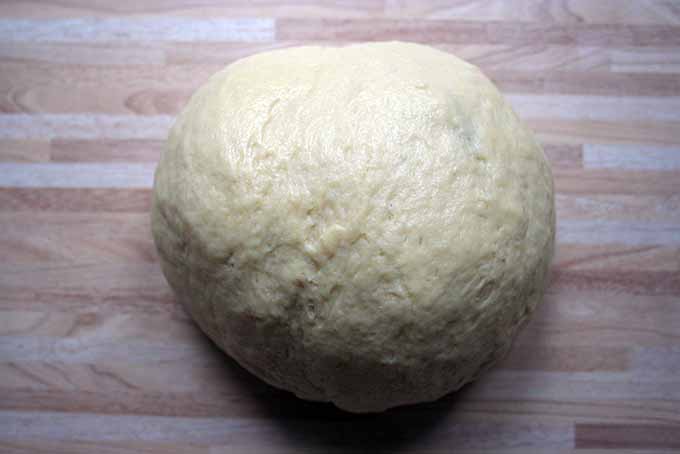
You’ll also want to give your dough ball some time to rise. Place a clean kitchen towel over your dough, and put it in a warmer than usual spot to rise, on a clean surface. Placing it in the oven with the light on is usually a good spot where nothing will disturb it.
Leave your dough to rise for about 45 minutes, or until it looks like the ball has almost doubled in size.
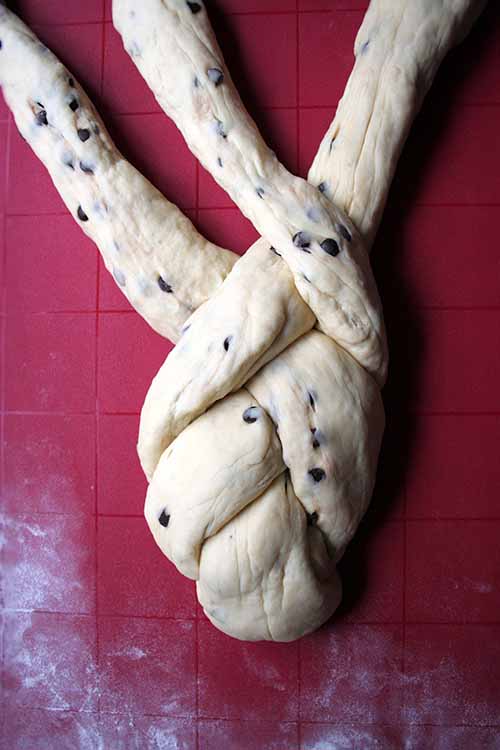
Step 8 – Add Chocolate Chips
Next, it’s time to add your delicious chocolate chips! Before you do, measure 1 tablespoon of your total amount of chips, and set them aside for a later step.
You’ll knead the morsels right into the dough by hand. After that, divide the ball of dough into 3 smaller balls of equal size (or 6, if you’re making two smaller loaves).

After dividing your dough – or in the meantime – prepare a baking tray lined with parchment paper to prevent the bread from sticking.
Step 9 – Braid Your Dough
Now, it’s time to flour up your clean countertop, or a large cutting board that’s ideal for preparing dough.
You’ll then take the three rounds of dough and roll them out into elongated sections in the flour, about 20 inches each (shorter if you’re making two loaves).
Next: you’ll braid them together!
Step 10 – Let Your Braid Rise
Once you’ve braided up a whole loaf, place the braid upon your parchment-covered baking sheet.
You may have to place it on the sheet diagonally (similar to what’s shown in the picture below) to make your braid fit.
Set it aside in a warm place, and let it rise a little more for about 25 minutes.
Step 11 – Preheat Oven
While waiting a little bit for the yeast to rise one last time, this is a great time to preheat the oven (if your bread is not rising in the oven, that is)!
Set the temperature to 350°F.
Step 12 – Coat Your Bread
Time for the second egg, your last ingredient. You will crack and whisk this together in a small bowl until smooth and combined.
Using a food-grade brush (like in the picture below), you’ll apply the egg wash as a coating to your bread, so it gets that nice crisp and golden outer texture!
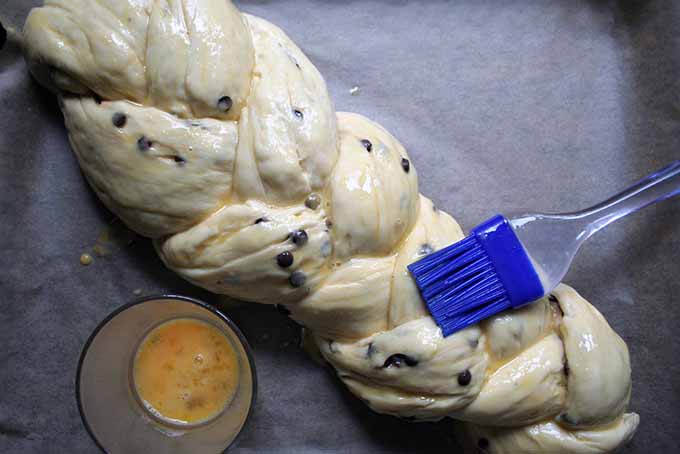
After brushing on the egg, take that last tablespoon of chocolate chips and sprinkle them atop your braid.
The egg coating should also help these chocolate morsels to stick to the bread. If they don’t, take any that fall off and stick them gently into the dough, towards the center or in a fold, so they won’t fall off onto the tray and burn.
Step 13 – Bake It
If your oven is preheated and ready to go, it’s time to stick your braided bread dough in!
Bake for about 25-30 minutes, using the outside texture and color as a good indicator – when ready, the outside should be golden brown and firm.
Think your bread is browning too fast? No worries – take a sheet or two of aluminum foil and cover your bread with it for the last 10-15 minutes of baking, to prevent burning or developing a tough crust.
Step 14 – Let It Cool
Once it’s all browned up and done, remove your braid from the oven and let it cool down, right on the baking sheet that you baked it on.
About 30-45 minutes of cooling time is optimal if you want that desired fluffy loaf that won’t fall apart when you eat it!
If you need to, you can remove your bread to a wire cooling rack – though you may risk damaging that beautiful loaf in transit, or watching your bread fall apart if you move it too soon while it’s still too hot.
Once your bread is cooled, you can dust it with a bit of powdered sugar (or not) and slice to desired thickness with a trusty bread knife. It’s so delicious!
I hope you enjoy this recipe! I know I sure have (many times) and you will, too.
Looking for more flavor-packed yeasted bread recipes to impress your guests? Check out these:
What are your experiences with braided breads? Ever tried the irresistible combination of chocolate and banana, or do you have your own combos that are simply to die for? What do you like to serve yours with?
We’d love to hear from you! Please feel free to comment in the section below. I hope you have many happy baking times ahead!
Photos by Nina-Kristin Isensee, © Ask the Experts, LLC. ALL RIGHTS RESERVED. See our TOS for more details.
About Nina-Kristin Isensee
Nina lives in Iserlohn, Germany and holds an MA in Art History (Medieval and Renaissance Studies). She is currently working as a freelance writer in various fields. She enjoys travel, photography, cooking, and baking. Nina tries to cook from scratch every day when she has the time and enjoys trying out new spices and ingredients, as well as surprising her family with new cake creations.


Wow. I could kiss my good blood sugar levels goodbye over this one too easily. It looks delicious. It might be hard to only eat a reasonable amount. 🙂
I’ve tried banana bread many different ways, but have never had it with rhubarb.
Bananas, rhubarb and bread – that’s a winning combination in my book! If it tastes half as delicious as it looks then it will be amazing.
I couldn’t have found this recipe at a better time. Mothers’ Day is tomorrow and I have been scrambling to find something For my mother and grandmother. This recipe looks super easy and right up my alley. I think they’ll love it and I’ll have to snag a bit for myself as well.
And did you try the recipe to surprise your mother? If you like, you can let us know how it turned out or if you have any more questions about preparation. But, for sure, I hope it was a success and all of you could snack some slices 🙂
Wow that looks amazing! When I make banana bread I always go heavy on the banana, love the moist texture it gives. I also use bread flower, I find my mixer likes a bit better for these types of dishes. I’ve never braided bread before, is it as easy as you make it look? Makes the presentation look awesome!
Thanks, it is definitely a great addition, I love the sweet and moist consistency, too. The braiding is not quite difficult, if you’re holding on to the resting times and the kneading, it should work really well, because the dough has kind of a “good grip” 😉 When you decide to try it, I’ll keep my fingers crossed that everything turns out great!
Wow! This is definitely one that I am going to keep! My little girl loves bananas, chocolate, and bread! What better way to treat her a bit by combining the 3! I’m going to try this out and see what happens. It looks really easy to make. And I’m sure hubby will enjoy this as well, he’s been bugging me for banana bread for a while now.
Well, that is indeed a bull’s eye then, right? Yeah, actually it’s not too difficult, especially if you go with the step-by-step directions. Those are original pictures, so when it worked out for me, it should for you, too 🙂 I hope your family likes it as much as mine does.
This is a nice recipe. I agree completely with one of the main comments about the smell in the house when making bread. Store bought bread is unnutritious and flavorless, but add in the fact that you can make your house smell amazing for hours is a real win-win.
But that said, I think when you add chocolate to a recipe, it no longer qualifies as bread 🙂
Indeed, the smell of a freshly baked loaf turns your house into the “place-to-be” for lovers of baked goods 🙂
The term “bread” might be confusing at first, here in Germany it’s a bit easier, because there is a special expression for this kind of sweet yeast loaf, so everyone knows what to expect, and that ingredients like that can be involved. I think the english term “yeast bread” doesn’t cover this completely, but the pictures help to understand what it’s about 🙂
I’ve been meaning to start baking bread, but I just never got around to doing a simple google search.
Seeing this article, I thought, why not do a quick read? I ended up spending quite a few minutes reading through the instructions and checking to see if I had the required materials.
While I’m not going to start off with something as complicated as this, its still pretty good to know that I simply need to mash a banana and put some chocolate chips into bread without any issues.
I think it’s great that you would like know more about baking bread at home. I can only recommend it, and there are for sure some recipes that will work for beginners, too. I’m sure you’ll find some more information while browsing here on Foodal. I’m also planning to add a nice+easy bread recipe that is suitable to make for everyone!
Have you ever heard of food addiction? I think this is a prime example of it, goodbye healthy eating. I don’t like plain banana bread, but once you add chocolate and it looks like this then you’ve got me hooked!
Hah, I think this could really belong into that category 😉 I simply adore this combination, I could snack it away without any spread, because the sweetness of the fruits and the chocolate is luscious enough!
This one looks absolutely amazing! Can’t wait to make this. It looks delicious and not even that complicated. My mother used to make similar braided breads, although that was 2 different dough. A regular and a chocolate flavored, then she braided the two together. Thanks for sharing this recipe!
Oh, that sounds wonderful! I can imagine that it must also look adorable with two different colored strands of dough. That is one thing I am looking forward to try. In return, I hope you will love this one, too!
I am going to take the combine it with rhubarb suggestion and run with it. That is probably my all time favorite to add to sweets, and it just gives it that little tart taste and little sour, and I cannot get enough. It is kind of hard to find a little bit so it takes a little work, but well worth the trouble in my opinion.
Last year I found an excellent recipe for yeast-raised banana bread on Taste of Home. I often have overripe bananas in my kitchen, and I wanted something with less sugar than a quick bread. I have modified it by adding a cinnamon-sugar swirl. After reading this entry I am planning to include your recipe in my holiday baking. Thank you!
Excellent recipe. I browned my butter and mixed 30g of sour cream in with my nonfat milk to bump up the fat. Aside from that I followed exactly as written and it turned out amazing! I let my dough rise on top of the oven while it was warming. Beautiful! Thank you.
When do you add yeast if using dry instant yeast in this recipe?
I’ve made this bread three times now, and I’ve learned a few things along the way. The first time the bread was massively under proved. This is 2 lb loaf (slightly larger actually) and enriched, it needs nearly double the time on the first prove.
Also better results will come from a two strand twist instead, but whichever you choose, make sure to leave room for the bread to grow. Be patient when rolling out your strands, if you stretch them, they will tear and try to return back to their initial shape. The second prove should take about an hour. Remember, this is a very large and heavily enriched dough, and now you’ve added chocolate chips which will further inhibit the rise.
Lastly, I would not use the suggested baking temperature, it’s too low. I would do I high heat for 20 minutes and then take the temperature down to cook for a further 20.
This loaf has a GREAT flavor, but be wary of adding additional ingredients. I tried adding cinnamon (it inhibits the rise) but it doesn’t come across after baking, but instead only reads as bitterness next to the chocolate and the mellow flavor of the banana. If it wasn’t so good I wouldn’t have kept making it and tweaking the recipe.
Remember altitude and season/weather can impact the dough as well and make sure to read the dough each time you bake. I would rate this recipe a lot higher if it came out better with the recipe as it is, with the changes, it comes out lighter and with a better crumb and is a 5 star loaf.
@bbaker, what would be the cooking temp you’d recommend when starting high and reducing?
Thanks Nina !!
I’ ve tried your recipe today, and I loved it !!!!
Next time, I will add a little liquid sweetener, not to add sugar and ruin the texture…… I think I will probably like it better a little more on the sweet side, than on the bread side….
(It might be the sugar we use here in Argentina is less sweet, it is made from sugar cane, not beets)
Thanks ,
Cristina