
“I’m going to make a cobbler,” I announced to my hubby. Taking stock of that day’s farmers market purchases, I added, “A tomato cobbler!”

This cobbler was a delectable creation made and enjoyed on an unusually cold and dreary summer night, the kind of unforeseen evening that involves splitting a bottle of red wine with a close companion and pulling out a bubbling casserole from a hot oven.
It was a very different atmosphere from the rest of the day – a capricious and sudden change of weather is to be expected from a Mid-Atlantic summer season!
That same day, we enjoyed a warm and sunny trip to our local farmers market, and brought home packed tote bags heavy with the weight of ripe cherry tomatoes, fresh herbs, shallots, and butter.
Once we unloaded everything, we planned to spend the evening hiking at the park, with absolutely no intention to stay home, turn on the oven, and bake.
But soon after we stowed away the very last shallot, the sky darkened, thunder rumbled in the distance, and raindrops started to fall.
No trip to the park. Boo.
But when life gives you lemons, you make something tasty with tomatoes!
And what better way to make use of an unexpected night at home than with a taste of comfort food boasting of fresh produce at the peak of ripeness?
I’m in the throes of summer tomato love, which I suspect many of you understand! And my comforting cobbler recipe is an easy way to showcase those juicy, bursting red rubies.
Rather than go with a cool and refreshing recipe like a tomato cucumber salad or a chilled creamy dip, it’s a fun shift to embrace a cozy, stay-at-home approach with an oven-baked meal.
I went with a very basic roundup of fresh ingredients for the base. It’s just a simple combination of whole tomatoes mixed with oil, caramelized shallots, garlic, and herbs.
A little flour in the base helps to gently bind and thicken the liquids that will inevitably burst from the whole tomatoes as they roast.

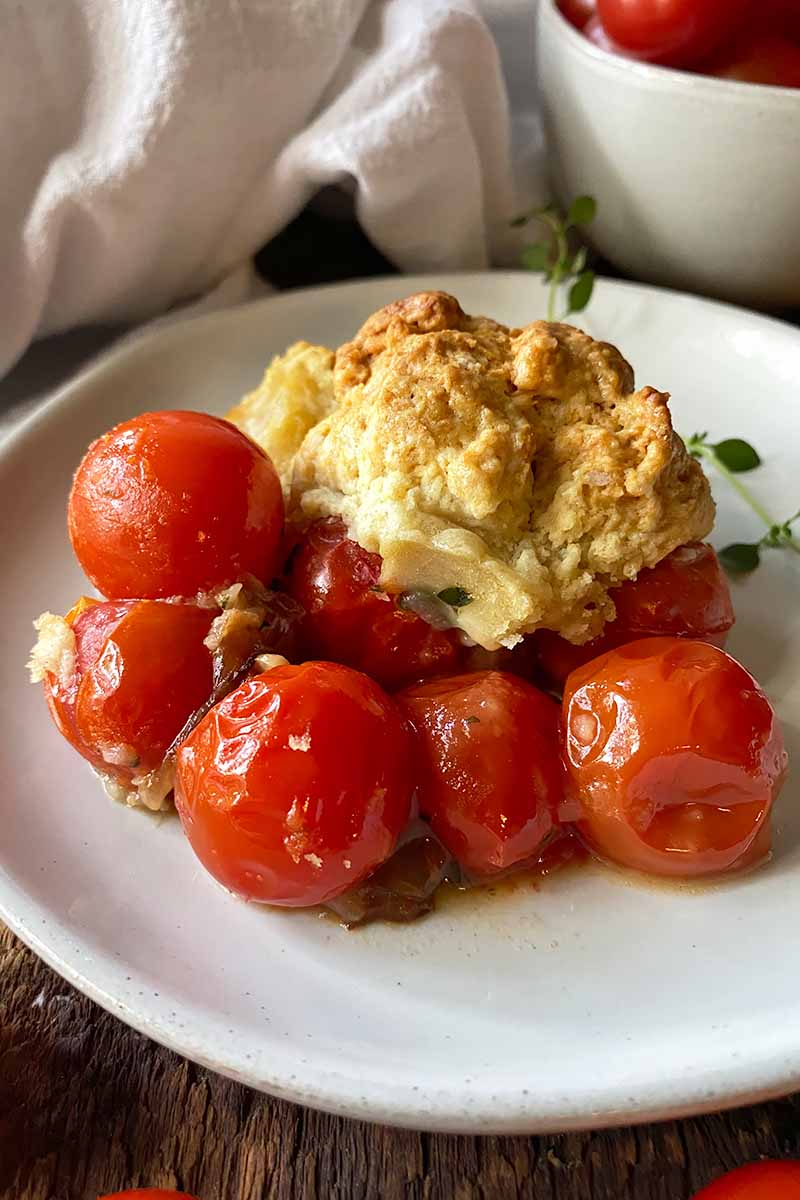
And for the topping, an easy drop biscuit recipe beautifully blankets the base in pillowy, buttery mounds with crisp crusts – an ideal match to pair with the acidic, melty tomatoes.
If you can make this recipe on a rainy day to bring you comfort and joy, even better!
Maybe this is what summer dreams are made of – take off those hiking boots, put on some slippers, and enjoy a home-baked meal.
Print
Tomato Cobbler with Buttermilk Biscuits
- Total Time: 1 hour, 20 minutes
- Yield: About 8 servings 1x
Description
This summer season, leave your expectations for chilled recipes at the door and make our warm tomato cobbler with tender buttermilk biscuits.
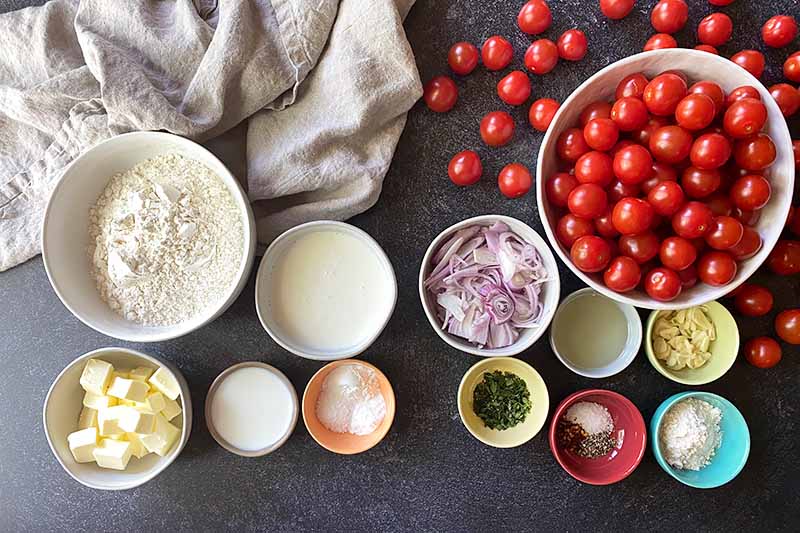
Ingredients
For the Tomatoes:
- 3 tablespoons olive oil
- 2 large shallots (about 1/4 pound), thinly sliced
- 4 large cloves garlic, thinly sliced
- 2 pounds cherry or grape tomatoes
- 1/2 teaspoon coarse salt
- 1/4 teaspoon crushed red pepper flakes
- 1/8 teaspoon freshly cracked pepper
- 4 sprigs fresh thyme, leaves removed and chopped (about 1 heaping tablespoon)
- 2 tablespoons all-purpose flour
For the Biscuits:
- 1 1/2 cups all-purpose flour
- 2 teaspoons baking powder
- 1 teaspoon baking soda
- 1 teaspoon salt
- 1/2 cup (1 stick) unsalted butter, chilled and cut into small cubes
- 3/4 cup buttermilk, divided
Instructions
For the Tomatoes:
- Preheat the oven to 350°F. Set out a 2 1/2-quart baking dish that is about 2 inches deep.
- Heat the oil in a large skillet over medium-high heat. Cook the shallots, stirring occasionally until lightly browned, about 5 minutes. Add the garlic and cook until fragrant, about 1 minute. Remove from heat and transfer to a medium bowl.
- Add the tomatoes, salt, red pepper flakes, pepper, and thyme to the bowl with the shallots. Stir together until incorporated.
- Evenly sprinkle the flour over the tomatoes. Gently fold the flour into the tomatoes with a spatula until the flour dissolves completely into the mixture with no lumps. Set aside as you make the biscuit dough.
For the Biscuit Dough:
- Whisk together the flour, baking powder, baking soda, and salt in a large bowl.
- Add the cubed butter, and use a pastry cutter to incorporate it into the flour mixture until the larger lumps are reduced to pea-sized pieces.
- Make a well in the center of the mixture and pour in 1/2 cup buttermilk. Stir with a spatula or your hands, combining everything until a thick dough forms. Do not overmix.
To Assemble and Bake:
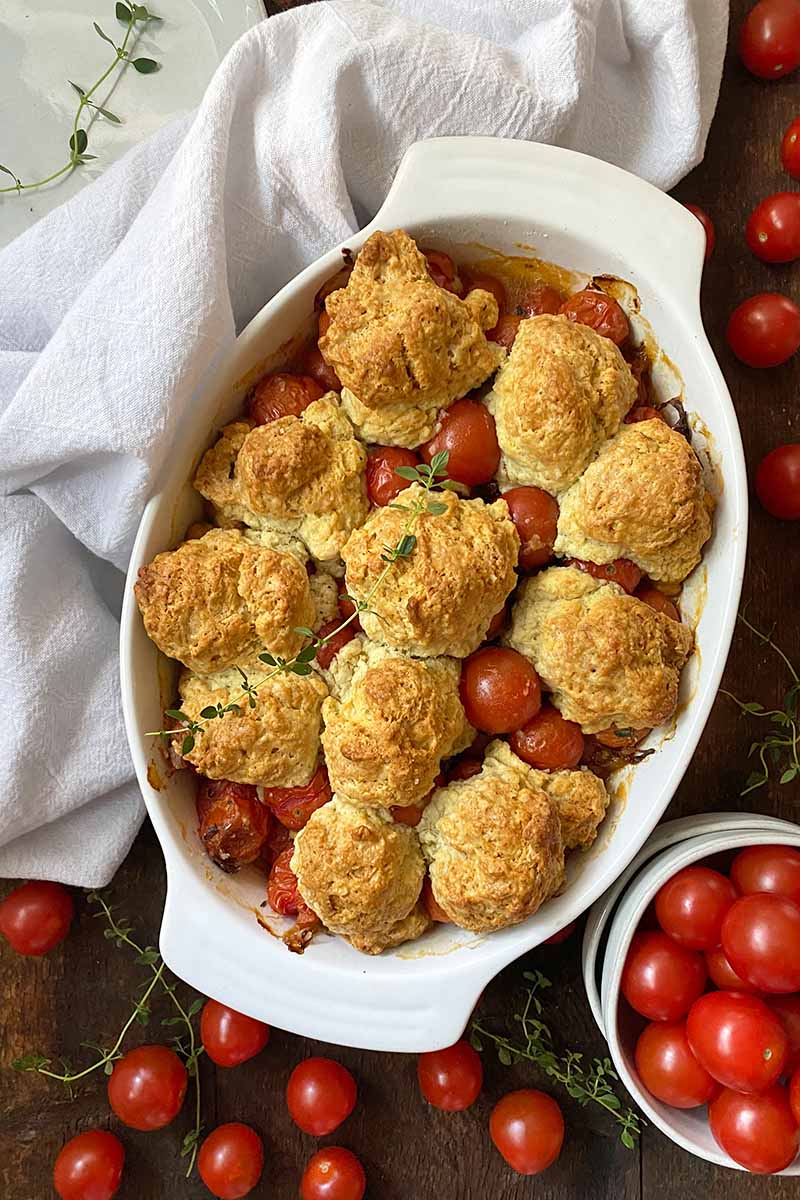
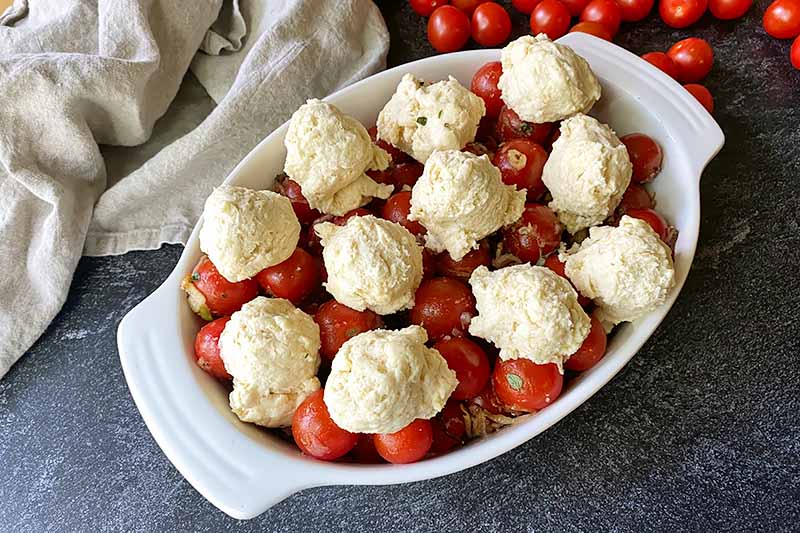
- Transfer and evenly distribute the tomato mixture into the baking dish.
- Using a 1/4-cup cookie scooper, gently and evenly place 10-12 mounds of biscuit dough over the top of the tomatoes, leaving a little space between each one.
- Lightly brush the dough with the remaining 1/4 cup buttermilk.
- Transfer the baking dish to the oven. Bake until the tomatoes are bubbling and the biscuits are golden brown, about 50-60 minutes.
- Transfer to a wire rack. Let cool for about 20 minutes before serving.
- Prep Time: 20 minutes
- Cook Time: 1 hour
- Category: Vegetarian
- Method: Baking
- Cuisine: Casserole
Cooking by the Numbers…
Step 1 – Prep
Preheat the oven to 350°F. Set out a 2 1/2-quart baking dish that is about 2 inches deep. An 8-by-8-inch baking dish or an oval gratin dish will both be great choices here.
For the biscuits, measure out the flour, baking powder, baking soda, and salt. Measure out the buttermilk and immediately place it back in the refrigerator to keep cool.
Same goes for the butter in the biscuits! Cut the butter into small cubes, put them in a small bowl, and immediately place it in the refrigerator.
Both the buttermilk and butter should remain as cold as possible to help maintain the biscuits’ shape as they bake. And because you aren’t making the biscuits right away, and you’ll be prepping the filling first, it is imperative that they stay as cold as possible until you are actually ready to make the dough.
For the base, measure out the olive oil, flour, red pepper flakes, salt, and pepper. Freshly cracked is best!
Thinly slice the shallots and the garlic with a sharp chef’s knife and sturdy cutting board.
Remove and roughly chop the leaves of the thyme. Discard the stems.
Rinse the cherry or grape tomatoes in a colander and set them aside. No additional prep is required for them – you get to leave them whole for this recipe!
Cutting them will release extra liquid to the casserole dish, more than what is necessary. Not only is this unappealing to eat, but this excess liquid will also increase the potential for the biscuits to get extra soggy on the bottoms.
While the biscuits are expected to get a little soggy on the bottom, they shouldn’t be excessively soggy to the point where they do not bake evenly.
These are also the reasons why we’re using a smaller variety. If we went with a bigger variety that we would absolutely have to chop for this recipe, there would be far too much liquid in the dish that wouldn’t evaporate and reduce during the cooking process.
So, stick with the cherry or grape varieties. And leave them whole, please and thank you.
Want to grow your own cherry tomatoes for use in this recipe? You can read all about it on our sister site, Gardener’s Path!
Step 2 – Cook the Shallots and Garlic
Use a large skillet to warm up the oil over medium-high heat. Add the shallots and cook them until they start to brown, only stirring occasionally. This will take no more than 5 minutes.
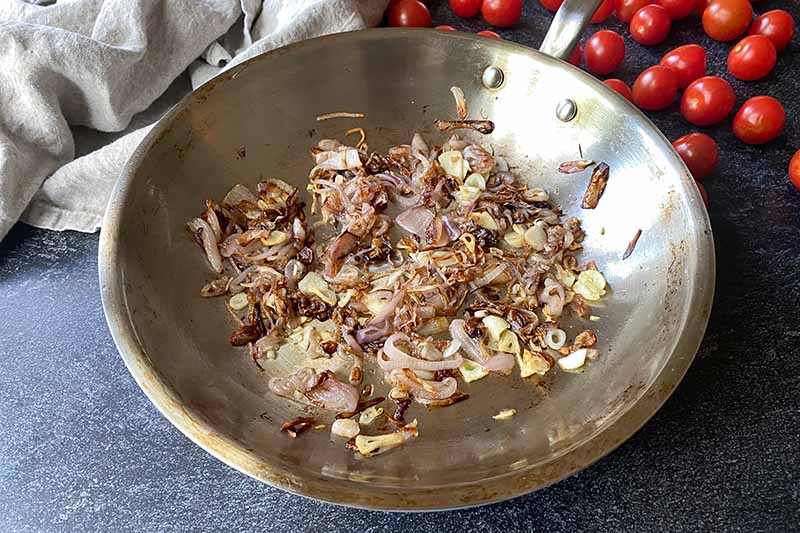
Constant stirring will prevent scorching those beautifully browned sections on the slices – those are the real winners in creating big, savory flavors! Burning them, on the other hand, will just lead to bitterness.
Add the garlic next and cook just until it’s fragrant, without burning. You’ll only need to cook the garlic for an extra minute, stirring constantly/occasionally.
Immediately remove the pan from the heat and transfer the shallots and garlic to a medium bowl.
A rubber spatula will be the best tool to scrape out all of the slices from the pan into the bowl.
Step 3 – Add the Tomatoes, Seasonings, and Flour
In the bowl with the shallots and the garlic, add the tomatoes, red pepper flakes, thyme, salt, and pepper.
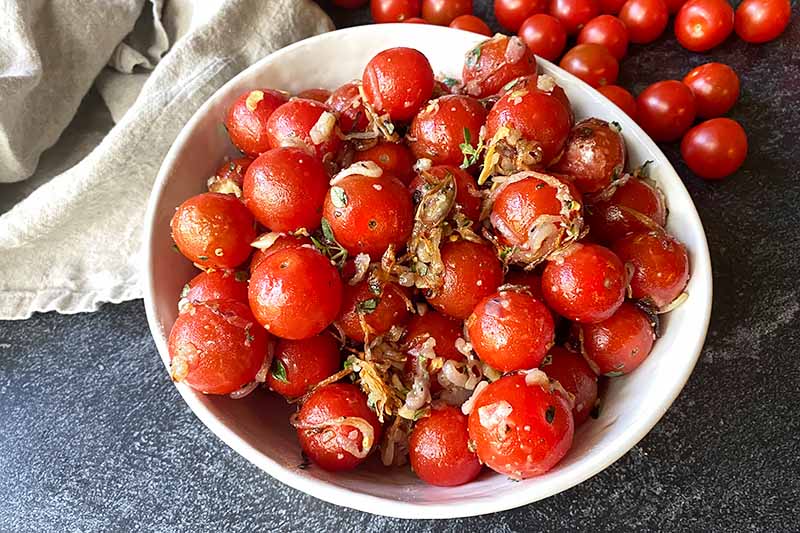
Mix all of the ingredients together with your spatula until everything is evenly and thoroughly combined.
Sprinkle the flour over the mixture. Using your spatula, gently fold the flour into the tomatoes until it is completely dissolved.
You don’t want to add the flour all at once in one pile, as this may create clumps. You want the flour to be evenly dispersed to help it thicken effectively as the mixture bakes and the liquids are released from the tomatoes.
Set aside the bowl at room temperature as you make the biscuit dough – you’ll be needing it soon enough!
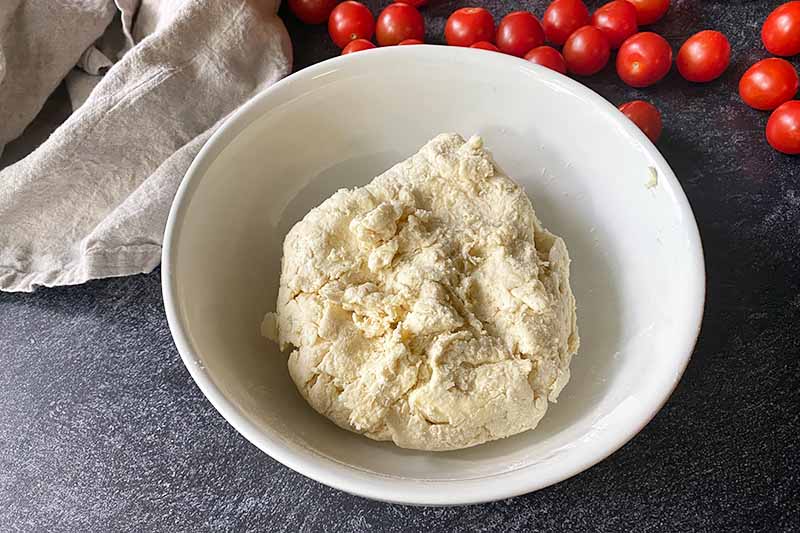
Step 4 – Make the Biscuit Dough
Remove the buttermilk and cubes of butter from the fridge. We’re finally ready to use them!
For this cobbler, we’re taking inspiration from our buttermilk drop biscuit recipe. While we’re only providing a quick tutorial in this one step, you can find more information as well as in-depth step-by-step instructions by reading the full recipe right here.
Whisk together the flour, baking powder, baking soda, and salt in a large bowl until they are thoroughly incorporated. You can also choose to sift the ingredients together.
Scatter the cubed butter over the dry ingredients. Using a pastry cutter, incorporate the butter into the flour mixture, cutting in the cubes until they’re roughly the size of peas. You could also use two butter knives to do this instead.
Form a well in the center of the mixture using your hands. Pour in 1/2 cup of buttermilk, saving the remaining 1/4 cup for brushing the tops of the biscuits before baking.
Stir the buttermilk into the flour mixture. You can use your hands or a sturdy spatula. I also love using a pliable plastic bench scraper for mixing biscuit dough.
When the buttermilk is mixed well enough into the dry ingredients, gently knead to create a thick dough.
Do not overmix! Only mix until a dough is formed, and you can’t see any liquid buttermilk anymore – mixing just until a dough forms will prevent the biscuits from having a tough, chewy texture when baked.
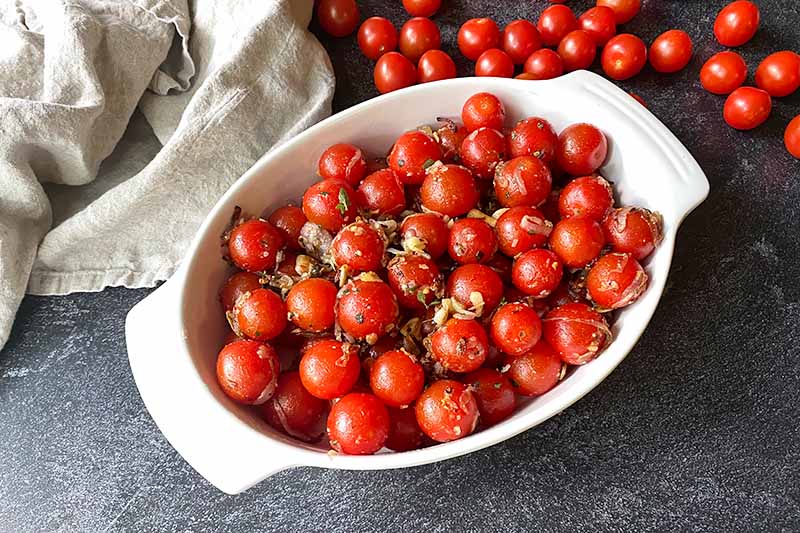
Step 5 – Assemble
Transfer the mixture to your baking dish. Evenly distribute the ingredients to cover the entire bottom of the baking dish.
Using a 1/4-cup ice cream or cookie scooper, Place about 10 to 12 mounds of biscuit dough over the top of the tomatoes.
First place them around the entire edge of the baking dish, then in the center, leaving a little space between each one. There should be some open spaces between the biscuits so they can spread and bake evenly.
Lightly brush the tops of the biscuits with the remaining 1/4 cup buttermilk using a pastry brush. If you don’t like an extra browned crust, you do not have to brush the tops with the remaining buttermilk.
Step 6 – Bake
Transfer the baking dish to the oven, and bake the casserole for about 50 to 60 minutes.
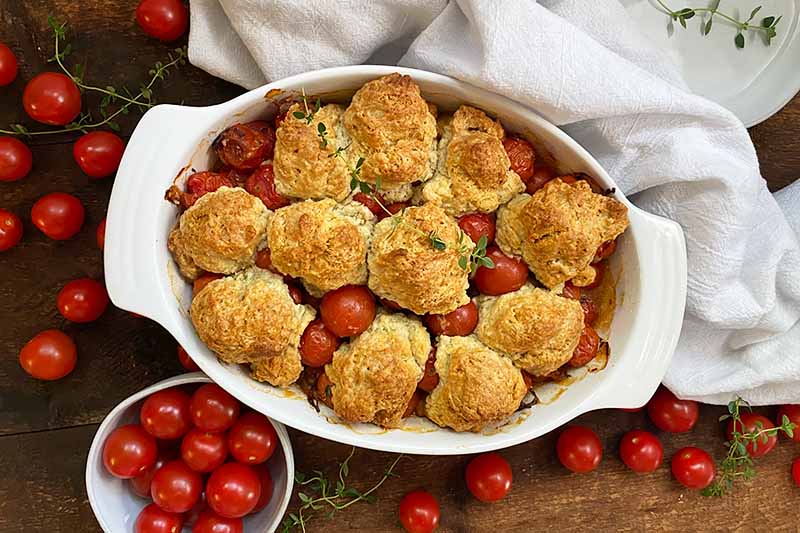
At this point, the base will be voraciously bubbling and the biscuits will be golden brown and crispy on top.
Step 7 – Cool and Serve
Transfer the baking dish to a cooling rack. Don’t dig in immediately!
Let the cobbler cool down for about 20 minutes before serving – not only will this prevent a scorched mouth, but this amount of time is helpful for the liquids to continue to thicken and for the biscuits to finish baking from the residual heat.
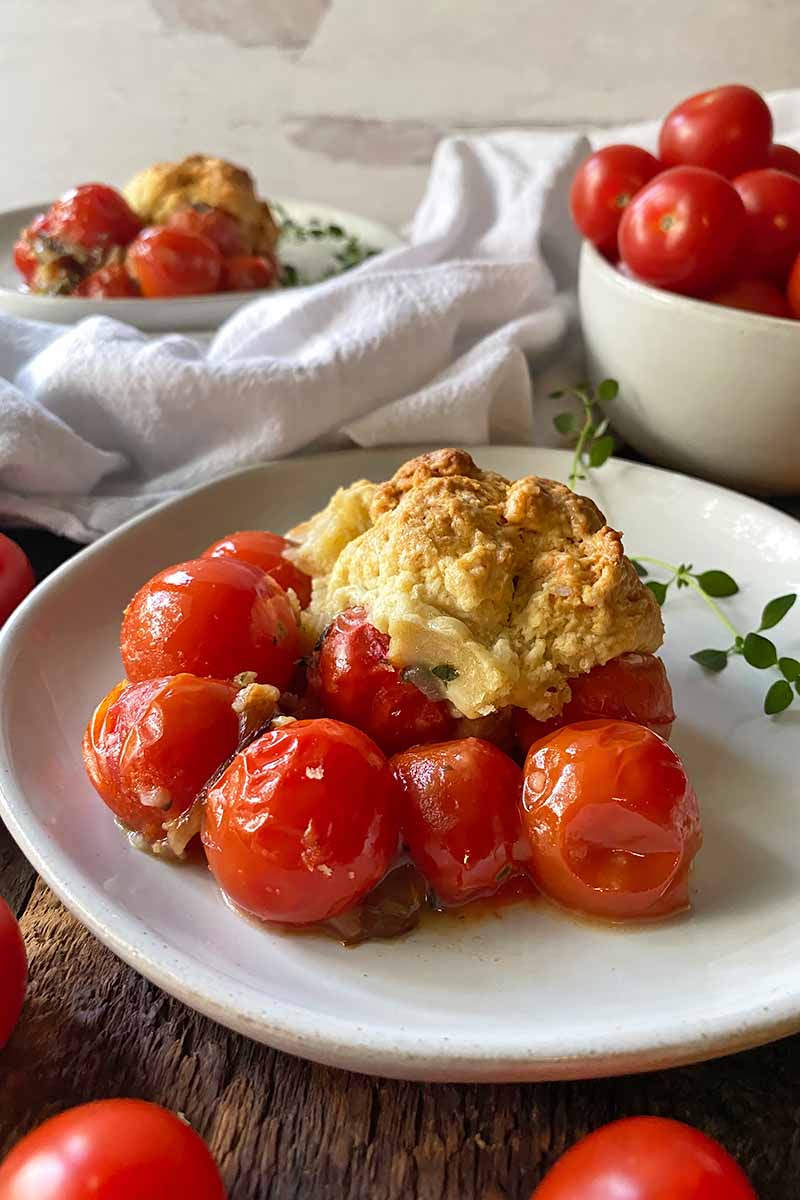
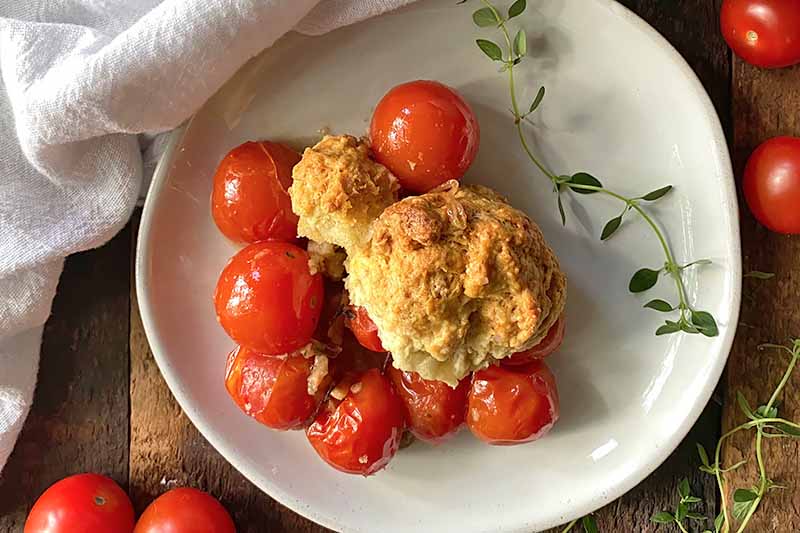
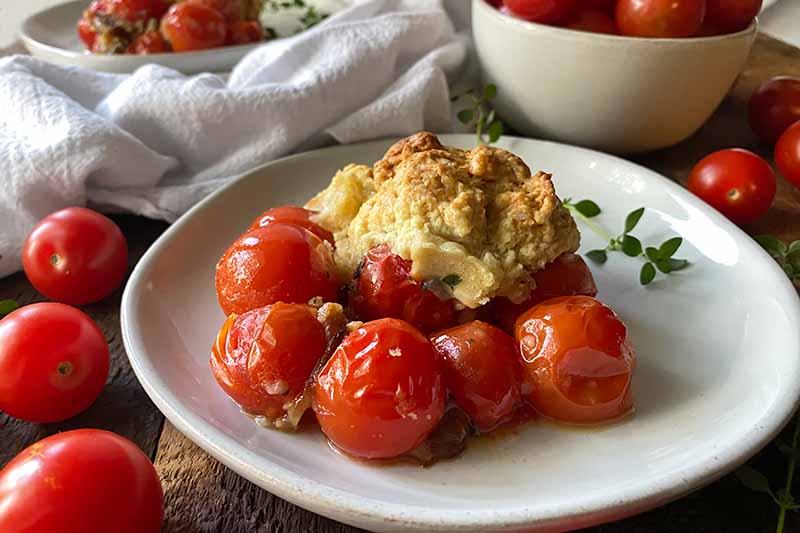
After cooling, serve and enjoy in deliciously messy mounds in bowls!
What’s a Cobbler without Biscuits?
If you went that route, you would just get a pile of roasted tomatoes without the carb-y counterpart!
Would that be delicious? Certainly.
But would it be a cobbler? Certainly not.
Both the word for a shoemaker and the dessert “cobbler” are inspired by a cobbled road, which is paved using small, round cobblestones on top.
Biscuits provide the defining look of a cobbled road – those cute and fluffy mounds resemble the cobblestones!
Tickled by this idea? So much so that you want to make this recipe over and over again? We have a long list of homemade biscuit recipes to swap out for the original one, if you’re interested.
To start, try this cobbler with our cheese and chive sourdough biscuits if you want to create additional flavor combinations with an added savory component.
Prefer to transform this recipe into a vegan dinner? Use our flaky and buttery vegan biscuit recipe instead.
Whatever you decide to do – let us know in the comments below! There are so many different directions you could take to make this summery recipe uniquely yours!
Tomatoes happen to be a favorite summer ingredient at Foodal. Are they one of yours? Head to your farmers market, grocery store, or pick them from your own garden. You’ll need more to make more delicious meals! Tomatoes will tantalize your taste buds in these recipes:
Photos by Nikki Cervone, © Ask the Experts, LLC. ALL RIGHTS RESERVED. See our TOS for more details. Originally published by Shanna Mallon on August 9, 2013. Last updated on July 28, 2022.
Nutritional information derived from a database of known generic and branded foods and ingredients and was not compiled by a registered dietitian or submitted for lab testing. It should be viewed as an approximation.
About Nikki Cervone
Nikki Cervone is an ACS Certified Cheese Professional and cheesemonger living in Pittsburgh. Nikki holds an AAS in baking/pastry from Westmoreland County Community College, a BA in Communications from Duquesne University, and an MLA in Gastronomy from Boston University. When she's not nibbling on her favorite cheeses or testing a batch of cupcakes, Nikki enjoys a healthy dose of yoga, wine, hiking, singing in the shower, and chocolate. Lots of chocolate.

I will be making this cobbler this weekend, for brunch on Sunday with my parents. It will be my last hurrah with an oven for a few months as our kitchen is renovated…
And I was just wondering what to do with all those tomatoes from my CSA basket. I’m so glad you turned them into a meal – and with a crust the family will eat.
Oh, I’m so glad, Bethany! And, man, a loot of tomatoes is one of my favorite summer things!
Oh my goodness. This has to be one of my favorite recipes you’ve posted. I have never heard of a tomato cobbler and I can only imagine how wonderful. This is so timely with the tomato art festival tomorrow.
I love the idea of a tomato cobbler. I can’t wait to try it!
I LOVE this tomato cobbler idea and will be making it next week for sure, a new way to enjoy tomatoes is always welcome!
🙂 Enjoy your summer tomatoes; that cobbler looks delicious.
I made this today for an evening picnic/concert at the park, and I just wanted to come back to tell you how much we loved it. So delicious, a big hit with everyone. I made it with spelt flour. Such a comfort, flavorful summer dish, I can’t wait to make it again. The baked tomatoes in the oven have such an intense flavor, just delicious. I really love your recipe writing style and want to follow your example for my recipes as well. Anyway, a wonderful experience from the empty pan to the empty bowl 🙂 Thank you.
I feel like this cobbler is such a warm, comforting kind of meal…I’m so intrigued! I’ve tasted a bit of tomato PIE before, and it was so good…I bet a cobbler would be similarly amazing!