We occasionally link to goods offered by vendors to help the reader find relevant products. Some of these may be affiliate based, meaning we earn small commissions (at no additional cost to you) if items are purchased. Here is more about what we do.
Snap out of your denial, and face reality. Another school year is just weeks away!
Have the complaints and moaning started yet? Have you written your loooong shopping lists for the kids’ school supplies, clothes, and books? Are you rushing to get those last-minute summer activities in before it’s too late?
If you’re lucky (fingers crossed), your little ones may actually be happy and ready for a new academic year.
The smell of fresh folders, papers, and pencils! The fun ride on the school bus! The new teachers and classes!
But not every child will feel as enthusiastic about the fast approach of a new year.
Some will need your help through this hesitation, a little boost of enthusiasm to get them excited for the schooling that soon awaits them.
Ease those kiddos into another school year with something you know they’ll love, beyond any doubt:
Cookies!
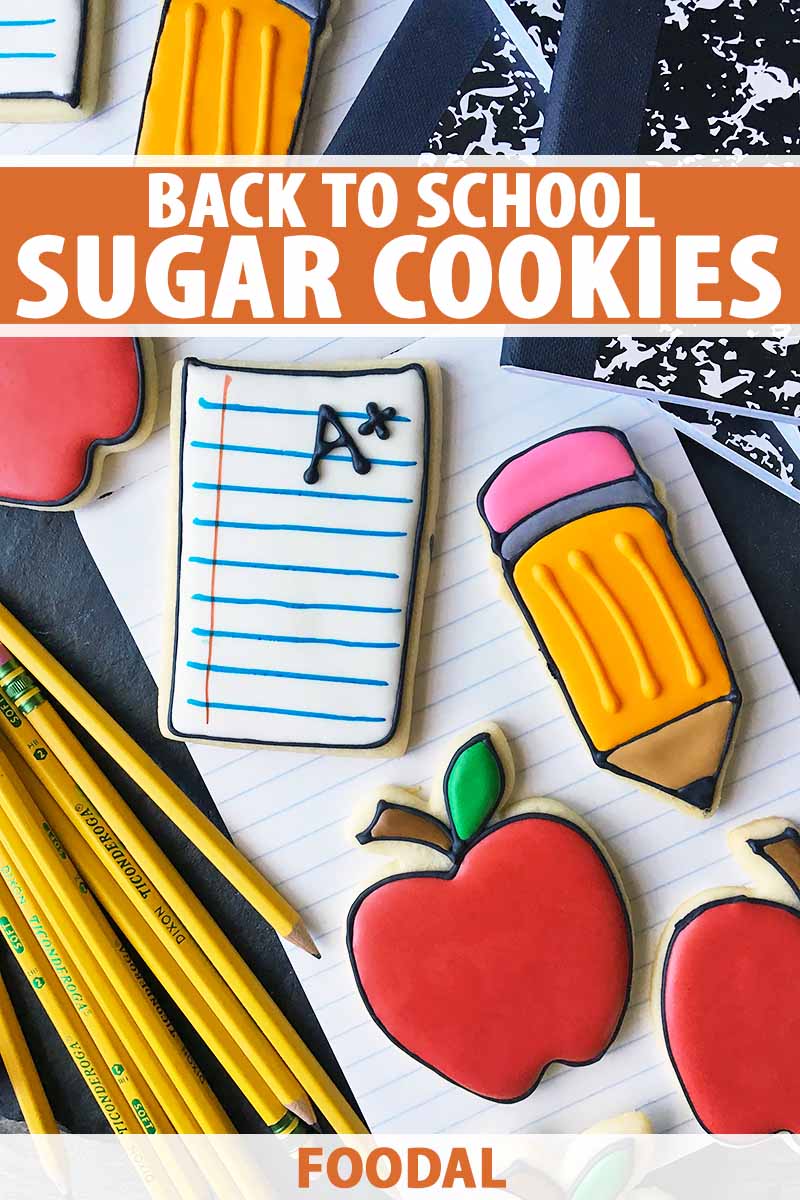
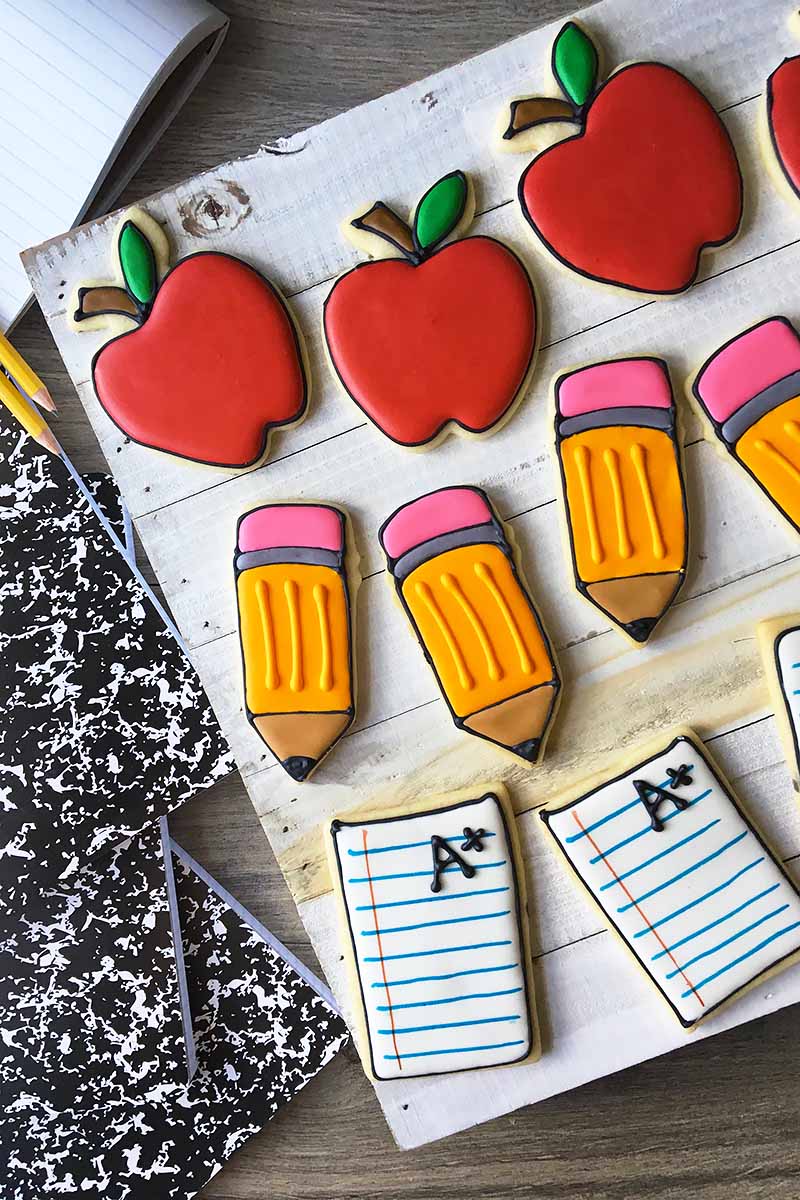
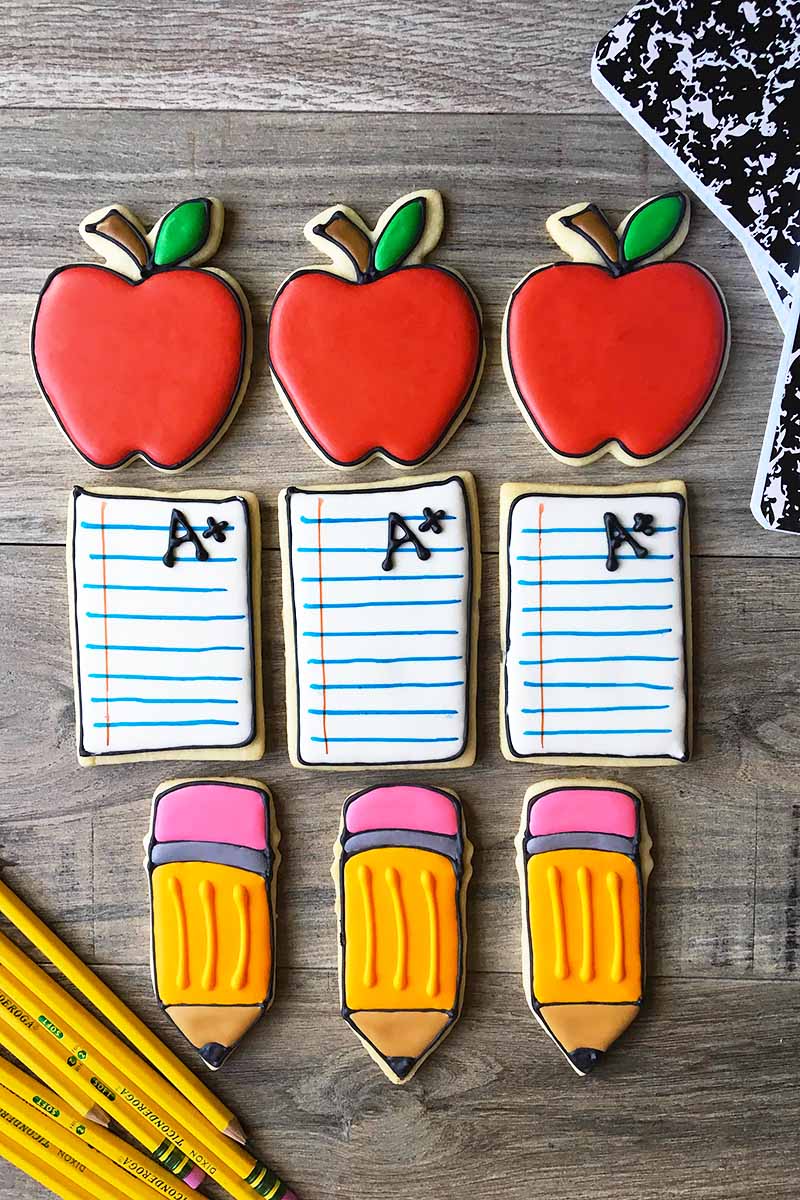
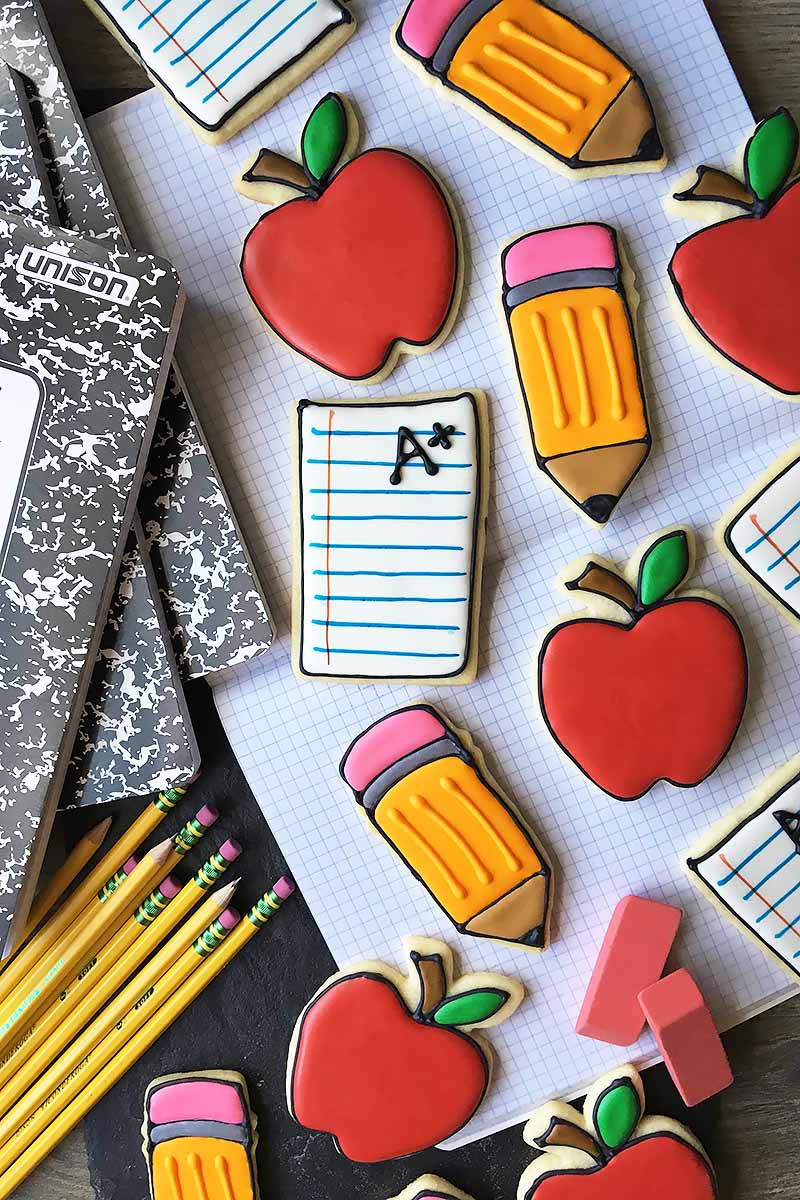
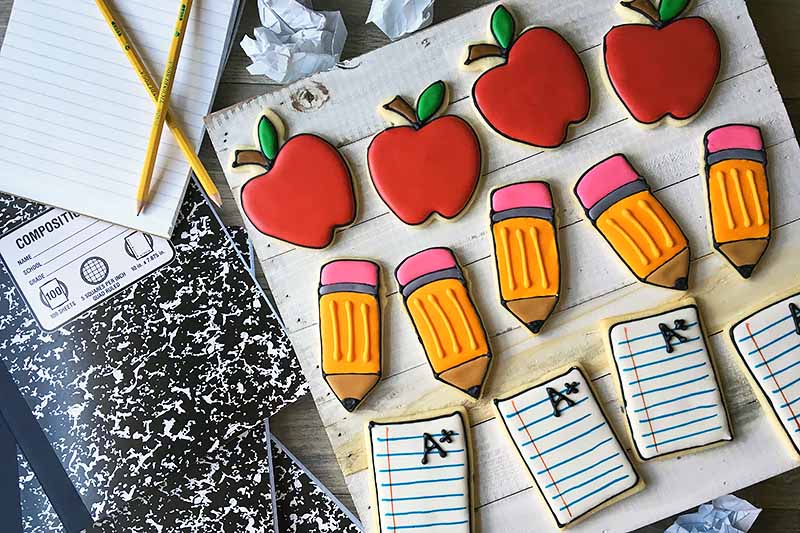
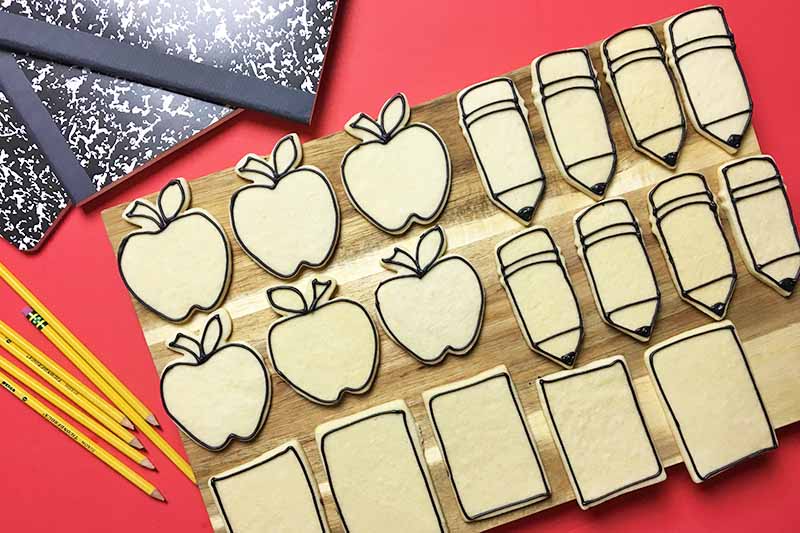
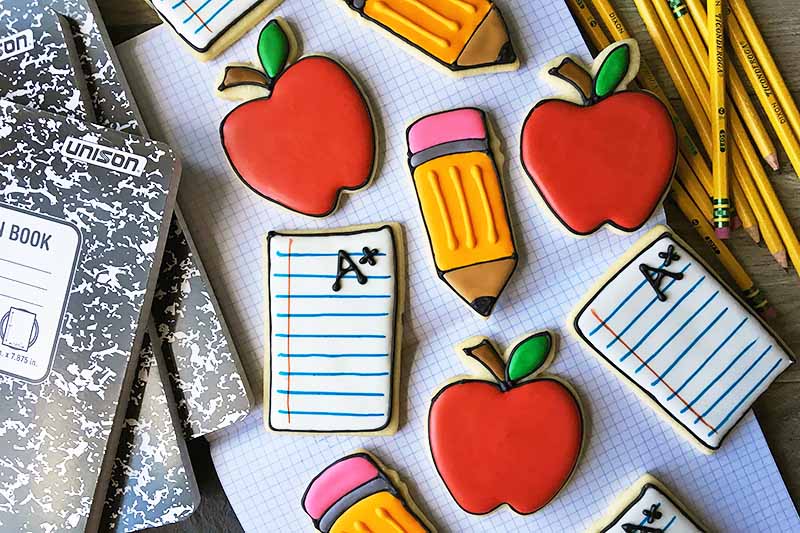
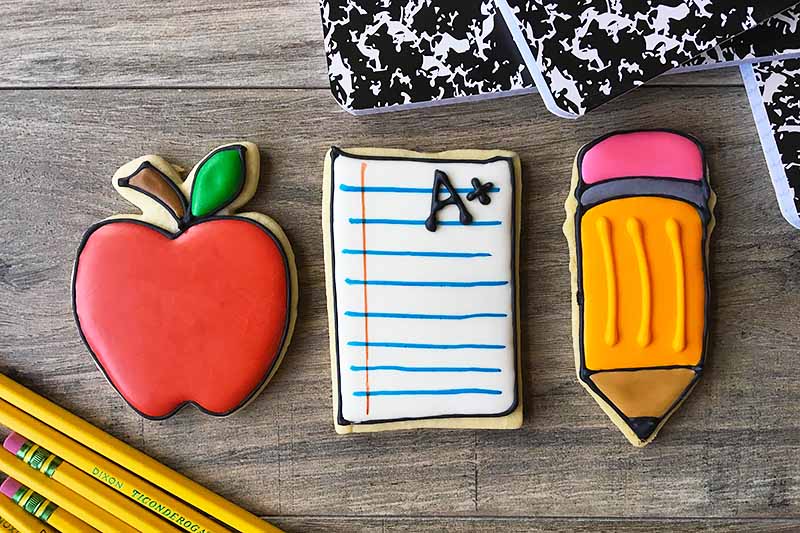
These fun back to school cookies will brighten up any somber student’s face as soon as they see a plateful of red apples, yellow pencils, and crisp pieces of notebook paper.
Colorful and vibrant, these treats covered in royal icing designs are the sweetest introduction to a new school year. Place a couple in their lunchbox as a surprise, and they’ll be delighted to see these beautifully decorated sweets.
Ann Clark 3-Piece Back to School Cookie Cutter Set – Apple, Pencil & Paper
The cookie cutters I used (an apple, a pencil, and a rectangle) are available as a 3-pack on Amazon.
You can choose to make all three varieties, or just try one design to manage your time and keep the decorating process simple.
Seriously, who wouldn’t love a bunch of A+ papers?
Print
Back to School Cookies
- Total Time: 5 hours, 10 minutes
- Yield: 20-24 cookies 1x
Description
Ready for a new school year? If your kids are sad that summer is ending, bring back their smiles with our colorful back to school cookies.
Ingredients
- 1 batch sugar cookie dough for 20–24 cookies
- 1/2 cup all-purpose flour, for dusting
- 1 batch royal icing, about 3 cups
- Assorted food colorings
Instructions
For the Cookies:
- Prepare one batch of sugar cookie dough. Form into a large disc and wrap in plastic wrap. Refrigerate for one hour.
- Remove the dough from the refrigerator and place on a lightly floured flat work surface. With a rolling pin, spread and flatten out the dough until it is about 1/4 inch thick.
- Using cookie cutters in the shapes of an apple, a pencil, and a rectangle (for the sheets of notebook paper), cut out shapes from the dough. Dip the cookie cutters in flour if the dough sticks to the cutter. Re-roll the dough once and cut again. Discard any excess. The dough should yield 5-8 of each cookie cutter shape.
- Transfer the cookie dough cut-outs to two or three sheet pans lined with parchment paper or silicone mats. Place the pans in the refrigerator for 20 minutes to chill.
- Preheat the oven to 325°F while the dough chills.
- Remove the trays from the refrigerator and immediately bake for 8-10 minutes, depending on the thickness of the dough. They will still be pale white and soft to the touch. Remove from oven. Let stand on the trays for 1 minute, then transfer the cookies to wire racks to cool completely.
For the Royal Icing Outline:
- Prepare one batch of royal icing to a medium-stiff consistency.
- Remove about 1/2 cup of frosting. Cover the bowl of remaining frosting with plastic wrap. Set aside at room temperature.
- Add black food coloring to the 1/2 cup of icing. Stir to combine. Place in a piping bag fitted with a #2 round tip.
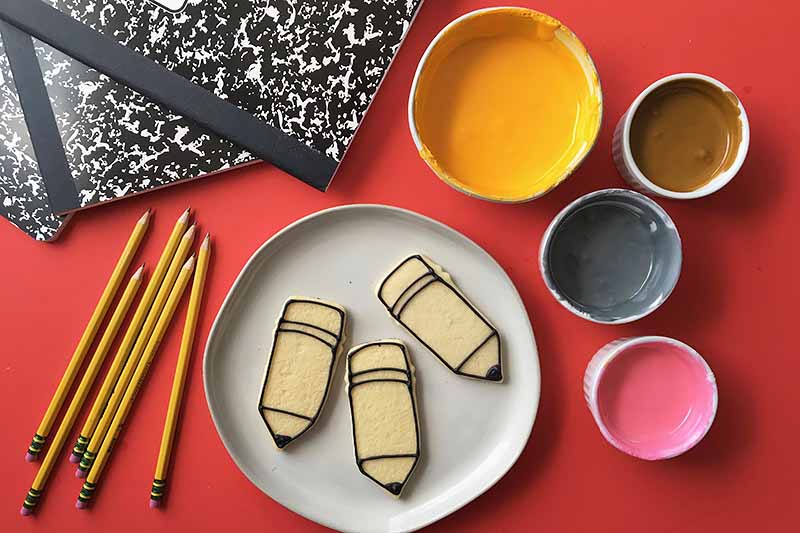
- To Outline the Pencil, outline 5 separate sections: the eraser, the metal holder, the main part of the pencil, the exposed wood, and the tip. Fill the tip completely with the black icing.
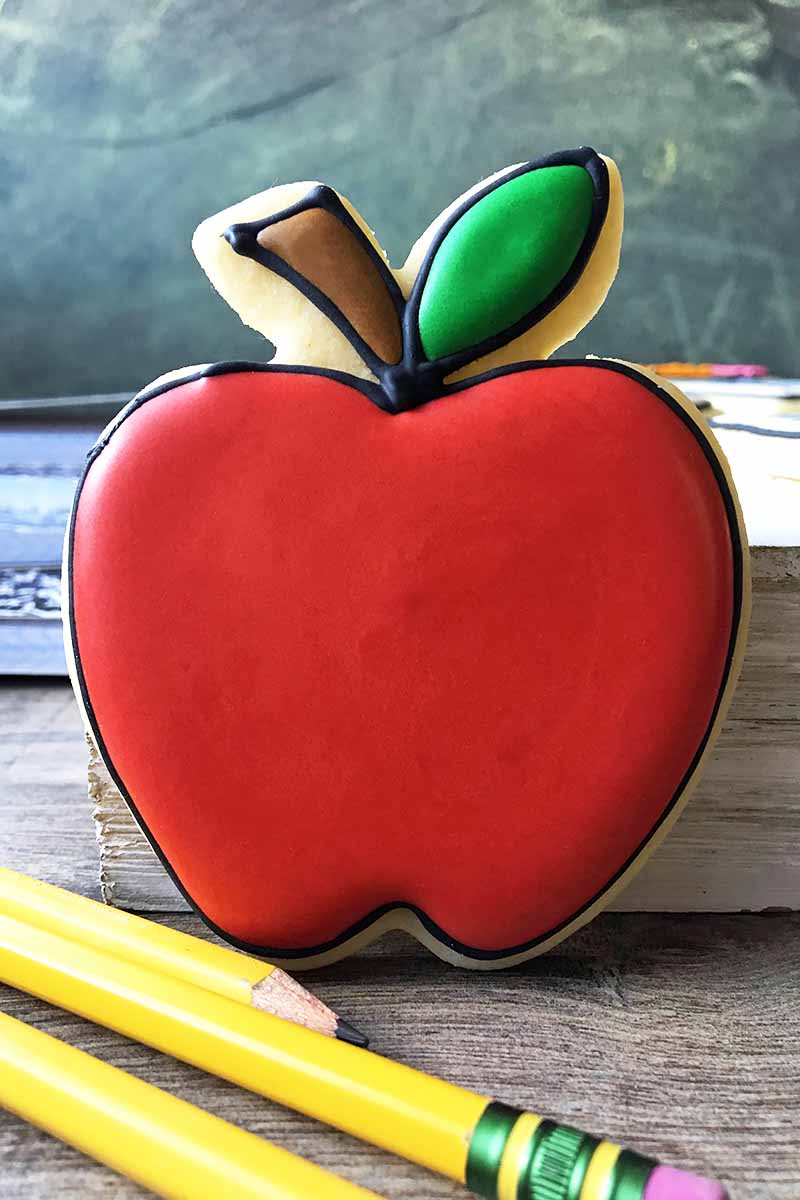
- To Outline the Apple, outline 3 separate sections: the stem, the apple, and the leaf.
- To Outline the Notebook Paper, outline 1 section: a large rectangle.
- Reserve the remaining black icing for extra details, like the “A+” on top of the notebook paper. Leave in the piping bag and set aside for later use.
For the Royal Icing Filling:
- Divide the remaining reserved frosting as needed for the various colors of the cookies.
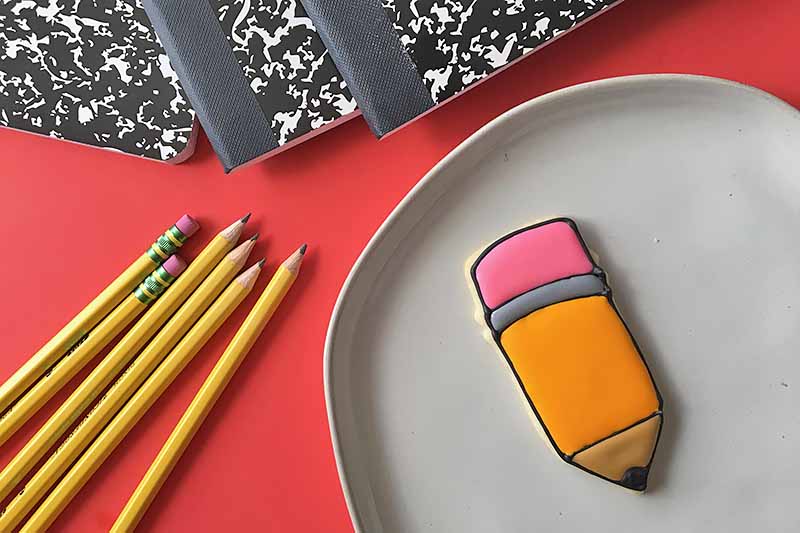
- To Fill the Pencil, use about 1/2 cup for the main part of the yellow pencil, and about 1/8 cup each for the pink eraser, gray metal holder, and light brown wooden section. Save any leftover yellow icing for any extra details on the pencil. Leave in the piping bag and set aside for later use.
- To Fill the Apple, use about 1/2 cup for the red fruit, and about 1/8 cup each for the green leaves and brown stems.
- To Fill the Notebook Paper, use about 1/2 cup for the white paper.
- After adding the food coloring, add any additional water as necessary to achieve a flood icing consistency. Using separate piping bags and separate #2 or #4 round tips for each color, fill in each section.
- Let the cookies sit at room temperature until the icing is completely set and hardened, about 2-3 hours.
Additional Decoration:
- Once the icing base has dried completely, add any extra details. For the notebook paper, use edible markers to draw lines. Use the reserved black icing to pipe an “A+” at the top of each cookie. For the pencil, use the reserved yellow to pipe three lines on the pencil.
- Let the additional decorations set for another 30 minutes at room temperature.
- Once set, eat and enjoy!
Notes
We love using our recipes for Classic Sugar Cookies and Royal Icing!
- Prep Time: 5 hours
- Cook Time: 10 minutes
- Category: Cookies
- Method: Baking
- Cuisine: Dessert
Cooking by the Numbers…
Step 1 – Make and Chill the Dough
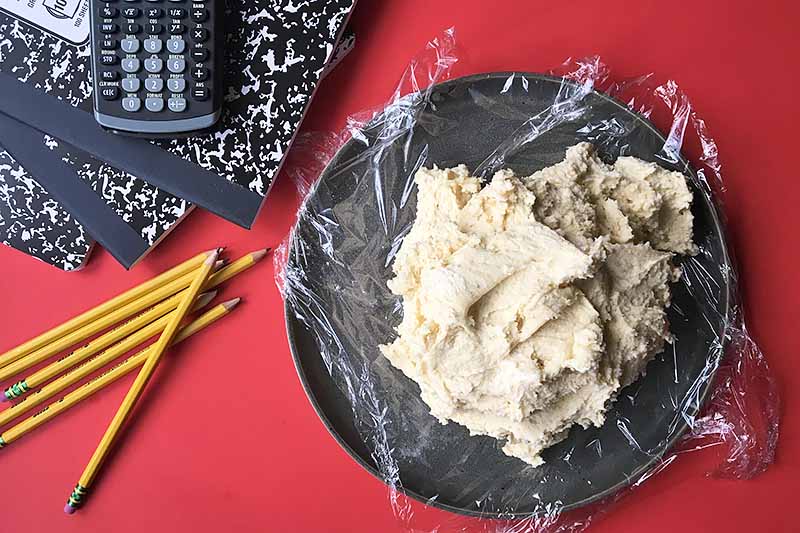
Follow our recipe to make a classic sugar cookie cut-out dough. Be sure to not overmix the dough, to keep them soft and tender with minimal gluten development.
Once you have mixed the dough, form it into a flat, compact disc by hand and wrap it in cellophane. Place it in the fridge for at least one hour to fully chill it.
This process helps to re-harden the unsalted butter, which makes it much easier to roll and cut the dough in the next step.
Step 2 – Roll and Cut
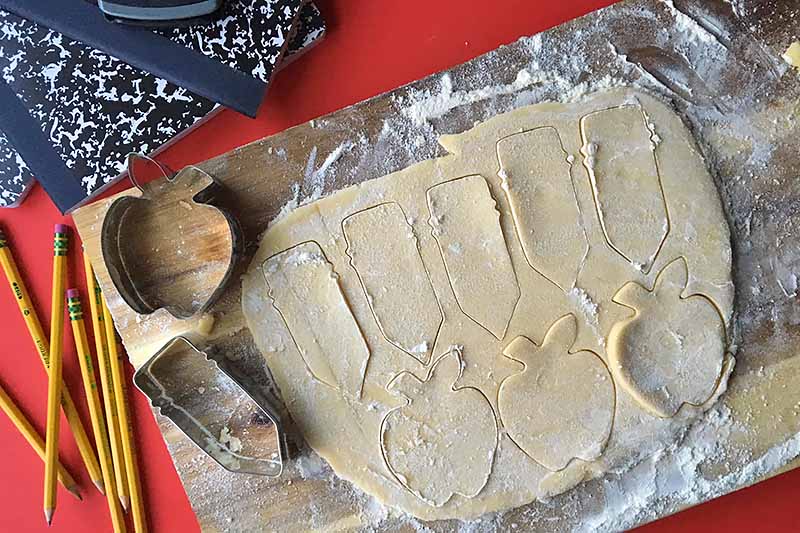
Place the chilled dough on a lightly floured work surface. With a rolling pin, roll out the dough to an even layer about 1/4 inch thick.
If you prefer something a little thinner, roll the dough out to about 1/8 inch thick.
You may need to lightly flour the top of the dough to keep it from sticking to the rolling pin.
Using cookie cutters in the shapes of apples, pencils, and notebook paper, cut out shapes from the dough, dipping the cutter in flour to prevent sticking. Re-roll the dough once and cut again. Discard any excess.
The dough will yield about 5-8 cookies in each style, depending on shape, size, and thickness of the dough, and if your cookie cutters have the same dimensions as mine, about 2 inches by 3 1/2 inches.
Step 3 – Chill
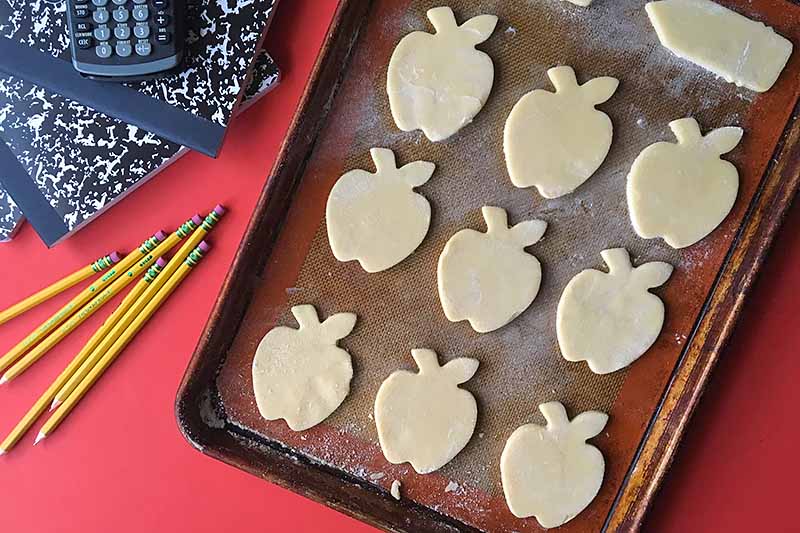
Place the cut-outs on two or three baking sheets lined with parchment paper or silicone mats, leaving about 1/2 inch of space between each to allow room for any spreading. Place in the refrigerator to let the shaped dough re-chill and set.
As they are chilling, preheat the oven to 325°F.
Step 4 – Bake
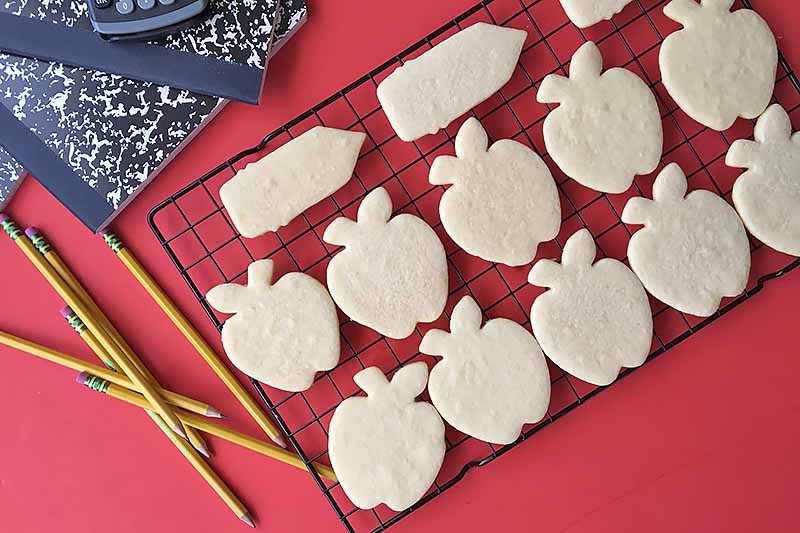
Bake for 8-10 minutes, depending on the thickness of the dough. They will still look very white and puffy on top. Remove from the oven and let cool on the pan for just one minute before removing and letting cool completely on a cooling rack.
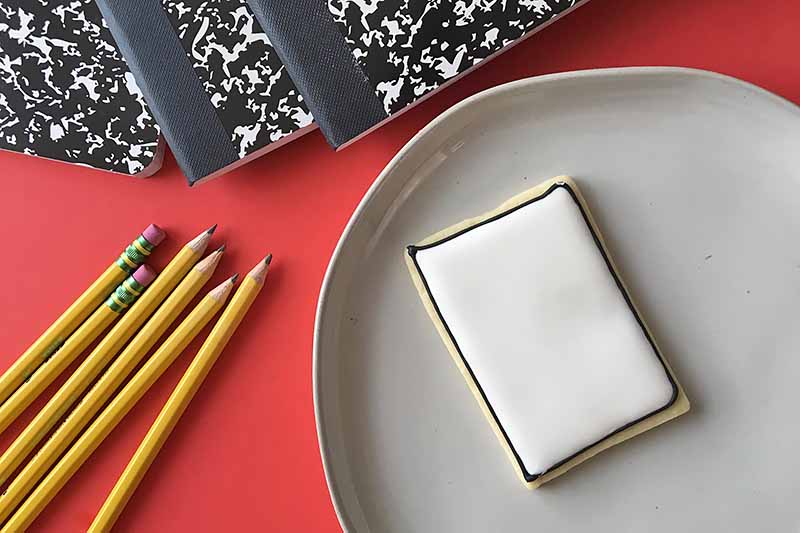
Step 5 – Outline with Black Royal Icing
Prepare one batch of royal icing to a medium-stiff consistency.
Remove about 1/2 cup of the frosting. Cover the bowl of remaining frosting with plastic wrap. Set aside at room temperature.
Add black food coloring to the 1/2 cup of icing. Stir to combine. Place in a piping bag fitted with a #2 round tip.
Outline each cut-out with the black icing, outlining the different shapes as needed for the apples, pencils, and notebook paper.
Let harden completely before filling, for about 1 hour at room temperature.
Hey, what a sec… what’s royal icing? We’ll school you on this amazing decoration with our helpful tutorial!
Step 6 – Fill with Royal Icing in Assorted Colors and Set
Divide the remaining reserved frosting as needed for the various colors of each design.
I like the bright, bold colors with the dark outline – this combo gives them a fun, cartoonish appearance!
After adding the food coloring, add any additional water as necessary to achieve a flood icing consistency. Using separate piping bags and separate #2 or #4 round tips for each color, fill in each section.
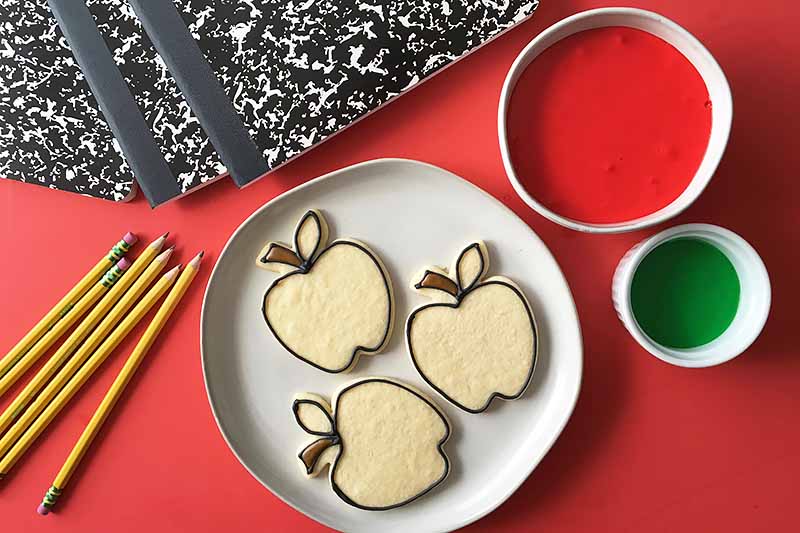
For the apples, use red as the main color, brown for the stems, and green for the leaves.

For the pencils, use yellow for the main color, pink for the eraser, gray for the metal band (fun fact: it’s called a ferrule!), and light brown for the exposed wood on the bottom.
For the notebook paper, use the plain white royal icing (no need to dye this!) for the main shape.
Let the cookies set at room temperature until the icing is completely set and hardened, about 2-3 hours.
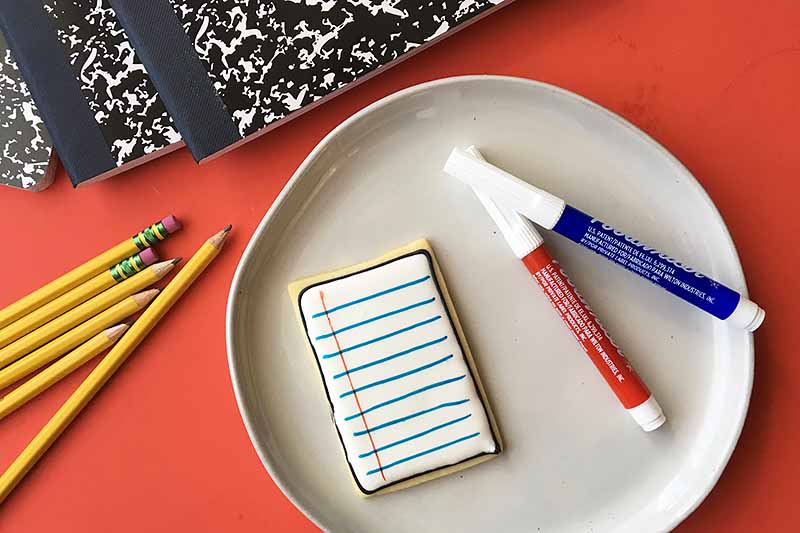
Step 7 – Extra Decorations
Once the icing base has dried completely, add any extra details with leftover icing.
Wilton FoodWriter Color Fine-Tip Edible Markers, 5-Piece
For the notebook paper, you can draw lines that resemble the blue and red lines on a real piece of paper, using edible markers. These are available on Amazon, or in the baking section of most grocery or craft stores.
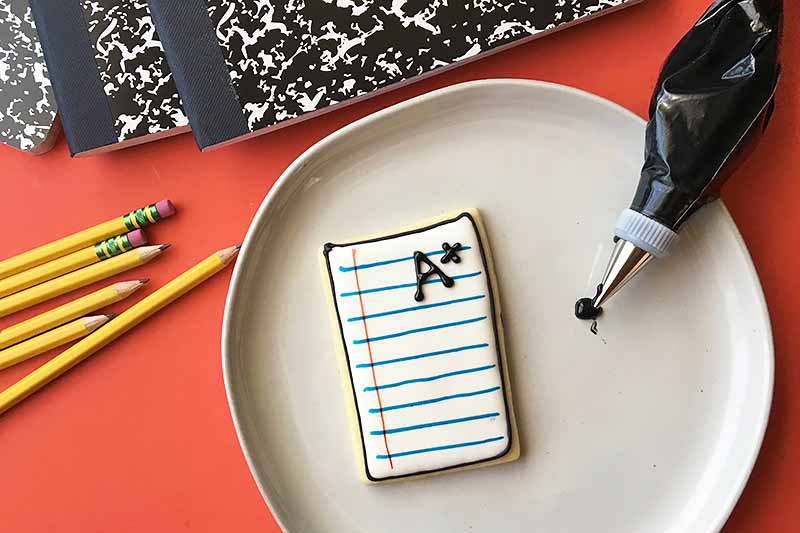
Once you draw the lines, use the reserved black icing to pipe an “A+” at the top of each rectangle.
For the pencil, use any reserved yellow to pipe three lines on the pencil.

Step 8 – Set Completely
Let the additional decorations set for another 30 minutes.
Once set, eat and enjoy!
It Takes Time, But Your Little Students Will Love Them!
As with any royal icing dessert, these will take a hefty handful of hours to craft before anyone is allowed to touch and eat them.
But the smiles you’ll get from your kids are so worth it.
Once they see how fun and colorful the decorations are, once they taste how soft and chewy the cookie is, and how sweet and crunchy the royal icing is, they will be so excited that the new school year has finally arrived!
Well, maybe…
At least these desserts will help to make the beginning of the new school year a little easier to endure.
Start off with trying just one design, then make the other styles I recommend. Do you have any other shapes and designs you have tried, or would like to explore? Perhaps your child’s school teacher would love a bouquet of royal icing flower cookies! Let me know your thoughts in the comment section below. We are always looking for fun ideas!
For more royal icing designs, try more of these bedazzled delights among our large collection of sweet cookies:
Photos by Nikki Cervone, © Ask the Experts, LLC. ALL RIGHTS RESERVED. See our TOS for more details. Product photos via Wilton and Ann Clark Cookie Cutters.
Nutritional information derived from a database of known generic and branded foods and ingredients and was not compiled by a registered dietitian or submitted for lab testing. It should be viewed as an approximation.
About Nikki Cervone
Nikki Cervone is an ACS Certified Cheese Professional and cheesemonger living in Pittsburgh. Nikki holds an AAS in baking/pastry from Westmoreland County Community College, a BA in Communications from Duquesne University, and an MLA in Gastronomy from Boston University. When she's not nibbling on her favorite cheeses or testing a batch of cupcakes, Nikki enjoys a healthy dose of yoga, wine, hiking, singing in the shower, and chocolate. Lots of chocolate.