Creme brulee – it’s the classic French dessert.
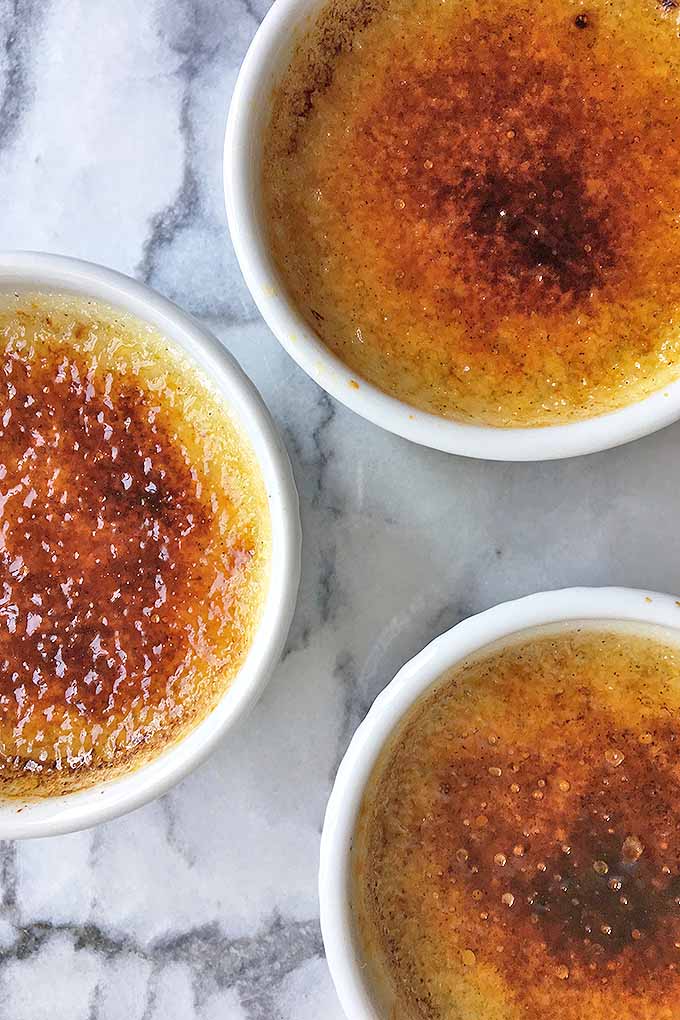
And the glassy caramel topping mesmerizes all who eat it.
I still remember the first time I was taught to shatter the shell before scooping into the creamy custard below.
My grandparents took me on a week-long trip to Chicago for my twelfth birthday. We saw a few plays, explored a few museums, and ate dessert at every dinner – the absolute highlight of the trip for this pastry chef in the making.
When my grandma ordered the creme brulee, she warned me that I was in for something special. We shattered the topping together and she watched as I devoured the entire dish with glee.

Creme brulee may seem intimidating or overly complicated to make, relegated to the realm of restaurants and high-class establishments. But it’s actually far easier to whip up in your own kitchen than you might think.
Just whisk together a few basic ingredients, pour them into ramekins, and bake.
That’s pretty much it!
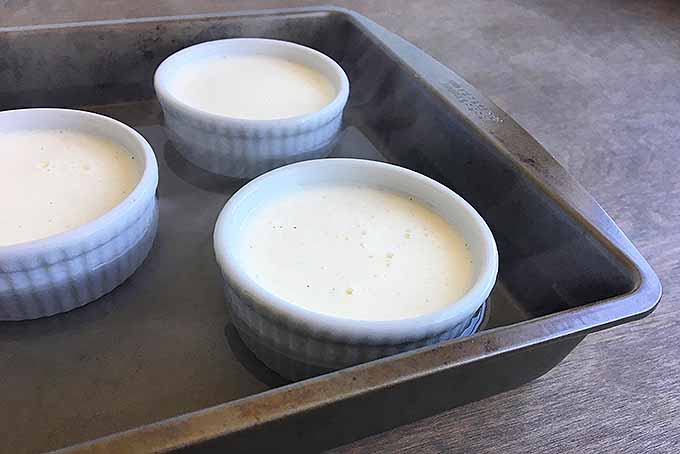
The baking process is the only part that gets a little bit tricky. In order to cook the custard evenly, it bakes in a water bath.
Achieving this involves setting ramekins in a deep pan of boiling water before placing it in the oven. Baking in a water bath is sometimes done when making cheesecake at home, as well.
If you’re not careful in your execution of this step, you’ll end up with scalding water running down your arms. But as long as you work slowly and carefully, your custard will cook successfully.
In fact, patience and organization are the keys to many successful cooking projects. Check out our post on kitchen safety for more tips.

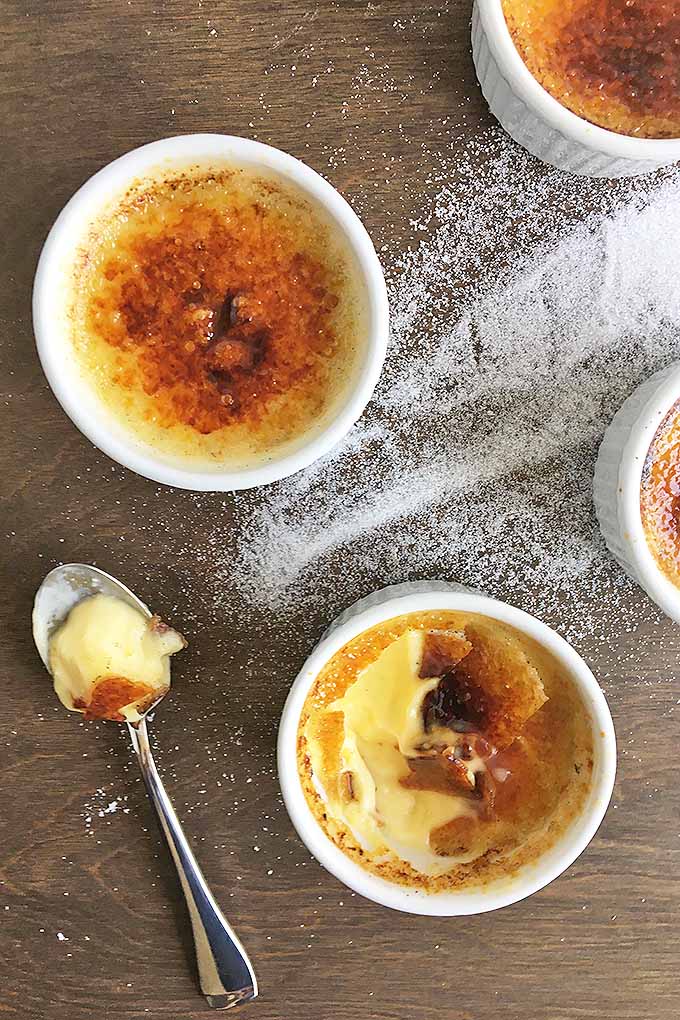
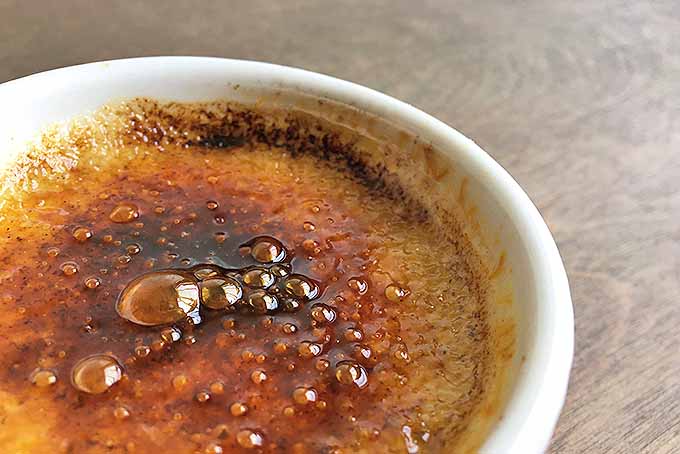
Once it’s cooked, the best part about making creme brulee at home is torching the sugar on top.
I always love watching sugar melt into caramel. It’s even more fun when you get to eat it right away!
Shake Things Up with Flavor Variations
Vanilla is a classic flavor that complements the other simple ingredients, but if you’d like to vary the recipe a bit, you can flavor the cream during the first step.
Using the same method as you’ll find in my recipe for homemade caramels, you can steep tea, coffee, or spices in the cream, or add liquor.
You could also whisk 1/4 cup of dark chocolate pieces into the hot custard before passing it through the strainer – just be sure that it melts completely before straining, so you won’t lose any.
Don’t limit the extra flavorings to the custard alone. Add more variety by topping individual servings with your favorite fruit, chocolate shavings (we know the best microplanes to get the job done!), a dusting of cinnamon, or cookie crumbs.
Print
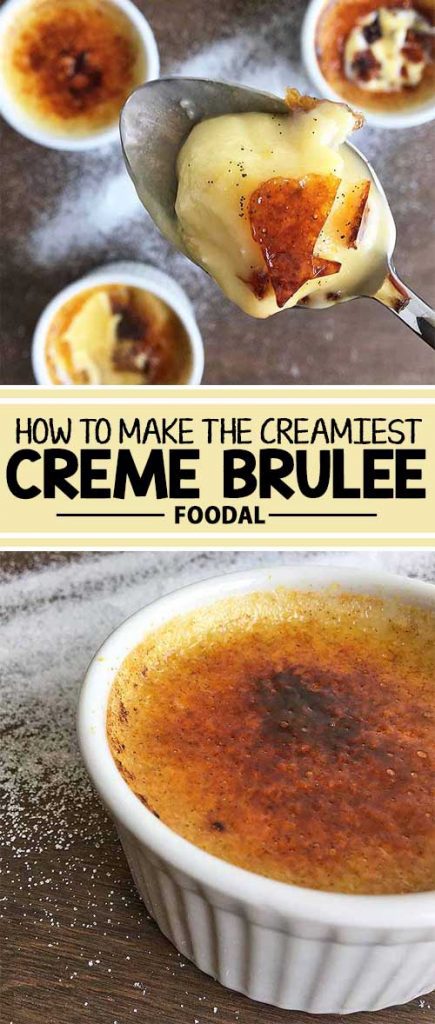
The Creamiest Creme Brulee
- Total Time: 4 hours, 25 minutes
- Yield: 4 6-ounce ramekins
Description
Learn to make the French classic, a super creamy creme brulee. Our simple recipe offers plenty of options to mix up the flavors.
Ingredients
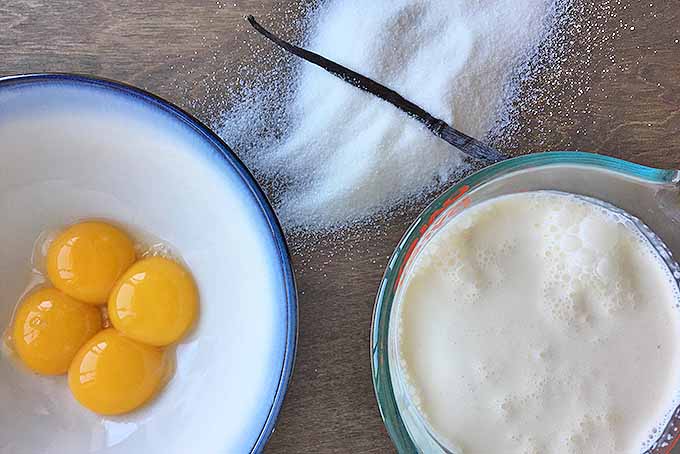
- 1 whole vanilla bean
- 2 cups heavy cream
- 4 large egg yolks
- 1/2 cup plus 3 tablespoons granulated sugar, divided
Instructions
- Preheat the oven to 300°F and bring 6 cups of water to a boil on the stove.
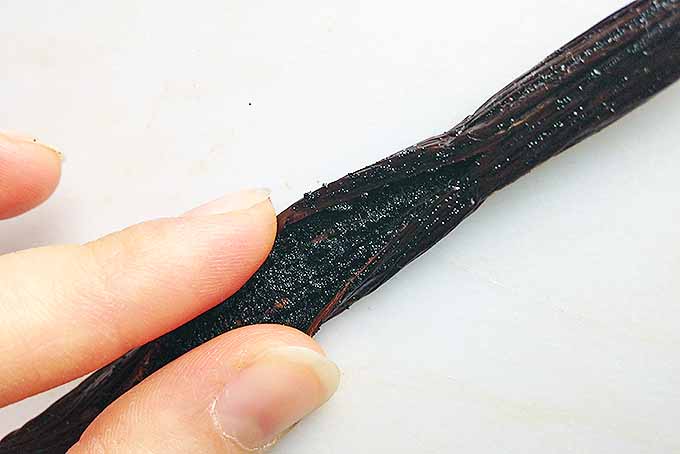
- Split the vanilla bean in half and scrape out the seeds. Add both the seeds and the pod to a medium-sized pot with the cream, and heat on medium-high until scalding. Pour through a fine mesh strainer or chinois into a large mixing bowl, to cool slightly and strain out the vanilla pod.
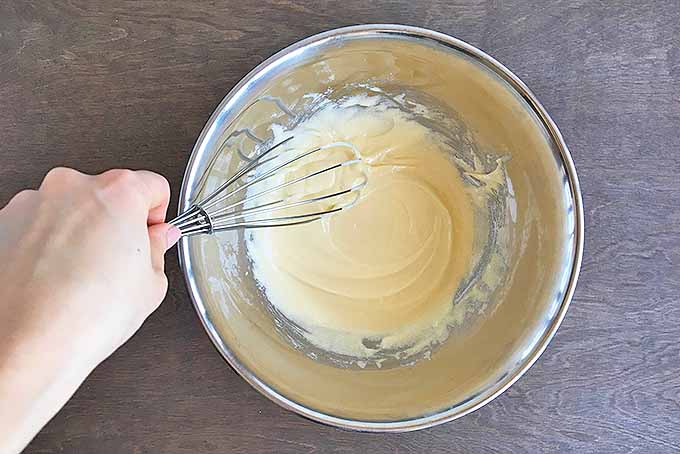
- Whisk together the egg yolks and 1/2 cup sugar until thick and pale, then slowly pour in the warm cream in a steady stream, whisking continuously. Whisk until smooth and then pass through the strainer once more.
- Pour the custard into 6-ounce ramekins. Place them in a deep roasting pan, and fill the pan with the boiling water until it reaches 2/3 of the height of the ramekins. Cover the roasting pan tightly with aluminum foil.
- Carefully transfer the pan to the oven and bake for 30 minutes. When finished, the custard will jiggle slightly but it will no longer be liquid.
- Remove the aluminum foil and take the ramekins out of the pan with a sturdy set of tongs. Let cool in the refrigerator for least 3 hours, until chilled. If you’d like to keep them in the fridge for more than one day, wrap them with plastic wrap once they have cooled completely. They will keep for up to a week.
- To serve, sprinkle the top of each custard lightly with the remaining granulated sugar and caramelize with a kitchen torch until deep auburn in color. Keep the torch set to a medium-sized flame and heat around the perimeter of the dish first, finishing with the center. Let rest for three minutes before serving.
- Prep Time: 25 minutes
- Cook Time: 1 hour
- Category: Custard
- Method: Baking
- Cuisine: Dessert
Cooking by the Numbers…
Step 1 – Cream
Begin by preheating the oven to 300°F and placing your oven rack in the middle position.
Check the clearance of your roasting pan before you begin, to be sure it will fit – some pans have tall handles that leave little wiggle room if the oven rack is too high.
Fill a large saucepan with 6 cups of water, and place it on the stove over high heat to bring to a boil.
Split the vanilla pod down the middle with a paring knife, and scrape out the seeds. Put both the seeds and the pod in a medium-sized pot with the cream over medium-high heat.
It’s important to use a larger pot than you may think is necessary, and to keep a close eye on the cream as it heats – or else it will overflow onto your stove.
And that’s not going to be fun to clean up! (But not impossible – check out our post on cleaning large kitchen appliances for tips.)
Heat the cream until it is scalding. Scalding dairy is the phase right before boiling, when it begins to bubble around the edges and up the sides of the pot.
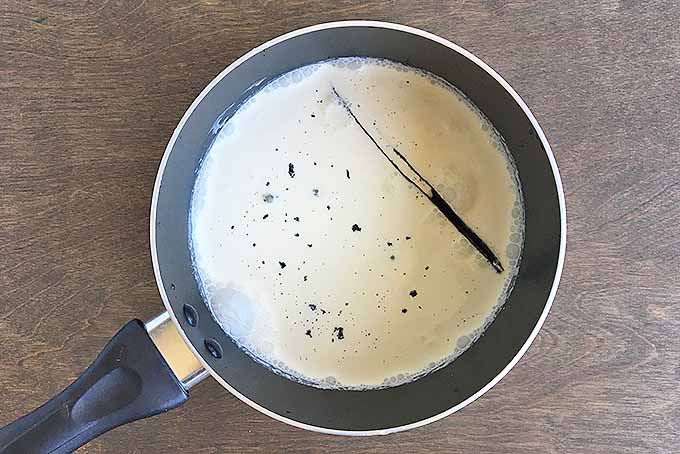
You’ll know you’ve reached this stage when the cream begins to bubble around the edges and is about to boil over. As soon as it hits the scalding point, pour the cream through a fine mesh strainer or chinois to strain out the vanilla pod and cool down the mixture.
Step 2 – Whisk
In a large bowl, whisk togetherthe egg yolks and 1/2 cup of sugar until thick and pale. This is called the ribbon stage.
Step 3 – Temper
Temper the eggs by slowly pouring the hot cream into the egg mixture in a steady stream while whisking constantly. Continue to whisk until all of the cream has been poured in.
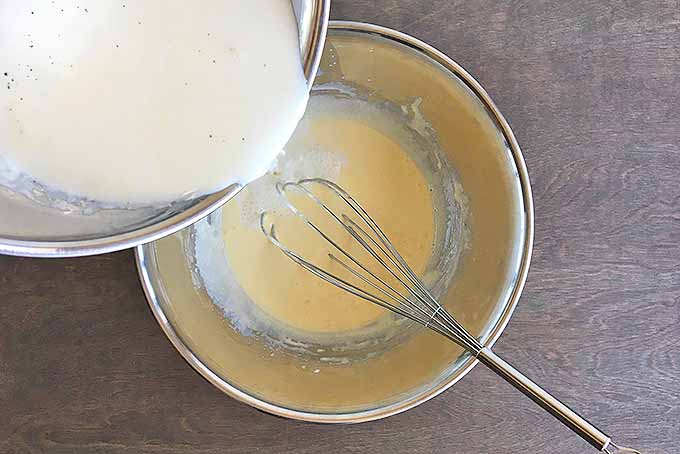
You can definitely complete this step on your own, but it is easier and safer if you have an extra pair of helping hands at home! Have one person whisk while the other pours the hot mixture into the eggs for easy tempering.
Once the custard is whisked together, pass it through the strainer one more time to remove any bits of egg that might have scrambled.
Temper Tantrum: How Tempering Works
Tempering is the process of gently and gradually increasing the temperature of a food item so that it does not cook too quickly.
This cooking technique is usually applied to egg-based custards and sauces to prevent the risk of curdling.
Eggs are very delicate – if high heat is rapidly introduced to a raw egg mixture, the proteins in the eggs go into “shock” and coagulate (solidify) too quickly. Essentially, this results in weird, lumpy, liquidy scrambled eggs.
No, thank you.
Patience and a good whisking hand are two necessities when tempering! By slowly pouring a heated mixture into the eggs as you are simultaneously whisking, you are gradually increasing the temperature of the liquid.
A steady whisking motion will provide a continuous movement of blending, which helps to both emulsify the mixture and also maintain a consistently rising temperature.
When tempering is done correctly in this way, you are sure to get creamy, dreamy success!
Step 4 – Pour
Pour the custard into individual 6-ounce ramekins. If you don’t have ramekins, shallow oven-safe serving dishes will work as well.
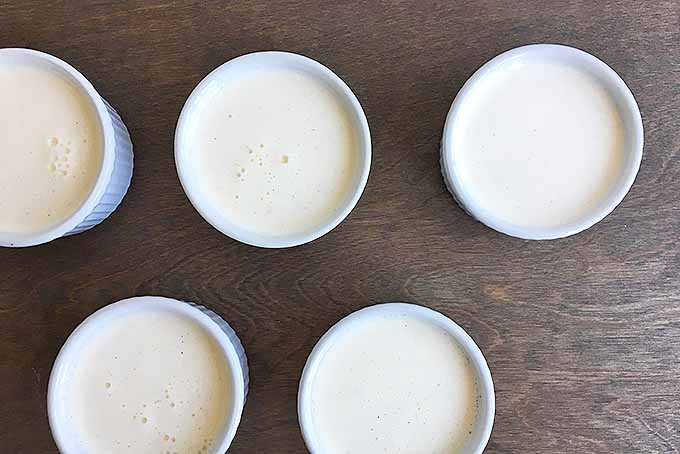
The deeper the dish, the longer it will take to cook. It’s best to use a dish no more than three inches tall and at least two inches in diameter so that you will have plenty of surface area for the sugar topping.
If using traditional 6-ounce ramekins, this recipe will yield four servings.
Place the dishes in a roasting pan that is at least 2 1/2 inches deep. Fill the pan with boiling water until the water reaches 2/3 the height of the ramekins, and cover tightly with aluminum foil.
Work quickly so you won’t lose heat.
Step 5 – Bake
Very carefully, transfer the pan to the oven. Bake for 30 minutes. If you are baking in a custard dish that is deeper than two inches, it might take slightly longer to cook, up to 1 hour.
You will know the custard is finished when it jiggles slightly if a ramekin is shaken lightly.
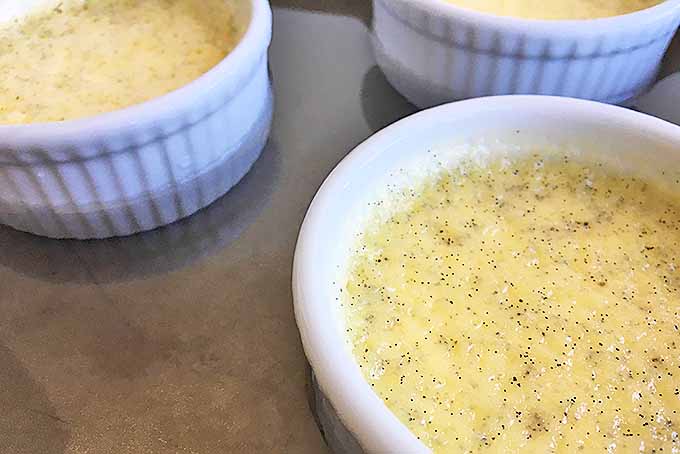
If it is still liquid in the center, it needs to continue cooking. And if there is no jiggle, unfortunately you’ve cooked your custard for too long. If this is the case, it will still be edible, though a bit rubbery in texture.
We’ve all had our desserts fall flat once in awhile – don’t give up! This dish is definitely worth another go, until you get it right.
Check out the following posts for more dessert prep and baking tips, and suggestions for saving your dessert when it falls flat, or literally falls on the floor.
Step 6 – Cool
Remove the pan from the oven very carefully when the custard is finished cooking.
I prefer to take the aluminum foil off of the dish before pulling it out of the oven so I am able to watch the water, and keep from accidentally splashing myself.
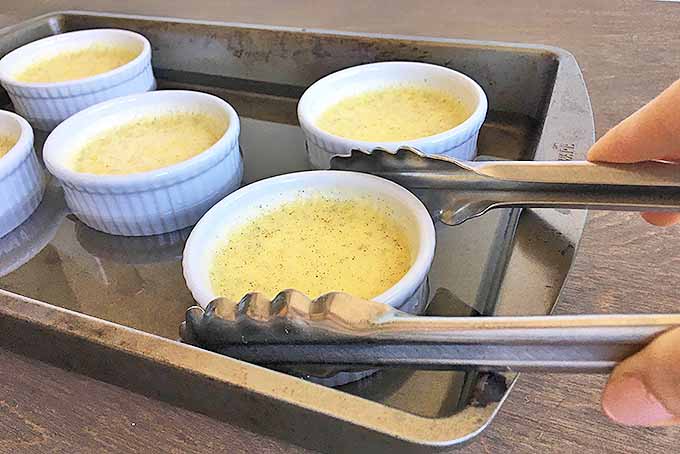
Remove the ramekins from the pan with tongs. Let cool in the fridge until chilled all the way through, for about three hours.
If you plan to serve them the same day, just keep them in the fridge until you are ready to serve. If not, wrap them in plastic wrap once they are completely cool. They will keep in the refrigerator for up to 1 week.
Step 7 – Serve
When you are ready to serve, remove the ramekins from the fridge. Using a clean kitchen towel or disposable paper towels, pat off any condensation that may have formed on the top.
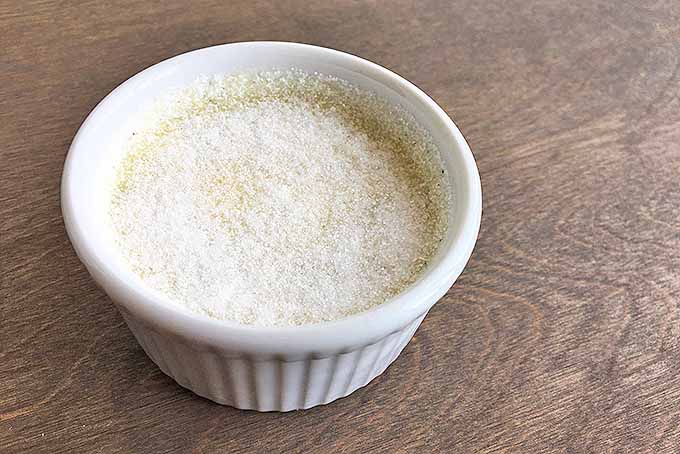
Sprinkle the remaining 3 tablespoons of granulated sugar in an even layer over the tops of your puddings, and brulee with a kitchen torch.
Move the flame around the perimeter of the dish first to melt the edges, and finish by melting the center. Heat until the sugar takes on an auburn color.
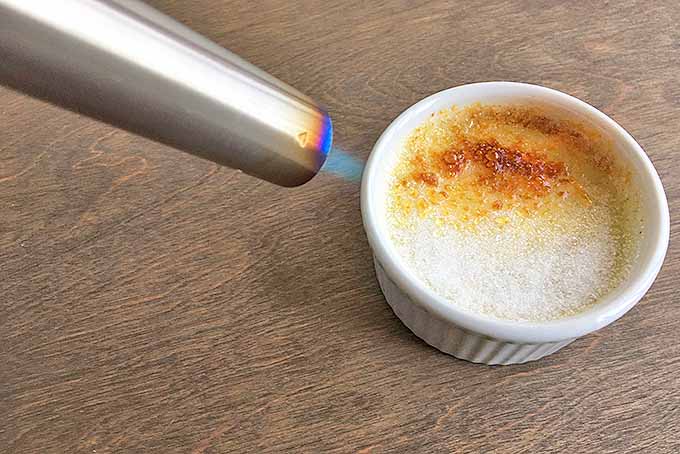
Don’t let it get too dark, or it will taste bitter and burned.
Be very careful when you are doing this. The melted sugar will be incredibly hot – over 300°F! Touching it, or the hot parts of the torch, would lead to one nasty, painful burn.
Let the dishes rest for three minutes after torching, to be sure that the sugar has cooled completely before serving.
Shatter Away!
You will know that your creme brulee-making has been a success when you hear the satisfying tap, tap, tap, crunch! of the spoon on the surface.
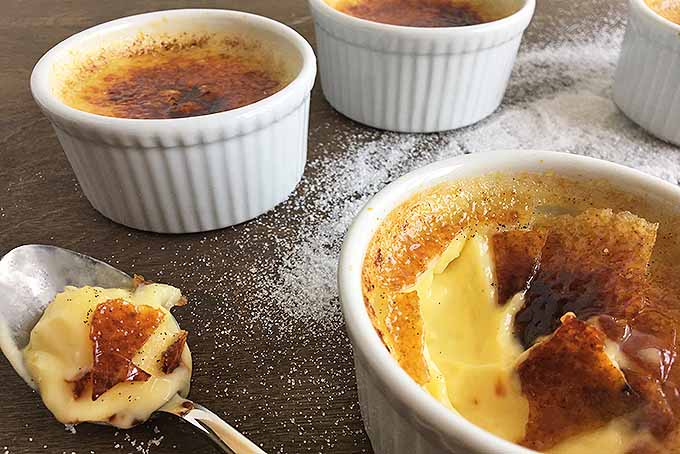
The flecks of vanilla speckled through the custard lend lots of flavor, and the sweetness is balanced by the slight bitterness of the caramel topping.
Treat yourself to something fancy – give this classic recipe a try tonight. You’ll be amazed at what a wonderful dessert you can create at home.
For more creamy custard-based desserts, indulge with a few more recipes:
Do you remember when you first tried creme brulee? Were you mesmerized by the shattering shell? Tell us about your experience in the comments below!
Don’t forget to Pin It!
Photos by Nikki Cervone, © Ask the Experts, LLC. ALL RIGHTS RESERVED. See our TOS for more details. Originally published June 8th, 2015 by Jennifer Swartvagher. Revised and expanded on May 22nd, 2017 by Kendall Vanderslice, with additional writing by Nikki Cervone.
*Nutritional information derived from a database of known generic and branded foods and ingredients and was not compiled by a registered dietitian or submitted for lab testing. It should be viewed as an approximation.
About Kendall Vanderslice
Kendall’s love of food has taken her around the world. From baking muffins on a ship in West Africa and milking cows with Tanzanian Maasai, to hunting down the finest apfelstrudel in Austria, she continually seeks to understand the global impact of food. Kendall holds a BA in Anthropology from Wheaton College and an MLA in Gastronomy from Boston University, and has worked in the pastry departments of many of Boston’s top kitchens. Based in Somerville, Massachusetts, Kendall helps to run a small community supported bread bakery and writes about the intersection of food, faith, and culture on her personal blog, A Vanderslice of the Sweet Life.
I like how simple this creme brulee recipe is. I want to try it now. I’ve only eaten it a couple of times, but they’ve always been an enjoyable dessert on the rare occasion that I’ve seem them on the menu and had the desire to order something sweet. Of course, I’d love to eat it for every meal, but that would do some terrible things to my waist line!
Amazing! This looks so simple and elegant to make. We have a torch (Christmas present), but no ramekins. By any chance, could this be made into different things? Cupcake holders for instance? :S
If you do not have any ramekins, I would recommend using a casserole dish, and making 1 large creme brulee, but I suppose a muffin tin would work as well.
Such a classic and decadent dessert. I haven’t had the courage to try it yet, but the recipe does look simple and easy to follow. I may one day try it and practice it before serving it to anyone outside of the family.
There’s a similar dish in the Philippines called “leche flan” or “creme caramel” that is as easy to make as a creme brulee and I love making both. I’ve seen a lot of debate whether both dishes are the same but I think both have different textures though they have similar tastes. Anyways, this recipe is really helpful for those who want to make a simple version at home. Awesome article!
I love creme brulee. I’ve had it at restaurants, but have never made it at home, because it seemed as if it must be difficult to make. I do have a torch (or two) in my wish list, so hopefully I will be making it in the future, and now that I know how easy it actually is to make, I’ll be using your recipe.
Wow! I would love to try making this with the method that you used. I’ve prepared this once or twice for special occasions but I’ve used the tried and tested formula of making caramel separately and then applying it rather than using a torch to melt the sugar in place. This version may make things easier. Thanks for this!
My absolute favorite dessert is creme brulee! My issue is that it typically is so expensive at restaurants, although I can never refuse it when I see it on the menu. I’m so ecstatic that I happened to come across this article. I’ll be making this for sure in the near future.
You know what I have not had this dessert. I’ve worn body cream with this scent. Which smelled amazing. Looking at it I do think this one would be decadent. One would be enough because the ingredients are rich.
A gourmet dessert that seems really easy to make. Would be very impressive if you had guests over.
I would love to try this recipe. Then you get to use a kitchen torch too?? This recipe sounds like a lot of fun to make. A chocolate version sounds just as good.
I have never had this sadly. Hopefully it tastes as good as a restaurant. Lol. Thanks for a desert idea. I think I’ll try it out before a big dinner though just in case it doesn’t come out too well.
It looks gourmet. I hope I could make it look exactly like that without collapsing.
I never thought that making creme brulee was this easy! I’ll try to make it and practice making it until I perfect it, so that when the time comes when my uncle has to leave the country -which is just around the corner- I’ll be able to make him his favorite creme brulee. He’ll be so thrilled!
Crème Brulee is my favorite dessert of all time! If we go out to eat at a restaurant and it is on the dessert menu I cannot resist ordering it. I never realized it was so simple to make, so I have always avoided making it. I will definitely try this recipe because it seems very simple to prepare and looks delicious!
The picture does look a lot like our local ‘leche flan’. Just looking at the picture, one could argue that they are indeed the same. However, going through the recipe I can see the difference between the two. In this recipe, heavy cream is used while in our ‘leche flan’ as the name suggests is heavy on milk (combination of condensed milk and evaporated milk). Next major difference is the manner of cooking. Leche flan is cooked through regular steaming. White sugar is caramelized and placed in a tin pan (llanera), cooled and then the mixture of milk, vanilla, and egg yolks are poured over, then steamed. No oven. But then again, with the rameskin placed in a roasting pan filled with water, this is akin to steaming (in a way).
Wow, this recipe looks so simple and decadent. I’ve been meaning to make a creme brulee for a while, but I don’t think I’ve found a recipe as straightforward as this. I will definitely try this soon, I’ve always thought it was extremely difficult to make and required a lot of culinary skills.
I make a creme brûlée similar to this one except it calls for a pinch of salt. Other than that small addition the recipe is the same. This is one of the easiest desserts to make, creamy, delicious and impressive to serve to guests. I make it all the time. It’s either creme brûlée or panna cotta.
Just made this tonight with my husband. Oh my God! It was amazing and really easy. It was fun to do together and made it easier.
Do you whisk by hand or with a mixer…I am not certain if this can be over whisked 🙂
Cant wait to try this today for our Christmas dessert
Hi! I have a question, If you cover the pan with aluminum, is possible that condensed water fall into the ramekins??
Thank you!
I’ve made this recipe several times and it comes out perfect each time. Curious about adding a liquor to this recipe. Any suggestions?
Crystal – We’re so thrilled you like the recipe! You have endless possibilities with additional flavorings, especially with liqueurs. Adding a teaspoon or two will go a long way to augment the flavor. Here are some ideas:
Grand Marnier: if you want a hint of orange
Frangelico : If you want a hint of hazelnut
Kahlua: If you want a hint of coffee
Wonderful ideas! Thank you! Just a teaspoon or do you recommend 2t, to your recipe? I would fear making it less likely to set properly.
One teaspoon should do the trick!
My first taste of this fabulous dessert was sitting in a Paris café on New Year’s Day not far from Notre Dame Cathedral back in 2001! Our friend’s daughter convinced me to try it, I had not ever been a custard fan. I was hooked from that day on! I have made your recipe a few times now with great success. Thank you so very much for allowing me to indulge in this fabulous dessert from my own home!
I used one cup of sugar because it called for one cup when it was 4 cups. So I doubled. Your directions don’t change when you up the qty yielding.
Are you talking about the multiplier on the recipe card? One cup of sugar would be the correct amount to use if you want to double the recipe and make it with four cups of cream. This multiplier function does seem to be working if you click on the up/down arrows, but this recipe still features an older version of the recipe card publisher that we no longer use. Thank you for pointing this out- we will post an update ASAP!