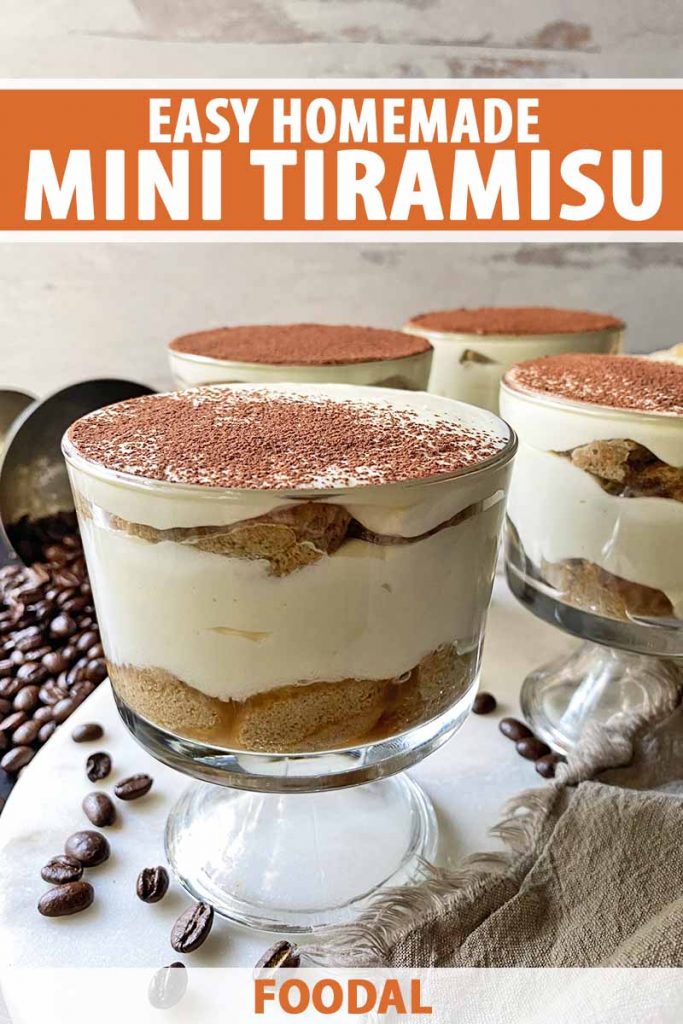
“Set and forget” probably brings slow cooker recipes to mind, but I’m extending this time-saving concept to my recipe for easy mini tiramisu!
Mini tiramisu cups can be prepped ahead of time so you don’t have to worry about the final course when you have a busy dinner ahead of you.
When you’re entertaining at home, I bet you’re like me and try to strategize a game plan by choosing desserts that are easy to assemble, make, and serve.
Or you may cheat just a little and buy a cake from the store, or assign someone else the task of bringing dessert! You’re already doing so much to keep the party going, host with the most!
By the time you’re a few hours into a dinner party, the last thing you want to worry about is completing a complicated dessert.
You’re already exhausted with planning and making appetizers and the dinner course, the impending clean-up of dishes piling up ever so precariously in the kitchen, and you might be feeling that slight buzz from a glass of wine or a cocktail.
Or two. Or three. But who’s counting?
But if you are determined to make a homemade meal from start to finish, and want to serve your guests a homemade recipe as a sweet ending to a fun party, turn to tiramisu.
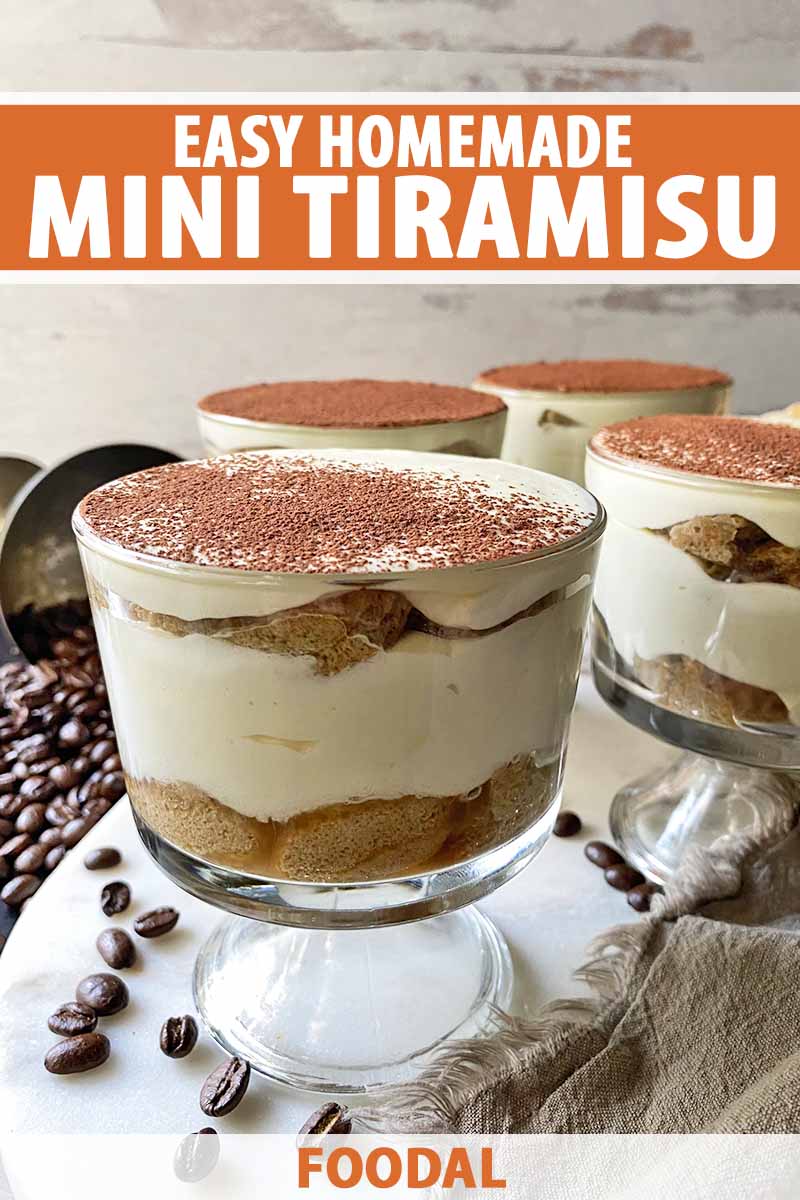
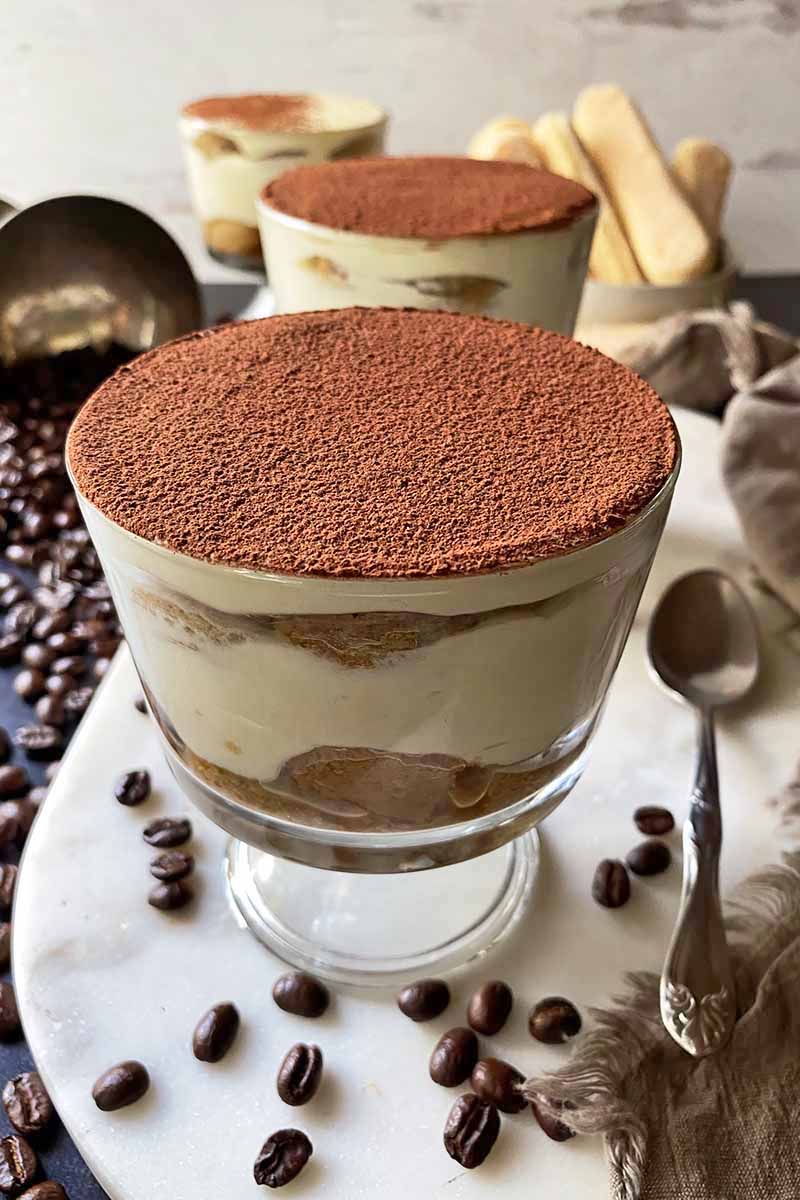
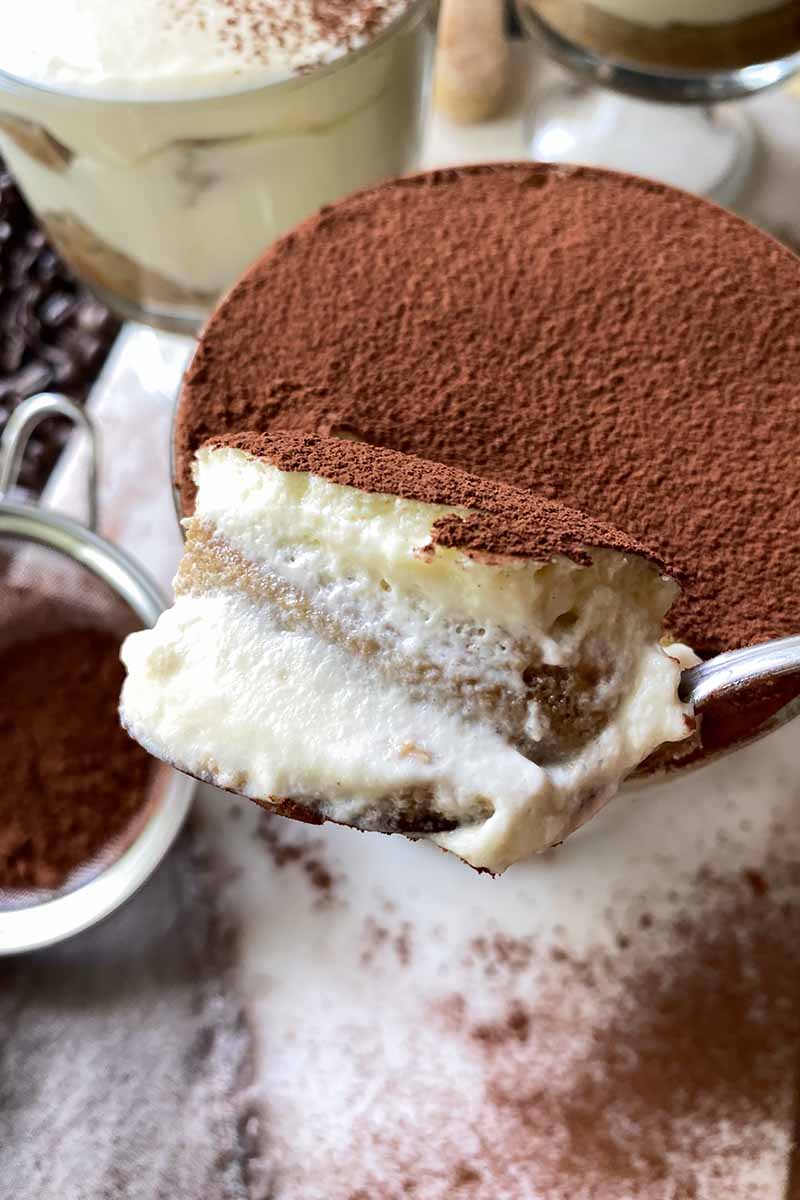
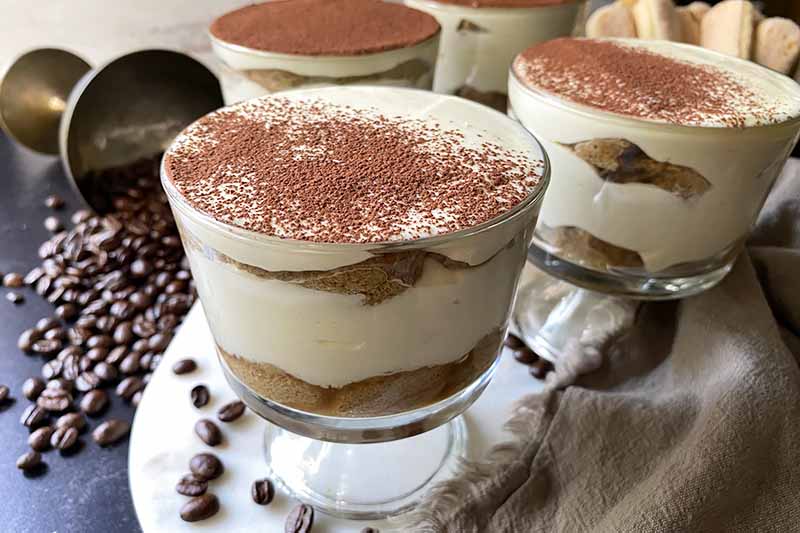
You’ll appreciate the ease and effortlessness of this recipe, because everything is assembled – and later served – directly in individual cups or bowls.
You don’t have to worry about a huge casserole dish! You can leave behind any fear that the tiramisu won’t set in time for you to cut it into perfect squares to serve.
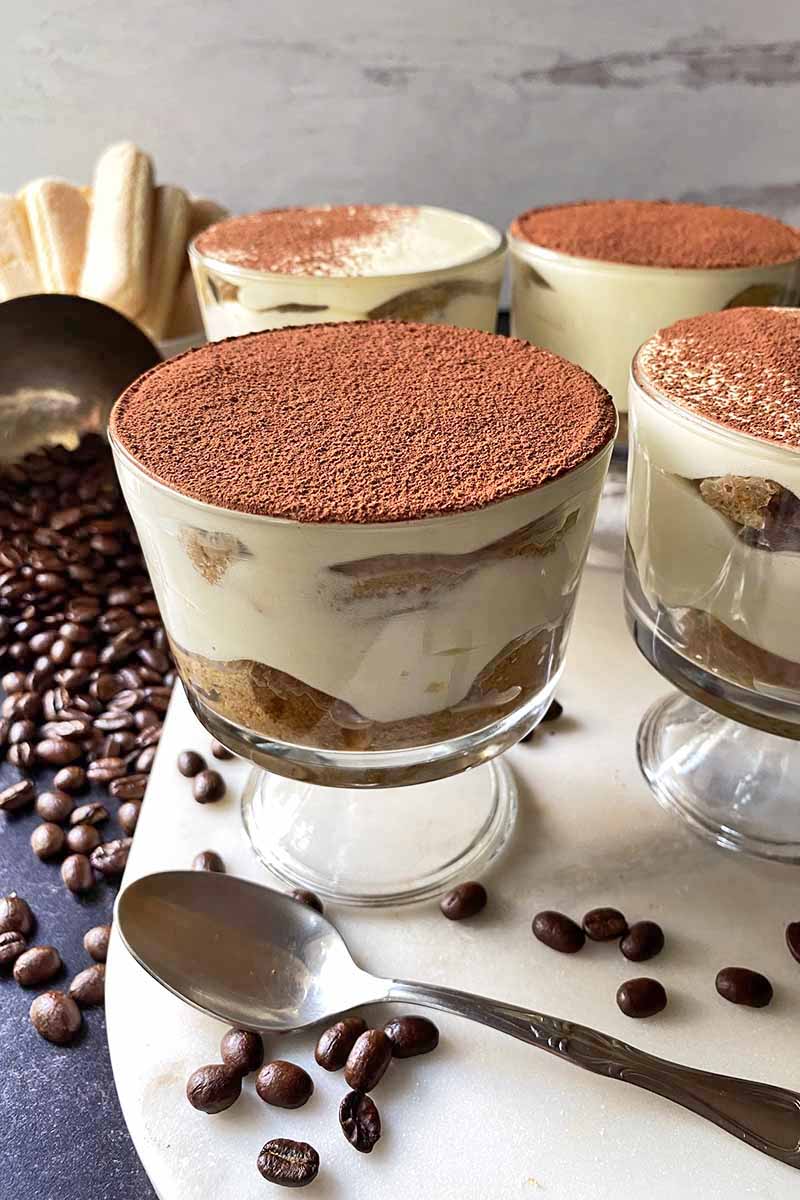
The layers of rich mascarpone cream and ladyfingers soaked in strong coffee and brandy will stay contained in their tiny little homes, up until the ravenous digs of the dessert spoon.
The tiramisu can be prepped anywhere from one hour to a whole day in advance – based on your party prep schedule, you can decide when will be the best time to make it.
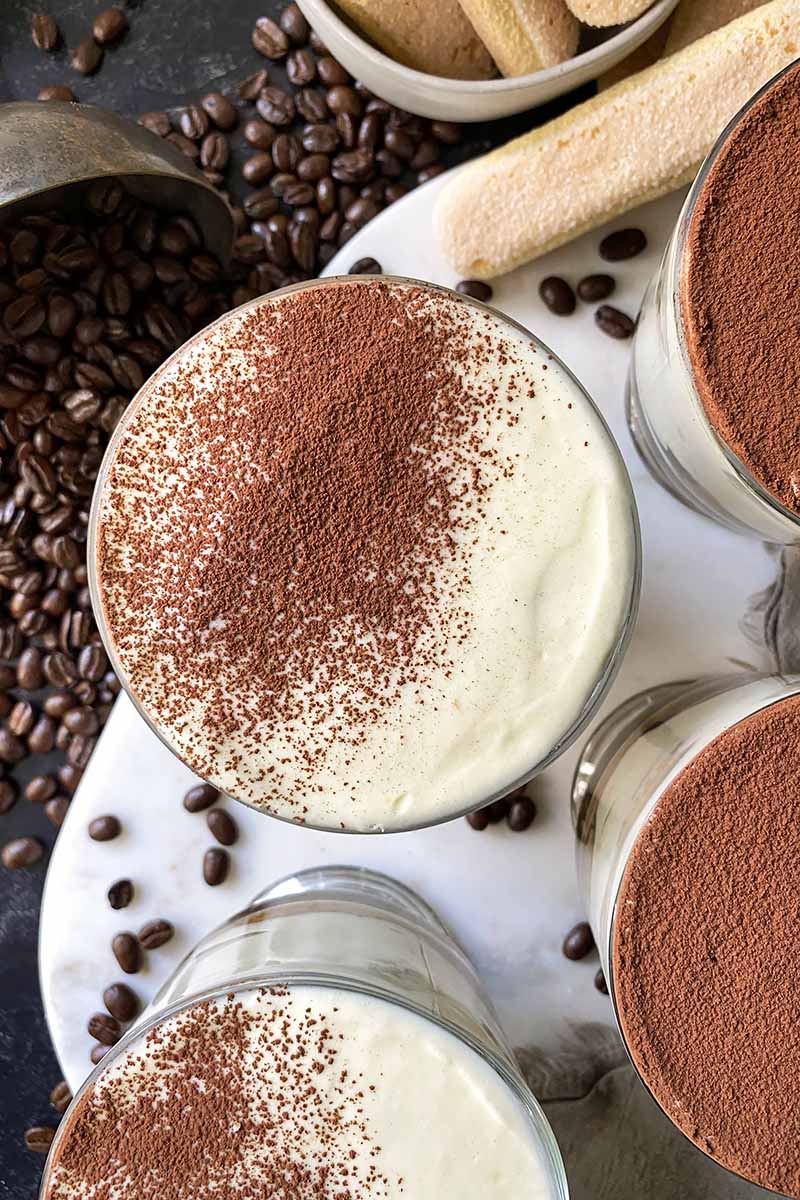
Served with a light dusting of cocoa powder as the finishing touch, your work is complete.
Who needs any added stress? Kick back, relax, pour yourself some of that brandy you used to soak the ladyfingers, and enjoy both the company and the tiramisu!
Let’s raise a glass to this creamy, dreamy dessert!
Print
Easy Mini Tiramisu
- Total Time: 1 hour, 45 minutes
- Yield: 4 servings 1x
Description
Are you too busy to worry about dessert for your dinner party? Make our individual tiramisu ahead of time so you can focus on the main course.
Ingredients
For the Cream:
- 3 large egg yolks
- 1/2 cup granulated sugar, divided
- 3/4 cup heavy cream
- 1 cup (8 ounces) mascarpone cheese
- 1/2 teaspoon vanilla extract
To Assemble:
- 1 1/2 cups espresso or very strong coffee
- 2 tablespoons brandy or cognac
- 16 ladyfingers, halved
- 2 tablespoons unsweetened cocoa powder
Instructions
To Make the Mascarpone Cream:
- Using a hand mixer or the whisk attachment in a stand mixer, whip together the egg yolks and 1/4 cup granulated sugar at high speed until very pale yellow and about tripled in volume, about 5 minutes. Transfer the mixture to a small bowl, scraping as much as possible into the bowl with a spatula.
- Using the same mixer and bowl, whip the heavy cream and remaining 1/4 cup granulated sugar at high speed until medium peaks form, about 3-5 minutes. Add the mascarpone and continue to whip at high speed until the cheese is completely incorporated and a soft and fluffy mixture forms, about 2 minutes.
- Gently fold the sweetened egg yolks into the mascarpone cream until completely combined. Avoid overmixing.
To Assemble:
- Whisk together the coffee and brandy in a shallow bowl and set in between a plate holding the halved lady fingers and four empty dessert bowls measuring about 4 inches wide and 3 inches tall.
- Working quickly, dip one ladyfinger half at a time into the coffee mixture and place in the bottom of a bowl. Repeat this process, adding four pieces each (two ladyfingers total) to the bottom of each bowl. You will need to shingle and press them down slightly.
- Using a two-inch cookie scooper, scoop one portion of the cream into each bowl on top of the ladyfingers. Spread the cream in an even layer.
- Repeat with the remaining ladyfingers, placing four pieces (two ladyfingers total) on top of the first cream layer in each bowl. Repeat scooping one portion of the cream on top of the ladyfingers. Spread the cream in a neat, even layer.
- Loosely cover each bowl with plastic wrap and chill in the refrigerator for at least 1 hour or up to 24 hours.
- Remove the plastic wrap. Directly before serving, lightly and evenly dust each bowl with a thin layer of cocoa powder. Serve immediately.
Notes
Be advised that this recipe contains raw eggs. Consuming raw eggs may increase your risk of foodborne illnesses, especially for those with certain medical conditions or compromised immune systems.
- Prep Time: 35 minutes
- Cook Time: 10 minutes
- Category: Dessert
- Method: No-Bake
- Cuisine: Italian
Cooking by the Numbers…
Step 1 – Prep and Measure Ingredients
Prepare a stand mixer fitted with the whisk attachment, or a hand mixer with beaters. Set out a couple of spatulas, a 2-inch cookie scooper, a small spoon or small offset spatula, and a small fine mesh strainer.
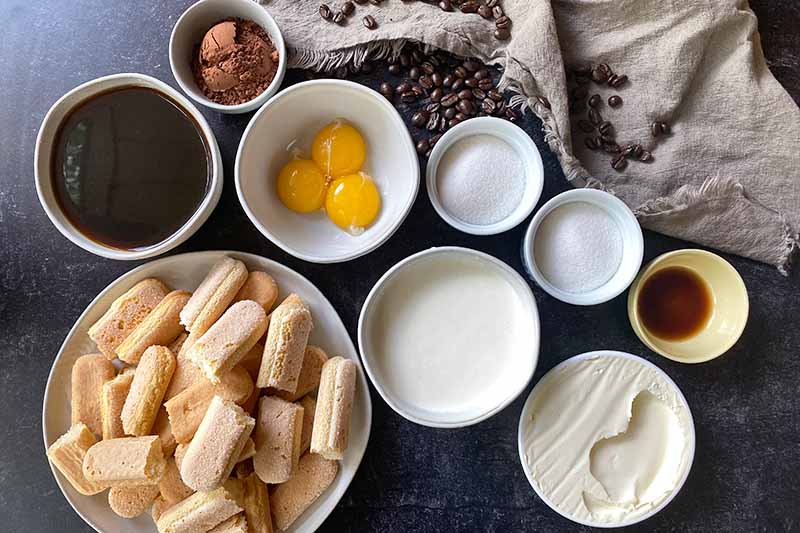
Set out 4 dessert bowls, measuring about 4 inches wide and 3 inches tall. While this is not necessary, I prefer to use see-through glass bowls, so you can gaze upon the luscious layers!
Break 16 ladyfingers in half and set aside on a plate – there will be 32 pieces total. You will use 8 pieces for each bowl, and 4 pieces per layer.
Measure out the granulated sugar, heavy cream, mascarpone, vanilla extract, and cocoa powder.
Measure out and whisk together the espresso and brandy in a small bowl. Set aside.
Separate three eggs, placing the yolks in a small bowl and saving the egg whites for a future use, like for meringue!
Step 2 – Whip the Egg Yolks and Sugar
With your stand mixer or hand mixer, whip together all of the egg yolks and 1/4 cup of the sugar at high speed until the mixture turns very pale yellow in color and triples in volume. This will take about 5 minutes.

To check to make sure it’s the right thickness, lift the whisk from the bowl – you should see a thick stream – a ribbon – that can hold its shape slightly once it drops back down into the mixture in the bowl.
Transfer the mixture to a small clean bowl, scraping out as much as possible from the bowl and off of the beaters with a spatula.
Making tiramisu is a fantastic way to use up any leftover egg yolks – so anytime you’re making an egg white omelet or soufflés, be sure to store the yolks in your fridge to make this dessert within the next day or two!
Step 3 – Make the Whipped Mascarpone
To make the mascarpone cream, you can use the same bowl and beaters that you used for whipping the egg mixture.
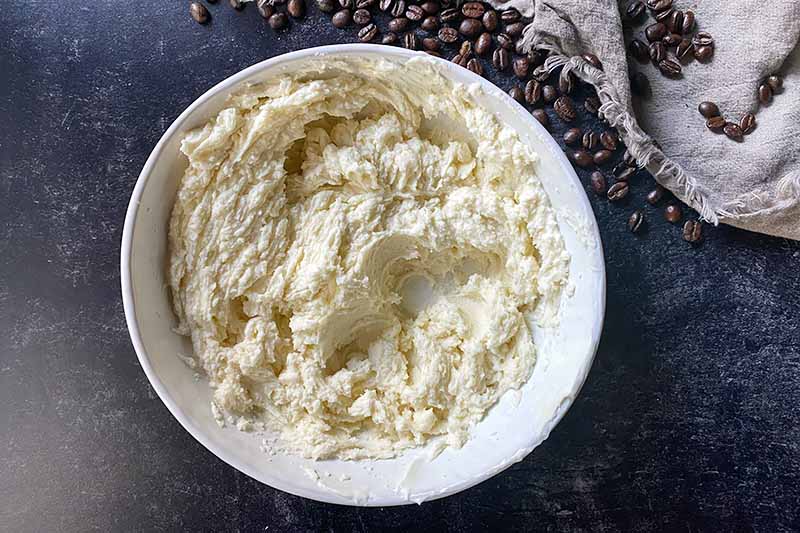
Place the heavy cream and remaining 1/4 cup of sugar in the bowl. Whip them together at high speed until medium peaks form, for about 3 to 5 minutes.
If you’re prone to messes using your stand mixer, you can start at medium speed, then gradually increase the speed when the heavy cream begins to thicken.
You want something sturdier than loose peaks for the sweetened cream, since you’ll need some structure as you combine it with the soft mascarpone cheese. However, you don’t want to overwhip this into very stiff peaks, – an excessively firm structure will be difficult to combine with the mascarpone.
Once you see medium peaks, which come to a point and then slowly fold at the tip, add all of the mascarpone to the bowl.
Continue to whip until the mascarpone is completely incorporated into the whipped cream, and a soft and fluffy mixture forms. This should take about 2 minutes.
Note: The texture of mascarpone cheese can vary widely depending on the brand available to you at the grocery store. Some varieties of this fresh cheese style are thick and grainy, while others are creamy and smooth. The texture of the mascarpone cheese will affect the final outcome of the cream for the tiramisu, but whether the resulting cream is a little grainy or smooth and a little loose, these results are all acceptable and delicious!
Step 4 – Fold the Egg Yolks into the Mascarpone Cream
Using a spatula, gently fold the egg yolk mixture into the mascarpone cream.
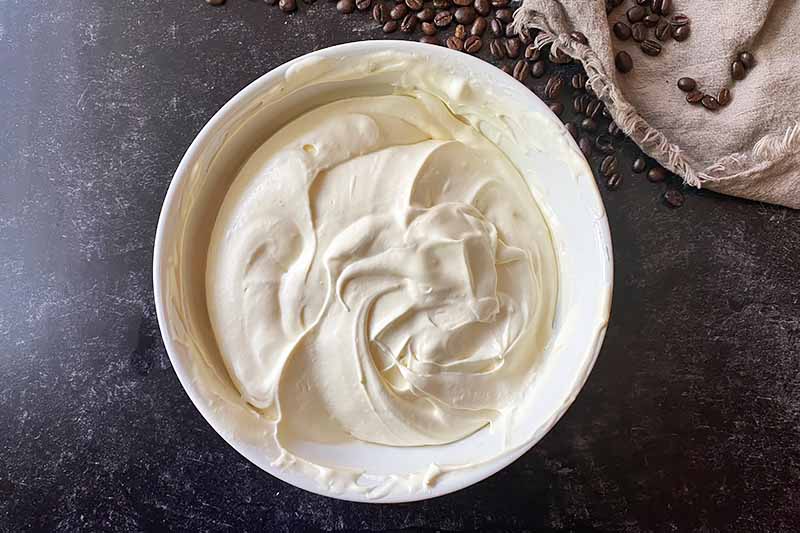
You want the two mixtures to be completely combined without excessively mixing them together. Overmixing may cause the cream to lose its gorgeous volume.
Step 5 – Dip Ladyfingers and Assemble
Before filling the bowls, create a neat assembly line: on the left, place the plate of ladyfinger halves. In the middle, place the bowl containing the coffee and brandy mixture. On the left, place the four dessert bowls in two rows.
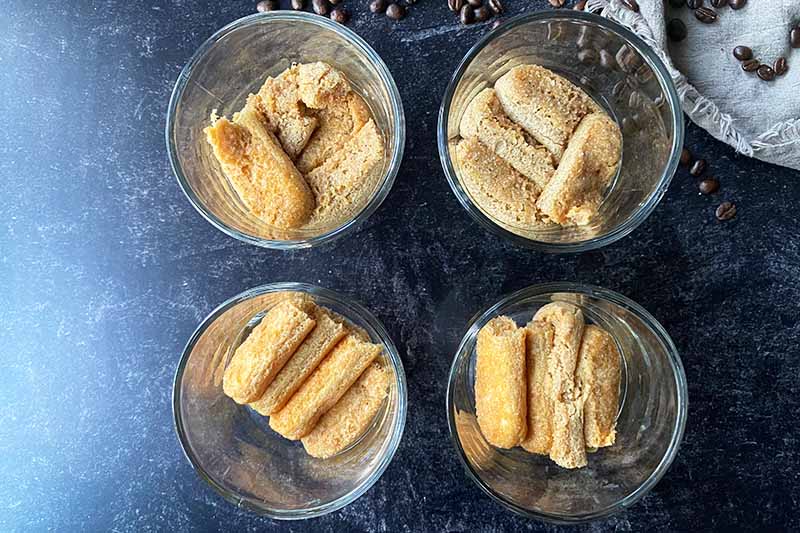
Working with one ladyfinger half at a time, quickly dip each piece into the coffee mixture, making sure to coat it on all sides, and immediately place it in the bottom of a bowl.
Ladyfingers are very delicate and porous, and will fall apart if they are left in the coffee for too long. They just need a super quick dip!
Repeat this process, arranging four pieces in the bottom of each bowl.

Depending on the size of the cookies and your serving bowls, you will need to shingle and press the pieces down slightly as you add them. At this point, the cookies will be soft enough to manipulate and press as needed.
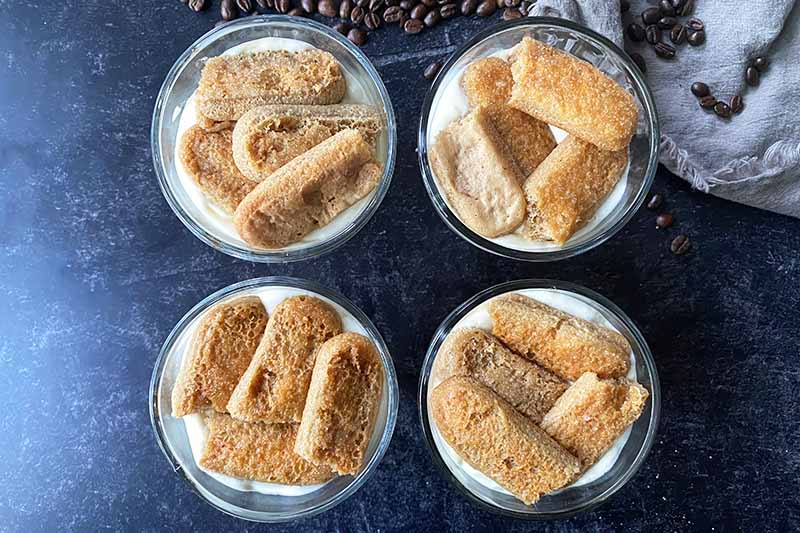
It’s completely fine if the cookie layers are not totally even – they will be covered up by the mascarpone cream.
Using a two-inch cookie scooper, scoop one portion of the cream into each bowl on top of the ladyfingers. Spread the cream in a flat, even layer without aggressively pressing down.
Repeat the dipping and arranging process with the remaining ladyfingers, adding four pieces on top of the first cream layer in each bowl.
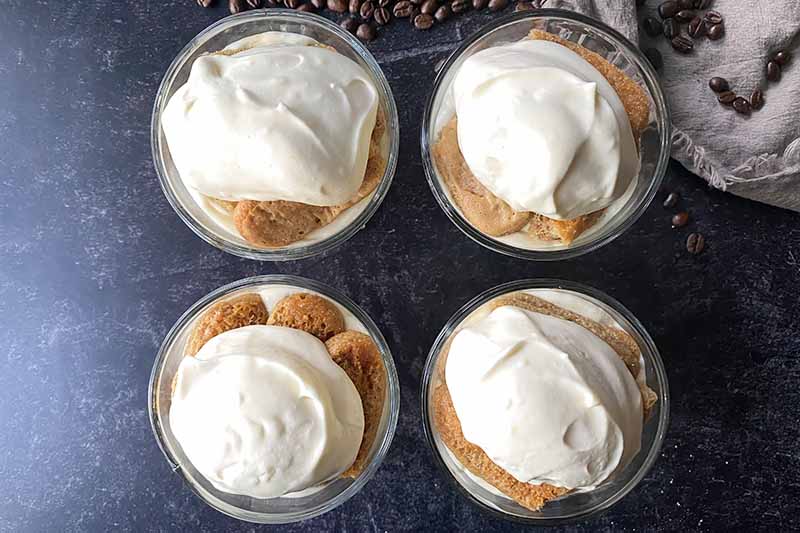
Repeat scooping one portion of the cream on top of the ladyfingers in each bowl. Because this is the final layer that will be displayed, make sure you spread the cream in a neat, even layer.
Step 6 – Cover and Chill
To prevent a thin, dried film from forming on the top of the cream, loosely cover each bowl with plastic wrap without letting the wrap touch the surface.

Transfer the bowls to the refrigerator. You can chill the tiramisu up to 24 hours before serving, or for a minimum of 1 hour.
The mascarpone cream will stiffen slightly and the ladyfingers will continue to absorb the coffee and become softer over time the longer the tiramisu chills.
Step 7 – Dust with Cocoa Powder and Serve
Ready to serve them? Transfer the bowls from the refrigerator to a work surface protected with a baking sheet or large tray.
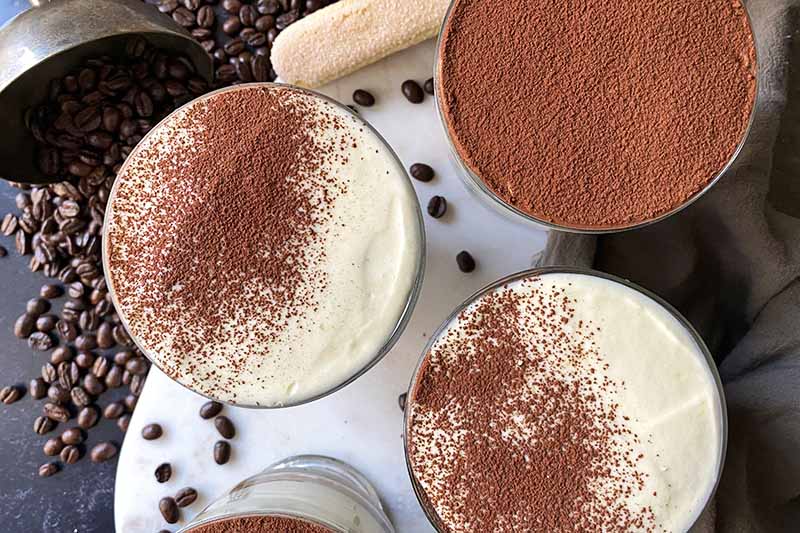
Lightly dust the mascarpone cream on top of each bowl with the cocoa powder, using your fine mesh strainer to create an even dusting.
Serve immediately!
If you dusted the cocoa powder on before chilling, it would partially dissolve into the wet cream and darken in color. It will still taste delightful, but it won’t look too pretty this way.
Waiting until right before serving will keep the cocoa powder light and dry.
Play with the Toppings
Cocoa powder does not have to be the one and only option for a pretty garnish on top of the tiramisu.
If you’re not a fan of the powdery and bitter profile of cocoa powder, you can use finely chopped, shaved, or curled chocolate on top instead.
Choose your favorite darkness for the chocolate: milk, semisweet, bittersweet, or dark will all be delicious alternatives.
If you want something even sweeter, you can also use white chocolate, though it won’t provide any color contrast to the cream on top.
And don’t stop there – let’s go a few steps further with another fun finisher. If you can get your hands on chocolate-covered espresso beans, plop a few on top!
But if none of these options are appealing to you, plain is a perfectly acceptable way to go.
What is your preferred dessert strategy when you’re planning a dinner party: homemade or store-bought? Do you have any tips or tricks for making the dessert course a breeze? Leave a comment below.
Oh, excellent eggs! They are an essential ingredient in a wide variety of desserts and baked goods. For more ideas that rely on the amazing fat and protein content of egg yolks, save these recipes now:
Photos by Nikki Cervone, © Ask the Experts, LLC. ALL RIGHTS RESERVED. See our TOS for more details. Originally published on November 17, 2014. Last updated on September 12, 2022.
Nutritional information derived from a database of known generic and branded foods and ingredients and was not compiled by a registered dietitian or submitted for lab testing. It should be viewed as an approximation.
About Nikki Cervone
Nikki Cervone is an ACS Certified Cheese Professional and cheesemonger living in Pittsburgh. Nikki holds an AAS in baking/pastry from Westmoreland County Community College, a BA in Communications from Duquesne University, and an MLA in Gastronomy from Boston University. When she's not nibbling on her favorite cheeses or testing a batch of cupcakes, Nikki enjoys a healthy dose of yoga, wine, hiking, singing in the shower, and chocolate. Lots of chocolate.