Try saying “pretty plump plums” five times in a row. Go on, I dare you.

It’s tough to do – what a crazy tongue-twister!
But try eating a delicious homemade galette filled with pretty plump plums, and you’ll experience an entirely different outcome.
You won’t have any trouble scarfing down a slice.
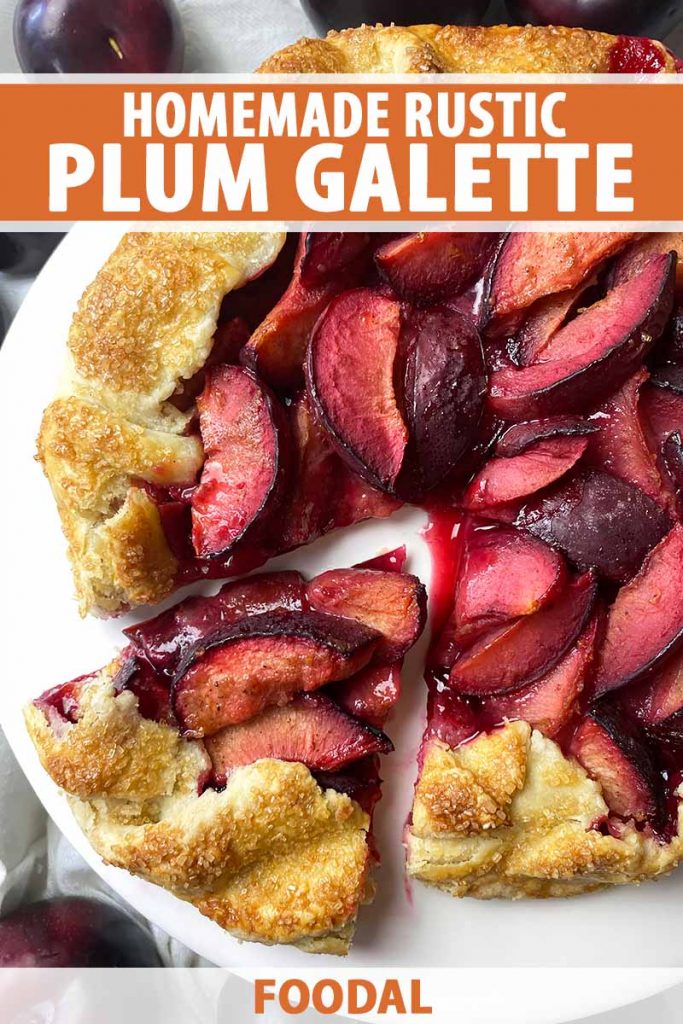
If you’re in need of a no-frills dessert, one that’s both easy to prep and a delight to enjoy, then you should try this simple and rustic homemade plum galette.
With a brazen attitude that tosses away the coquettish modesty of a pie fully covered by a top crust, perhaps only with a slit or two on top to taunt and tantalize, galettes are bold, shameless, and uninhibited with regard to their chosen fillings.
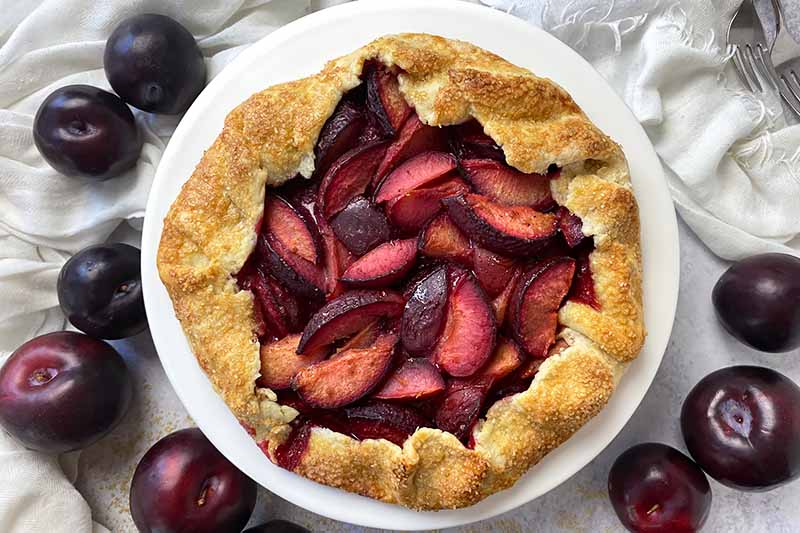
Tender, buttery dough only partially envelops juicy stone fruit in this tasty pastry – you’ll still be able to see a lovely little pile of gorgeously hued plums in the very center when you bring it out to the table.
Happily bubbling away when it’s pulled hot from the oven, you’ll be hypnotized by the scent of ground cinnamon and nutmeg mixed with the plums.
You can achieve the boldest and freshest aromas from whole warming spices by grinding them yourself, using a microplane or the finest side of a box grater.
The succulent plums aren’t the only part of this dessert that will capture your attention – the flaky crust is more than just a simple vessel to display the beauty that lies within it.
A few drops of almond extract mixed into the dough offer a subtle scent of sweet nuttiness, and turbinado sugar sprinkled on the egg-washed edges will create a caramelized crunchy crust as the galette bakes.
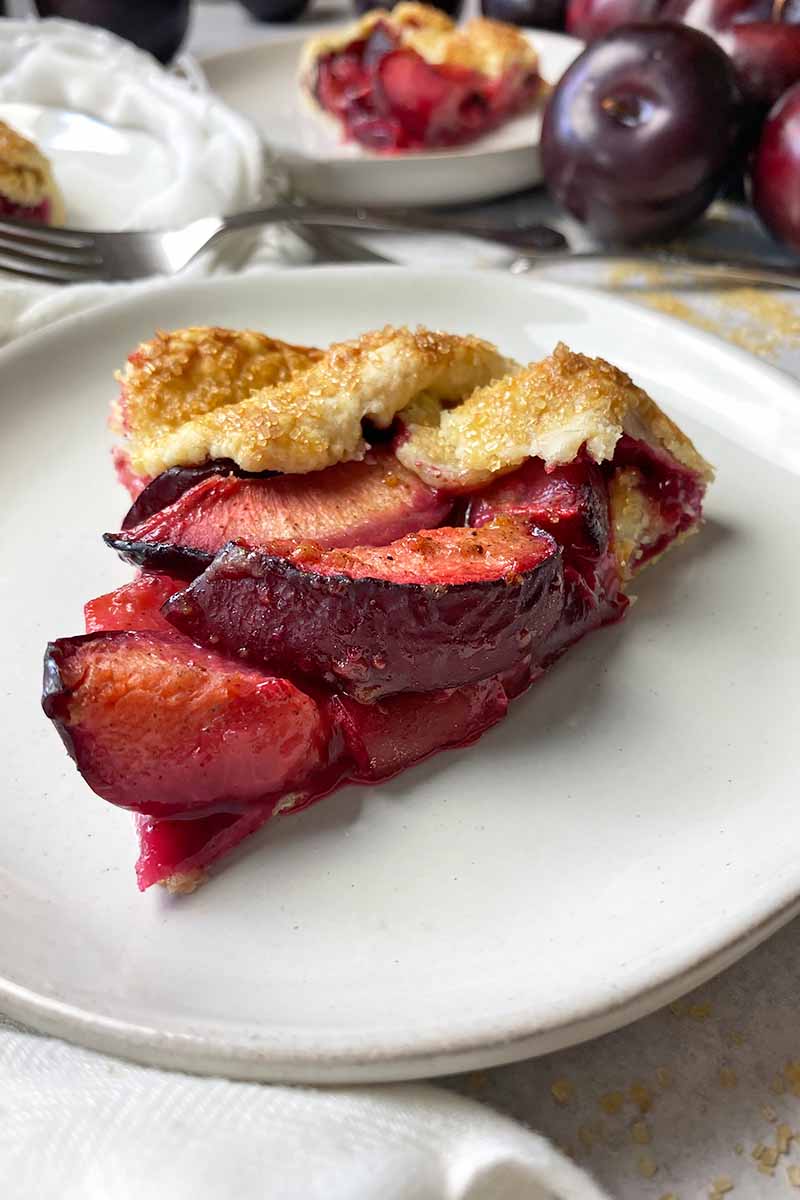
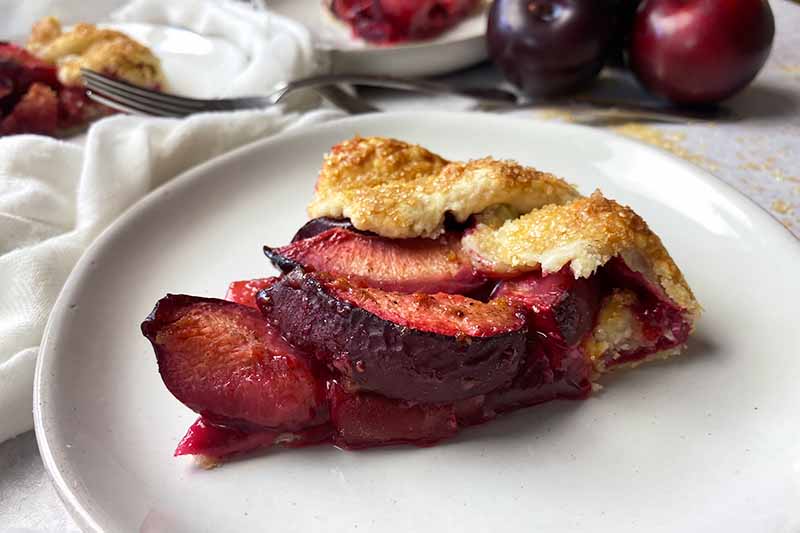
There’s little work involved in the final presentation: just serve the galette sliced into wedges, maybe with a scoop or two of homemade vanilla ice cream, and you are moments away from taking a big bite of pure plum paradise.
That’s another tongue-twister you don’t need to say.
Print
Rustic Plum Galette
- Total Time: 2 hours, 15 minutes
- Yield: 1 galette (6 to 8 servings) 1x
Description
Our rustic plum galette is a no-frills dessert featuring juicy, tender stone fruit in a flaky and buttery crust.
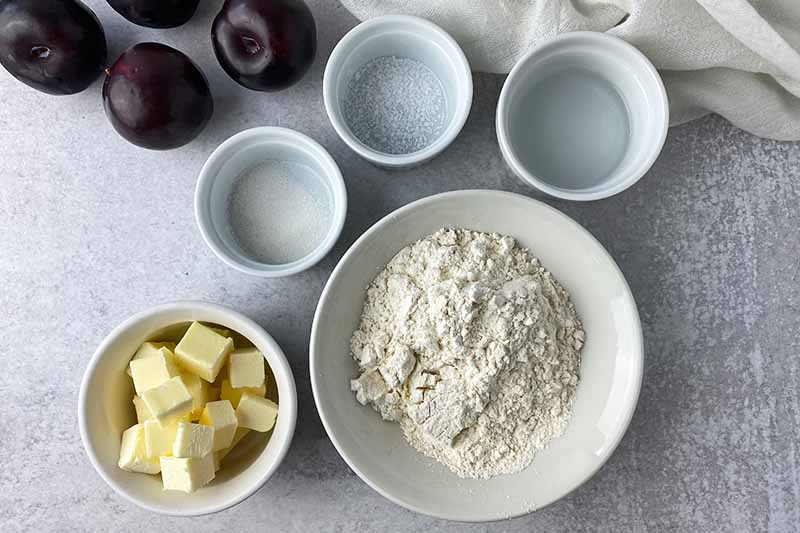
Ingredients
For the Dough:
- 1 cup all-purpose flour, plus more for dusting
- 1 teaspoon granulated sugar
- 1/4 teaspoon salt
- 6 tablespoons (3/4 stick) unsalted butter, cold and cubed
- 3 tablespoons cold water
- 1/4 teaspoon almond extract
For the Plum Filling:
- 6–8 ripe plums (about 1 1/2 pounds)
- 1/2 tablespoon all-purpose flour
- 1 tablespoon granulated sugar
- 1/2 teaspoon lemon zest
- 1/4 teaspoon ground nutmeg
- 1/4 teaspoon ground cinnamon
For Assembling:
- 1 large egg
- 1 tablespoon cold water
- 1/8 cup turbinado sugar
Instructions
To Make the Dough:
- In a large bowl, whisk together the flour, sugar, and salt. Using a pastry cutter, cut the cold butter cubes into the flour mixture until the butter pieces are pea-size and coated entirely in flour.
- In a small bowl, whisk together the almond extract and cold water. Knead the liquid one tablespoon at a time into the flour-butter mixture with your hands until a thick and cohesive dough just begins to form.
- Form the dough into a flat disc. Cover the disc completely in plastic wrap, and chill for at least 45 minutes in the refrigerator.
To Assemble and Bake:
- Preheat the oven to 375°F. Line a baking sheet with parchment paper or a silicone mat and set aside.
- Remove the dough from the fridge and let it sit at room temperature for about 10 minutes.
- Slice each plum into 8 pieces, discarding the pits, and transfer to a large bowl. Sprinkle the flour, sugar, lemon zest, and spices over the plums and gently toss together until the plums are evenly coated. Set aside.
- Remove the dough from the plastic wrap and place on a lightly floured work surface. Dust the top of the dough with flour. Using a rolling pin, roll and flatten the dough into a circular shape about 12 inches in diameter and 1/8 inch thick. Carefully transfer the dough to the prepared baking sheet.
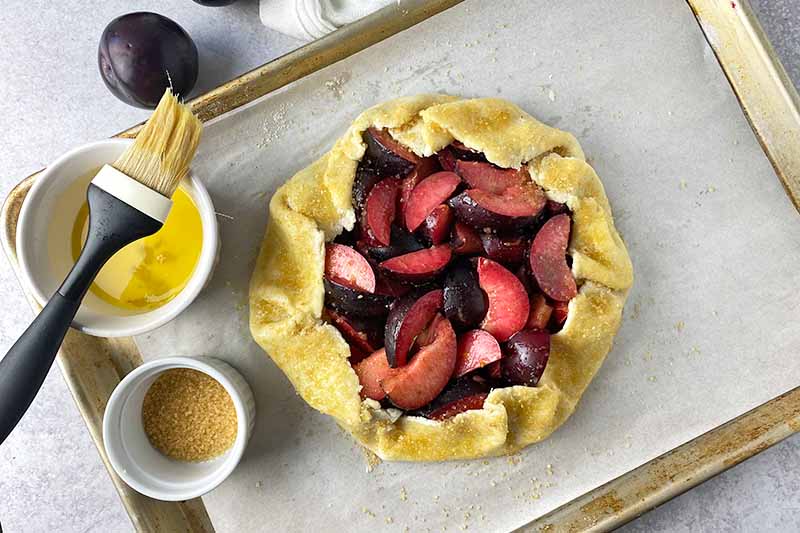
- Arrange the plums in a pile in the center of the dough, leaving about 2 inches of space around the edges. Fold the edges toward the center, pleating them around the plum filling.
- Whisk together the egg and 1 tablespoon cold water. Brush the crust with the egg wash and lightly sprinkle with turbinado sugar.
- Immediately transfer the baking sheet to the oven. Bake for 40-45 minutes, rotating the baking sheet halfway through, until the fruit starts bubbling and the dough turns golden brown.
- Remove from the oven. Cool the galette on the baking sheet for about 5 minutes. Serve while still warm, or transfer to a cooling rack to cool completely and serve at room temperature. Store any leftovers in an airtight container in the refrigerator or at room temperature for up to 3 days.
- Prep Time: 40 minutes
- Cook Time: 45 minutes
- Category: Galette
- Cuisine: Pastry
Cooking by the Numbers…
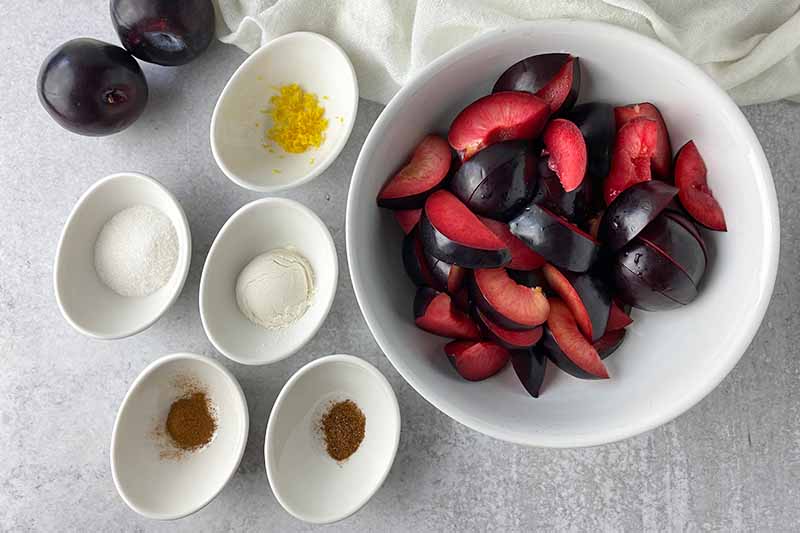
Step 1 – Measure and Prep Dough Ingredients
For the dough, measure out the all-purpose flour, granulated sugar, salt, cold water, and almond extract. Keep some additional flour on hand for dusting when you’re rolling out the dough.
Once measured, put the water in the refrigerator until ready to use to keep it cold.
Cube the 6 tablespoons of unsalted butter and place in a bowl. Don’t let the butter sit out at room temperature for too long!
For the flakiest pastry, the butter needs to remain cold. If the butter seems soft after cutting, place the bowl in the refrigerator for 15 to 20 minutes to chill.
Uh-oh – is someone allergic to almonds? In a pinch, you can easily replace the almond extract with an equal amount of vanilla extract.
Because the dough will need to chill in the refrigerator for at least 45 minutes, wait to prep the fruit until just before you need it.
Step 2 – Make the Dough
Whisk together the flour, sugar, and salt in a large and sturdy bowl.
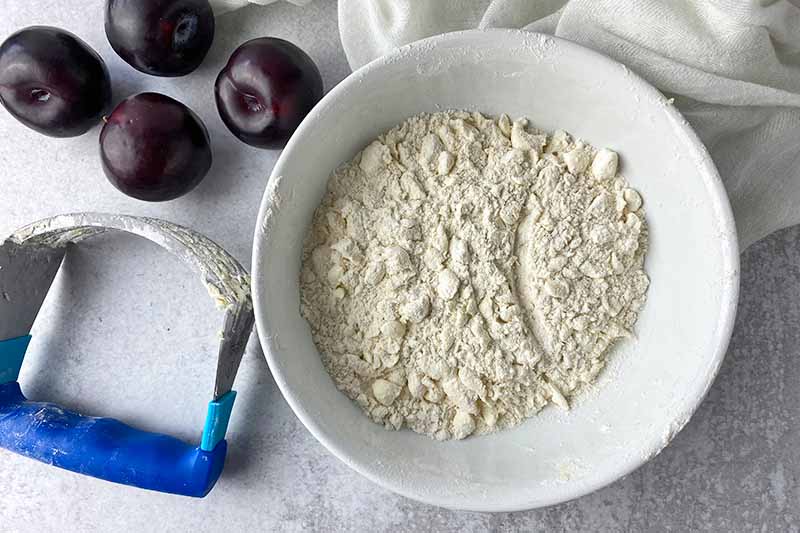
Cut the cold butter cubes into the flour mixture with a pastry cutter or two butter knives until the pieces are roughly pea-size and are coated entirely in flour.
Whisk together the almond extract and cold water in a separate small bowl.
Adding the liquid mixture one tablespoon at a time, knead the liquid into the butter mixture with your hands until a thick and cohesive dough just begins to form.
If the dough feels too dry and crumbly, continue adding more liquid a tablespoon at a time.
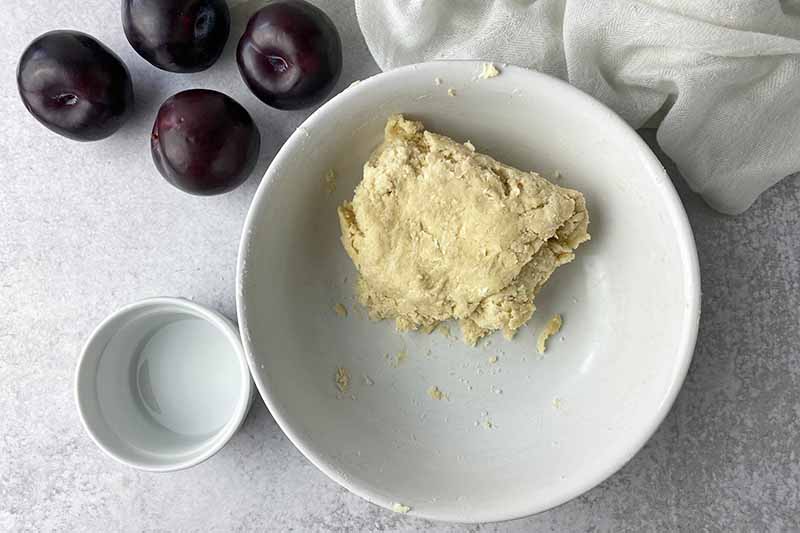
Do not overmix, or else the dough will become tough and chewy after baking.
Form the dough into a flat disc, dusting your hands, the dough, and your work surface lightly with flour as necessary to prevent sticking. Cover the disc completely and tightly in plastic wrap, and chill for at least 45 minutes in the refrigerator.
If you are planning ahead, you can make and chill the disc of dough for up to 2 days in the refrigerator before moving on to the following steps, or it can be frozen and defrosted for later use, sealed in an air-tight zip-top bag.
Step 3 – Prep the Fruit Filling
When you’re ready to bake the galette, remove the dough from the fridge and let it soften at room temperature for 10 to 15 minutes. The dough will be too stiff if you try to roll it cold from the fridge.
As the dough is coming to temperature, prep the oven and the plums.
Preheat the oven to 375°F and position the rack in the center. Line a rimmed baking sheet with parchment paper or a silicone mat. Set aside.
With a sharp knife and sturdy cutting board, slice each plum into eight wedges and place them in a large bowl. You want to keep the skins on, but discard any pits.
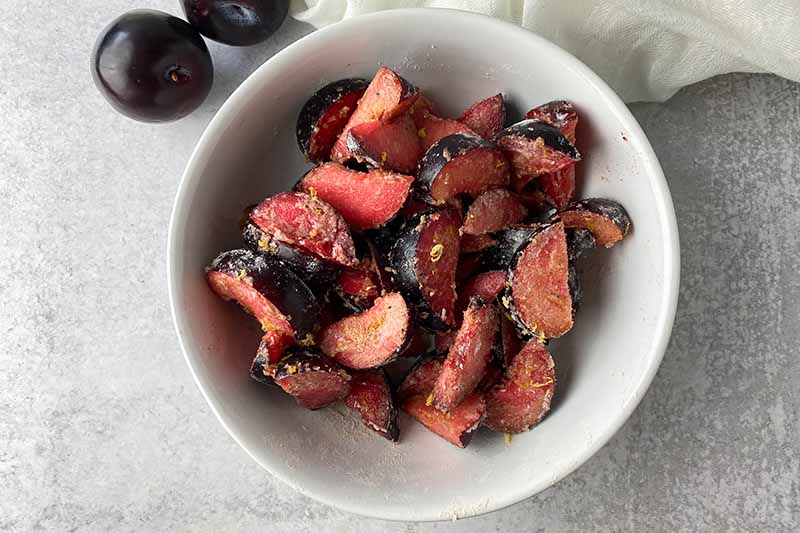
Zest the lemon and measure out the granulated sugar, all-purpose flour, ground nutmeg, and ground cinnamon. Sprinkle these ingredients over the prepped fruit and stir to combine until the plums are evenly coated.
Whisk together one egg and a tablespoon of water in a separate small bowl. Measure out 1 tablespoon of turbinado sugar. Set both aside.
Step 4 – Roll out the Dough
Lightly dust a clean and flat work surface with flour. Remove the plastic wrap from the dough and sprinkle the top with more flour. Keep a bowl of flour close to you on your work surface if needed for additional dusting.
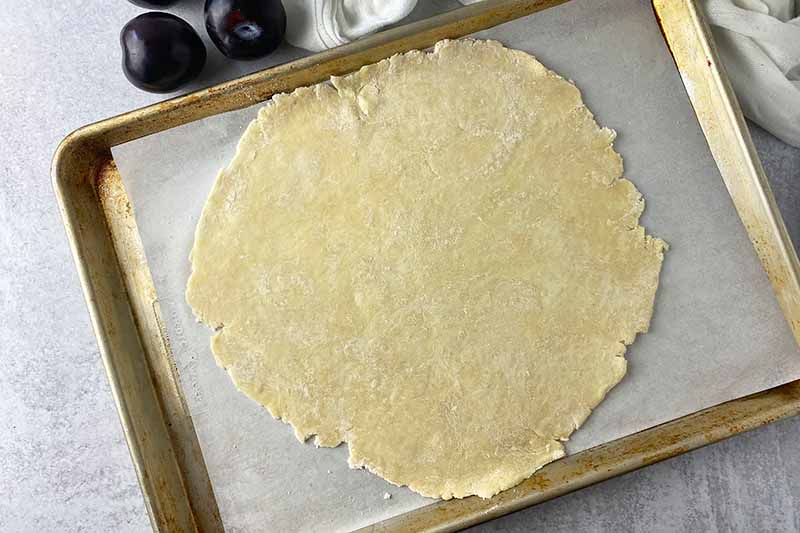
Using a rolling pin, roll out the dough into a circle until it is about 1/8 inch thick and has about a 12-inch diameter. Continue dusting the dough and work surface lightly with flour to prevent sticking, as needed.
For a cleaner presentation, you can trim any ragged edges of the dough with a knife.
Carefully transfer the dough to the prepared baking sheet, placing it in the middle of the sheet.
For an easy method to transfer the dough, gently fold it in half and quickly place it on the baking sheet. Unfold and reposition it as needed.
Step 5 – Arrange the Fruit
Transfer the spiced plums from the bowl onto the dough, arranging them in a pile in the center.
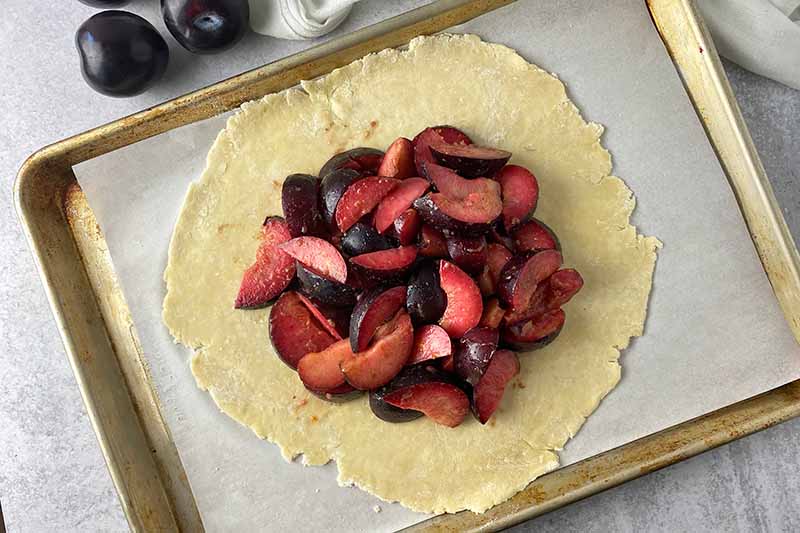
You can arrange the sliced fruit however you would like, either in a rustic pile or shingled neatly in rows or concentric circles.
Leave about 2 inches of space around the edges – this is what we’ll use to create the galette’s crust.
Step 6 – Create the Pleated Crust
Fold the edges of the dough up and inwards slightly over the filling, pleating each section of dough that you’re holding between your fingers as you gently fold it.

There will still be a large space in the center filled with fruit that will not be covered by any dough. The dough should hold its shape around the perimeter, to keep the filling in place as it bakes.
Step 7 – Brush, Sprinkle with Sugar, and Bake
Brush the crust with a thin layer of the egg wash using a pastry brush. Sprinkle the crust with the turbinado sugar.
Immediately transfer the baking sheet to the oven – you do not want the butter to soften any further, as this may cause the dough to spread and lose its shape when baked.
If the dough seems very soft after you have formed the galette, you can place the baking sheet in the refrigerator for 10 to 15 minutes. This will be enough time for the butter in the dough to chill and re-harden before you place it in the oven.
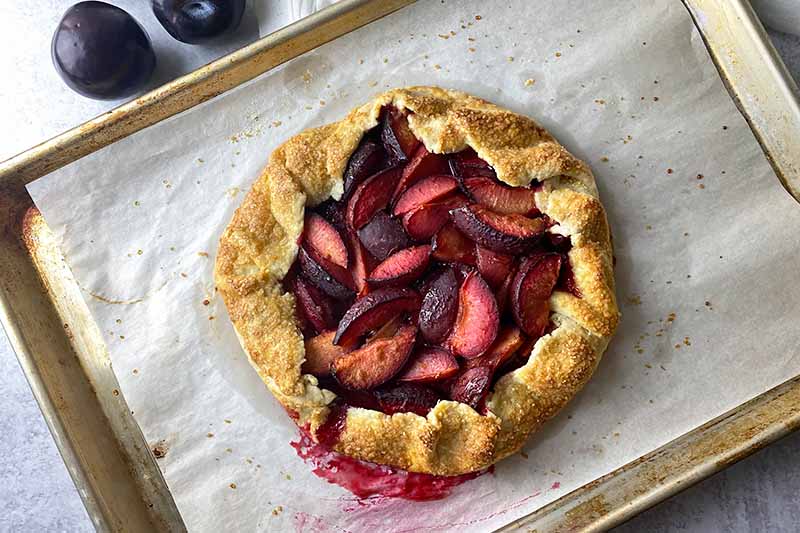
Bake the galette for 40 to 45 minutes, until the fruit filling is bubbling and the dough turns golden brown. Rotate the baking sheet halfway through to ensure the galette bakes evenly.
Step 8 – Cool and Serve
Remove the baking sheet from the oven. Allow the galette to cool on the baking sheet for about 5 minutes before transferring to a serving platter. Slice into wedges like a pie and serve warm.
You can also serve the galette at room temperature. After the galette has cooled for 5 minutes on the baking sheet, carefully transfer it to a cooling rack to cool completely, for about another 30 minutes.
Leftovers can be stored in an airtight container either at room temperature or in the refrigerator for up to 3 days. If storing at room temperature, be sure the room in which it will be stored is not excessively humid or hot – if so, the galette should be stored in the refrigerator.
Pretty Plump Plums
I have always admired pretty plump plums ever since childhood, beginning with the colorful illustrations in books and lively scenes in movies that have stayed fresh and bright in my memory:
Seeing three dark purple oblong plums the Very Hungry Caterpillar ate made me yearn for a bite of a freshly picked fruit, and watching Thumbelina jump out of a homemade pie filled with juicy halves of the delicious drupes almost caused me to lick my television screen.
So with these memories still clear and vibrant in my mind, I am happy to pay homage to this glorious fruit in my own way – sliced and baked to tender perfection in a sweet and buttery galette!
Choose plums that are in season and ripe, and count your blessings if there are a few different varieties available for you to buy at your local grocery store or farmers market!
Gathering a few different types to use in this dessert will yield an array of shades displayed in the center of the pastry – a beautiful assortment of colors like pale yellow, light pink, and crimson red will take the eater’s breath away!
How do you like to use plums in desserts? Tell us about your favorite recipe in the comment section below!
And we’ll return the favor by sharing even more recipes featuring another important ingredient that brings warmth and joy to so many baked goods, including this one: cinnamon! Try these next when you’re ready to bake another fruity treat:
- Cinnamon Apple Tart Cake
- Vegan Banana Bread with Cinnamon and Garam Masala
- Cinnamon Ricotta Pear Stacks
Photos by Nikki Cervone, © Ask the Experts, LLC. ALL RIGHTS RESERVED. See our TOS for more details. Originally published on November 8, 2014. Last updated on September 2, 2022.
Nutritional information derived from a database of known generic and branded foods and ingredients and was not compiled by a registered dietitian or submitted for lab testing. It should be viewed as an approximation.
About Nikki Cervone
Nikki Cervone is an ACS Certified Cheese Professional and cheesemonger living in Pittsburgh. Nikki holds an AAS in baking/pastry from Westmoreland County Community College, a BA in Communications from Duquesne University, and an MLA in Gastronomy from Boston University. When she's not nibbling on her favorite cheeses or testing a batch of cupcakes, Nikki enjoys a healthy dose of yoga, wine, hiking, singing in the shower, and chocolate. Lots of chocolate.

Fruit galettes are the prettiest desert, I think! It’s also one of my faves. I have never made a plum one before. I’m going to try this recipe over thanksgiving. I hope it turns out as good looking as yours 🙂 Can’t wait to share it!
Well, hello plum GALETTE. May I vote BEFORE I make this? To the best of my recollection, I’ve never heard of galettes, plum or otherwise, before this. Surely I would have remembered something like this had I seen it before.
This plum galette is certainly out of the ordinary (like your family felt at first), but this is such a beautiful looking dessert that I will have to try to make this. I wish I had some right now so that I could have some with the coffee that I am currently drinking. I don’t have all the ingredients to make this right now, but this recipe is definitely on my cooking to-do list.
I’m a bit on the fence about this one, but I would be fully cooperative to give it a try. I haven’t ate anything of this nature before with the type of ingredients in it such as plum. Sure, I’ve ate plum on it’s own but never considered eating it in a pie. Time to go and try making this hidden secret known as a plum galette.
This looks very yummy 🙂 If I made that for my Dad and his two brothers, they’d think they were in heaven – they all love anything to do with plums!
I have never indulged in a galette before but by golly it sure does look delicious, this is a wonderful alternative over all the confectionery out there that makes the kids and ‘sweet tooth like me’ go crazy out there!….a complete hands on recipe…why not try it out?! {rhetoric question} 😉
I love plums, and the picture makes this really tempting to try. I also had no idea what tubinado sugar was up until now. I’ll have to try to find some, though if I can’t, I wonder if brown sugar would function as a substitute? Turbinado sugar seems to have the same qualities as brown sugar does, but I could be wrong. I’m also not surprised that this dessert is from French cuisine. France definitely makes some of the best pastries in the world. 🙂
Just given the image alone I would love to live on half of one of these guys for breakfast for the rest of my life. Sadly, I’d need my plums to be in season & that would ruin my dream. Only alteration I would suggest is to mention using fresh nutmeg. Nothing better.
Haha, Little Jack Horner, I remember that! I’ve never had plum in a pie before either. I’d love to try this galette, it looks like a perfect sweater-weather dessert. I wouldn’t be at all surprised if it became my favorite way to eat plums.
It’s refreshing to see someone making a dessert with plums. I love the rustic look of the turbinado sugar on the crust. Galettes are a welcome change to more involved pastries, especially on weeknights, when most of us have very little time to prepare a meal and dessert. I’m looking forward to tasting the mixture of plums, lemon zest, almond extract, cinnamon and nutmeg in this recipe, it sounds like a delightful combination.
Well I have to say that this one is new to me in a lot of different ways. First off, I have not had a lot of plums in my day, so that intrigues me right off the bat. Second, I am not sure I have ever had a galette, so you have that. Then, it is not really new to me, but anytime I have seen “rustic” as a descriptor in food it has turned out delicious, so this seems right up my alley. I like the size of the thing too, and it seems perfect for summer snacking. Thank you for sharing this.