
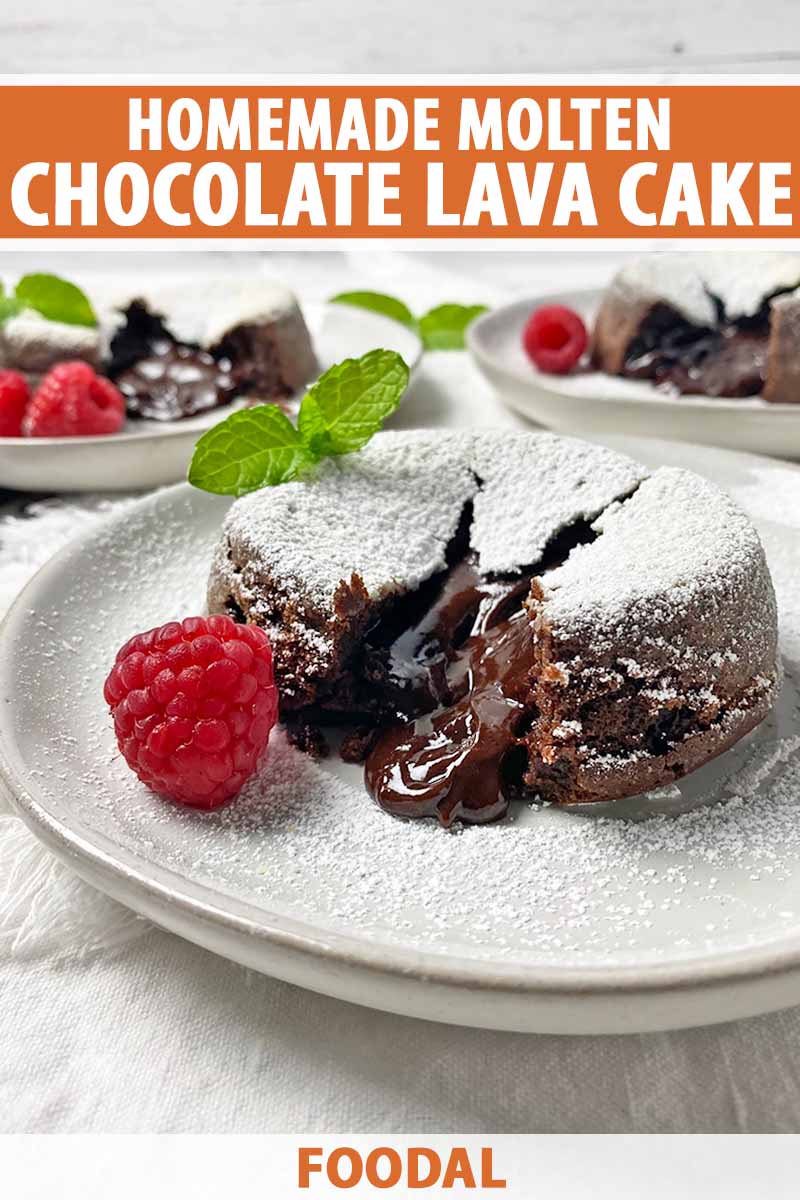
If you have a huge crush on chocolate like I do, you should absolutely learn how to bake your own homemade molten lava cake!
We all know the profile of this iconic restaurant classic:
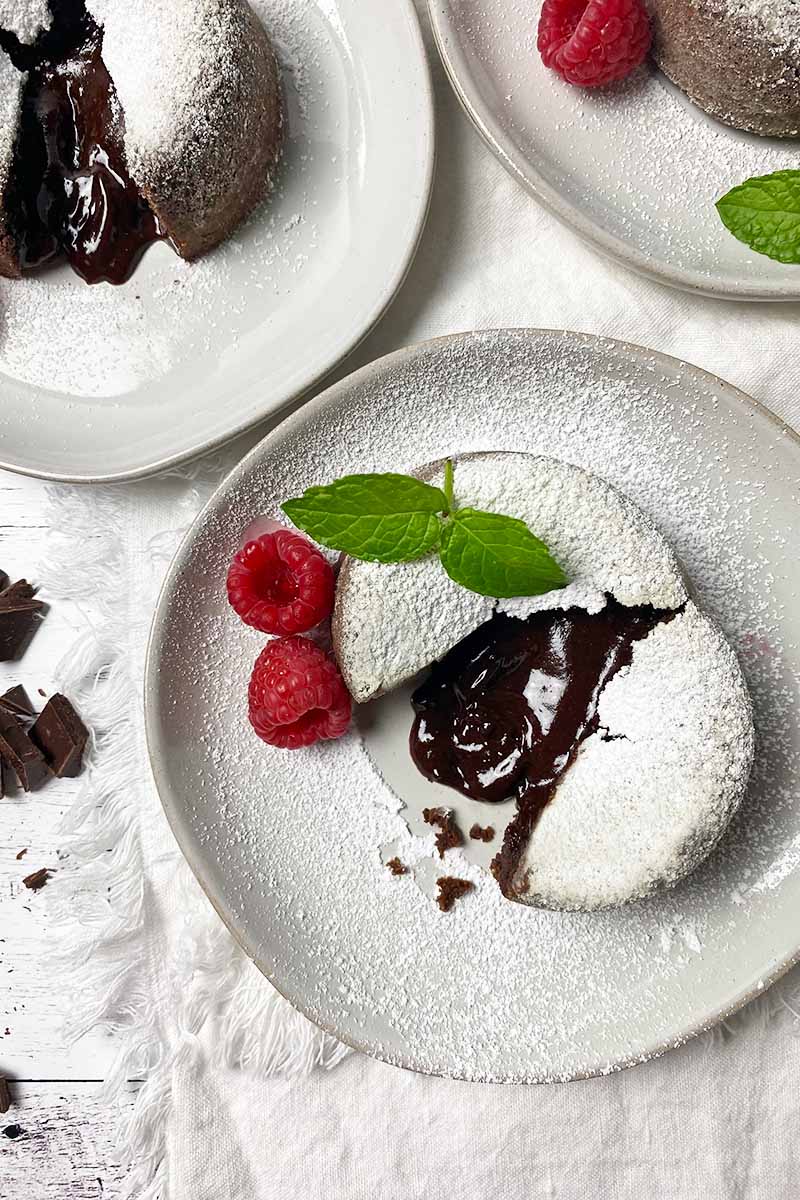
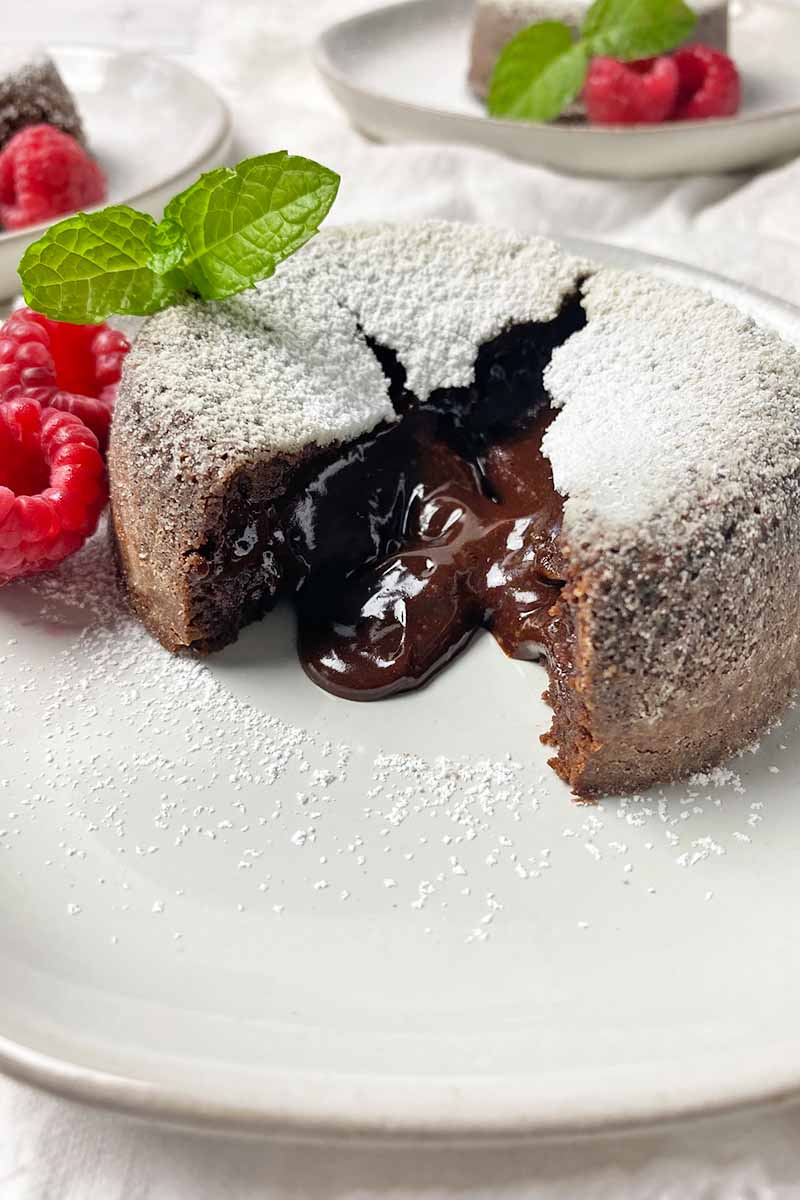
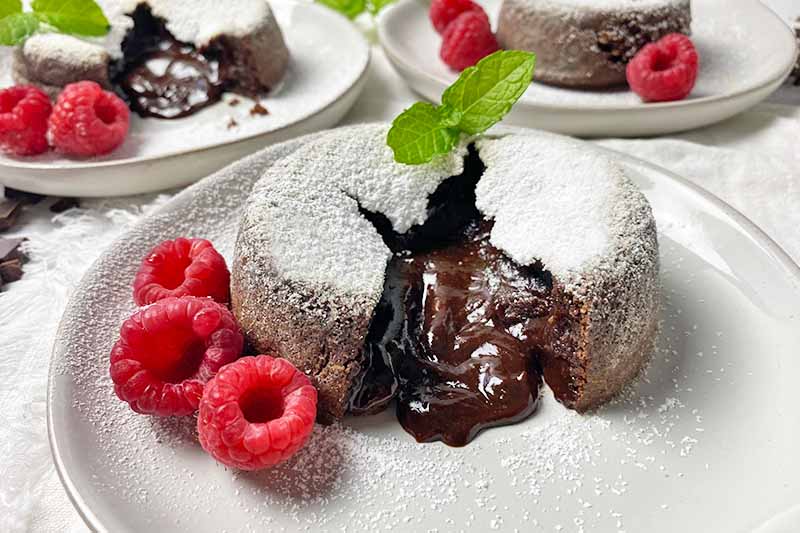
Served warm, it’s a chocolate dessert with a soft and tender, cakey exterior. As soon as you cut into it, this delicate shell quickly releases a seductively flowing, gorgeously gooey, lava-like core.
There really are no wild “I’ve-been-mastering-this-craft-for-years” pastry chef skills required to make this dessert – you can easily take the recipe from your favorite restaurant to your own home kitchen.
As long as you can handle a few basic prep techniques, you’ll be rewarded with a beautifully baked dessert.
And you can trust me – my friends and I would make lava cakes when we were in middle school!
Imagine a few prepubescent tweens chatting about “Gilmore Girls,” gossiping about what happened last weekend at the 7th grade school dance, and complaining about math homework while savoring spoonfuls of a glorious dessert we baked from scratch!
Like, whoa. Literally insane.
And if you’re still a little nervous – don’t worry, I won’t be sending notes to my classmates making fun of you in 5th-period study hall – we have tips and advice for you to review every step of the way in our Cooking by the Numbers section of the article below.
Don’t really know how to grease a ramekin? I’ll teach you how.
Need a refresher on properly melting chocolate? I got you.
Afraid to invert a hot cake onto a serving plate? You’re in good hands.
If a giggling group of teenyboppers who still need Mom and Dad to drive them to the mall and movies can make a rich and indulgent chocolate cake, you can too.
Print
Molten Chocolate Lava Cake
- Total Time: 30 minutes
- Yield: 4 servings 1x
Description
With a tender, cakey exterior and a gooey, flowing center, chocolate lava cake is an indulgent dessert that can satisfy your strongest cravings.
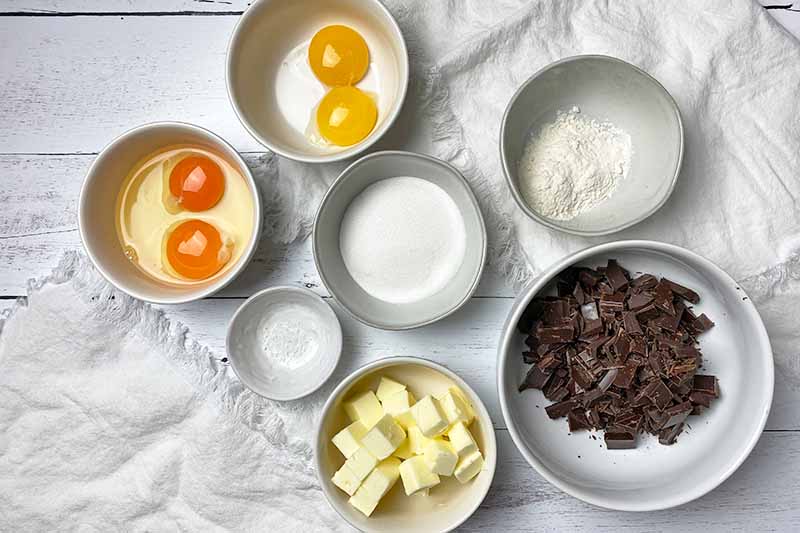
Ingredients
- 1/2 cup (4 ounces) room temperature unsalted butter, cubed, plus more for greasing
- 6 ounces bittersweet chocolate (60-75% cocoa), coarsely chopped
- 2 large eggs, room temperature
- 2 large egg yolks, room temperature
- 1/3 cup granulated sugar
- 1/8 teaspoon coarse kosher salt
- 1/8 cup all-purpose flour, plus more for coating
- Powdered sugar, vanilla ice cream, or whipped cream, for serving (optional)
Instructions
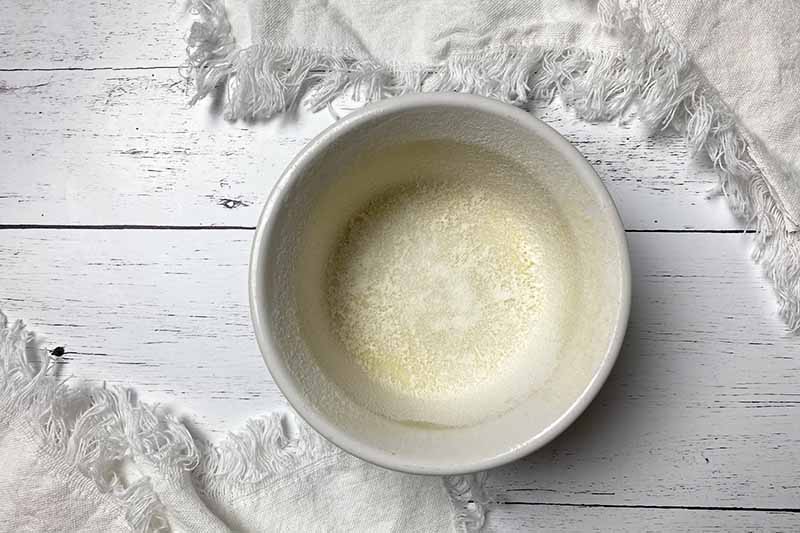
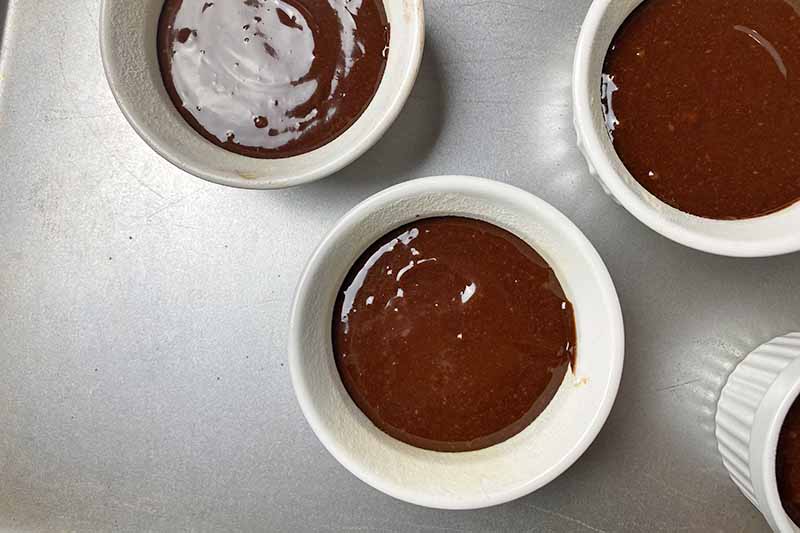
- Preheat the oven to 450°F. Lightly grease 4 6-ounce ramekins with butter. Lightly dust with flour, and tap out any excess. Place the ramekins on a rimmed baking sheet.
- Prepare a double boiler. Fill a medium pot a third of the way full with water and place on the stovetop over low heat. When the water begins to gently simmer and steam, place the chocolate and butter in a heatproof bowl and set over the pot, ensuring the bottom of the bowl does not make contact with the water.
- Heat the chocolate and butter, stirring continuously, until they are completely melted and a smooth mixture forms, about 2-5 minutes. Remove the bowl from the pot and set aside.
- In a large bowl, vigorously whisk together the whole eggs, egg yolks, sugar, and salt until slightly thickened and pale, about 2-3 minutes.
- Gently whisk the chocolate mixture into the egg mixture until just incorporated. Then, whisk in the flour until just incorporated. Do not overmix.
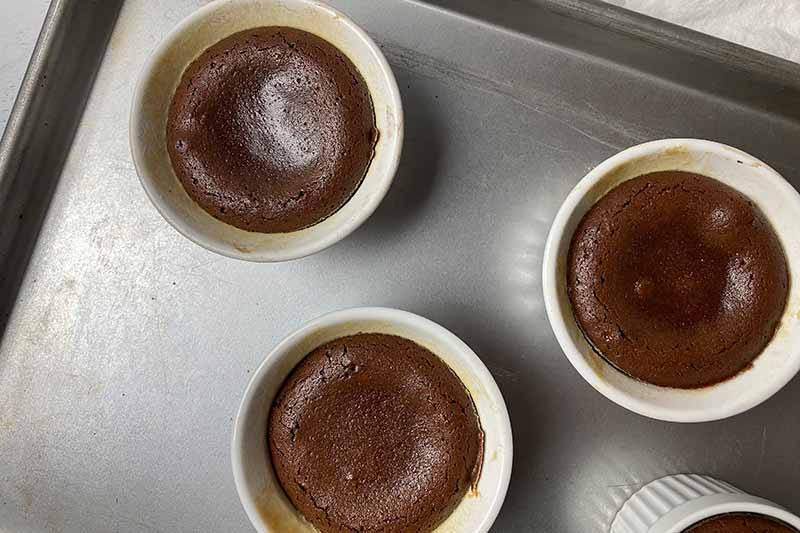
- Spoon the batter evenly into the prepared ramekins. Use the back of the spoon to smooth the tops. Transfer the baking sheet to the oven and bake for 10-12 minutes, or until the sides of the cakes look firm but the centers are still soft.
- Remove the baking sheet from the oven. Allow the ramekins to cool on the baking sheet for 1-2 minutes.
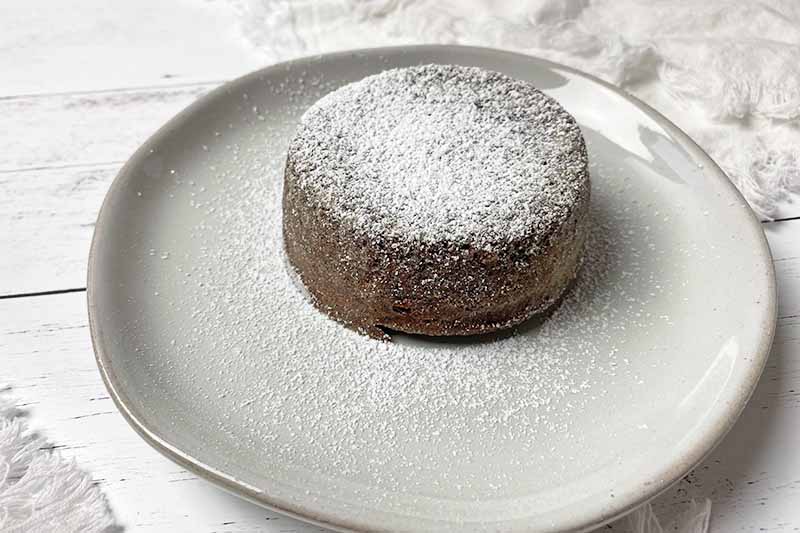
- Working quickly, cover the top of one ramekin with a small dessert plate and quickly invert the ramekin onto the plate, using a kitchen towel or oven mitt to protect your hand. The cake should release easily from the ramekin. Repeat with the remaining cakes.
- Serve immediately while still hot with your preferred toppings. Cut into the middle of the cake to reveal the molten center!
- Prep Time: 15 minutes
- Cook Time: 15 minutes
- Category: Cake
- Method: Baking
- Cuisine: Dessert
Keywords: molten, lava, chocolate, cake
Cooking by the Numbers…
Step 1 – Prep
Preheat the oven to 450°F. Position a rack in the very center of the oven for the most even baking.
Prepare a double boiler – it can heat up as you continue your prep work. Fill a medium pot about a third of the way full with water and place it on the stovetop over low heat. Keep the water at a very gentle simmer.
Choose a heatproof bowl that fits on top of the pot without touching the water underneath.
Lightly grease four 6-ounce ramekins with butter. You just need a thin layer of butter – but make sure you cover the more difficult spots inside the ramekin, like along the inner circumference where the bottom meets the side.
It’s easy for the cake to stick if you miss these crevices!
You can also use a nonstick cooking spray for this step, but the flour tends to clump with this application, and I like the extra, subtle flavor the butter provides on the exterior of the cake.
Fill one ramekin with about a tablespoon of flour. Roll the flour around the interior of the ramekin, ensuring the flour lightly coats the bottom and the sides.
Pour and pat out the remaining flour into another ramekin. Repeat this coating step with the remaining three ramekins. Dispose of any excess flour.
Just like the butter, you only need a thin coating of flour to prevent the cake from sticking. You don’t want to use too much flour, or else you’ll see an unnecessary white coating all over the exterior when you release it from the ramekin.
Place the greased and coated ramekins on a rimmed baking sheet and set aside.
For the batter, measure out the granulated sugar, salt, and flour.
Weigh the chocolate. Using a sturdy cutting board and sharp knife, coarsely chop it. Small pieces of chocolate will melt more quickly than large squares.
Use the same cutting board and knife to cube the butter. It’s the same philosophy here – small pieces of butter will melt more readily. It will also melt more quickly if you use butter that is at room temperature.
Crack two eggs into a large bowl. Separate the yolks from the whites. Save the whites for another recipe, like for macaroons or fluffy Belgian waffles.
Crack two more eggs into the same bowl. And always check and remove any shell fragments!
I also recommend using room temperature eggs. The batter will come together more readily if they are at room temperature rather than cold.
Step 2 – Melt Chocolate and Butter
Transfer the chocolate and butter into the heatproof bowl and place over the simmering pot of water.
Use a spatula to continually stir the chocolate and butter, allowing them to evenly melt and mix together.
Once the ingredients are completely melted and a smooth mixture has formed, which will take about two to five minutes, immediately remove the bowl from the pot and set it aside to cool slightly as you move forward. Be sure to use a potholder – the bowl will be hot!
Don’t let this mixture sit over the hot pot for longer than necessary, as you may cause it to seize! If that happens, we have solutions to save your seized chocolate.
Step 3 – Whisk Eggs, Sugar, and Salt
Pour the sugar and salt into the bowl with the eggs. Vigorously whisk the ingredients together until a light and slightly thickened mixture forms. This will take about two to three minutes by hand.
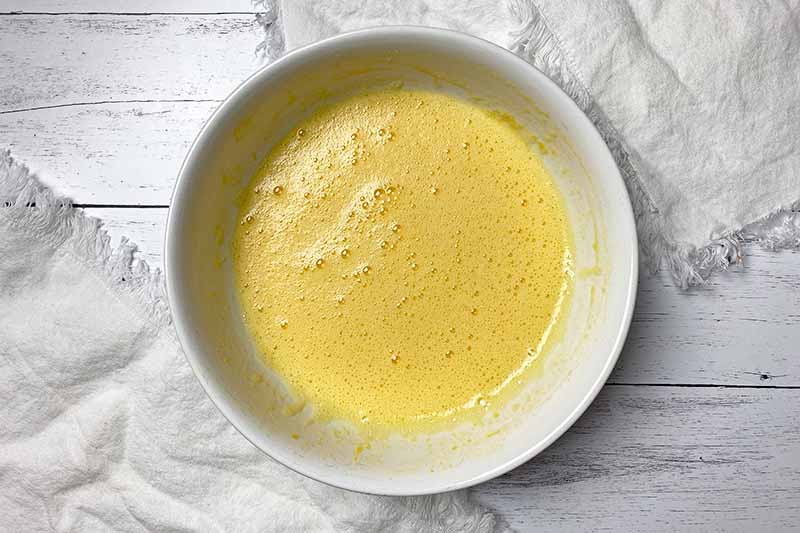
If you’d rather save your arm strength, you can use a hand mixer or an immersion blender with a whisk attachment for this step – it will take an even shorter amount of time with little effort on your part, about 1 minute. Thanks, technology!
Step 4 – Combine Ingredients
Pour the melted butter and chocolate into the whipped egg mixture. Use a whisk to gently mix them together just until incorporated.
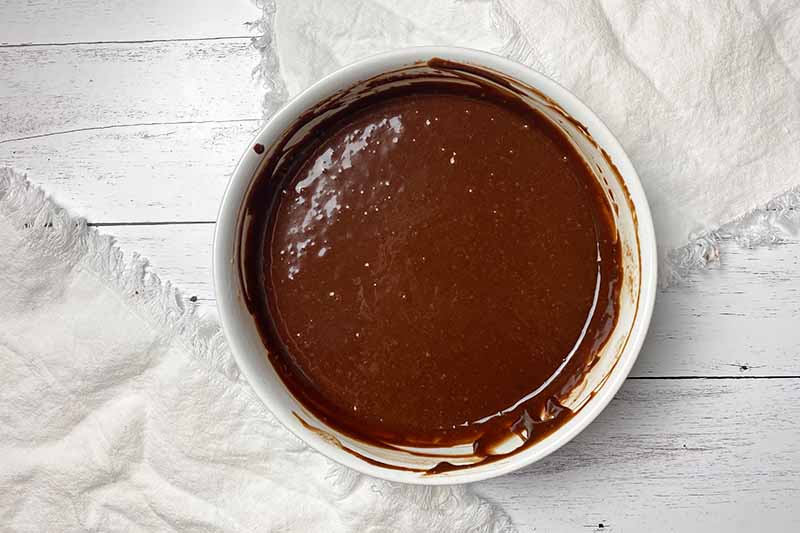
Pour the flour into the bowl and gently whisk it into the mixture, just until incorporated.
In order to maintain a tender cake exterior, do not overmix the batter.
Step 5 – Portion
Spoon even amounts of batter into each of the prepared ramekins. The batter will fill the ramekins about 3/4 of the way full.
Use the same spoon or a small offset spatula to smooth the tops of the batter in each ramekin. This is to ensure even baking.
Step 6 – Bake
Transfer the baking sheet to the oven and bake for 10 to 12 minutes.
While the cakes are baking, set out small serving plates, spoons, and kitchen towels or oven mitts to protect your hands.
You should also prepare the toppings you prefer to serve. Make sure you have powdered sugar, whipped cream, or vanilla ice cream ready to go!
When you reach the 10-minute mark, there are different ways to check the cakes for doneness:
- The sides of each cake will look firm, but the centers will still look very soft and glossy.
- A toothpick inserted in the very center of one cake should come out still covered in batter.
- If you gently shake the baking sheet, the centers should jiggle slightly.
Remove the baking sheet from the oven. Allow the ramekins to cool on the sheet for one to two minutes before moving on to the next step.
They need this brief period to cool for the structure to slightly set, or you might end up with an entirely gloopy – yet still delicious – mess on your plate!
It wouldn’t be the worst situation, honestly… but let’s get it right the first time!
If you are concerned about the food safety risk of consuming partially cooked eggs, you can check the internal temperature after the first 10 minutes of baking by inserting a thermometer in the very center of one cake.
According to experts at the USDA, dishes containing eggs should be cooked to a minimum internal temperature of 160°F.
The molten core should be cooked to that minimum temperature within 10 minutes, but if it is less than 160°F, you can bake them for another 2 to 5 minutes.
Keep in mind that the more time the cakes bake for, the more the core will set.
Step 7 – Invert
For this step, focus on working with one ramekin at a time, and have your kitchen towel or oven mitt ready.
Cover the top of one ramekin with a dessert plate. Quickly invert the ramekin onto the plate, holding the ramekin with your towel or mitt for heat protection.
Once the plate and ramekin have made contact, try not to move the ramekin around, as any excessive movement may cause the cake to deform and deflate prematurely.
The cake should release quickly and easily from the ramekin – good work with greasing and coating it!
Quickly repeat this process with the remaining ramekins.
Step 8 – Serve
Serve the desserts immediately while they are still hot, with your preferred toppings.
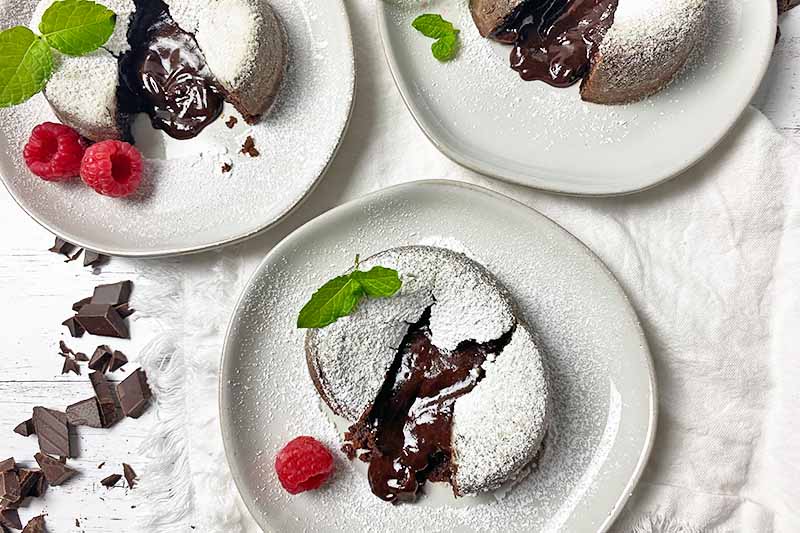
Powdered sugar will look very pretty and delicate lightly dusted on each cake, while hefty dollops of ice cream or whipped cream bring even more over-the-top decadence to the table.
Choose your weapon wisely.
And enjoy the wild ride of cutting into the center, and seeing the molten center slooooooowly pour out onto your plate!
What If I Have Extras?
If you have far more discipline than I do and you weren’t able to finish your dessert, extras can easily be stored in the refrigerator.
Allow the cake to cool down completely before transferring it to an airtight container. Leftovers can be stored in the fridge for up to one week.
While you can reheat the cake in the microwave for 20 to 30 seconds to enjoy it warm as originally intended, allow me to gleefully play devil’s advocate by saying something you might not expect…
I think you should try it cold.
When chilled, whatever is left of the liquidy core transforms into a thick, decadent, fudgy center – it’s an entirely new dessert that you will fall in love with all over again.
What will you do? Will you gobble up an entire lava cake hot from the oven, or will you be able to practice restraint and try some of it cold? Don’t forget to leave a comment below!
Let’s keep this dessert theme going with even more homemade treats. Rich, seductive, and irresistible, make these impressive chocolate recipes next:
- Dark Chocolate Ganache Tart
- Individual Chocolate Souffles (Gluten-Free)
- Homemade Chocolate Cookie Ice Cream Sandwiches
Photos by Nikki Cervone, © Ask the Experts, LLC. ALL RIGHTS RESERVED. See our TOS for more details. Originally published March 22, 2015 by Nina-Kristin Isensee. Last updated on August 12, 2023.
About Nikki Cervone
Nikki Cervone is an ACS Certified Cheese Professional and cheesemonger living in Pittsburgh. Nikki holds an AAS in baking/pastry from Westmoreland County Community College, a BA in Communications from Duquesne University, and an MLA in Gastronomy from Boston University. When she's not nibbling on her favorite cheeses or testing a batch of cupcakes, Nikki enjoys a healthy dose of yoga, wine, hiking, singing in the shower, and chocolate. Lots of chocolate.
This looks absolutely sinful! I’m a very big fan of dark chocolate myself and I just can’t help but make this. It’s simple, it has very few and common ingredients, and it looks great. I might make a couple of batches and sell them to the neighbors if I have time. Great recipe!
You are definitely right TommyVercetti… absolutely sinful, downright tempting, you’d think the presentation is real, i was almost licking the screen off, am not having a crush on chocolate here, this is a much deeper relationship 😉 fortunately the recipe is simple and friendly, easily doable…therefore no excuses 🙂
You know something? I always shied away from making lava cake because I assumed it was a lot harder than this. Goes to show I shouldn’t be afraid of trying things. Thanks for the recipe. This will go great with a berry compote.
It never occurred to me that I could *make* a lava cake!! The recipe looks pretty simple. I know that my local grocery store sells bakers sugar with all the baking stuff, so I hope that’s the same as caster sugar. Seeing that all these ingredients are usually in my cupboard, my family will be beyond thrilled when I make this often.
I checked up baker’s sugar and you can use it just like caster sugar. Enjoy 🙂
This looks absolutely gorgeous and so easy to make dairy free as well. (I have a substitute for butter than will work brilliantly with this).
I think it would also work really well in individual ramekins, dropping the cooking time down to 5-10 minutes and served with a touch of cream on the top and perhaps a touch of ground cinnamon to the icing sugar topping as well.
Lava cake is my favorite dessert to order at restaurants. I never thought that it would be so easy to make. It’s so rich and decadent, that I imagined it was something a very experienced pastry chef could pull off. I don’t think that I can find caster sugar anywhere in my area, but I will take the tip of using the food processor to make the regular sugar finer.
Same. I always thought that it must be reaaally hard to make one because it’s cake outside and flowy chocolate inside. Well, now I can save more money XD
I always thought these type of cakes were difficult to get right too and that’s what has put me off trying in the past. I would be extra sinful and serve this with vanilla ice cream – mmm!
My favorite kind of dessert with pure chocolate. I have tried this once and it worked, but I think smaller ones in gratin dishes works better so as to keep the chocolate from oozing out and being wasted. Timing is so important, you can’t multitask when making this as I discovered.
Thank you for letting me in on that little secret there Bella, No Multitasking when making/baking this one cake…looks like a real ‘attention seeker’ don’t you think 😉 and timing is everything…got it, because sometimes my mind can be in different places at the same time!
I have had lava came before and I loved it. I was so excited when I saw the recipe was on here! Unfortunately, though, now that I read it I’m skeptical about my ability to bake it. It doesn’t leave a lot of leeway. That has always been an issue for me. It can’t hurt to try, though, right?
You should definitely have a try! Even if it doesn’t work out with the timing perfectly, you’ll still have a nice chocolate bake. The molten inside could be your “icing on the cake” 😉
I am telling myself to look away right now. I should not have clicked on this delicious page! Mmmmm! That looks amazingly good and way too tempting. But, seriously, I’ve always wanted a good molten cake recipe. I admit that I didn’t search very hard, because I know I’ll be tempted to make it more often than I should. I’m such a chocoholic.
Thanks for the great explanation for caster sugar as well. I’ve been meaning to look it up, since I’ve seen it mentioned a lot lately.
I adore chocolate this looks so good. I would have to eat it all by myself. My husband doesn’t share my love for the brown sweet creamy stuff. He has no clue that I love it more then him. If chocolate were a man he’d be in trouble.
Well, your husband should reconsider his attitude towards chocolate, it’s so worth it 😉 Otherwise, I would definitely come over for some lava pudding to share. No way is too long to go for chocolate!
I should really quit looking at foodblogs at night. Makes me hungry and makes me want to bake something. I gotta try this sometime. The only problem is that I have to try tons of recipes from here since they all look equally delicious and I fear that I might end up not trying some I found good looking.
I have to admit I’m a chocolate addict, anything chocolate I love! My husband and I always order lava cake when we go out to a restaurant for dessert and have always wanted to try to make my own at home but I always thought it was to complex for me but this recipe goes to show I was wrong. I cant wait to try this recipe, I know it will be a great hit in this house!
I’ve heard of these, but have never made one, so I was curious when I saw the picture and recipe on here. The process seems fairly easy, and I have no doubt this would be delicious. Is there any particular depth pan that works best for this type of dessert? I don’t want to take a chance on it spilling over.
I often use a small, round baking dish and I looked it up: it has a diameter of 7 inches and is approx. 3 inches deep.
I think at least 3 inches depth should be fine, it is not going to rise a lot.
“Crush” is exactly how I feel towards chocolate! I have seen this dish on tv. This cake looks really good but knowing me I might mess this up somehow. Maybe I can find someone to make this recipe with. Thanks for making the is post.
Just looking at the picture of this cake is mouth-watering. This is such a treat. I know a whole lot of people who will enjoy this surprise over the Christmas season! Thanks.
wow! I’m not a huge fan of sweets, but every once in a while a cake, cookie, pie,candy, or ice cream will call to me. And, this one just did. It looks amazing! Chocolate cake with an oozing chocolate center…. can’t goo too wrong there!
Even if I’m not a really big fan of chocolate this looks so, so good! It looks like a way cooler version of a brownie, perfect for colder days on my opinion!
I only have tried making chocolate muffins a couple of years ago and they were a literal hot mess, but I’m pretty sure that with some help, the right ingredients and more time on my hands, I will be able to make this one.
Thank you so much for sharing!
Thanks, that’s right! On a cold day, this dessert is perfect right from the oven. Great to hear that you like this recipe although chocolate is not your absolute favorite. I hope you’ll enjoy this gorgeous dish 🙂