How did I find myself falling in love with toffee, typically one of my least favorite desserts, and perhaps my sworn enemy on this Earth?

By making it from scratch. Over and over and over again.
Toffee had never been high on my list of preferred treats. And a chipped tooth after one unfortunate toffee-eating incident hasn’t helped with its overall likability either.
But when you have to make toffee for baking and pastry school in order to ace your sugar work class, or at least make it well enough to get a passing grade, earning your diploma kind of depends on it!
So, toffee and I had to set aside our differences so we could learn how to like each other.
It may have been all the sugar dust in the air, but I gradually began to see the lovely beauty behind toffee’s hard exterior.
Now, my legs go all loose and wobbly every time I take a big whiff of the irresistible aroma of melted butter, caramelized sugar, and warm vanilla.
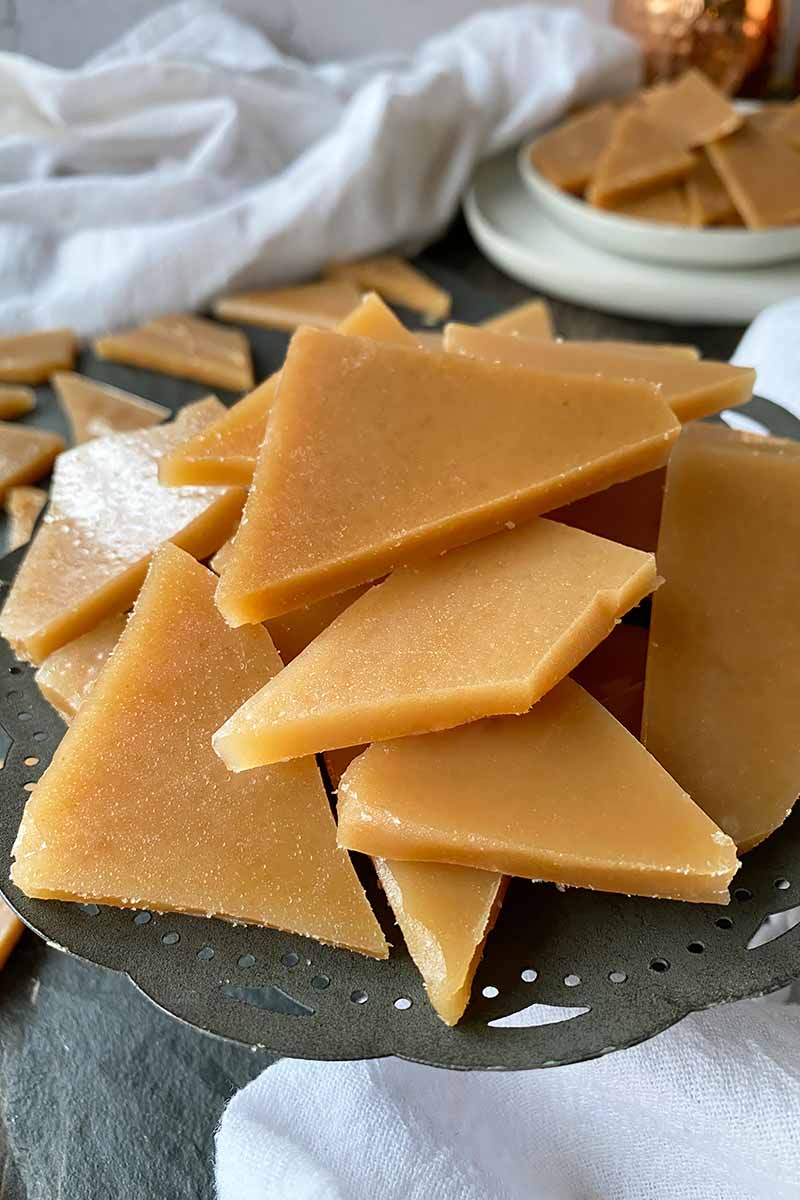
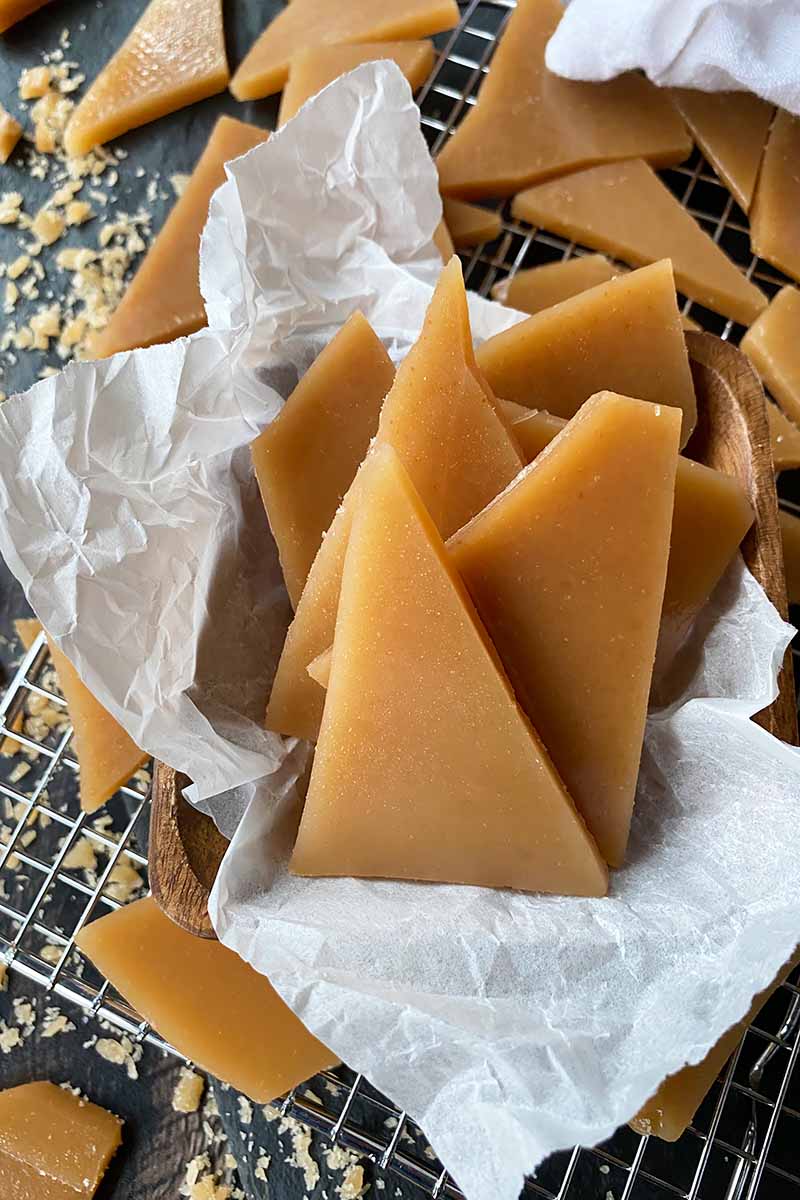
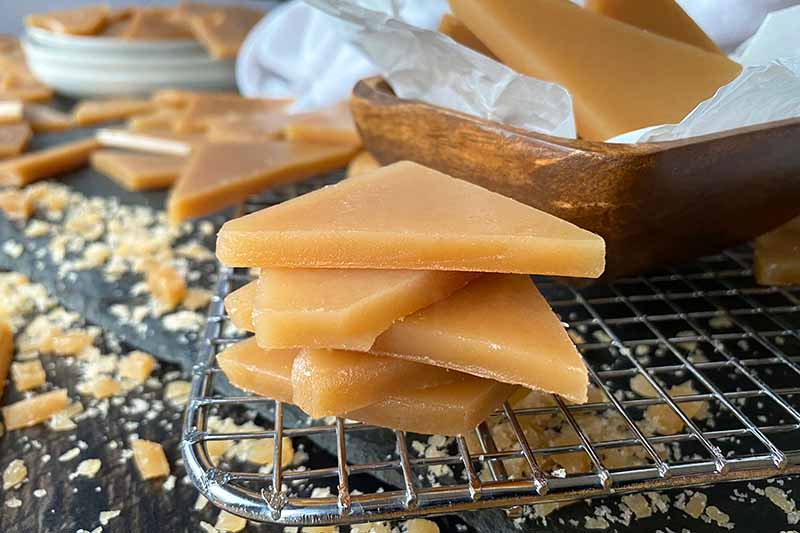
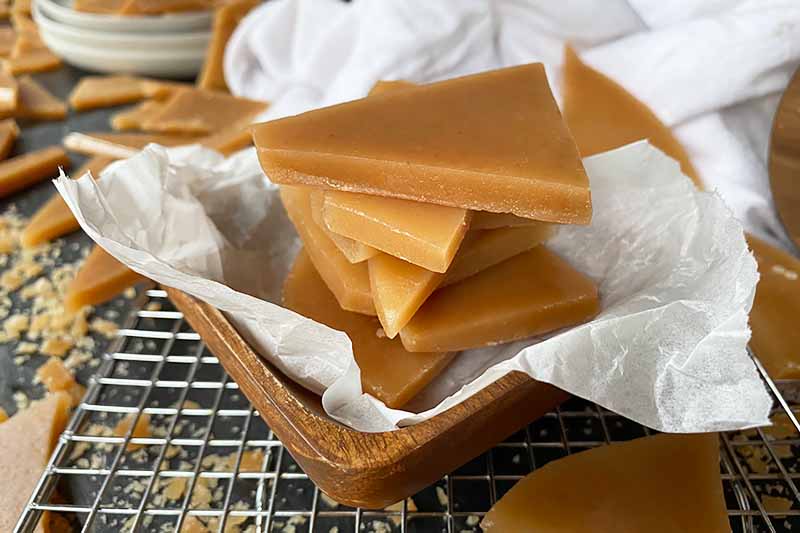
I get so giddy when I gaze upon the gorgeous, deep amber hue of the candy as it sets in the pan.
And the texture offers a refreshing, slap-in-the-face, stick-to-your-teeth bit of something different from all the soft cakes and brownies I typically prefer eating!
We soon became best friends – and just like besties do, toffee even told me some of its most cherished secrets on how to make it perfectly every time.
It took a few tries and a lot of patience, but it finally warmed up to me.
Here are three life lessons I’ve gained from our sweet friendship:
Lesson #1: Corn Syrup Will Be Your Savior
I have been personally traumatized by more failures than I care to admit, when the butter and the sugar separate and refuse to mix together to form a solid component.
I hate seeing that pool of butter on top of the sugar in the pot… it’s an obvious sign of a broken toffee that is incredibly difficult to fix.
Like any cooked sugar recipe, making the toffee mixture is a delicate process that can turn against you in an instant when you do something (or even say something) it doesn’t like.
Separation and crystallization may occur if the heat doesn’t remain even, if you stir too often (more on that below), or if the ratio of ingredients is off.
One of the key ways to prevent this from happening is to add a little corn syrup to your recipe. The corn syrup impedes the formation of crystals, lowering the risk of poor results like separation or an unintended crumbly, brittle texture.
Lesson #2: You Can Stir, But Use Severe Discipline
You should stir constantly in the beginning as the butter and sugar melt together to form a homogenous mixture. But as soon as it starts bubbling, drop the spoon.
At least for a little while.
Too much agitation may cause the mixture to crystallize or separate, but too little stirring may cause the mixture to heat unevenly and burn.
The latter is a highly likely outcome due to the addition of butter in toffee recipes. While the components in butter help to promote browning and the release of volatile flavor compounds, they are more delicate and prone to burning. Without stirring, the bottom and sides of the mixture will brown too quickly, and may potentially burn.
You’ll only need to stir the mixture one to three times while it comes to the correct temperature, but no more than that.
For the best results, stir OCCASIONALLY, and use a CLEAN SPOON every time!
If you use the same spoon in between stirs, any dried sugar particles on the old spoon may cause the mixture to seize.
Yup, it’s that picky.
Lesson #3: Temperature Matters
You can’t simply go by color alone when determining how long to cook toffee.
There are different temperature ranges that affect the final hardness of the product. The texture may be too soft if you cook the mixture for too little time, and it may be too hard and bitter, perhaps even burnt, if you cook it for too long.
The best way to determine the temperature of the mixture is by using a thermometer. This little tool completely eliminates any guesswork. Just be sure you have one that registers at higher temperatures!
For optimal hardness, toffee should be cooked in the lower range of the “hard crack” stage, ideally between 290 and 300°F. You can learn more about these stages in our article on making caramels.
You may see some minor fluctuations in this recommended range from other sources, but I would advise against going any higher than 305°F as the absolute max.
No more chipped teeth, please!
Okay – so you have your ingredients, a thermometer, and a newly discovered sense of confidence. Let’s make the perfect homemade toffee!
Print
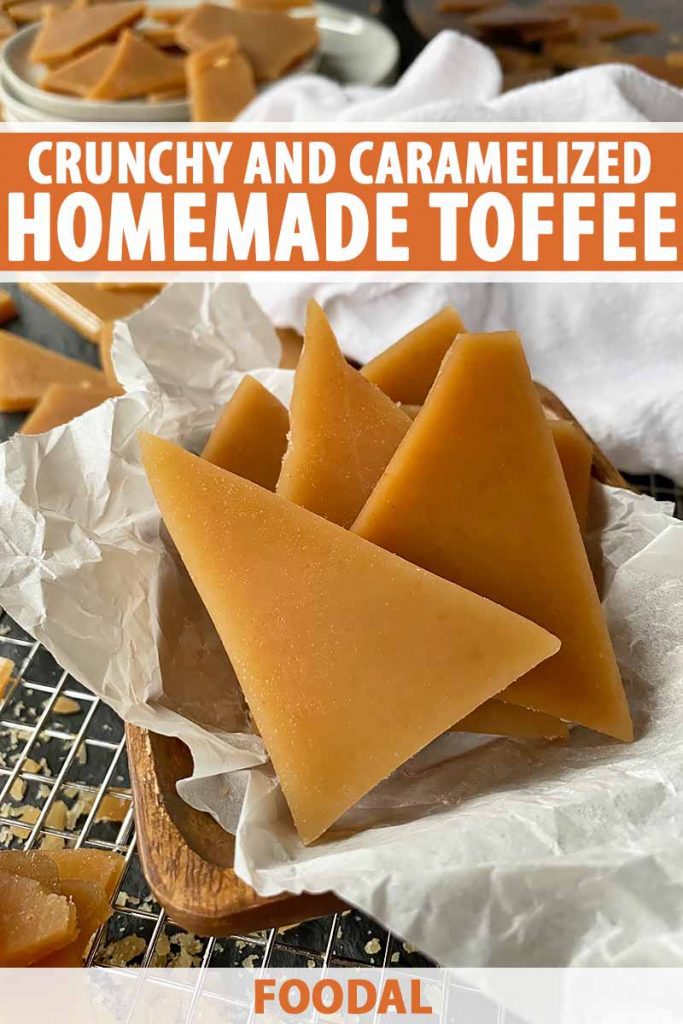
Homemade Toffee
- Total Time: 2 hours, 40 minutes
- Yield: 15-20 servings (2-3 small pieces per serving) 1x
Description
Do you know how to make the perfect toffee from scratch? We share all the secrets to achieve the best texture, taste, and color.
Ingredients
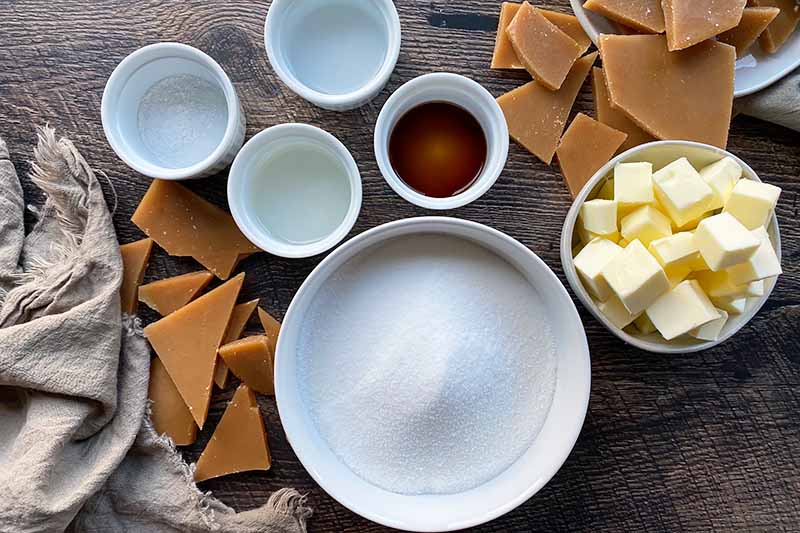
- 2 cups granulated sugar
- 2 sticks (8 ounces) room temperature unsalted butter, cubed
- 1/4 cup water
- 2 tablespoons light corn syrup
- 1 teaspoon vanilla extract
- 1/2 teaspoon salt
Instructions
- Use a rimmed quarter-size baking sheet for thicker toffee (1/4 inch thick) or a rimmed half baking sheet for thinner toffee (1/8 inch thick). Line it with a silicone mat or aluminum foil. Spray the liner and sides of the pan very lightly with nonstick cooking oil spray. Set aside.
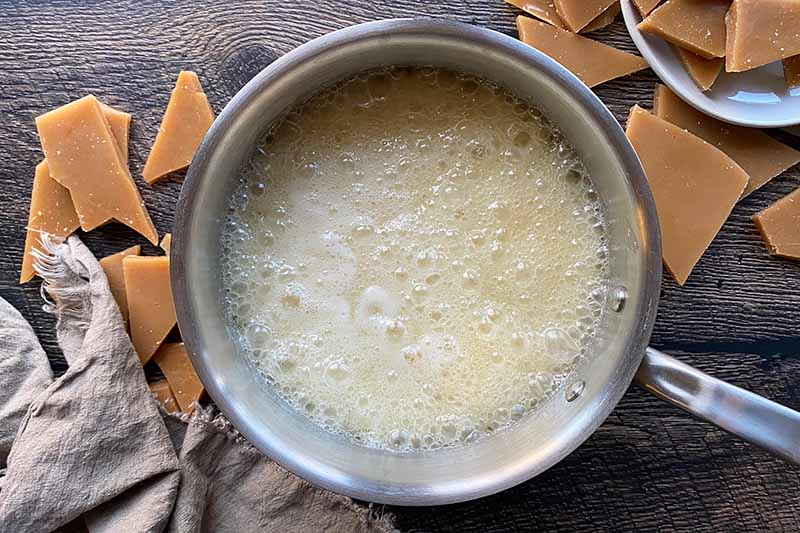
- Combine all ingredients in a clean 3-quart saucepan. Place over medium heat to dissolve the sugar and melt the butter, stirring constantly with a heatproof spoon or spatula.
- Once the ingredients are completely melted together, continue to stir constantly until the mixture begins to boil.
- Once the mixture comes to a boil, remove the spoon and decrease the heat to low. Continue cooking, stirring only one or twice with a clean heatproof spoon or spatula each time until the mixture becomes dark golden in color and reaches a temperature between 290 and 300°F on a digital or candy thermometer. This will take about 25-30 minutes.
- Immediately remove the pot from the stove and pour into the prepared pan, using a clean heatproof spoon or spatula to spread the melted toffee mixture across the pan. If using a half baking sheet, the toffee will not cover all of the sheet.
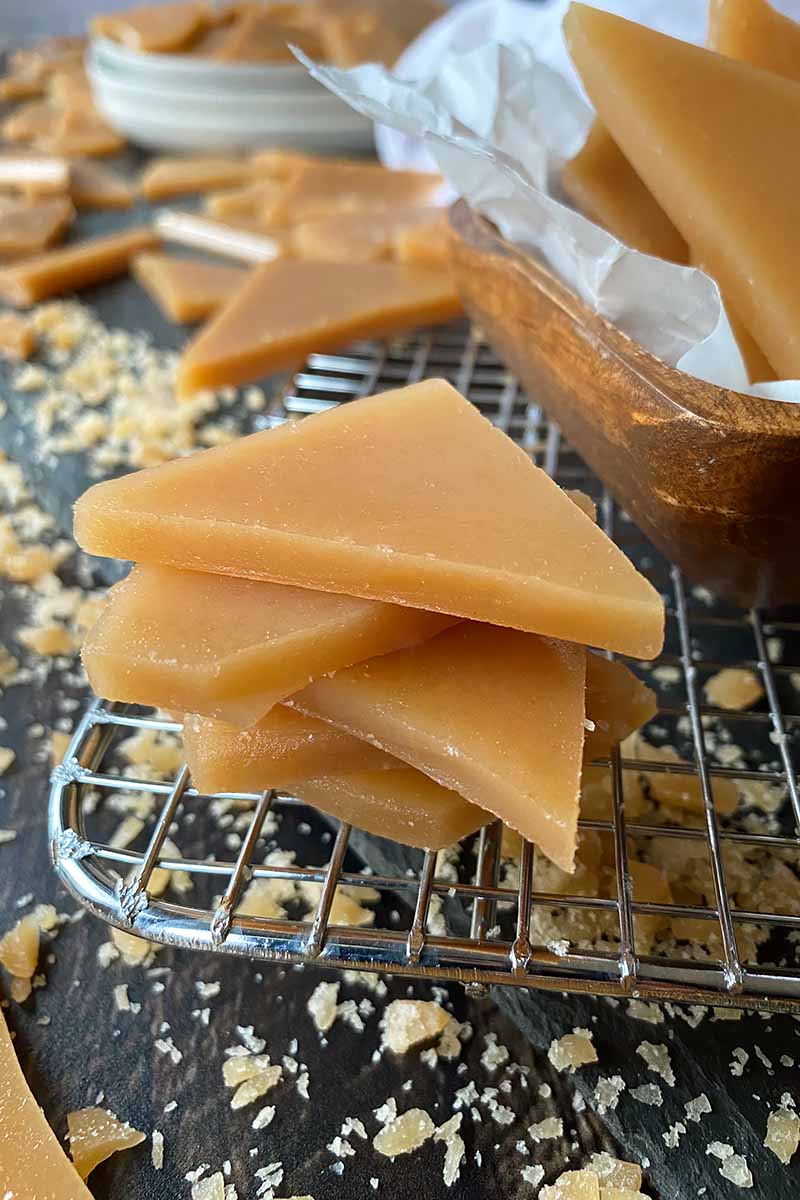
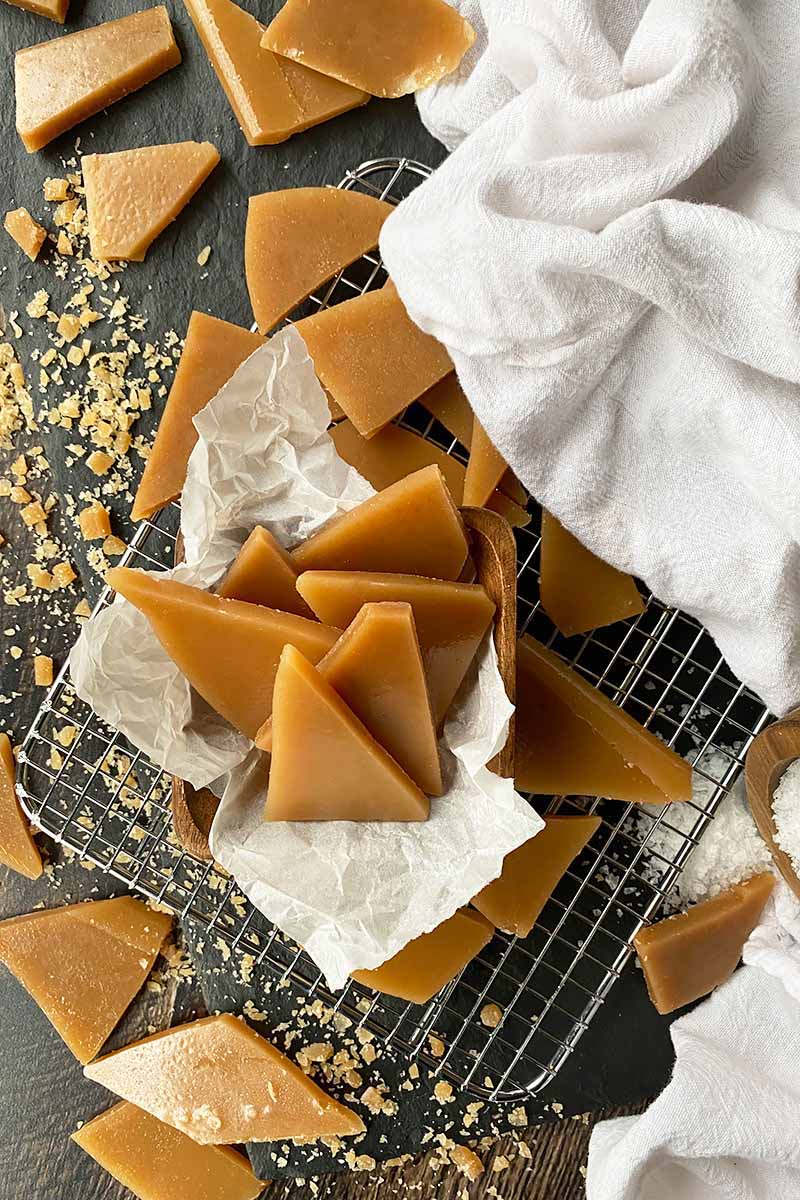
- Let cool at room temperature, for about 2 hours. Once completely cooled, invert the pan onto a clean work surface to remove the toffee. Break into single-serving-sized pieces and serve.
- Store at room temperature in an airtight container for up to two weeks.
- Prep Time: 10 minutes
- Cook Time: 30 minutes
- Category: Candy
- Method: Stovetop
- Cuisine: Dessert
Cooking by the Numbers…
Step 1 – Prep and Measure Ingredients
Line a rimmed quarter-size baking sheet (about 13 by 9 inches) with a silicone mat or aluminum foil. Spray the mat and sides of the pan with nonstick cooking spray. Set aside.
A quarter baking sheet will yield toffee that is about a 1/4 inch thick. You can use a half baking sheet (about 18 by 13 inches) if you prefer thinner toffee.
Set out a thermometer, a clean, 3-quart saucepan (preferably heavy-bottomed to prevent scorching), and multiple clean, heatproof spoons.
Cube the butter and let it come to room temperature. Using room-temperature butter as opposed to cold butter helps the mixture to melt and combine quickly.
Measure out the sugar, water, corn syrup, vanilla extract, and salt.
The addition of water also helps to combine the ingredients, as the sugar will dissolve easily in water.
Step 2 – Combine, Melt, and Boil the Ingredients
Combine all of the ingredients in the saucepan.
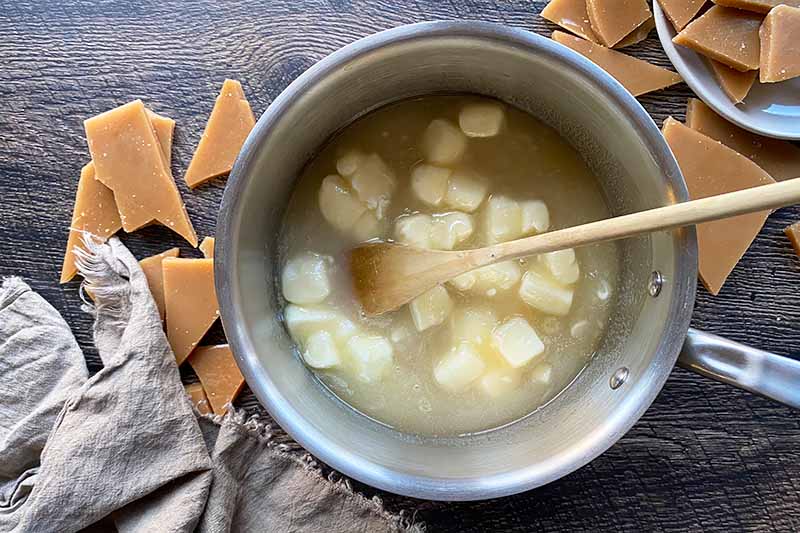
Stir constantly with a heatproof spoon or spatula to fully melt and combine the ingredients. Continue stirring constantly until the mixture comes to a boil.
Step 3 – Continue Cooking
Turn the heat down to low, and immediately remove the spoon or spatula.
Lowering the heat is very important! This will prevent the mixture from burning, and will gently heat and slowly caramelize the mixture for better texture and color. It will also lower the risk of the mixture separating or crystallizing.
If you start seeing sugar crystals forming around the edge of the pan above the syrup, you can brush those areas with a damp pastry brush.
Stir the mixture once or twice as the mixture continues cooking, but note that you do not want to stir constantly. Stirring a caramel constantly once it has boiled may cause the mixture to separate or crystallize. However, stirring once or twice is necessary to redistribute the heat and prevent the mixture from burning.
Be sure to use a clean spoon every time you stir to prevent the mixture from crystalizing!
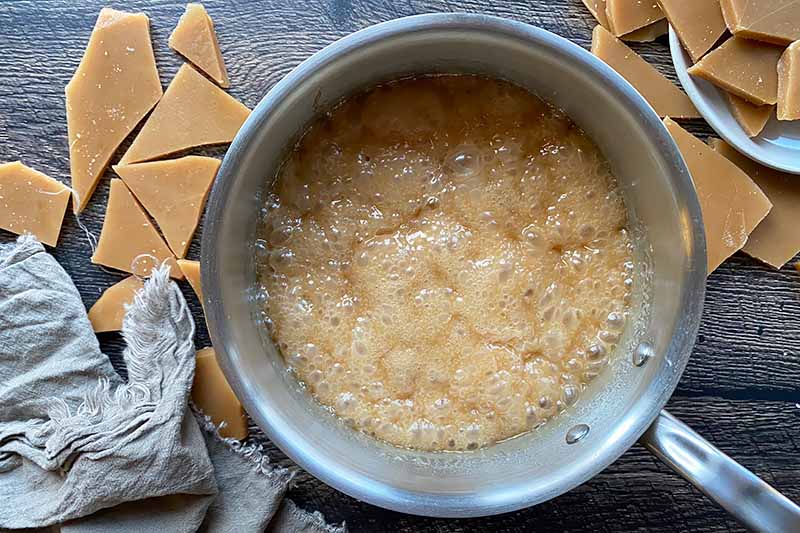
Cook the mixture until it reaches the lower end of the hard crack stage, between 290 and 300°F on a digital or candy thermometer.
This will take about 15 to 25 minutes, depending on the strength of the heat from your burner.
You will need to check the temperature routinely throughout the cooking process once the mixture starts to gain some color. Just like with the spoon, you will need to clean off the thermometer to remove any hardened sugar before you resubmerge it in the mixture.
Step 4 – Pour into Pan and Cool
As soon as the mixture reaches the preferred temperature range, immediately remove the pot from the heat. Very carefully pour the mixture into the prepared pan, and quickly use a heatproof spatula to spread it across the pan.
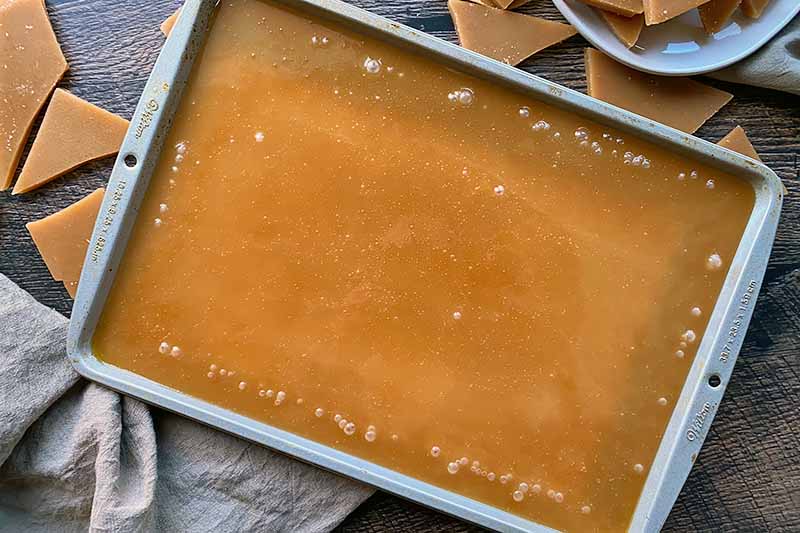
Let the mixture cool completely at room temperature for about 2 hours. The pan and the toffee should be cool to the touch before moving on to the next step.
Step 5 – Break and Serve
Invert the pan on a clean surface or large cutting board to remove the toffee. Using the back of a spoon, break the toffee into single-serving-sized pieces, about 1 1/2 to 2 inches long.
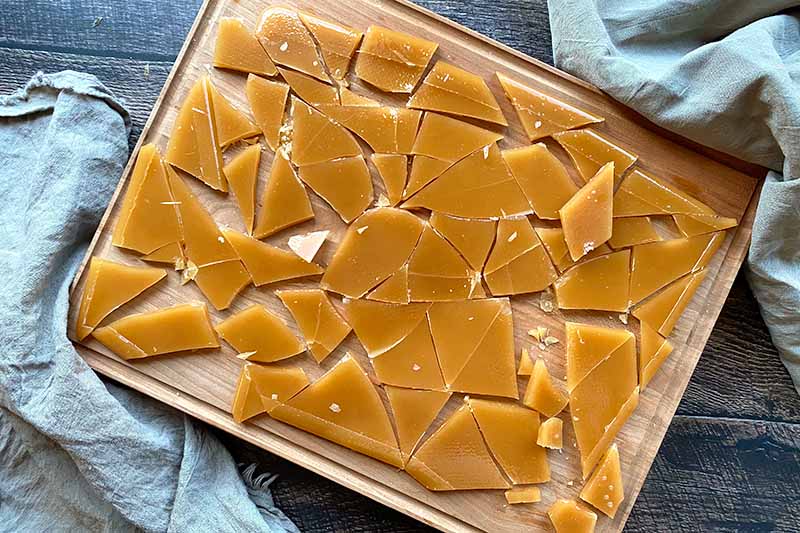
Serve and enjoy!
Store the toffee in an airtight container at room temperature. The pieces typically won’t stick together when stored at room temperature away from any source of heat, but you can use pieces of parchment or wax paper in between each layer as a safe precaution.
The toffee will keep for up to two weeks.
Use It ALL Up!
Consider this recipe as a simple base for a variety of different applications.
You can break it into small pieces with a heavy spoon or in a food processor to make toffee bits to use in cookies, or as a fun and crunchy garnish for ice cream, mousse, and pudding.
I’ve even melted some pieces in my morning coffee! It’s divine when combined with homemade pumpkin spice creamer – such festive fall flavors!
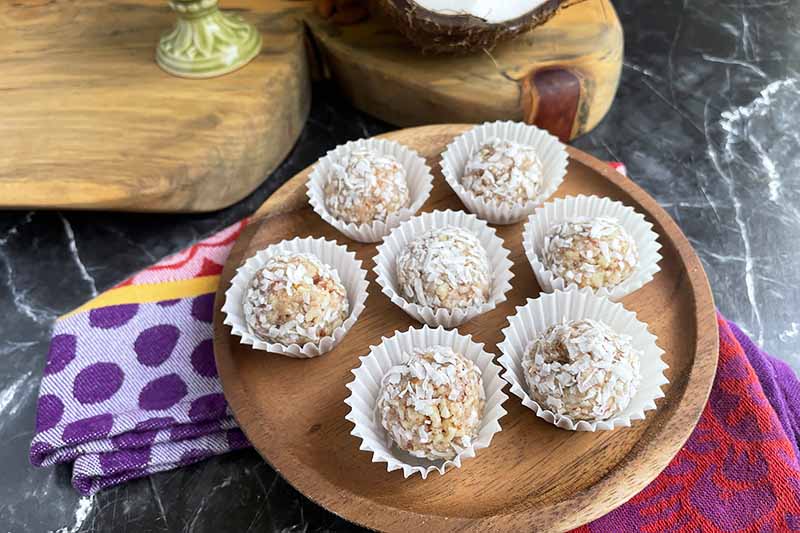
And if you’re like me and not the biggest fan of plain toffee on its own, I find that it’s even better with some toasted chopped nuts mixed into the base just before you transfer it to the baking sheet, or spread with melted chocolate on top after it cools, or both – a page taken from our vegan pecan chocolate toffee recipe. This is also a great article to get even more tips for making toffee at home.
How do you like to enjoy your toffee? Do you prefer it plain, mixed with nuts, or covered in a layer of chocolate? Do you think you’ll make it as a gift for your family and friends during the holidays? I want to hear all your brilliant ideas in the comment section below!
Want even more candy recipes to satisfy your sweet tooth? Give us top hats and call us Willy Wonka! We have plenty more for you to choose from, starting with these top favorites:
Photos by Nikki Cervone, © Ask the Experts, LLC. ALL RIGHTS RESERVED. See our TOS for more details. Originally published by Shanna Mallon on June 23, 2009. Last updated on December 16, 2021.
Nutritional information derived from a database of known generic and branded foods and ingredients and was not compiled by a registered dietitian or submitted for lab testing. It should be viewed as an approximation.
About Nikki Cervone
Nikki Cervone is an ACS Certified Cheese Professional and cheesemonger living in Pittsburgh. Nikki holds an AAS in baking/pastry from Westmoreland County Community College, a BA in Communications from Duquesne University, and an MLA in Gastronomy from Boston University. When she's not nibbling on her favorite cheeses or testing a batch of cupcakes, Nikki enjoys a healthy dose of yoga, wine, hiking, singing in the shower, and chocolate. Lots of chocolate.


I apologize for star rating…I haven’t made the toffee as yet, but I liked your recipe the best. What I want to do is make toffee covered pretzels and I can’t find anything on this. By chance, do you have a suggestion on how to do this? Thanks in advance for your help!
Hi, Carol! We haven’t tested fully enrobing pretzels in the toffee. However, an easier and safer option would be to let the toffee fully set, then chop the toffee until very small (you can also use a food processor to pulse) to make small bits. You can cover the pretzels in melted chocolate, then roll them in the toffee bits. Place them on a baking sheet lined in parchment paper, and let them set until the chocolate is completely hardened.
Maybe you can try this toffee/caramel coating recipe that I use for caramel puffs every year- Melt one stick of butter in saucepan over medium heat. Add one cup lightly packed brown sugar and one half (1/2) cup light corn syrup to pan and stir with butter until well mixed. Heat and stir until mixture starts to bubble. Remove from heat and stir in one teaspoon of baking soda until well mixed and foaming. Pour over pretzels in a bowl and stir to coat evenly. Spread out pretzels on wax or parchment paper and allow to cool. Store in airtight container and enjoy!
What do I do with my homemade toffee that tastes good except it is so hard to chew? Afraid I might break a tooth. Any way to salvage it?
The struggle is REAL, Betty!!! If you’re too nervous to bite down on a thick slab of toffee, you still have other options to enjoy it so nothing will go go to waste. I always love to pulverize it in the food processor, pulsing it for a few seconds at a time, until you get small bits. Store them at room temperature in an airtight container – You can use these to sprinkle over ice cream, frozen yogurt, pancakes/waffles, cheesecake, or on top of freshly whipped cream and fruit, and more! You can also mix these bits into cookie dough!
This looks amazing I am making this as a surprise Christmas gift for my stepmom who loves toffee. I managed to not get corn syrup any tips for me?
Hi, Nichole! What a tasty gift idea!
No corn syrup? Uh-oh! As I explained in the body of the text… Lesson #1: Corn Syrup Will Be Your Savior! This is an essential ingredient in some toffee recipes, as it is a helpful ingredient to prevent crystallization and separation. Because our recipe relies on corn syrup as a main component, I wouldn’t try to make this particular recipe without it! You might want to save this for when you can get it, or maybe find another recipe that does not use corn syrup.
This looks so good I saved the recipe.
Hope you enjoy making it, Wendy!
Unbelievably delicious, and worked perfectly the first time. Great recipe!
I am giving you a HUGE high-five through the computer screen, Laura! Thanks for the feedback! Are you going to serve the toffee plain as is, or do you have other plans for it?
I’m currently having issues with the browning process. I have an electric stove so when I put it on low after it boiled the mixture stayed at 250 degrees f. I waited 25 mins but it wasn’t browning. I don’t know what else to do besides turning up the temperature significantly for it to reach this point.
All stoves are different, as are different types of cookware and their ability to conduct and retain heat. Temperature is very important when making this recipe, but the goal is to avoid overheating the mixture – not to keep the temperature artificially low. Rather than turning the stove up significantly, a much more gradual increase as needed is recommended in candymaking, to avoid burning as you approach the hard crack stage. We hope you’ll give the recipe a try again!
Hi – every other toffee recipe on the Internet with 2 cups of sugar seems to call for 2 CUPS of butter. You call for only 2 STICKS of butter, which is half that (at least for U.S.-size sticks).
Assuming that wasn’t a typo, is there a reason for the difference? Perhaps it relates to your use of corn syrup? But that would be surprising since corn syrup is extra sugar, not extra fat. Have you just found that the recipe works better with less butter?
I’m hoping to try your recipe this morning after a separation failure last night.
Hey, there! Caramel-making is a tough mountain to climb, but a successful end result is so rewarding!
This is the appropriate amount of butter for our particular recipe. Butter is a complex composition of protein, water, and fat – while it browns easily and contributes both body and flavor to the caramel, it also requires a delicate touch when cooking with the other ingredients. Using less butter allows us to control this process a little better.
Even though the use of the corn syrup does introduce additional sugar, you can’t overlook the importance of its chemical compound structure, and how it plays a vital role in caramel-making. With its long glucose chains, corn syrup inhibits crystallization by essentially forming a tangled web that impedes the motion of sugar and water molecules, reducing the risk of crystallization and separation.
All recipes will be a little different – some may use more butter, others may use brown sugar, and cooking times will vary.
I understand how frustrating a process caramel-making can be! And there are a multitude of factors that can cause your toffee to seize, crystalize, and separate, even if you are using a tried-and-true recipe. I hope you take some time to read through our entire article, which provides plenty of essential info each step of the way!
Thanks for the reply. I had actually gone ahead and made it in the meantime, carefully following your instructions, except that I doubled the butter to match all the other recipes on the web.
I’ll try it your way next time, now that you’ve confirmed that it wasn’t a typo. Mine did come out great and was a hit … but perhaps with your lower amount of butter, the surface would be dry rather than buttery to the touch. (The slightly greasy surface that I got might reflect a tiny bit of separation at the end.)
I also followed a few pieces of advice that I’ve found elsewhere:
1. To keep sugar crystals off the sides of the pot, where they could trigger crystallization: (a) butter the sides before adding the other ingredients. (b) add the sugar carefully to the middle of the pot, (c) during cooking, occasionally brush the sides with a wet pastry brush.
2. Wait until the toffee is done to stir in the vanilla, in order to preserve the vanilla’s flavor.
3. Line the baking sheet only with parchment paper. No spray necessary.
Next time I may try powdering the sugar in the Vitamix to promote dissolving. One can’t use powdered sugar because it has additives like cornstarch — but powdering granulated sugar myself seems fine, and should make the “completely dissolve” phase both safer and faster.
My search for the perfect toffee stops here! This is the best recipe and tastes so good. I quickly stirred chopped macadamias through it before pouring it into the pan. Thank you so much for sharing xx