Which holiday traditions are the most important to you?

In my family, most of these revolve around food. Other than baking cookies at Christmastime and preparing special dishes for a big Thanksgiving feast, making Italian Easter bread is my favorite.
If the notes in my recipe book are accurate, I’ve been combining yeast with flour, adding candied fruit, nuts, and spices, and carefully nestling dyed eggs into braided dough to make this cherished recipe for nearly 20 years, and I was eagerly strapping on an apron and helping my grandmother with the baking for another decade or so before that.
Sometimes I made individual nests instead of a continuous ring loaf, used multicolored fruit instead of candied citron, or experimented with sliced versus slivered almonds.

I swapped sweet fennel seed for anise when that’s all I had in my spice rack, enjoyed the meditative contemplation of kneading bread dough by hand on a floured countertop, and watched in wonder while my KitchenAid mixer did the work for me with a sturdy dough hook for the first time.
Sometimes there are loved ones in the kitchen with me, and other times I’m on my own. There’s always music to jam out to – once it was played on the clock radio on the kitchen shelf with the napkins, now it’s beamed over wi-fi to my Google Home.
Today, there’s also a laptop or a cell phone carefully propped up on the counter. This is so I can FaceTime or Skype with my brother, while we dye eggs and bake together across 3,000 miles.
Baking bread is part art and part science, and even though they’re always made with love, these loaves didn’t always look perfect.
There are years when they’ve turned out a little too brown on one side, or the ends of the braid started to become a bit unfurled during baking, with four picture-perfect well-behaved eggs and one that managed to bust free.
Early Easters mean it’s cold outside with low humidity, and other times the windows are flung open on a sticky, humid spring day that means I need to add a lot more flour to the dough than in other years.
Whatever the conditions, and whoever I’m with, this recipe always makes me think about the bakers in my family of past generations, carefully crafting the same loaves year after year on Easter Eve, alongside Easter pies filled with savory meats and cheeses, and sometimes a chocolate chip-studded orange-scented ricotta cheesecake, with a tender homemade crust.
I always feel a connection to them, across the years, traversing many miles.
I won’t lie – homemade bread takes a lot of time to make. You’ll use a lot of eggs and get flour all over your kitchen, and in your hair, and on your cell phone. There will be plenty of dishes to wash, and counters to scrub.
But the results are so worth it, whether enjoyed spread with unsalted European butter while seated elbow to elbow with extended family on Easter morning, or secretly snacked on at midnight around the kitchen table like I did one year, bursting with excitement while I giggled with my soon-to-be sister-in-law, knowing that her surprise bridal shower was the next morning (and getting yelled at when our laughter woke my mom, who was fitfully slumbering upstairs).
Whether this bread reminds you of something your great-grandmother used to make, or it’s a new recipe that you’ve never tried, give it a shot this year. Make it again the next year, and the year after that, and begin to experiment a little to make it your own.
Before you know it, you’ll have your own family tradition, the perfect centerpiece to your celebratory holiday breakfast.
Print
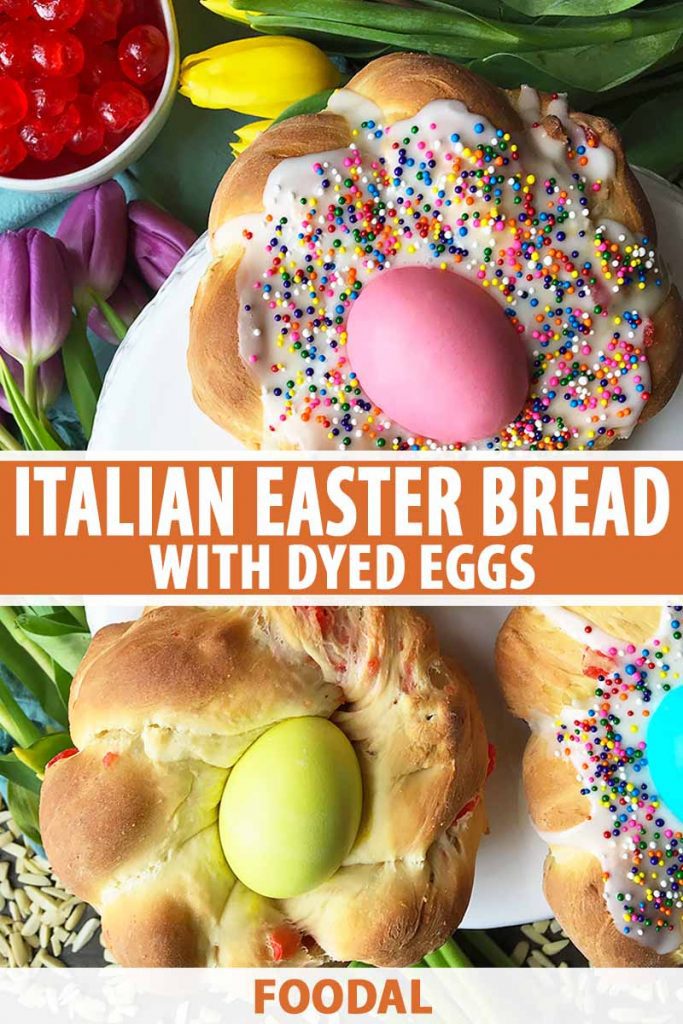
Italian Easter Bread with Dyed Eggs
- Total Time: 3 hours 25 minutes
- Yield: 3 small bread rings 1x
Description
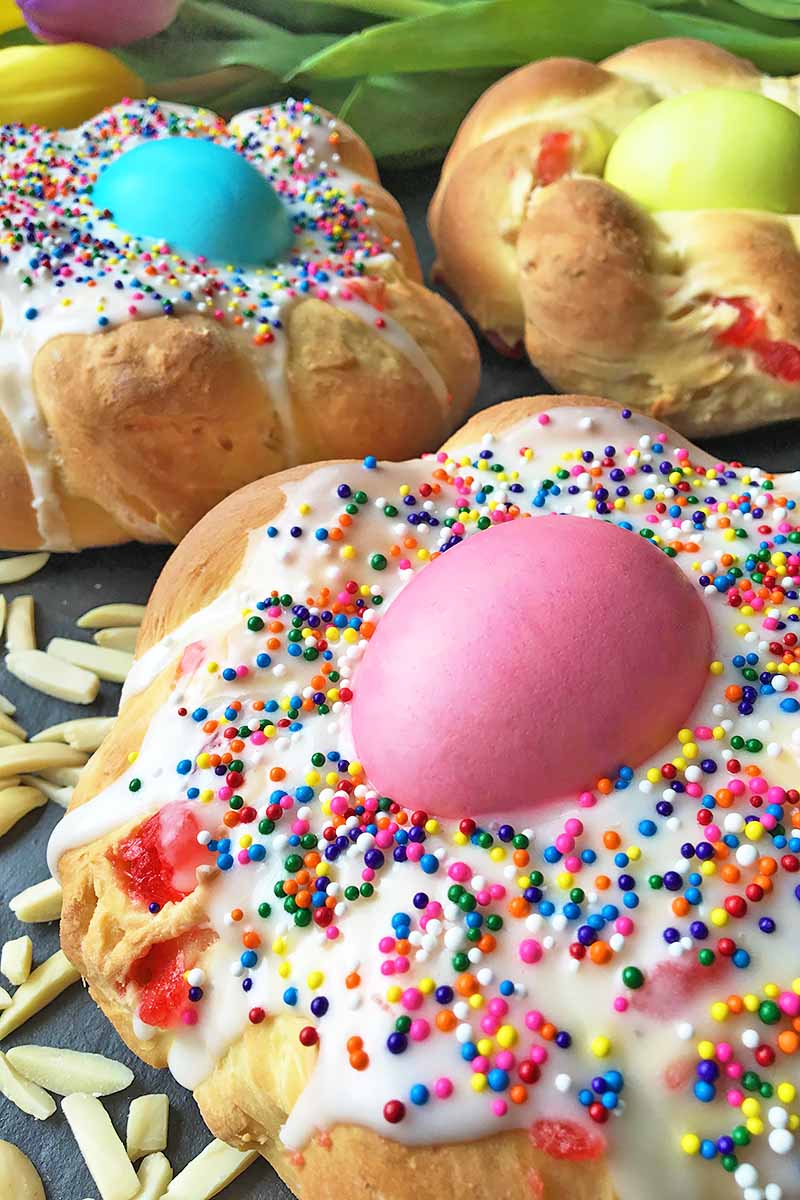
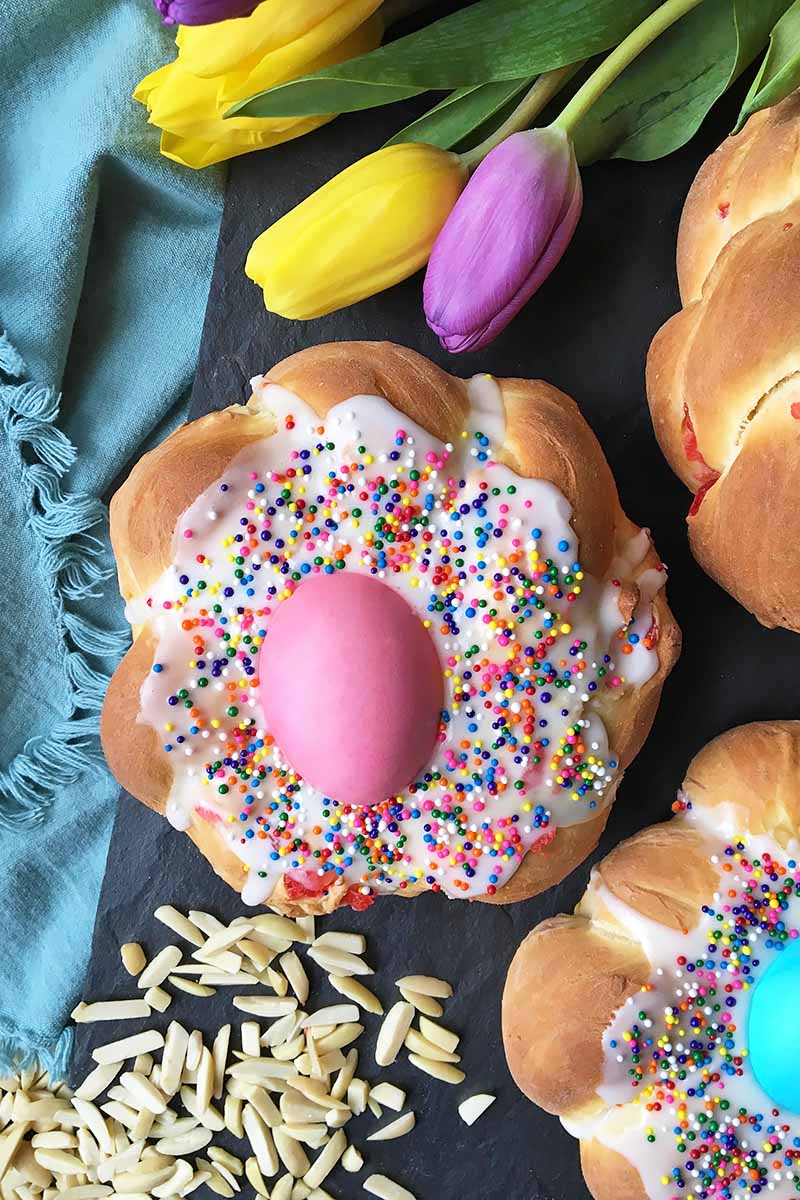
Topped with a dyed egg and filled with a scattering of candied fruits, nuts, and anise seeds, you’ll enjoy this Italian Easter Bread.
Ingredients
For the Bread:
- 2 1/2 – 3 cups unsifted all-purpose flour, divided, plus more for dusting
- 1/4 cup granulated sugar
- 1 teaspoon salt
- 1 package (1/4 ounce) active dry yeast
- 2/3 cup whole milk
- 2 tablespoons unsalted butter
- 2 eggs, plus one egg yolk
- 1 cup mixed candied fruits
- 1/2 cup chopped blanched almonds
- 1/2 teaspoon anise seed
- 3 raw eggs, dyed in various colors
For the Glaze and Sprinkles (Optional):
- 3/4 cup confectioners’ sugar
- 1 1/2 tablespoons whole milk
- 1/4 teaspoon vanilla extract
- 1/4 cup multicolored nonpareils
Instructions
For the Bread:
- In a large bowl, combine 1 cup flour, the sugar, salt, and yeast.*
- Heat milk and butter in a saucepan over low heat until the liquid is just warm and the butter is completely melted.
- Add the milk mixture to the dry ingredients, and stir with a sturdy spoon. Add the 2 eggs.
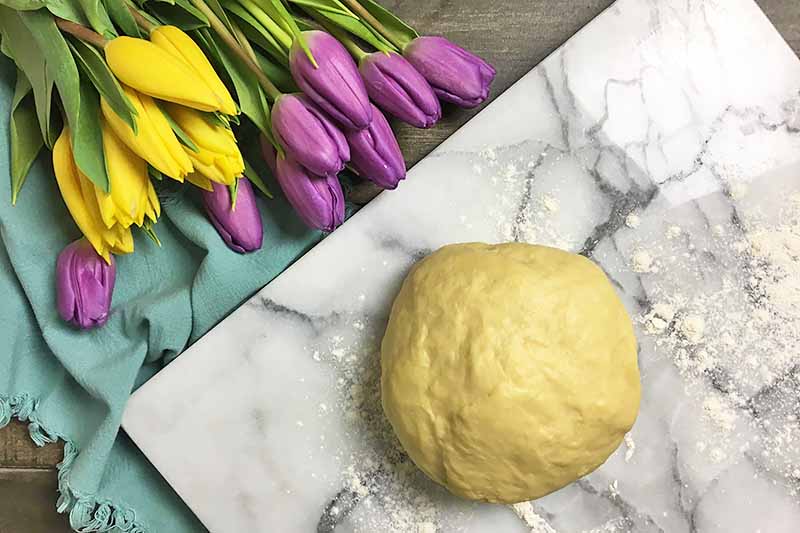
- Gradually add the flour, 1/2 cup at a time, until a very soft, slightly sticky dough forms. You may not need to use all of the flour.
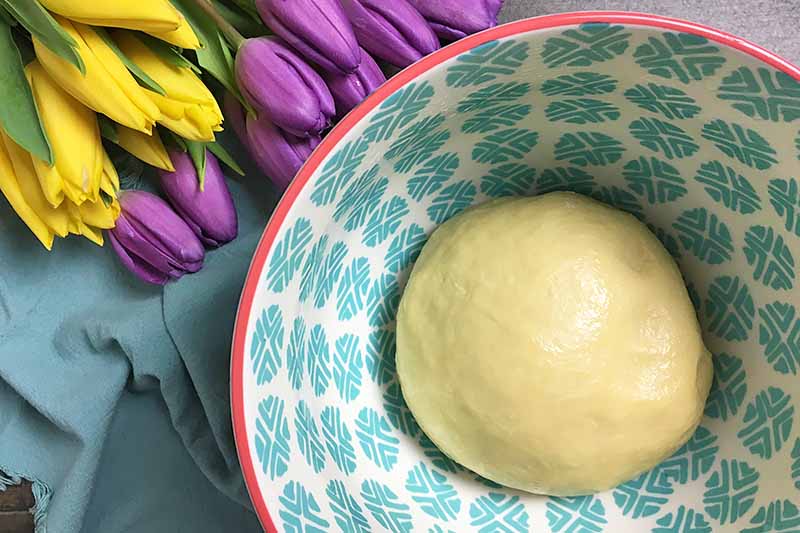
- Turn the dough onto a lightly floured work surface. Knead by hand for about 5-8 minutes, until very smooth and elastic.
- Shape into a ball, and place in a bowl lightly greased with butter or oil, rolling it around to coat the entire ball in a thin film of fat. Cover, and let rise until doubled, about one hour.
- Punch the dough down, and turn onto the same lightly floured work surface. Knead in the fruits, almonds, and anise seed.
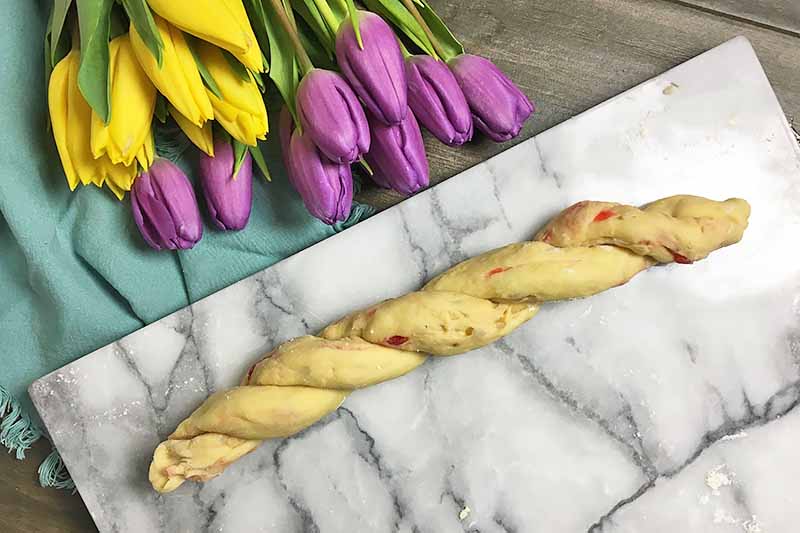
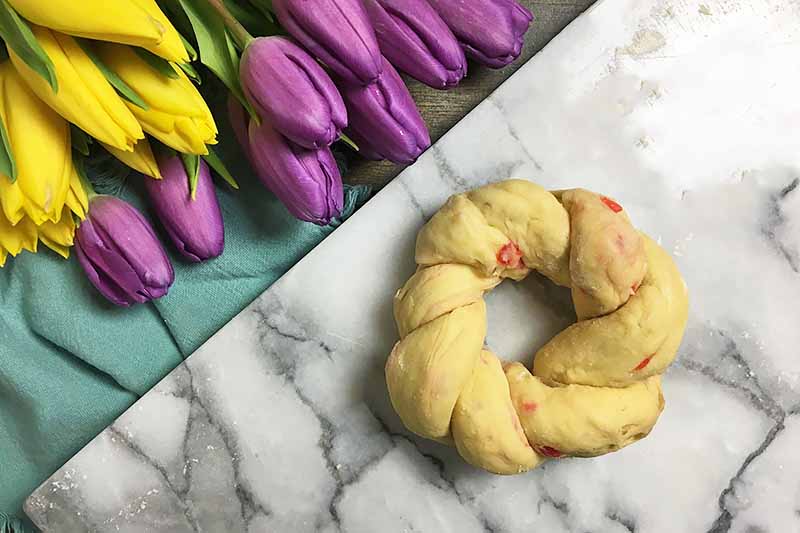
- Divide the dough into 3 equal parts. Divide each part into halves – there should be 6 pieces total. Cover and let rest for 10 minutes. Roll each piece of dough into about a 12-inch rope. Place two ropes together, and pinch one end. Twist the ropes together. Form into a ring on a baking sheet lined with parchment paper or a silicone mat. Repeat with the other 2 sets of ropes, making a total of 3 bread rings.
- Cover, and let rise again until doubled, about 1 hour.
- Carefully place a dyed egg in the center of each dough ring. Whisk together the egg yolk and 1 tablespoon water. Carefully brush the top and sides of the bread, avoiding the dyed egg.
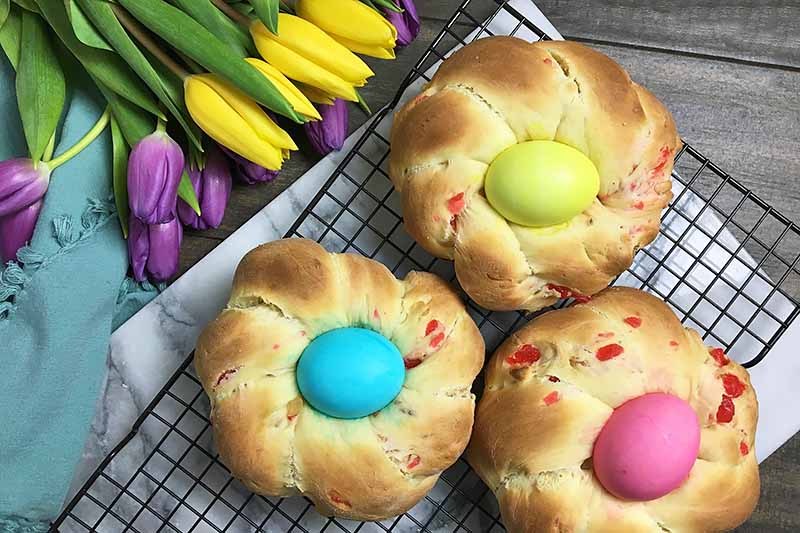
- Bake at 350°F for 20-25 minutes, until puffed and golden brown on the outside. Remove from the baking sheet and let cool completely.
For the Glaze and Decorating (Optional):
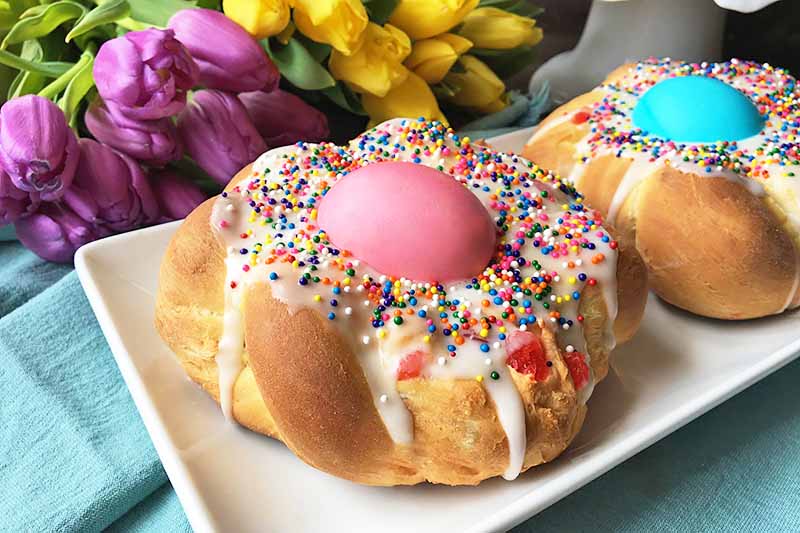
- Whisk together the confectioners’ sugar, milk, and vanilla. Let sit and thicken slightly, stirring occasionally, about 10 minutes.
- Once the bread is cool, spread the glaze evenly around the top of each ring. Let harden slightly before garnishing with sprinkles. Serve and enjoy!
Notes
*Instead of by hand, you can mix and knead the dough in a stand mixer fitted with a dough hook attachment.
- Prep Time: 3 hours
- Cook Time: 25 minutes
- Category: Bread
- Method: Baking
- Cuisine: Baked Goods
Cooking by the Numbers…
Step 1 – Dye the Eggs

Dye the raw eggs in any food dye color of your choosing. It’s best to use white eggs, rather than other colors. The vibrancy of the dye will stand out more on a white base than a brown, red, or blue shell.
Make sure the eggs are completely dry before making the dough! This will lessen the risk of the dye bleeding onto the dough as it is baking.
Step 2 – Mix the Dough
In a large bowl, combine 1 cup all-purpose flour, the granulated sugar, salt, and yeast. I like to combine these ingredients with a whisk, to make sure all of the dry ingredients are mixed thoroughly.
Heat the milk and butter in a saucepan over low heat until the liquid is just warm and the butter is completely melted. Be sure to not allow the milk to boil or scorch – it will heat up quickly!
Add the milk mixture to the dry ingredients, and stir together with a sturdy spoon. Add the 2 eggs and stir until combined. The mixture will be very sticky.
Gradually add the flour, 1/2 cup at a time, until a very soft, slightly sticky dough forms. You may not need to use all of the flour.
Instead of mixing and kneading the dough by hand, you can complete Steps 2 and 3 with a stand mixer fitted with the dough hook attachment if you prefer.
Step 3 – Knead the Dough
Turn the dough onto a lightly floured, flat work surface, or on a wooden work bench.
Knead by hand for about 5-8 minutes, until very smooth and elastic. You may need to add more flour as necessary if the dough starts to sticks to the work surface.
Shape into a ball, and place in a large bowl lightly greased with butter or a neutral vegetable oil, rolling it around to coat the entire ball in a thin film of fat.
Don’t clean off your work surface yet! You’ll need that lightly floured area for another step later on.
Step 4 – Proof
Cover with a towel or plastic wrap, being sure to not let the covering touch the dough so that it has room to rise.

Let proof in a warmer part of your house until it doubles in size, about one hour.
Step 5 – Mix in the Fruit, Nuts, and Spice
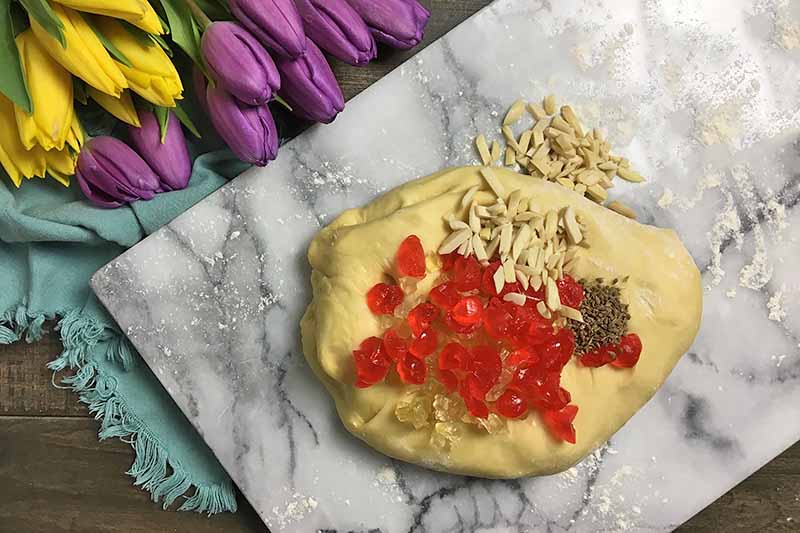
After the dough has risen, punch it down with your fist, and turn it out onto the same lightly floured work surface.
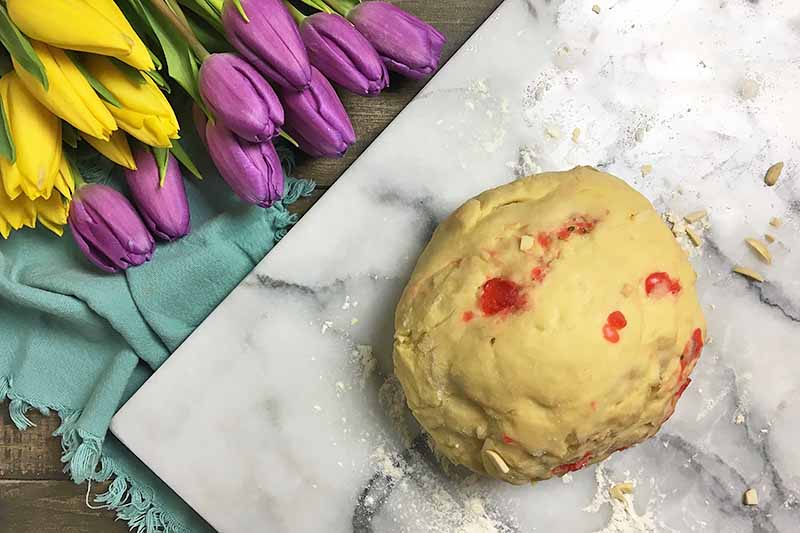
Knead in the fruits, almonds, and anise seed until everything is completely incorporated throughout the dough. You may need to use a little more flour so it doesn’t stick.
Step 6 – Divide and Shape
Divide the dough into 3 equal parts. Divide each part into halves – there should be 6 pieces total. For more even division into equal amounts, you can use a scale to weigh the dough.
Cover the pieces and let rest for 10 minutes to re-soften them and allow the gluten to relax.

Roll each piece of dough into a 12-inch rope. Place two ropes together, and pinch the top ends together. Twist the ropes together. Form into a small ring with a small hole in the middle, and place on a baking sheet pan lined with parchment paper or a silicone mat.
Repeat with the other 2 sets of ropes, making a total of 3 bread rings. Position the bread rings on the same sheet pan, leaving enough space in between each ring for rising.
Don’t feel like making individual rings? You can make one large loaf instead! You can braid the bread however you want, making three or four indentations on the top of the loaf for the eggs.
Step 7 – Second Proof
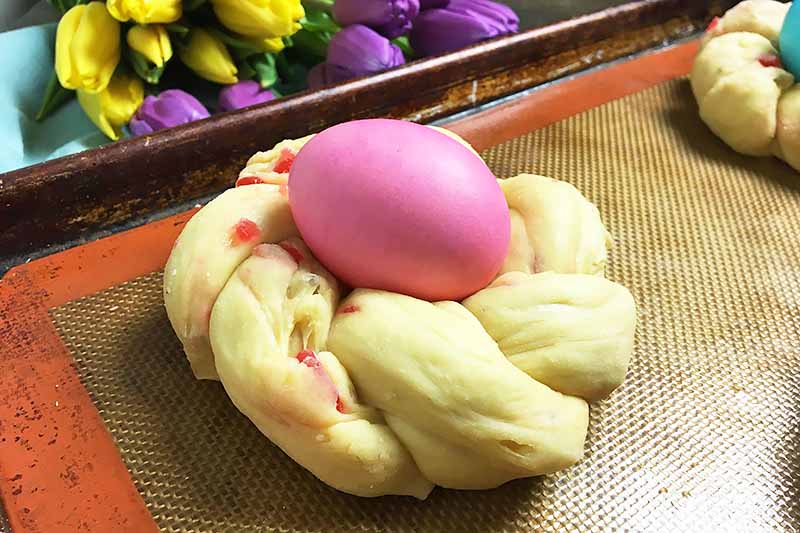
Cover, and let rise again until nearly doubled in size, about 1 hour. Carefully place a dyed egg in the center of each risen ring.
While the rings are rising during this step, preheat the oven to 350°F
Step 8 – Bake
Whisk together the egg yolk with about a tablespoon of water. Carefully brush the top and sides of the bread, avoiding the dyed egg. The dye from the egg will bleed if the egg yolk contacts it.
Bake for 20-25 minutes, until puffed and golden brown on the outside. Remove from the baking sheet pan and let cool completely.
Step 9 – Garnish and Serve

In a small bowl, whisk together the confectioners’ sugar, milk, and vanilla. Let sit and thicken slightly, stirring occasionally, about 10 minutes – this can be done as the bread is cooling.
Once the bread is completely cool, spread the glaze evenly around the top of each loaf. Garnish with sprinkles, and let the icing harden slightly before slicing, serving, and enjoying!
Not a fan of the icing and sprinkle combo? You can choose to leave the bread as is, with no garnishes except a beautifully browned crust.
A Festive Bread to Welcome Spring
Topped with bright and colorful eggs and filled with a delicious assortment of candied fruits, nuts, and anise seeds, this festive fluffy baked treat will surely be enjoyed by everyone this Easter holiday!
You get to decide if you want to make one large loaf, or cute individual rings like these. Let me know what you do this year, and feel free to share all of your own holiday traditions in the comment section below.
For more breads to try this spring, make these recipes next:
Photos by Nikki Cervone, © Ask the Experts, LLC. ALL RIGHTS RESERVED. See our TOS for more details. Originally published on March 30, 2015 by Jennifer Swartvagher. Last updated: November 29, 2022 at 9:06 am. With additional writing and editing by Nikki Cervone.
Nutritional information derived from a database of known generic and branded foods and ingredients and was not compiled by a registered dietitian or submitted for lab testing. It should be viewed as an approximation.
About Allison Sidhu
Allison M. Sidhu is a culinary enthusiast from southeastern Pennsylvania who has returned to Philly after a seven-year sojourn to sunny LA. She loves exploring the local restaurant and bar scene with her best buds. She holds a BA in English literature from Swarthmore College and an MA in gastronomy from Boston University. When she’s not in the kitchen whipping up something tasty (or listening to the latest food podcasts while she does the dishes!) you’ll probably find Allison tapping away at her keyboard, chilling in the garden, curled up with a good book (or ready to dominate with controller in hand in front of the latest video game) on the couch, or devouring a dollar dog and crab fries at the Phillies game.


That bread looks awesome. For me, there’s nothing better than waking up to a homemade, fresh loaf in the morning. This would go perfectly with some tea, and maybe lots of extra butter and jam in it.
What’s the traditional Italian way? Eat it by itself or with some spreads?
I have always enjoyed this bread with a cup of warm tea. I have never used butter or jams to accompany it. It is delicious all on its own.
That bread looks amazing with the vibrant colour eggs in them. I have often cooked eggs in the oven, but never in their shells before. I guess you could use natural dyes such as turmeric and paprika to colour the egg shells as well as the method we used as a child which left the egg shells multi-coloured, but I can’t for the life of me think what it was called.
The Individual rolls look really stunning especially with the bows on them.
I found that it is relatively easy to hard boil eggs in the oven.
Preheat the oven to 325 degrees F.
Take a 12 cup muffin pan, and put a whole egg in each cup.
Bake for 30 minutes, remove eggs from pan and immediately place in an ice water bath.
Peel after allowing eggs to cool.
Some natural dyes make beautifully colored eggs.
I’ve remembered what we used to do, it was to wrap the eggs in various different coloured onion skins to dye them in a marbled effect.
They look amazing, but I don’t think my bread making skills are up to this just yet, but I am wiling to practice. I do like looking at other peoples work and it looks simple, but time consuming so I will need a year of practice I think.
Whilst the colored eggs do look good, I’m not sure I would go to the trouble of dyeing some especially. I’m sure these would look equally delicious unadorned! What actually happens with the eggs anyhow? I assume that they cook in the oven but are they then edible?
Yes, the eggs are edible.
Oh wow! I don’t have a bread maker,and don’t plan on getting one. I like to get my hands in there and actually make it myself. Apt of the recipes now a days wants you to have one. Trusts why I’m so excited a out this recipe. It looks good and I can make it with my hands. I am definitely going to give it a go at my next family gathering!
It’s so pretty. I’ve always wanted to make some. I was hoping you would post something about it. Using uncooked eggs sounds a lot better than some recommendations to go ahead and use boiled ones. I definitely wouldn’t try to eat them after that.
I think I would just make mine into a ring, like the last picture, and add the eggs afterward. Thanks for the recipe (the bread looks delicious) and the tips. I hope you, and everyone here, has a happy Easter.
I have never heard of Italian Easter Bread, but am very happy to have found this recipe. I am always looking for ways to impress my family at the holidays with unique, themed foods. For my particular use, I think I will make one large loaf. Could you tell me an approximate time that this recipe takes (from start to finish). I’m trying to plan my Easter weekend accordingly. Happy Easter and thank you, again, for this dazzling recipe.
I love how colorful the loaf is with the Easter eggs in it. I’ve seen pictures of this type of bread before, but have never attempted to make it. It didn’t occur to me that the eggs would be raw upon entering the oven, and that they would cook in the bread, but that makes sense. I always think of colored eggs as hard boiled before being colored, probably because I have butter fingers ;). This recipe does look a little advanced, but it’s something I might try at some point. Happy Easter, Everyone!
This is the first time I have seen this tradition. I had no idea you could dye eggs this way and then cook them raw in the oven. I always thought they may explode. However, this is a very nice and colorful tradition which will especially attract children and get them to eat their eggs!
Oh, that looks so delicious! I’m definitely going to try it! The only thing that worries me, though, is whether I have the right kind of yeast. In the country I currently live in, there’s only one kind of yeast sold in the stores. It’s granulated and in small packages which makes me think that maybe it’s active dry yeast, but I’m not sure. Do you think the bread will turn out ok if I’m wrong? I plan to make one bread for my family and a few rings with eggs in them for friends. They will be so thrilled!:)
Thank you for that wonderful recipe!
Don’t let the recipe intimidate you. Bread making is no more difficult than anything else. And it’s fun. Try it now, you won’t be sorry. And if you have children they can mimic what mama’s doing with the dough to make itty-bitty buns, etc. So fun.
Blessings to you,
Anne Nutter
I love this idea for baking with the kids, Anne. Thanks for sharing! Hope you had a happy Easter!
Can not wait to make this at Easter. I have been looking for a recipe that I used to make when I was in my teens it was from a woman’s magazine in the 70s . The exact ingredients. It was delicious and I wanted to try to make it again. I thought I could find it with Google but this sounds almost identical except it was one loaf. I will let you know how it turns out.
Enjoy, Holly! So glad you found our recipe, and we can’t wait to hear how it goes!