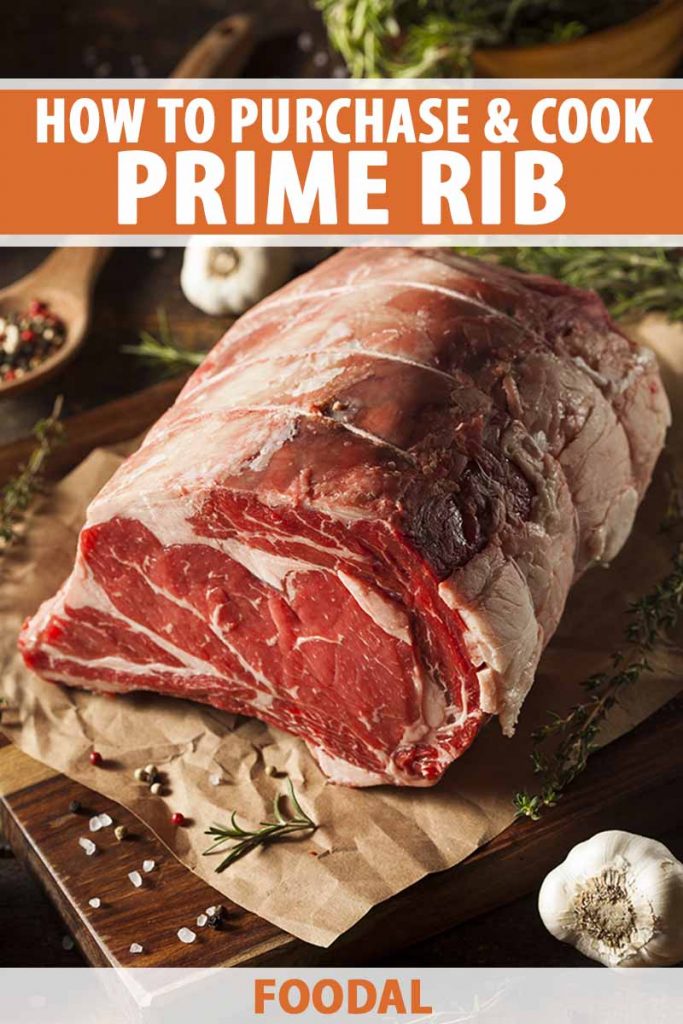
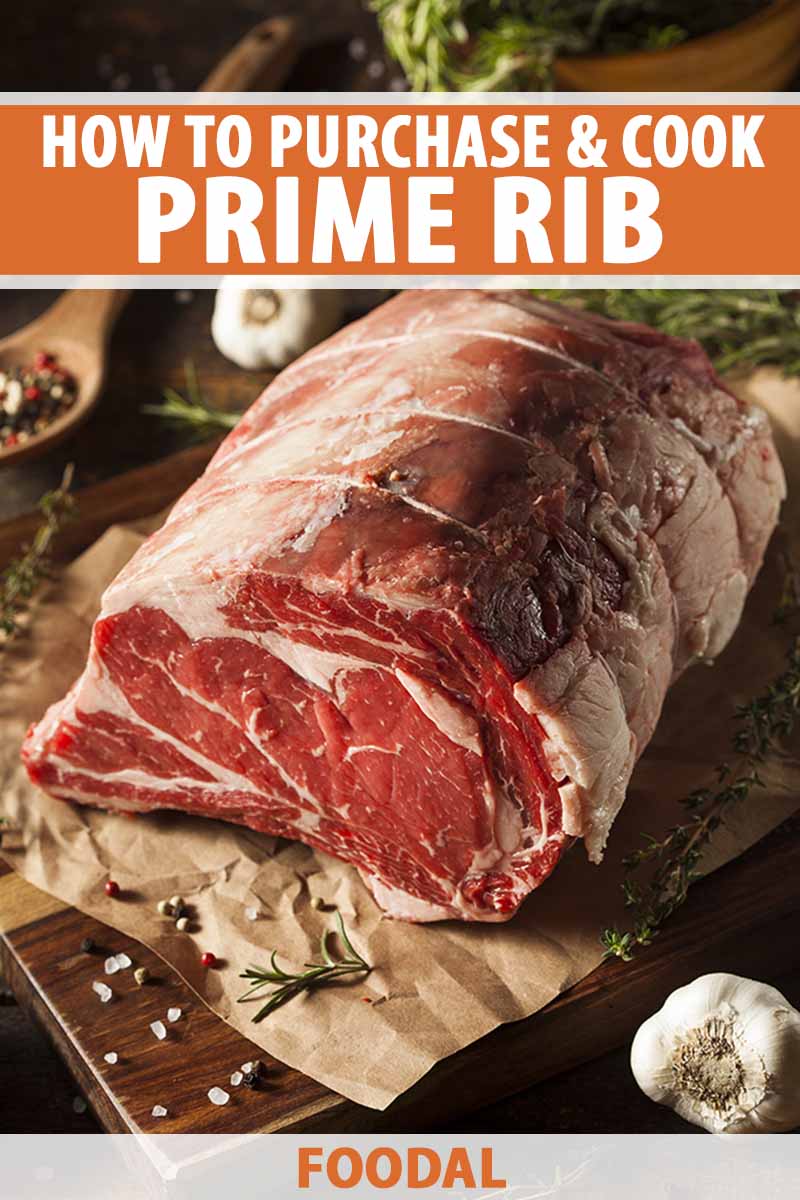
Prime rib is melt-in-your-mouth tender, incredibly flavorful, and without a doubt one of the most strikingly beautiful cuts of beef.
It’s the show-stopping main course to prepare at home and serve your guests when you’re hosting an impressive dinner party.
It’s an unforgettable main course, having enough presence to replace even the turkey for Thanksgiving!
If you’re determined to make a gorgeous roast for your next big gathering, let’s go over all the essentials together so you’ll have the necessary know-how before you make this substantial purchase.
We’ll teach you exactly what to look for when you’re ready to go shopping, as well as the correct terminology surrounding this cut of meat.
After that, you’ll learn how to cook prime rib properly, with our step-by-step instructions guiding you along the way.
And you can’t make prime rib without au jus!
Using all the delicious drippings from the meat you artfully cooked, you’ll be able to make a succulent and savory sauce as the best accompaniment for this savory entree.
We’re thrilled you want to serve family and friends a main course they’ll never forget – with our help and guidance, give them the prime rib of their wildest dreams right at home.
How to Purchase and Cook Prime Rib
Know Your Cuts and In-Store Preparations
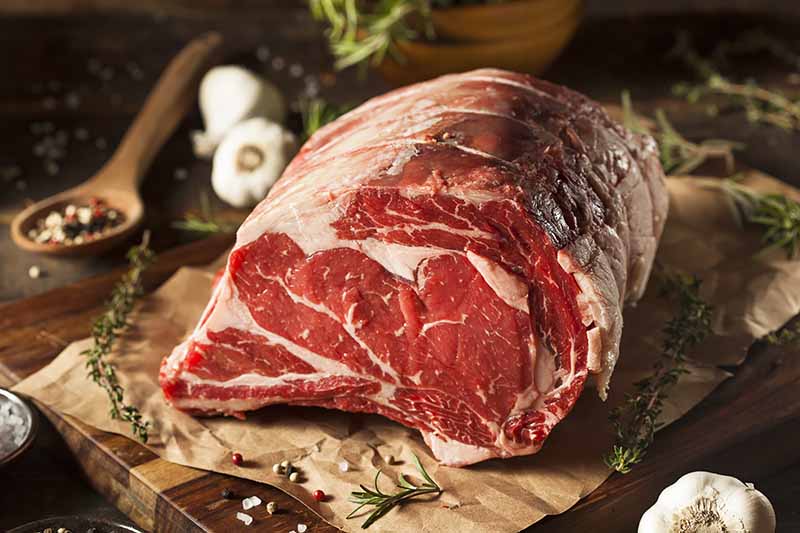
Prime rib is butchered from one of the main primal cuts of beef: the rib.
The center portion of the rib is not a well-exercised muscle of the steer, and therefore yields tender results when cooked properly – it’s one of the reasons why a succulent prime rib is such a cherished menu item!
Prime rib can be sold bone-in or boneless, and there are multiple names that are used to identify these secondary cuts.
The names are often used interchangeably, and can vary between different butcheries and regions of the world, so it can be confusing at first to understand the differences.
Generally, prime rib is also called a standing rib roast. This is butchered as a whole cut, with the rib bones still intact.
When butchered as a boneless cut, it is typically referred as rib roast or rolled rib roast, and can also be further divided into individual boneless ribeye steaks.
Are you wondering which cut you should buy? Let’s take a look.
Do you want to really impress a hungry crowd? Are you ready for jaws to drop at the dining table? Purchase a bone-in prime rib! Not only will a bone-in cut result in a juicier and more flavorful dish, it also offers an aesthetically lavish presentation.
Bone-in options are also slightly cheaper, because less labor is required from the butcher to prepare them.
But before rushing to the cashier, be sure to confirm with your butcher exactly what style of cut you are getting, in reference to the name advertised at that particular location!
If you don’t have a butcher in the area that sells prime rib cuts of beef, you may want to check high-quality online offerings, like the American wagyu options available from Snake River Farms.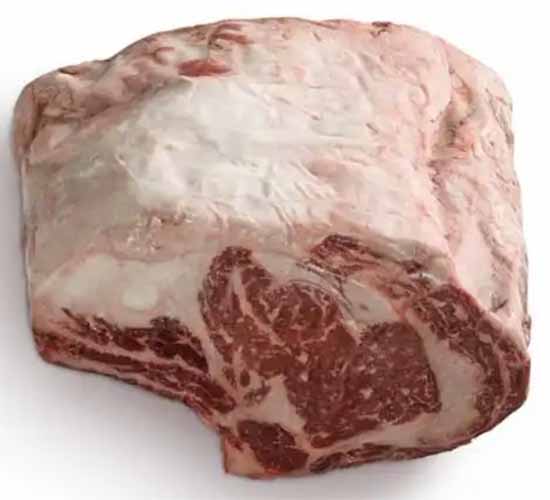
Snake River Farms American Wagyu Gold Grade Bone-In Prime Rib Roast, 3 Bones, available from Snake River Farms
For a cleaner presentation, you can ask your butcher if they are able to French the bones, removing any excess meat, fat, and sinew.
We also recommend asking your butcher to tie the roast for you. Tying your cut of meat with kitchen twine will keep the roast in a tight, compact shape so it will cook evenly.
If your cut of meat is purchased untied, you will need to do this yourself with kitchen twine as you are prepping.
Feeling extra confident with your knife skills? To save a little money at the store by doing some of your own butchering at home, read our guide on how to debone, roll, and tie your cut of prime rib. This article also explains how to remove excess fat.
Prime Rib and Prime Grade – Two Different Things!
To eliminate any confusion when you’re shopping at the grocery store or butcher shop, there is some important terminology to understand before you make your purchase.
The term “Prime” has two separate meanings: it can refer to the cut of meat as well as the highest quality grade in the USDA grading system for beef.
This is an important distinction to understand! Just because the label on your meat says “Prime” does not mean it is actually referring to a Prime quality grade.
The grade below Prime is known as Choice, which is what most supermarkets carry among their meat selections. Some butchers and online vendors also use their own grading systems to describe meat quality.
Speak to the butcher at your local market to ensure you are purchasing the cut of meat you were intending to buy. When you ask the butcher for prime rib, they will most often assume you are strictly speaking about the cut of meat, and not referencing the quality grade.
The quality of the meat will still be excellent from reputable sources, but if you are looking to splurge on a Prime quality selection, you may need to ask the butcher to place a special order in advance, or consider buying from online sources.
How Much Should You Buy?
A whole primal cut of rib – with all 13 ribs of the steer intact on one side – can potentially weigh over 40 pounds!
Butchers will cut it down and sell the halves as separate standing rib roasts. According to typical retail standards, this is considered a “full standing rib roast,” which usually consists of 6 or 7 bones.
These half cuts can still potentially weigh over 20 pounds each, so butchers often cut them down even further.
The various sections of rib segments taken from different locations on the animal have distinct differences from one another in both texture and flavor, notably described as either the first cut or the second cut.
The first cut is the loin end of the ribs – also called the small end – which consists of ribs 10 through 12. Because it includes the ribeye muscle, it will yield incredibly tender cooked meat.
The second cut is the chuck end of the ribs. It is closer to the shoulder of the steer, and consists of ribs 6 through 9. Full of connective tissue with more fat than the first cut, it will not be as neat and uniform as the other option, but it has a lot of flavor.
The roast pictured above from Snake River Farms, for example, includes three bones and the tender ribeye muscle.
You can request a specific weight or number of ribs, and specify which set of ribs you prefer, when speaking with your butcher. When you know you will have a list of specifications, it is advised that you order ahead of time to ensure you get what you want, and when you need it!
When setting your menu with a large cut like this, plan to purchase a cut with one rib for every two people, which is about one pound of bone-in prime rib per person.
Don’t let this hefty serving weight per person scare you into buying less than what you need! Because the bones contribute a significant portion of this weight, you won’t actually be serving each guest a full pound of meat.
For anyone who loves a list – hello, kindred spirits! – here’s a basic mathematical breakdown of general serving sizes and weights:
- 1 bone = 2 people = 2 pounds
- 2 bones = 4 people = 4 pounds
- 3 bones = 6 people = 6 pounds
- 4 bones = 8 people = 8 pounds
- 5 bones = 10 people = 10 pounds
- 6 bones = 12 people = 12 pounds
- 7 bones = 14 people = 14 pounds
- 8 bones = 16 people = 16 pounds
- 9 bones = 18 people = 18 pounds
- 10 bones = you get the gist, but are you SURE your roasting pan is big enough?!
Alrighty. So you have the exact cut you want, in the exact weight you want… Now, let’s roast it!
How to Cook Prime Rib
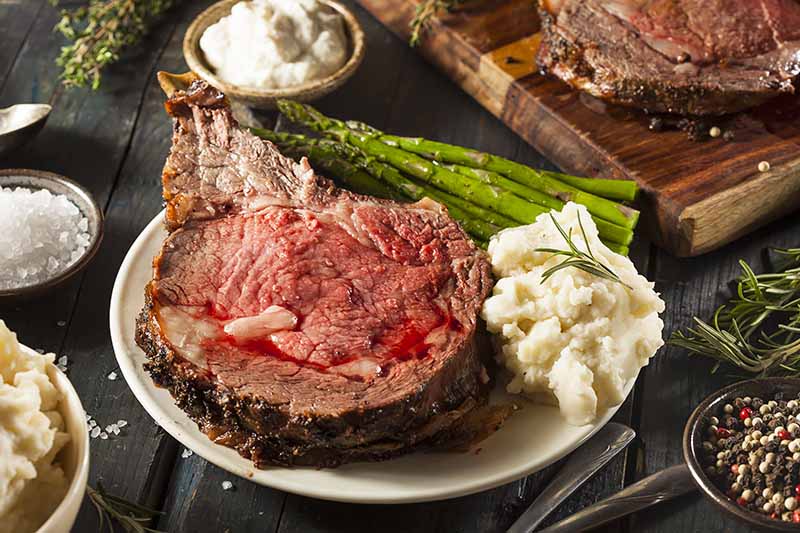
For the purpose of this basic tutorial, we will focus on a simple cooking preparation for a bone-in prime rib – a standing rib roast – that can serve about 8 people.
This version is a no-frills method, using only kosher salt and freshly cracked pepper as the seasonings.
You certainly have the opportunity to apply herbs and spices to taste, and we suggest reading through our guide to kitchen herbs and spices for flavor inspiration.
But we find less is more with this cut of beef, especially when you want to stick with the basics!
Step 1 – Prep and Measure Ingredients
You will need the following ingredients:
- 1 bone-in standing rib roast, about 8 pounds (4 bones)
- 2 tablespoons coarse kosher salt, plus more as needed
- 1 tablespoon freshly cracked pepper, plus more as needed
And here are the tools and equipment you should gather:
- Roasting pan with rack
- Paper towels
- Large rimmed baking sheet
- Meat thermometer
- Kitchen shears
- Large carving knife
- Large sturdy carving board with juice grooves
- Large serving platter
Step 2 – Prep the Meat and Preheat the Oven
In order for the roast to cook evenly, it should not be cold when you put it in the oven.
Before seasoning, remove the meat from its original packaging, discarding any excess juices. Loosely cover the meat in plastic wrap or aluminum foil, place it on a large rimmed baking sheet, and allow it to come to room temperature before cooking.
For an 8-pound roast, this will take one to two hours. The time required to reach room temperature will vary depending on the size of the roast – add more time for larger, thicker cuts.
When the beef is nearing room temperature, preheat the oven to 450°F. Arrange the rack in the center of the oven.
Step 3 – Season
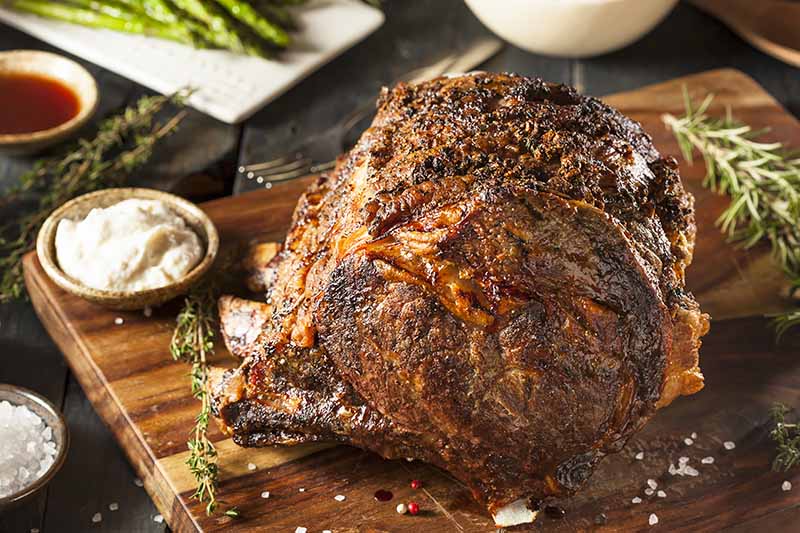
Pat the roast dry with paper towels. Evenly season the entire roast with salt and black pepper, pressing the seasoning with the palm of your hand into the exterior of the meat so it sticks.
The amount of seasoning will depend on the size of your cut. For an 8-pound roast, start with 2 tablespoons salt and 1 tablespoon freshly cracked pepper, using more as needed to season the entire piece of meat.
Transfer the seasoned roast to the roasting pan, with the fatty side facing up in the pan so it can cook and render properly.
Step 4 – Oven-Sear
Transfer the pan to the oven and roast for 20 minutes, then lower the temperature to 325°F. Do not open the oven door!
This method of cooking meat at a high temperature for a short period of time in the oven to begin is referred to as oven-searing, which is a different method compared to searing food in a pan.
Searing in a pan involves quickly browning the exterior of the meat as it makes contact with hot fat in the pan, while oven-searing is roasting the meat at a very high temperature for a short period of time before lowering the temperature in order to create a beautifully browned crust.
Step 5 – Continue Roasting and Check Temperature
Continue to cook the roast for about 1 1/2 hours before you start checking the internal temperature with your meat thermometer.
It is important to note that this initial checkpoint for an 8-pound bone-in cut as well as the total cook time will need to be pushed back depending on the weight of your roast and what your ideal level of doneness is. Estimate with the following amounts of time per pound, and start checking for doneness about 10 minutes before you expect the roast to hit your intended range:
- Rare: 12-20 minutes per pound
- Medium Rare: 20-25 minutes per pound
- Medium: 25-30 minutes per pound
- Medium Well: 30-35 minutes per pound
- Well: 35 minutes or more per pound
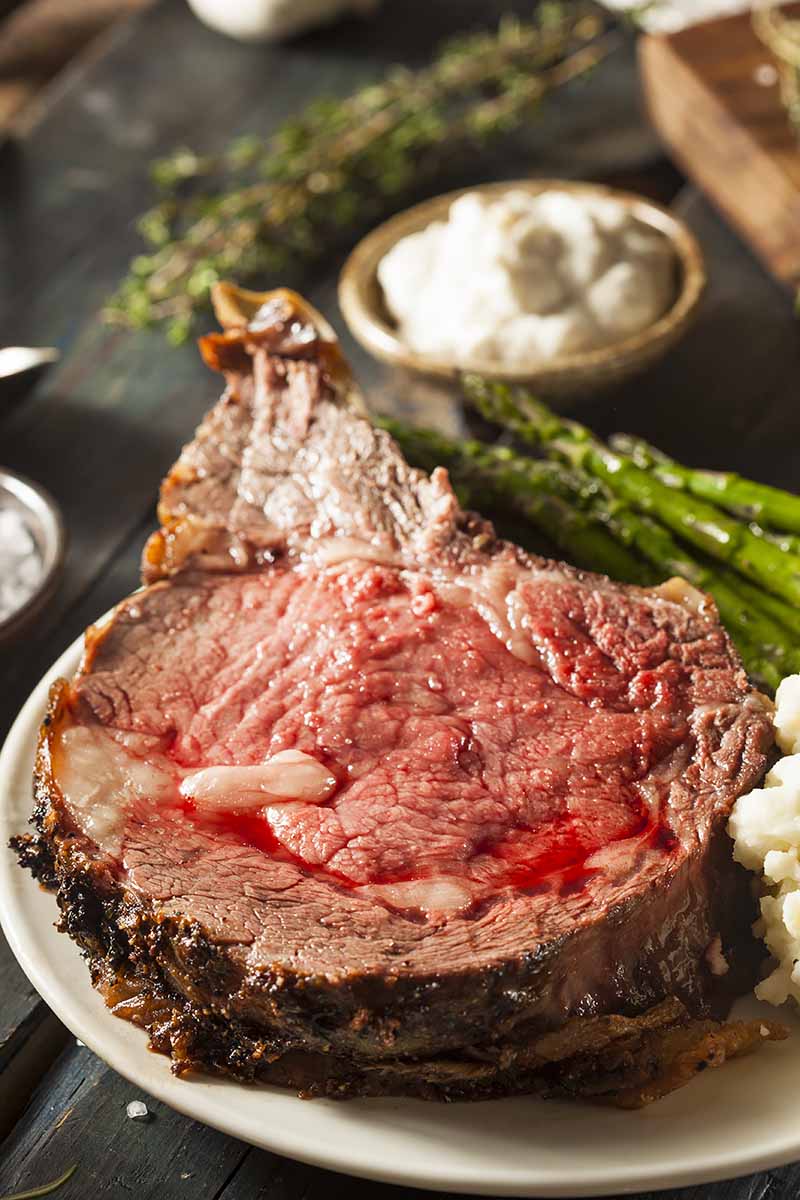
Here is your basic temperature guideline to check for doneness when pulling the meat from the oven. Choose the temperature that is ideal for you and your company to enjoy:
- Rare: 120°F
- Medium Rare: 130°F
- Medium: 140°F
- Medium Well: 150°F
- Well: 160°F and above
For the rarest roast, the internal temperature should be no lower than 115°F. But only pull it from the oven at this point if you and your guests love rare meat!
These temperatures may be lower than you would expect, but keep in mind that there will be continued carryover cooking that raises the temperature 5 to 10°F after the roast is removed from the oven and allowed to rest.
If the temperature is too low when you first check, continue cooking the meat and checking the temperature in 10-minute intervals.
Note: Boneless rib roasts will cook in a shorter period of time than bone-in selections. Because the bone acts as an insulator around the surrounding meat, it affects the distribution of heat as the beef is cooking, taking longer to reach your desired temperature.
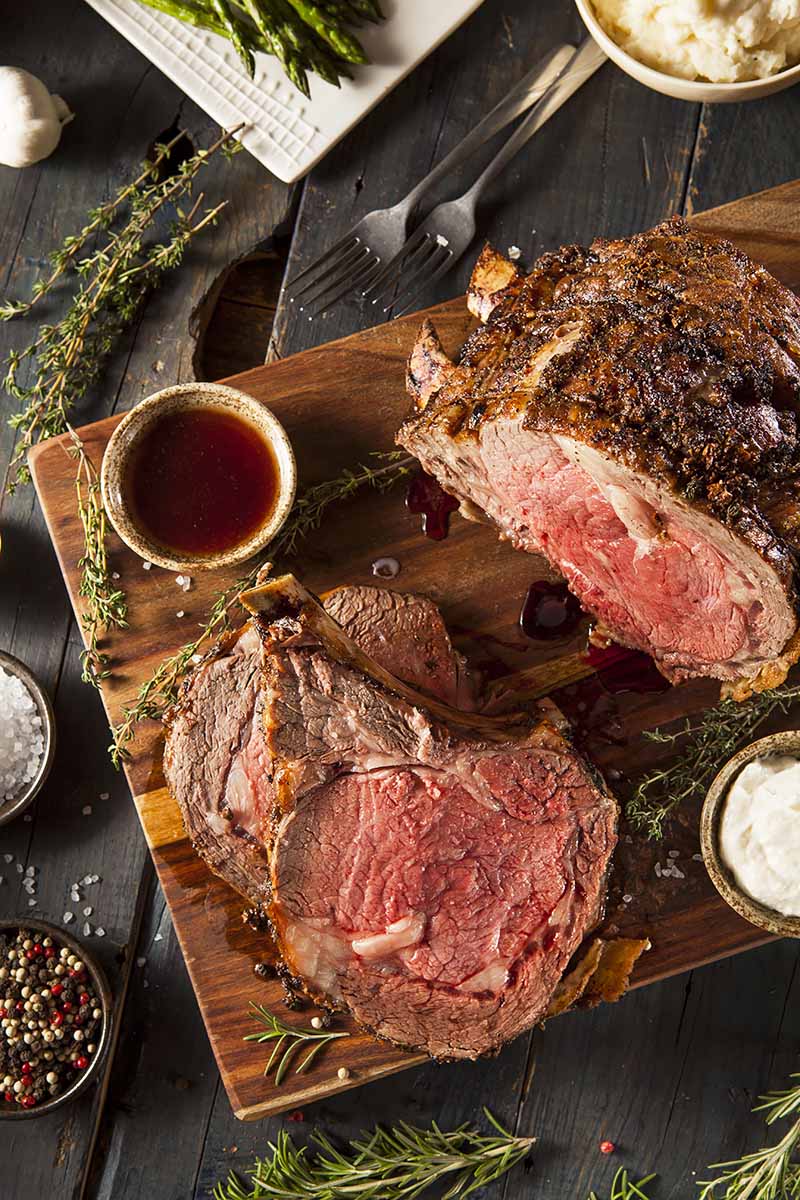
Step 6 – Remove from Oven and Rest
When the meat has reached your ideal temperature, immediately remove the pan from the oven.
Carefully transfer the roast to a large cutting or carving board – preferably one with grooves around the perimeter to catch any rogue juices!
Allow the meat to rest for 20 to 30 minutes. This resting period is absolutely essential. When the muscle fibers relax after roasting, the juices are redistributed throughout the meat, keeping your it as tender and juicy as possible!
Resist the urge to tent the meat with aluminum foil during the resting phase – the foil will collect steam, causing the crust to become soggy. A cut this large also retains heat for a long period, so you don’t need to worry about it getting too cold to serve while it rests.
Step 7 – Make the Au Jus Sauce
While the beef is resting, this is the best time to make au jus.
The French words “au jus” translated to “with juice” in English, and refers to the liquid naturally given off by the beef as it cooks.
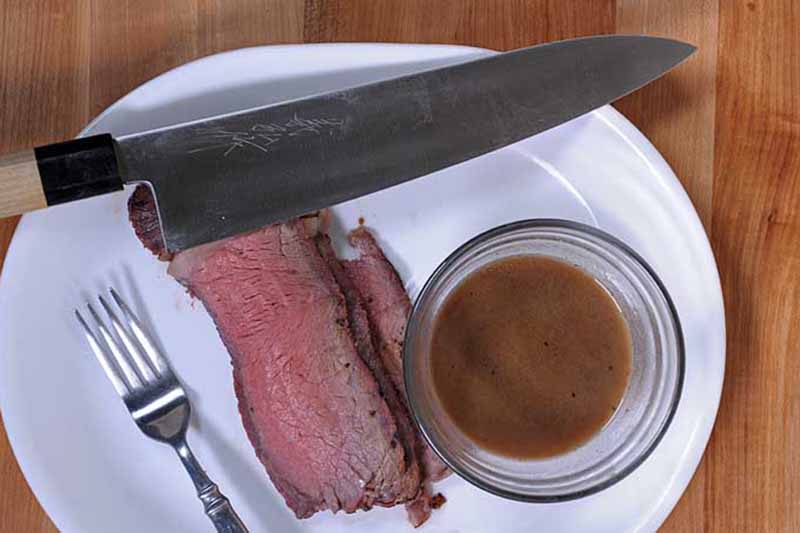
However, if you want bigger, bolder, beefier flavors, crafting your own au jus sauce is worth the effort – especially if the juices in your pan have dried out during roasting.
Preparing a reduction of the drippings, along with additional beef broth or stock and other ingredients, will yield incredibly concentrated meaty flavors.
You can make it from scratch with the help of Foodal’s very own au jus recipe!
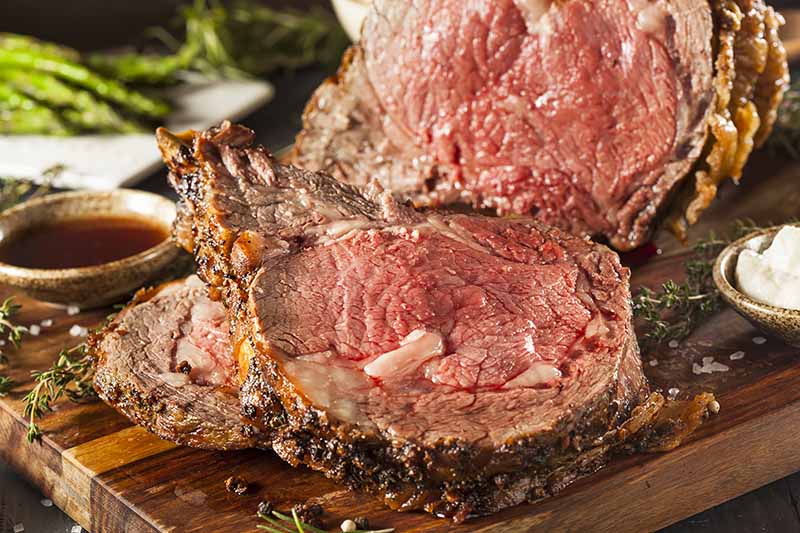
Step 8 – Cut and Serve
Is the meat finished resting? Using kitchen shears or a chef’s knife, cut off the kitchen twine.
With a carving knife, cut the roast into 1/2-inch-thick slices, going against the grain and using the bones as your guidelines for where to cut. If you chose a boneless roast, you can use a ruler to help you get the most precisely measured and even cuts for each serving.
Cutting against the grain of the meat means slicing with the blade perpendicular to the muscle fibers of the meat. By cutting through and thus shortening the muscle fibers with each slice, you will yield more tender pieces.
Serve and enjoy, with the au jus and your favorite side dishes and other accompaniments!
Which brings us to our final section of this guide…
Choose Your Accompaniments
When serving prime rib, you have plenty of tasty opportunities to create some delicious flavor combinations!
If you prefer the natural simplicity of the meat itself, let its true beefy flavors shine loud and proud by only choosing to serve your perfectly cooked roast with homemade au jus, the liquidy conglomeration of all your hard work.
But there are some other heavy hitters in the world of prime rib accompaniments – most notably horseradish!
As the classic zingy counterpart to a rich and tender slice of beef, horseradish is a highly popular choice for those who crave a fun punch of spicy flavor. You can mellow this strong hit by serving horseradish cream, often made with a base of heavy cream, sour cream, and/or mayonnaise.
Keep the side dishes simple – they are not the stars here! An easy preparation of roasted vegetables with mashed potatoes, or freshly baked bread will do just fine.
Prime and Proper Presentation
Now that you have your juicy beef roasted and ready to go, your sauces standing at attention, and your side dishes fresh and hot, it’s all about the final assembly!
You can choose to cut the meat and pre-plate your guests’ dishes in the kitchen, or you can go family-style by showcasing your jaw-dropping roast in the center of the dinner table, surrounded by bowls and plates of sauces and side dishes.
Set the scene you’ve always imagined for your dream dinner party – however you slice it, everyone will be excited to enjoy this insanely generous home-cooked meal!
Is this the first time you’re making prime rib? For readers out there who have tried their hand at it before, do you have any pieces of advice to share with the newbies that we didn’t cover here?
Tell us how you achieved your best successes, and give voice to your trials and tribulations, in the comment section below.
If you melt over meaty mains and want to learn how to cook other recipes just as perfectly as your prime rib, you’ll love our collection of knowledge-based, protein-rich articles and tutorials. Start with these, and explore more from there:
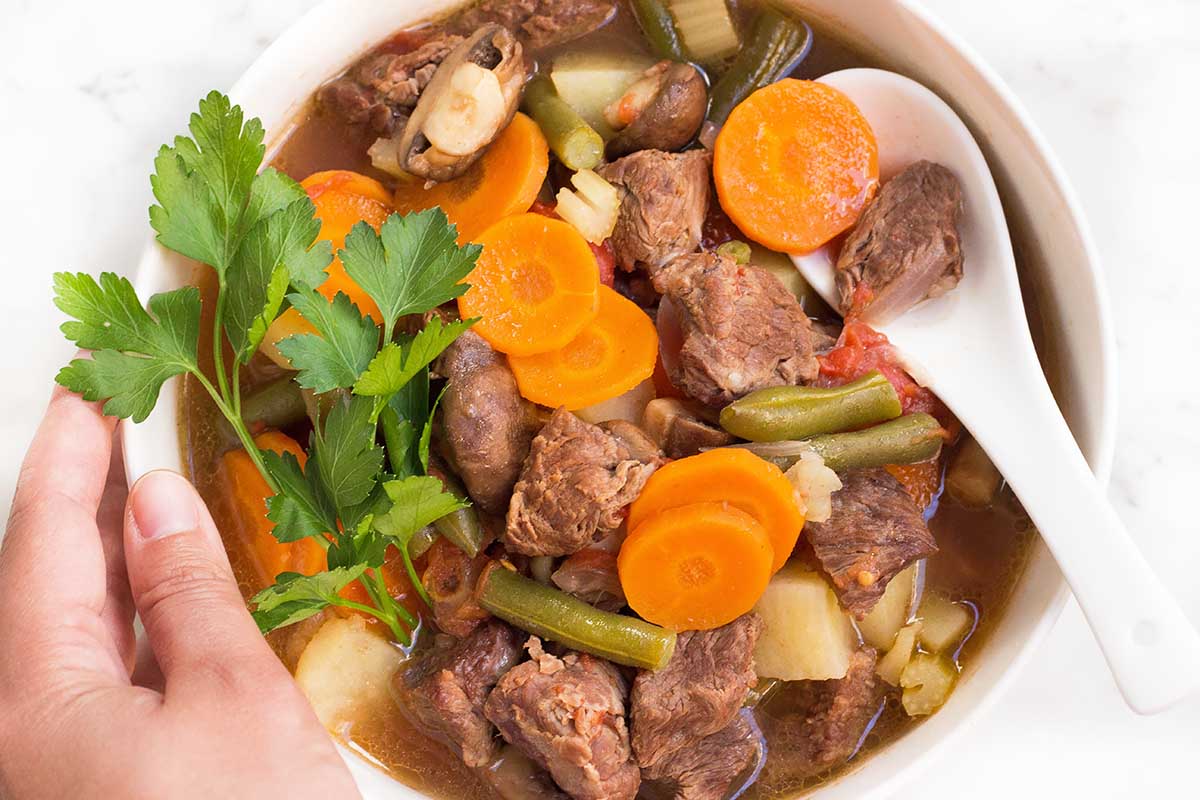
- How to Cook Beef Stew in the Electric Pressure Cooker
- How to Break Down a Whole Chicken Easily
- How to Cook Pork Shoulder in the Electric Pressure Cooker
© Ask the Experts, LLC. ALL RIGHTS RESERVED. See our TOS for more details. Originally published by Jennifer Swartvagher on June 20, 2015. Last updated on December 14, 2022. Uncredited photos via Shutterstock. Product photos via Snake River Farms.
About Nikki Cervone
Nikki Cervone is an ACS Certified Cheese Professional and cheesemonger living in Pittsburgh. Nikki holds an AAS in baking/pastry from Westmoreland County Community College, a BA in Communications from Duquesne University, and an MLA in Gastronomy from Boston University. When she's not nibbling on her favorite cheeses or testing a batch of cupcakes, Nikki enjoys a healthy dose of yoga, wine, hiking, singing in the shower, and chocolate. Lots of chocolate.
I am practically drooling right now, because this looks so good. Please pass the horseradish sauce! I’ve been telling my husband that I’ve been craving prime rib. I haven’t had it in ages. Of course, it’s not something we eat often, but it’s been a really long time.
I prefer medium rare as well. I used to like really rare meat, but I just can’t eat it like that any more. Medium rare sounds like perfection to me.
Are those roasted garlic mashed potatoes on the side? Crisp asparagus too? Heaven.
I don’t often splurge on expensive meat, since my budget is pretty tight these days, but your pictures look delicious, and they’re inspiring a craving in me that won’t be quenched by a lower end cut. I wasn’t aware that grocers didn’t stock higher end products.
When I was growing up, we would go to the butcher section of a large popular steak house that was known for selling quality meat, and also had a local butcher that we would use, but where I live now, they’re harder to find, so I thought grocery stores carried all types and grades, so that’s good to know.
I’m lucky because here I have a specialty store and a regular grocery store where I can ask for a special order. I can then have items hand-cut perfectly to my taste. These are not high end stores either, but being able to do that does feel like a luxury to me. We also have a meat shop that’s fairly nice. It’s a bit further away, but I do get over that way pretty regularly. It’s also a bit on the pricey side, unless there’s a good sale going on, but it is another option if in a pinch.
That looks fantastic! Here in the UK, beef on the bone was banned for several years due to BSE concerns. It was only re-introduced 15 years ago but you rarely see it in supermarkets, even now.
That prime rib looks delicious. I wonder if the number people becoming butchers is decreasing. Unless I go directly to where our local butchers are, I don’t tend to see too many of them in super markets.
Yep, there was definitely saliva buildup as I read this and viewed the pictures. Oh god it looks so good.
I frequent asian markets, so acquiring specific cuts and such is a skill that I’m proud to have, and now it looks like I’m putting it to use soon. Thanks for sharing.
I had no clue there was a difference between the cut and grade. I thought it all meant the same honestly. Shows how much I know about meat, right? At least I gained new knowledge to flaunt around to my husband; he’ll be shocked lol. The pictures look amazing though and I can’t wait to try it out, but I doubt it’ll look as good as the pics.
Yummy! I was able to get prime rib at a discount at the restaurant I worked at earlier this year & last. It wasn’t the most flavorful, but there is no doubt the rib cuts are the best.
I love trying out dry rubs and salts to add the beefiest flavor to my steak cuts, so I think I will try a suggestion from another article on this site and use some MSG for the next time I happen to make this.
Oh my God! I want those prime ribs right now! I think I could handle at least 5 of the servings all on my own. LOL. Thank you so much Jennifer for all the great information that you provided on this topic. Truthfully, I learned more today with you, than what I’ve learned in my lifetime. Thank you as well for the cooking instructions, they will help the making of this amazing dish, so much easier for me.
When do I put the meat thermometer in the meat? When it first goes in the oven facing the door? Or when I think it’s time?? Don’t want to keep opening oven door.
What type of thermometer do you have, Joan? Though some types may have a probe that can be inserted and kept in the oven throughout the duration of cooking, most meat thermometers are are not meant for continual use inside the oven. Rather, they are typically used to check the doneness of a roast after it is removed from the oven. Using the average time range indicated in a recipe, you would then pull the roast out, quickly close the door to keep the heat inside, check the temperature, and place it back in the oven again as needed.
See our guide for more information on meat thermometers, plus suggestions to pick one for purchase. You might also be interested in reading our guide to understanding your oven to learn more about the internal temperature of your appliance and its unique quirks.