
We occasionally link to goods offered by vendors to help the reader find relevant products. Some of these may be affiliate based, meaning we earn small commissions (at no additional cost to you) if items are purchased. Here is more about what we do.
Enjoying a slice of artisan bread is much like savoring a glass of wine.

Hold it up to your nose and take a deep breath, inhaling the tangy scent. Admire the loose structure, the glossy texture, the stark difference between crust and crumb.
Then close your eyes, take a bite, and chew. As you chew, inhale again to experience the full complexity of flavor.
If you’ve never had the pleasure of enjoying such a slice in the comfort of your own home, it’s high time you give it a try. You’ll be surprised that with just a little bit of explanation, you can learn to troubleshoot your way through artisan breadmaking.
I say “troubleshoot” because this type of bread is not quite so direct, in terms of following a recipe. You must follow the feeling of what you’re doing more than a list of weights and measures.
But once you’ve learned to read your dough, you’ll soon find that it’s much more enjoyable than following step-by-step instructions. It comes with the satisfaction of knowing that you’ve mastered an art form.
Here’s what’s to come in our guide to baking sourdough:
What You’ll Learn
What Is Artisanal Bread?
There is no exact definition of what makes a particular bread “artisanal.”
The “artisanal” food movement is a reaction to the large-scale industrialization of food production. In bread, this involves the introduction of high ratios of commercial yeast and dough conditioners to speed up the breadmaking process.
You know the stuff. Those squishy loaves that comes in plastic bags at the grocery store.
Artisan breads, then, are those which are made slowly and with small quantities of yeast, with few ingredients and no preservatives.
Just flour, water, salt, and yeast.
The category of so-called artisan breads typically refers to high hydration, lean recipes. This means the dough is made with just the basic four ingredients, using a high ratio of water to flour.
A higher hydration (i.e. wetter dough) encourages yeast activity and aids in the development of flavor.
Rather than necessitating intense kneading or machine mixing, over the course of time, water and naturally present enzymes break down the proteins and starches in flour in a process called autolysis. This provides more flavor to the dough than a short fermentation fueled by sugar could ever offer.
The Science Side
The long fermentation of artisan breads allows the enzymes present in the flour to slowly break down the starches and proteins, to make the bread flavorful and easy to digest. As the starches break down, they become great food for the yeast – which feasts happily, without the need for additional sugar.
It’s possible to create a long-fermented, high hydration, artisan bread using commercial yeast (this is the no-knead method made famous by Mark Bittman), but the most flavorful bread is made using the wild yeasts that are already present in the air around you.
The strains of yeast found in your grocery store variety thrive in a basic or alkaline environment – meaning they won’t create a super flavorful, tangy bread.
Wild yeasts, on the other hand, thrive in an acidic environment. A sourdough starter is a symbiotic network of wild yeasts and bacteria that work together to create an acidic environment that is mutually beneficial.
When used to leaven bread, both the yeast and the bacteria ferment the grains, developing more flavor and lending more nutritional benefits than a commercial yeast fermentation.
Sourdough Starter: Capturing Yeast
Making sourdough takes patience. Not only must you be mentally prepared for lots of mistakes, you must plan far in advance as well.
This starts with creating your yeast culture – sometimes called a starter or a levain.
Making the levain is simple. It is just a mixture of flour and water that’s left in a warm environment for a few days.
But you must not rush the process – it will take about 5 days before it’s active enough to raise a loaf of bread.
You can start with either all-purpose or bread flour, or you can use a mixture of white wheat and another grain.
An all-purpose starter is the most predictable, but additional grains provide more complex flavors.
Be sure to always use at least 50% all-purpose or bread flour to provide enough gluten. One of my favorite levains uses half all-purpose flour and half sprouted whole wheat. Some other possibilities include whole grains like rye, spelt, barley, or semolina.
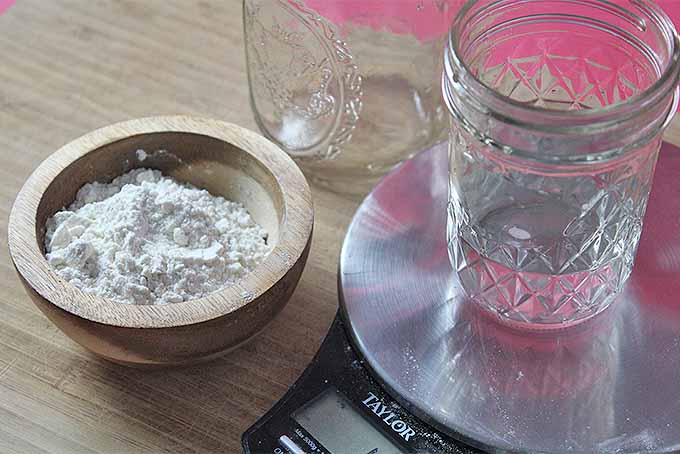
I recommend weighing your ingredients in grams. While the starter is incredibly resilient and won’t mind if your measures are slightly off, using a kitchen scale to get it right is just much simpler.
The levain rises and falls as it digests the flour, so weight measures account for these volume changes.
Also, it’s much cleaner and quicker to measure things straight into a bowl on a scale than it is to pull out different sizes of cups and spoons (which you’ll also have to wash!).
How to Make a Sourdough Starter at Home
Let’s get to it, shall we?
Day 1 – Combine Ingredients
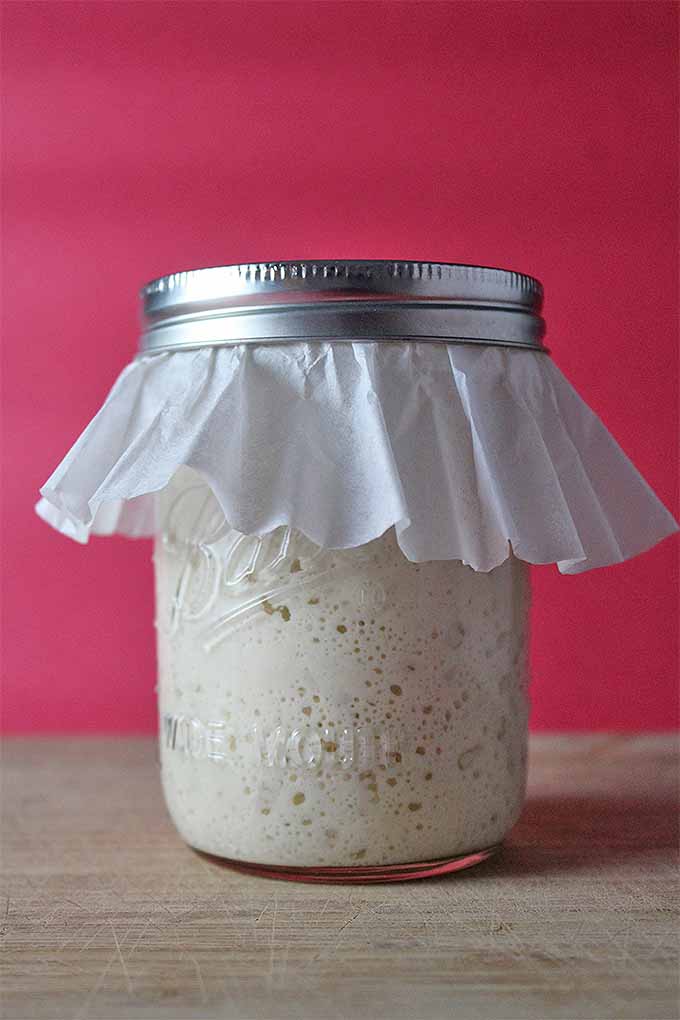
Mix together 50 grams of water and 50 grams of flour in a glass or plastic bowl. Cover with a light kitchen towel, paper towel, or coffee filter.
I prefer to use a mason jar without the lid insert. I cover the jar with a coffee filter and screw the lid ring on to hold it in place. This allows air to circulate while keeping out unwanted debris.
Day 2 – Wait
Just let things be. You should begin to see some small bubbles forming, and the mixture will be more liquid than it was the day before.
Day 3 – Feed
Add 50 grams of water and 50 grams of flour to the mixture.
Day 4 – Feed
Add another 50 grams of water and 50 grams of flour to the mixture.
Day 5 – Feed
Add yet another 50 grams of water and 50 grams of flour to the mixture.
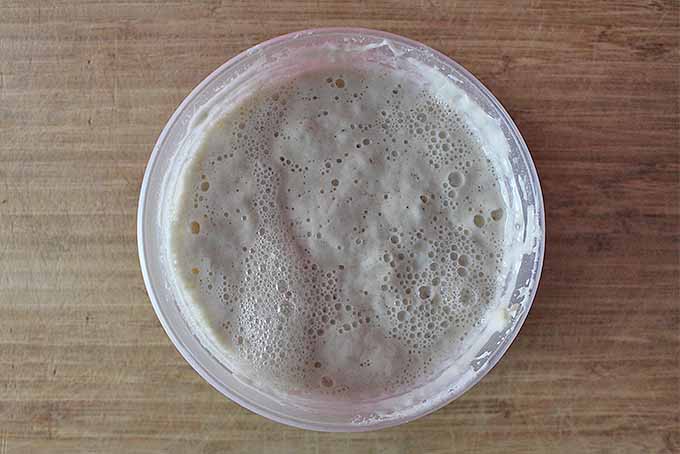
When the starter bubbles up and appears billowy, it is ready to use.
When it is ready, it will also float. If you think it’s at the right point, drop a small portion into water to test it.
Feeding and Caring for Your Starter
The number one rule of maintaining a starter is this: it won’t live if it doesn’t have a name.
I’m not sure if there is any science to back this up, but I can confirm that all of my unnamed starters have died from mysterious causes.
So make sure to give your starter a good name. I call mine Aerie.
After the naming is complete, the second most important rule of maintaining a starter is to feed it consistently.
If you plan to bake regularly, store the starter at room temperature. Feed it daily, following a 20:40:40 ratio: 20% starter, 40% flour, and 40% water.
For example, if you have 20 grams of starter, simply feed it 40 grams of flour and 40 grams of water.
Over the next 6 to 12 hours after feeding the starter, it will begin to smell sweet, slowly bubble up and grow, and then take on a slightly sour smell and begin to fall. The starter is most active and ready for baking when it is in the bubbly phase.
If you’re unsure as to whether your starter is in this active phase or not, try the float test. Just like when you were initially making your starter, pinch off a small portion and drop it into a cup of water.
If it floats, it is active. If not, give it a little bit more time.
To make the recipe below, you will need 100 grams of active starter. Of course, you’ll want to make sure you still have a small bit of starter remaining, to feed and allow the batch (your new friend, who has a name!) to carry on. I try to maintain a reserve of at least 25 grams of starter at all times.
Following the 20:40:40 ratio, this means that 4-6 hours before I’m ready to bake, I feed 50 grams of flour and 50 grams of water to my 25 grams of starter. Once it’s bubbly, I scoop out 100 grams for my recipe and reserve the other 25 for my next round of baking.
Print
Homemade Sourdough Bread
- Total Time: 10 hrs, 15 min
- Yield: 1 loaf
Description
Learn to make your own beautiful artisan loaves of sourdough bread at home, with homemade sourdough starter.
Ingredients
- 100 grams active starter, bubbly from a recent feed
- 200 grams water, divided
- 100 grams whole wheat flour
- 200 grams all purpose flour
- 10 grams salt
Instructions
- Mix together the starter, 100 grams of water, and the whole wheat flour. Let sit for 1 hour.
- Add the remaining 100 grams of water and the all-purpose flour. Stir to combine until the flour is fully hydrated. Let rest for 30 minutes.
- Sprinkle the salt over the top of the dough and squeeze it in.
- Stretch and fold the dough, stretching one corner up at a time and folding the mixture in half.
- Perform 4 stretch and folds (completing 4 full cycles with one fold starting at each corner), every 20 minutes for 2 hours.
- After the final stretch and fold, let the dough rest for 3 hours.
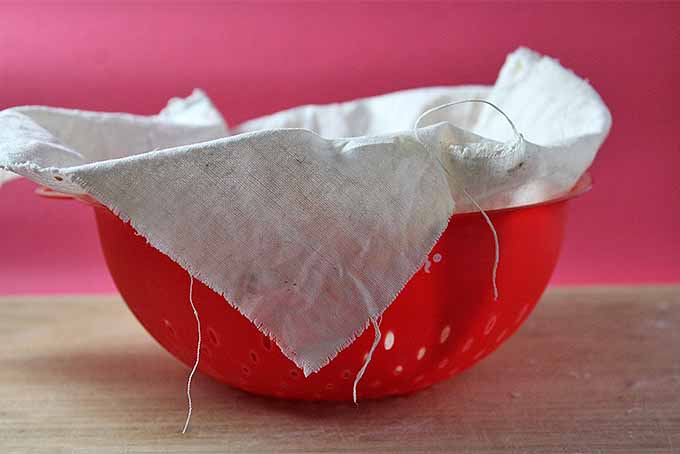
- Shape the dough into a round and place in a floured bread basket or a colander lined with a well-floured towel. Let rest for 3 hours.
- Set the oven to 500°F and place a baking tray, cast iron skillet, or Dutch oven inside to preheat.
- When the oven has come up to temperature, carefully pull the tray out of the oven. Flip the dough seam-side down onto the hot tray. Score the top of the dough with a slice 1/2 inch deep and 3 inches long. Feel free to get creative, using cool designs for this cut!
- Return the tray to the oven, toss 2 ice cubes in the bottom of the oven to create steam, and decrease the heat to 475°F.
- Bake for 35 minutes, or until the crust is dark auburn in color.
- Remove from the oven and let cool completely before slicing.
- Prep Time: 40 minutes
- Cook Time: 35 minutes
- Category: Sourdough
- Method: Baking
- Cuisine: Bread
Cooking By the Numbers…
Step 1 – Preferment
When I make sourdough bread, I like to layer the flavors through a series of fermentations. This means starting with a small portion of flour first, letting it ferment for a short time, then adding the rest of the flour.
By fermenting the whole wheat flour first, you begin to break down the denser whole grain, developing better flavor and texture. It’s a process you can use for non-sourdough bread as well, like in our soaked whole grain bread recipe.
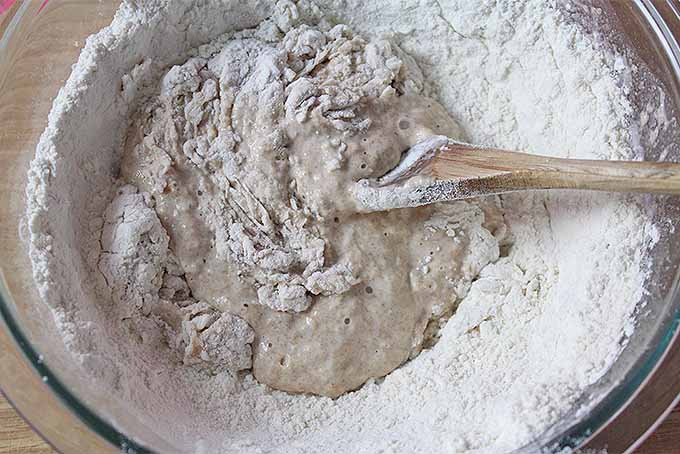
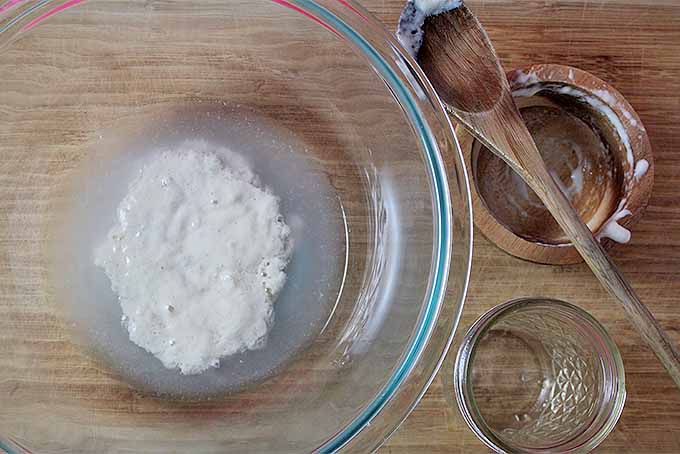
In a medium-sized bowl, mix together the starter, half of the water, and the whole wheat flour.
Let this ferment rest for at least 1 hour before moving on. It can rest for up to 3 hours if you prefer. Sourdough is very forgiving with time – most of the work happens slowly while it rests.
Step 2 – Autolyse
The second fermentation period occurs after the rest of the water and flour have been added to the preferment. The simplest way to blend them evenly is to pour the water into the preferment first, then add the flour.
Mix together until all of the flour has gotten wet, but keep in mind that you do not need to worry about achieving a totally smooth texture yet. It’s normal if the dough looks a bit shaggy at this point.
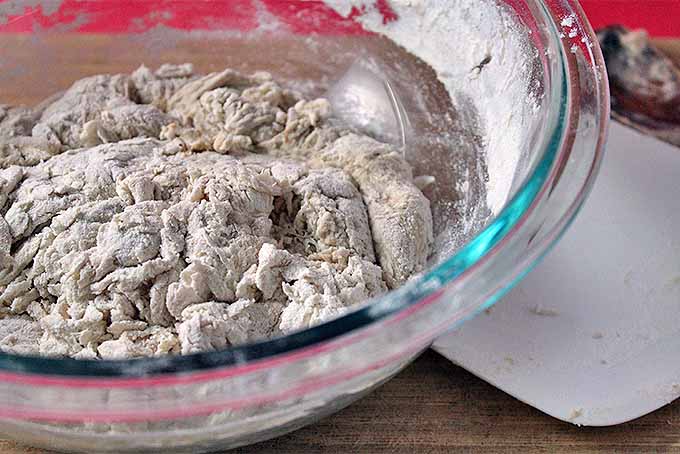
Once the flour is mixed in, the dough needs to rest for half an hour. This period is called the autolyse.
The water activates enzymes in the flour that begin to unravel the starches and the proteins. You will notice, once you return to the dough after about 30 minutes, that the texture will have changed significantly, making it much easier to work.
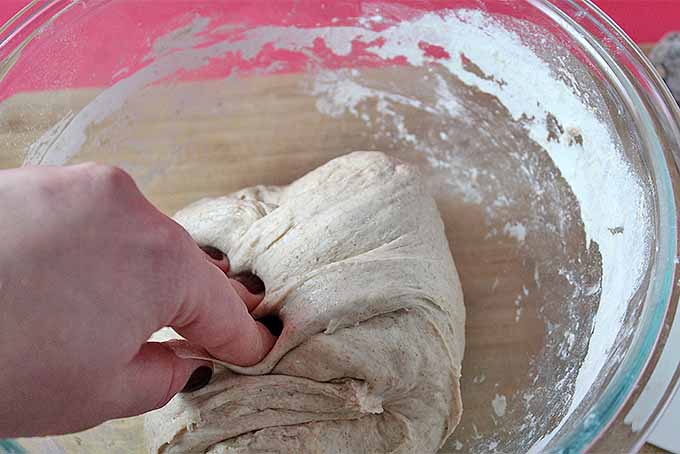
Step 3 – Salt
After the autolyse, it’s time to add your salt. Sprinkle it over the dough, and mush it in.
The best way to do this is to squish the dough between your fingers. Embrace your inner child! It’s a lot of fun.
Step 4 – Knead
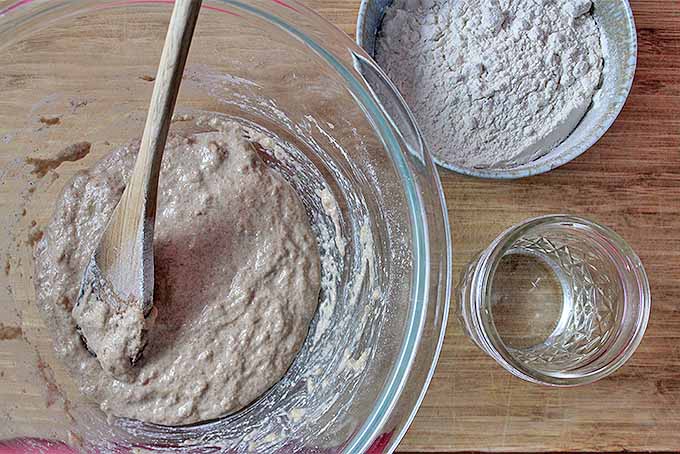
When you’re working with a wet dough, the kneading process is a little bit different than it would be for a low hydration mixture. While the purpose is the same, the process is actually much simpler.
Because the extra water and the longer fermentation time do a lot of the work of unraveling the gluten strands for you, it does not take as much physical labor to develop structure.
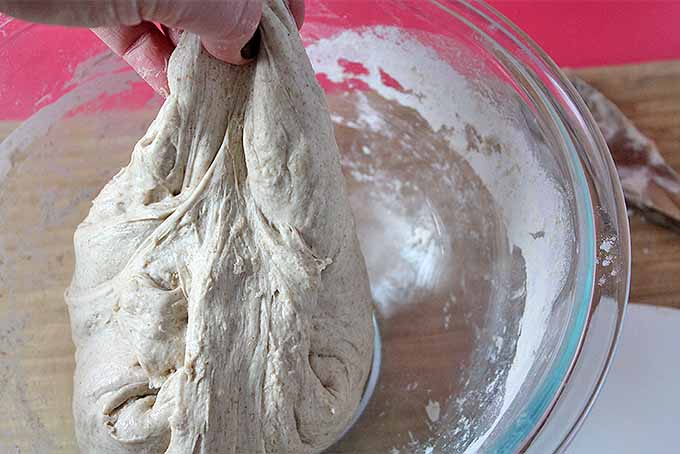
Bakers call this form of kneading a “stretch and fold.” This action is exactly like it sounds – you take a corner of the dough, stretch it up, and fold it over the rest of the dough. You’ll be amazed at how flexible and strong the mixture is.
Each time you completely a cycle of stretching and folding, you want to do it 4 times – ensuring that you get every corner. I like to imagine my bowl as a compass, pulling from the north, south, east, and finally the west side.
Do this every 20 minutes for 2 hours.
Step 5 – Bulk Fermentation
After the final stretch and fold is complete, let your dough rest for 3 hours. This period, called the bulk fermentation, is when the starter really begins to flavor and leaven the dough.
It won’t rise quite as much as a commercially yeasted dough, but you will see things beginning to grow.
“Sourdough” by Robin Sloane, Available on Amazon
Need a little reading to do while you wait? Check out Robin Sloan’s best-selling novel Sourdough: or, Lois and Her Adventures in the Underground Market.
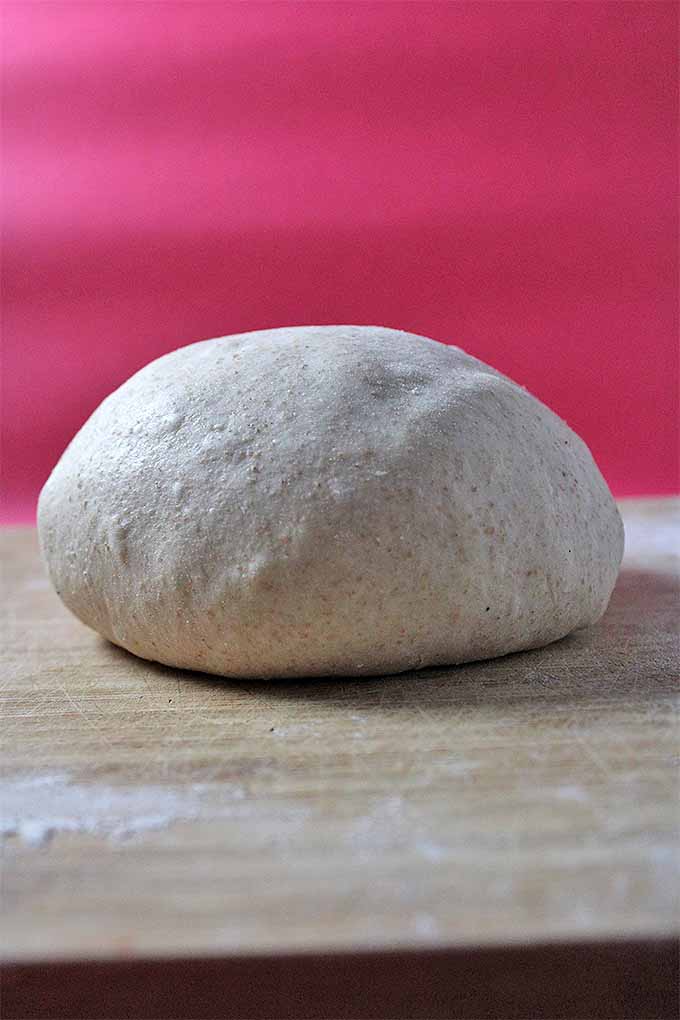
Step 6 – Bench Rest
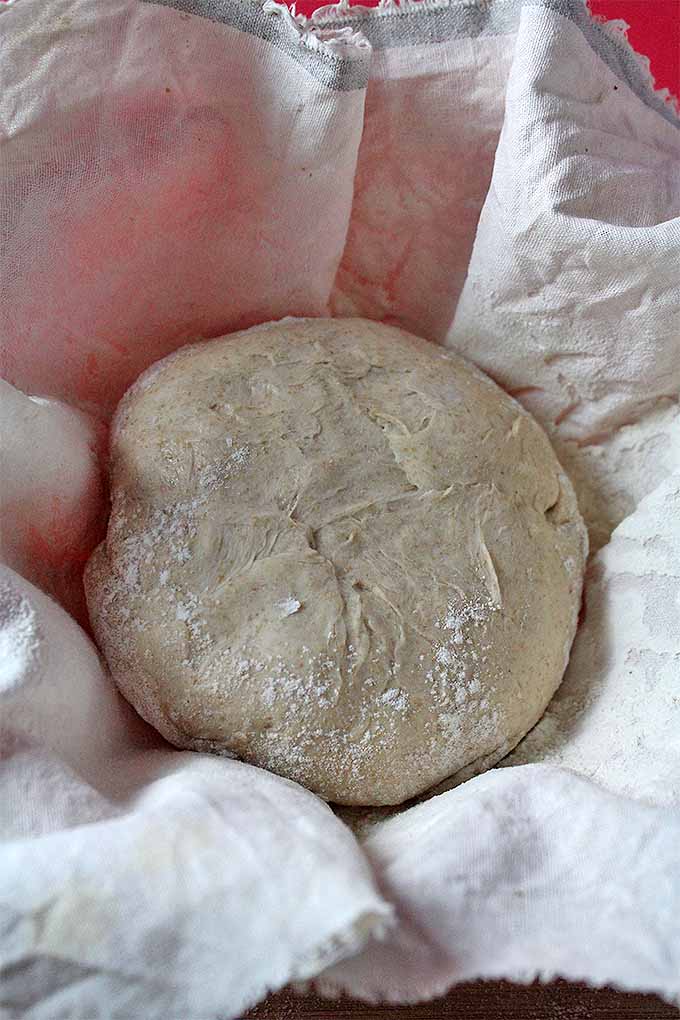
After the 3 hours is up, dump the dough out onto a floured bench board or countertop.
Fold the dough in half, turn it so that the seam side is down, and pull the dough firmly towards you. Rotate 90° and pull firmly towards yourself again. This will tighten it into a nice round.
Flip the dough upside down (seam side up) into a floured Banneton (bread basket), or a colander lined with a well-floured towel. Let it rest for 3 hours.
Again, the yeasts are continuing to flavor the dough and leaven it just a little bit more during this period.
If you’re looking to upgrade your bread baking gear, check out our guide to the best equipment must-haves and a few top-notch splurges.
You can also take your entire baking routine to the next level with these invaluable tips and tricks.
Step 7 – Load
When it’s time to bake, preheat your oven to 500°F.
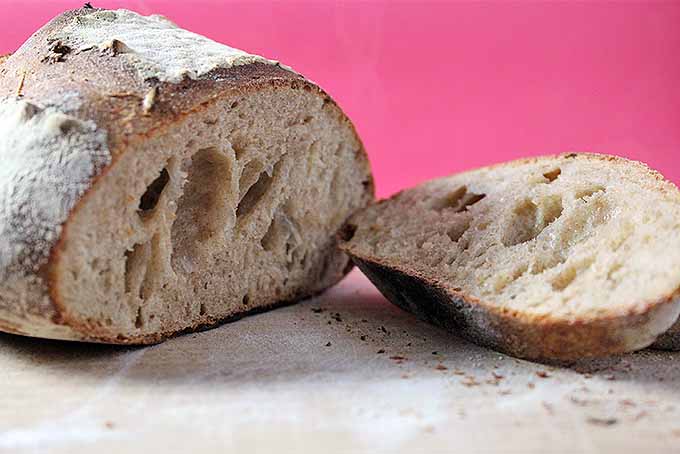
Lean bread bakes at a much higher temperature than almost anything else! The high temperature creates a burst of steam from within the dough that gives it that final push – creating the large, airy pockets that are unique to artisan breads.
When you preheat the oven, also preheat whatever you we be baking on or in – your baking tray or cookie sheet, cast iron skillet, or Dutch oven. Once the oven has come up to temp, carefully pull out your preheated tray or other baking receptacle.
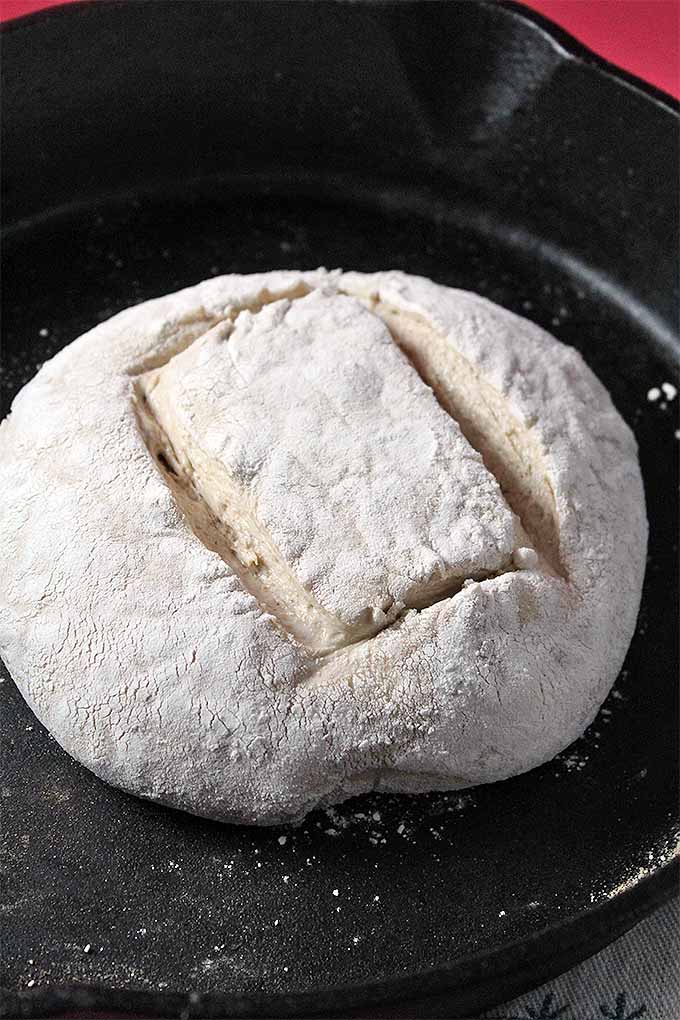
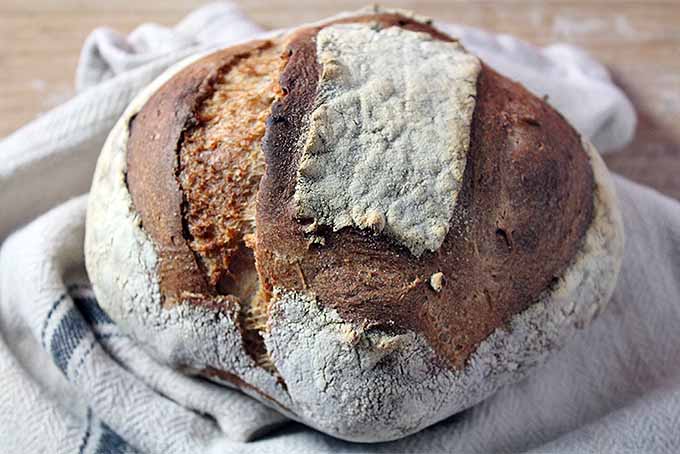
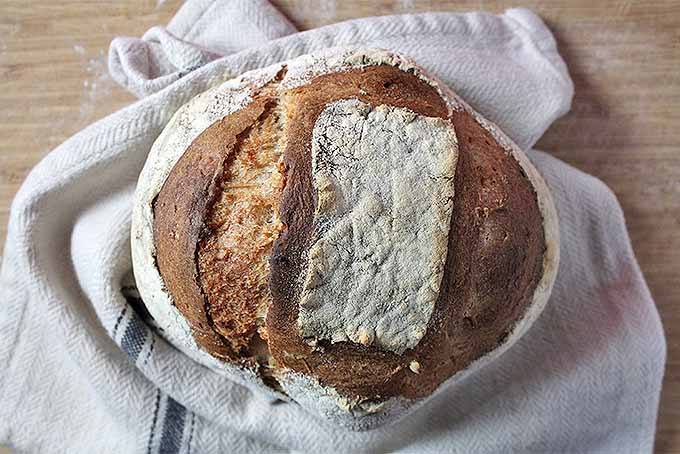
Flip the loaf seam-side down onto the hot tray, skillet, or Dutch oven. Slice the top with a lame, creating a cut that is 1/2 inch deep and 3 inches long.
Scoring the surface of the dough before baking allows you to control the direction in which it will expand, giving you more control over the final product, and helping to encourage an even bake.
Feel free to get creative, using cool designs for this cut! A large square or rectangle like I made here, a series of lines, a stalk of wheat, or a star are some of my favorites, but the options are endless!
If you are using a Dutch oven, put the lid back on and skip the next step.
Step 8 – Steam
Return the hot tray or pan to the oven, and toss a couple of ice cubes onto the oven floor.
As these melt, they will create a bit of extra steam that will help the outer crust of the bread remain soft while the inner steam gives the loaf its final push. This push is called the oven spring.
Step 9 – Bake
After closing the oven door, decrease the heat to 475°F.
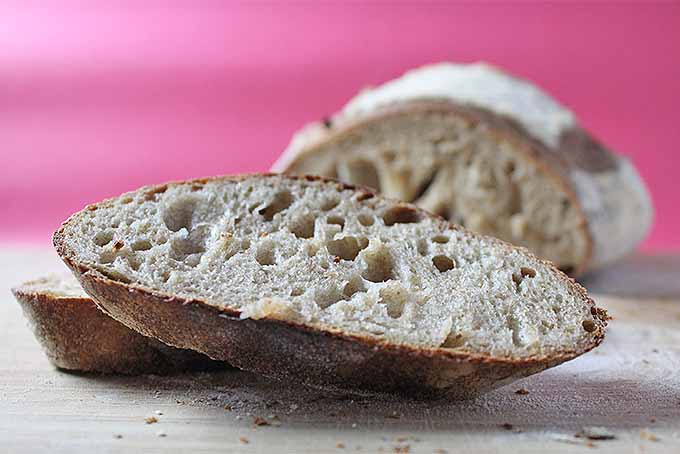
Let the bread bake for about 35 minutes, until the crust is deep auburn in color.
It is nearly impossible to burn artisan bread, because the temperature at which wheat burns is far higher than a home oven can reach. Thus it is better to let the bread go a bit longer than you might think it needs than to risk underbaking it.
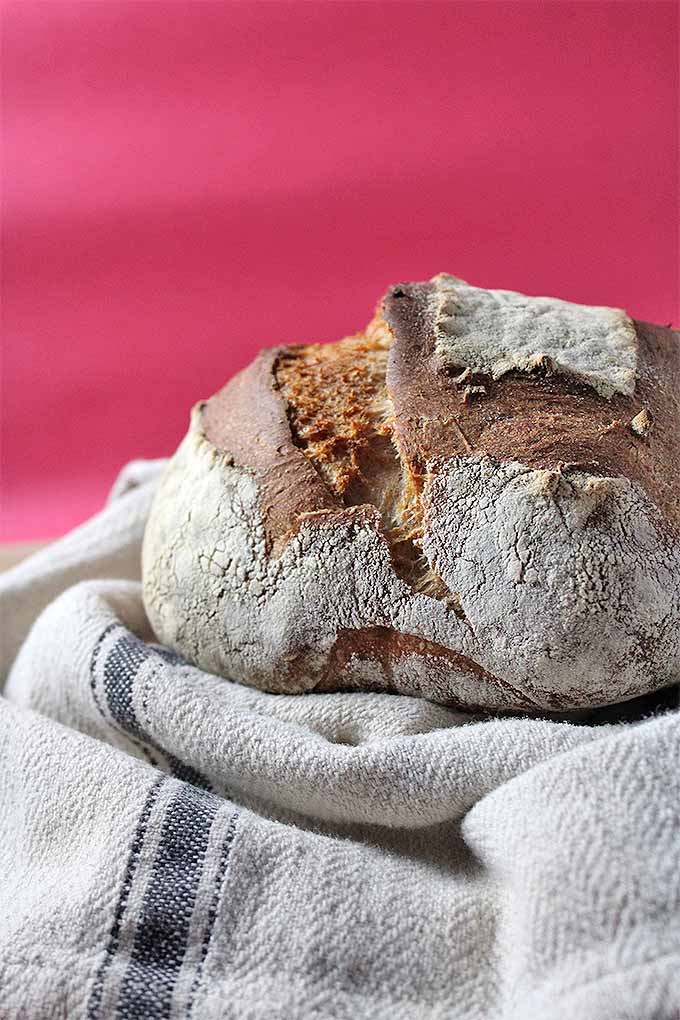
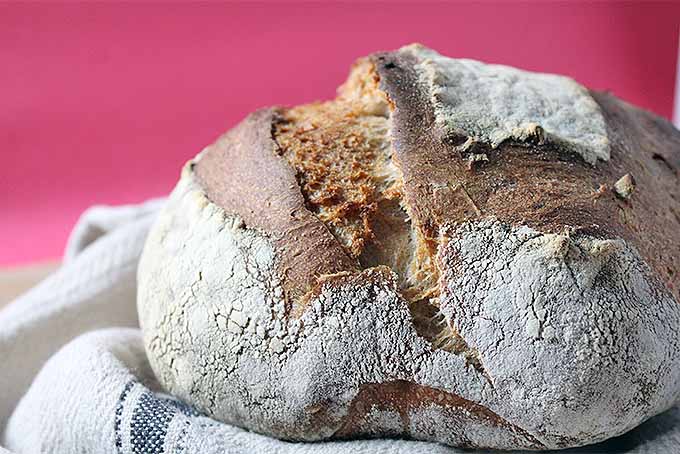
The crust should be hard, and the loaf should sound hollow if you knock on it.
Step 10 – Cool and Enjoy
Remove the bread from the oven and let it cool. As difficult as it might be to resist the delicious scent of your fresh bread as soon as it comes out of the oven, allowing it to cool is a necessary step in the baking process!
As the bread cools, the starches gelatinize and settle into their final form. If you cut your loaf open too soon, you will discover a gummy mess inside.
After cooling for 10-15 minutes, your bread is ready to slice with a sharp bread knife and eat.
Be sure to at least sample it without any additional toppings – your homemade creation will be so flavorful that you might find it really doesn’t really need any butter or jam!
Of course, these extra accoutrements never hurt, especially when you’re craving that muffuletta life… but please, make sure to taste it on its own first.
You’ll have so many opportunities to use the entire loaf of bread, from sandwiches to french toast!
Troubleshooting Tips
As I said before, making sourdough is far more about getting a feel for the process than it is reliant on a list of weights and measures. This is because the ambient temperature and the humidity in your kitchen can affect the way it behaves.
When it is hot out, you might be able to be pare down the times listed above by an hour or two. If your kitchen is quite cold, you might need a lot more patience, and a longer waiting period.
If you can’t fit the necessary steps into your daily schedule, you might need to pop the dough into the refrigerator for one of the rest periods, extending the total fermentation time it a few hours longer.
As you play with the recipe in your own kitchen, you will learn to feel and understand the needs of the dough. But when you begin, it is helpful to know how to troubleshoot a variety of issues that might arise.
What Do I Do When…
My Starter Doesn’t Seem to Bubble or Show Signs of Activity?
Your first starter can sometimes be difficult. Perhaps you’re in a chilly kitchen, or your flour is older than you realized. No matter the issue, there are a few solutions that can jump-start your levain.
First, make sure to use high quality, fresh flour. The starter thrives on the yeasts that are alive and already present on the wheat, so a starter made from freshly ground flour is ideal.
If locally ground wheat isn’t easily accessible in your area, just make sure you are using unbleached all-purpose flour. If the flour in your cabinet is more than a few weeks old, it might be worth purchasing a new bag to make your sourdough starter.
Cultures for Health San Francisco Style Sourdough Starter Culture, Available on Amazon
Also make sure your kitchen is not too cold, if you can! Mine gets really chilly in the winter, so I keep Aerie on a shelf next to my oven. If it is really chilly, then I make sure my oven is off and completely cool, turn on the oven light, and set Aerie inside to bask in its warm glow.
If you are really struggling, you can purchase dehydrated starter online or from a specialty grocery store. It will still take a few days to activate, but this can be beneficial if the flour and water process just isn’t working for you.
My Starter Is Stinky and Has Liquid Floating on Top?
If the smell is really sour, it’s not a problem. That liquid is called the hooch and it might have a greenish or brownish color. It’s nothing to fear!
This is a byproduct of fermentation that’s full of healthy and flavorful bacteria.
If you like a tangy bread, simply stir it back into the starter. But if you prefer a milder flavor (or if the sight of it scares you!) you can also just pour it off.
If the smell is more rank or rotten and less sour, then it’s possible that some bad bacteria have invaded the levain. It’s time to toss it out and start over again.
I’m Running out of Time – Can I Speed Things Up?
Time is a necessary ingredient in baking sourdough bread. However, if you don’t have a full 10 hours to get started, you have a few options:
You can skip the preferment and mix everything at once, saving one hour.
You can also perform all of your rests in a warmer environment, as long as the temperature never exceeds 100°F, and decrease them by an hour each.
Keep in mind that if you do this, your final loaf won’t have as much of a complex and well-developed flavor as you would get otherwise. But you’ll still have homemade bread!
Alternatively, you could mix up a preferment and add it to our basic bread recipe, for a quick-rising loaf with a bit more tang than you would get in the finished product if you used store-bought instant yeast.
I Need to Rest the Dough for More Than 3 Hours, But It’s Hot Outside!
Don’t worry! Your bread will be totally happy if you let it rest even longer. Just pop it in the refrigerator to retard or slow the fermentation.
If it’s the peak of summer and you live near the equator – or if it’s just sweltering outside – you could even throw it into the freezer for a period of time to let it rest even longer. Just make sure you allow plenty of time for it to defrost before you attempt to shape the dough.
I’m Going Out of Town – What Do I Do with My Starter?
While there are starter-sitters out there – people you can pay to feed your starter while you’re out of town – it’s also okay to freeze it.

Just feed your starter, and when it is in the bubbly active phase, toss it in the freezer. It will remain happy there for a long time. Once you’re back home, pull it out and let it defrost. Then feed it once a day for two days to wake it back up again.
What Else Do You Need to Know?
Baking bread with a starter used to be our only option, but today it’s seen a resurgence as a much-loved pastime and a treasured artisanal skill.
Share in the history of this great tradition, and start growing your own starter today. With a little patience, you’ll be baking delicious bread before you know it. You can use the recipe I provided, or try the unique taste of sourdough in another recipe, like our dark rye bread.
A little added bonus with this recipe is that it doesn’t require any eggs. Read our article to get even more egg-free baking tips and recipes.
Have you ever tried making sourdough before? Are you intimidated by the thought of attempting to make your own starter from scratch? Do you prefer simpler recipes like an old-fashioned white bread loaf? Share your stories, questions, and concerns in the comments below!
And for even more ideas to flex your baking muscles, use that sourdough starter next in these recipes:
- Tangy and Moist Sourdough Banana Nut Bread
- Lentil and Mushroom Soup in Sourdough Bread Bowls
- Sourdough Chocolate Cake with Peanut Butter Frosting
- Sourdough Cheddar Chive Biscuits
Photos by Kendall Vanderslice, © Ask the Experts, LLC. ALL RIGHTS RESERVED. See our TOS for more details. Product photos via Cultures for Health and Picador. Originally published on December 30, 2016. Last updated March 26, 2020. With additional writing and editing by Allison Sidhu.
Nutritional information derived from a database of known generic and branded foods and ingredients and was not compiled by a registered dietitian or submitted for lab testing. It should be viewed as an approximation.
About Kendall Vanderslice
Kendall’s love of food has taken her around the world. From baking muffins on a ship in West Africa and milking cows with Tanzanian Maasai, to hunting down the finest apfelstrudel in Austria, she continually seeks to understand the global impact of food. Kendall holds a BA in Anthropology from Wheaton College and an MLA in Gastronomy from Boston University, and has worked in the pastry departments of many of Boston’s top kitchens. Based in Somerville, Massachusetts, Kendall helps to run a small community supported bread bakery and writes about the intersection of food, faith, and culture on her personal blog, A Vanderslice of the Sweet Life.


I like that you mention putting the dough in the fridge to slow down the fermentation. I’ve always had a problem making artisan bread because I just can’t quite seem to get the recipe right! I want to keep trying, but until I feel good about my baking skills, I’m always on the lookout for the perfect loaf of artisan sourdough bread since it’s my favorite.
Hi Kendall, I’m trying your recipe now. Thanks so much for sharing. The info is very clear. Although I’m slightly worried it might not turn out well… I mixed mine and the autolyse looks very, very wet compared to yours… not sure how I’m supposed to knead it. Wonder if I should add more flour to it?
Hi Britta, Thanks for your message! We’re happy to hear that you’re trying Kendall’s recipe. Don’t worry- sourdough isn’t like other kinds of bread dough, as it has a wetter structure and the kneading process is more of a lift and fold rather than the usual firm push/pull on the bench that you may be used to. It’s typically sticky, somewhat saturated, and shaggy at this stage. Various elements can affect the moisture levels, such as the weather, humidity in your kitchen, age of your flour, and more. But I wouldn’t worry! This kind of baking is truly an art. Enjoy the world of fermented baking, and let us know how your loaf turns out. And feel free to share photos on our Facebook page. Good luck!
Hi Allison, wow thanks for the prompt response. I stretched and folded it a few times and the dough became manageable. I’m just waiting to put it in the oven now. Will share photos (if it turns out well)!
Hi, I’m on day three of the sourdough starter and it is very much alive with bubbles and growth but the smell reminds me of vomit. Is this normal or have I done something wrong?
Welcome to the world of sourdough, Claire! Sounds like you could have some clostridium growing in there, along with the lactobacillus. Our best advice it to start over. This is a common problem, but generally speaking, if your starer smells unpleasant it’s best to toss it and begin again. Good luck!
Great post. Thank you. Could you explain the best way to add to the starter? Is it best to mix the new flour water then pour into the jar or add both flour and water to the jar and mix the whole thing together?
The best way to add them is to pour the water in the jar first, then add the flour and mix it all together.
My starter is called Sally. She “started” today, in the hope of being able to make bread for Easter! Thank you for the great post and detailed instructions.
Hooray! Enjoy the sourdough, and let us know how it turns out!
Hello. Thank you for the recipe! I‘m going to put my dough for the bench rest step in the refrigerator and bake it in the morning. How long can I keep it in the refrigerator at this stage? Also, once I take it out, can it be put in the oven right away or should I wait for it to reach the room temperature first? Thank you.
Most dough can be fermented slowly in the refrigerator at this stage for 12-24 hours. Allow it to come back to room temperature before baking.
I made a couple of loaves…so good.
One tip. Everyone needs an oven thermometer. Mine was off by 20 degrees!
The BEST set of instructions on the net. Thank you so much!